Distributor function in the ignition system of a carburetor car
1. The engine does not start: - there is no gap or too large a gap between the contacts of the breaker; - burnt and dirty contacts; - the capacitor is out of order; - the interference suppression resistance of the “slider” is burned out; - the distributor cover is “broken”; - the low voltage wire is broken or its terminals are oxidized;
- Hall sensor burnt out (non-contact ignition). 2. The engine “shakes” at idle: - the gap between the contacts is not normal; - ignition is too “early”. 3. The engine “jerks” at high speeds: - the gap between the breaker contacts is too large; - the spring of the breaker movable contact has weakened;
- the springs of the centrifugal regulator have weakened.4. “Jerking”, interruptions in all engine modes: - damaged high-voltage wires, oxidized or loose in the sockets; - dirty, oily, burnt contacts of the breaker; - worn or broken corner of the moving contact in the distributor cover;
- cracks and burns in the “runner” and the distributor cover; - the capacitor is “half-broken” and needs to be replaced; - the bushings are worn out and the distributor shaft is “playing”; - the switch of the contactless ignition system is faulty.5. The car accelerates slowly, consumes a lot of fuel: - the ignition timing is set incorrectly.
The full name of this device “ignition switch-distributor” reveals part of its “responsibilities” - at a strictly defined time to break the low-voltage circuit of the ignition coil and distribute the resulting high-voltage energy, in a given order (1-3-4-2), among the cylinders .
The ignition breaker on the VAZ 2107 may need repair as a result of mechanical damage, wear of structural elements, and also due to moisture getting inside the device.
Distributor repair occurs when:
- the appearance of cracks and other damage on the cover of the device, usually the contacts burn out in this part of the structure;
- breakage of the runner;
- failure of the Hall sensor;
- wear of shaft bearing parts;
- broken contact of the regulator;
- broken diaphragm of the vacuum regulator.
If we are talking about a contact structure, then the capacitor in it can also fail.
As for the symptoms of node failure, they are as follows:
- the power unit is unable to develop power;
- the engine begins to triple, one or more cylinders may not function;
- the operation of the power unit is accompanied by popping sounds in the exhaust pipe or carburetor;
- when the driver presses the gas pedal during acceleration, detonation may be heard;
- the motor does not start.
Device malfunctions
Replacement and repair of the distributor on the domestic “six” is carried out in the event of incorrect operation of the mechanism.
We recommend: What oil and how much to pour into the Kia Rio engine: instructions, photos and videos
Below are the main symptoms of breakdowns that indicate possible malfunctions:
- The vehicle jerks while driving. Moreover, these jerks are completely uncharacteristic of a car.
- The engine generally does not start.
- When trying to accelerate the car, the car may also jerk, and the acceleration process itself takes a lot of time, and the engine may detonate - the piston rings knock.
- Increased fuel consumption.
As you can see, in general the symptoms are similar to those that appear when the ignition is set incorrectly. Of course, if such symptoms appear, it cannot be said for sure that the fault lies in the distributor, but attention should also be paid to diagnosing this unit.
As for the breakdowns that may force the car owner to repair or replace the mechanism, they are as follows:
- The unit slider is worn out and burnt out.
- The problem lies in the cover itself - the contacts on it could have burned out.
- Hall sensor failure. The problem may be associated not only with a breakdown of the controller, but also with poor contact on the regulator plug.
- Another reason that domestic drivers encounter quite often is the distributor bearing. After a long period of use, it could become loose, but it could also simply jam.
- Presence of mechanical damage, including cracks on the cover.
- Engine fluid gets into the distribution unit; usually the problem is related to the seal of the cap.
Contactless ignition system
The ignition system (IS) serves to create a pulse voltage and timely ignite the combustible mixture in the combustion chambers of the power unit. It is the main part of the vehicle's energy supply system.
The evolution of the “seven” ignition began with a contact-type mechanism. Its feature was the process of generating an electrical impulse using a group of contacts located in the distributor. The constant mechanical and electrical loads to which the contacts in such a system were subjected led to the fact that car owners very often had to clean them, change them and adjust the gap between them.
In the early 90s of the last century, the “seven” received contactless ignition. It made the life of the owners of these cars much easier, because in its design there were no longer any burning contacts that required constant adjustment. They were replaced by an electronic switch that does not require any maintenance.
The design of the contactless ignition system and the principle of its operation
The contactless ignition system (BSI) of the VAZ 2107 includes:
- electronic (transistor) switch;
- transformer coil (two-winding);
- distributor (distributor) with Hall sensor, contact cover and slider;
- set of high-voltage wires;
- candles.
Each of these elements is a separate part and performs its functions independently of other components. Sparking in a VAZ 2107 engine with a non-contact ignition system occurs according to the following algorithm:
- When voltage is applied to the starter, its rotor begins to rotate the crankshaft, which, in turn, rotates the distributor shaft with the slider.
- The Hall sensor reacts to this rotation, registers the rotation of the distributor shaft and transmits a signal to the switch. The latter, having received a signal from the sensor, turns off the current supplied to the primary (low-voltage) winding of the coil.
- At the moment the current is turned off, a powerful voltage pulse occurs in the secondary winding of the transformer, which is transmitted through the central wire to the slider (moving contact) located at the end of the distributor shaft.
- The slider, moving in a circle, alternately comes into contact with four fixed contacts located in the distributor cover. At certain moments, it transfers tension to each of them.
- From the stationary contact, current flows through a high-voltage wire to the spark plug, causing sparking at its electrodes.
In a contactless ignition system, the role of a breaker is performed by a Hall sensor and a switch
Installation Tools
For all work carried out we will need:
- key to 38;
- open-end or socket wrench 13;
- a 12 V control light with two wires attached to it (each wire is approximately 20 cm long).
DETAILS: Photo report on replacing the cabin filter in Opel Corsa C. Instructions on how to change the cabin filter in Corsa
How to work with tags correctly
There are three marks on the engine block next to the crankshaft pulley, each with its own length. You can feel these marks from the driver's side, but only strictly with the engine not running, since the pulley rotates at high speed when the engine is running! The shortest of them will mean that the ignition is advanced by 10 degrees or 10 degrees to the top dead center of the piston in the cylinder, the middle mark by 5 degrees and short - 0 degrees.
Step-by-step description with photos and diagrams
- If during the work you accidentally messed up the ignition setting, then do not rush to remove the valve covers to understand when the compression stroke begins. Do the following: remove the spark plug in the first cylinder and plug the hole with a small, tight plug made from a rag soaked in water. Having made sure that no one is standing nearby and will not be harmed by the impromptu plug flying out, in short series we turn the crankshaft with the starter for literally a split second, turning the starter on and off, and at the moment when the plug flies out with a characteristic sound from the spark plug hole, we stop turning the starter.
- Now, turning the crankshaft a little at a time by the pulley nut with a 38 wrench, we ensure that the marks on the pulley and the cylinder block coincide with the middle mark, which means 5 degrees.
- We unhook the latches from the distributor cover and look at the direction of the slider: when it is positioned as in the photo, then half the job is already done. If not, then use an open-end wrench or a 13-socket wrench to unscrew the nut, remove the distributor and put everything back in the required position.
Required position of the distributor and slider relative to the cylinder block - We make a mark with a marker on the cylinder block to further optimize the ignition settings.
For ease of ignition settings - Now we connect our light bulb with one wire to the positive terminal of the ignition coil, and the second wire to ground. We remove the central wire of the coil from the distributor cover and fix it at a distance of approximately 1-5 mm from ground. This is done in order to prevent breakdown of the ignition coil to ground.
- Having turned on the ignition, slowly turn the ignition distributor housing (distributor) in the direction of movement clockwise and watch when the light goes out. If it didn’t burn, then we leave everything as is.
- Slowly rotate the distributor housing in the opposite direction, until the light comes on and use a 13 key to secure the housing.
- Turn off the ignition, return the distributor cap and the central wire to their place. Unhook the wires of the control lamp.
Video about setting up a VAZ 2107 (carburetor)
How to remove the distributor drive
I tried to remove the subject on the ZMZ-2401 engine.
Nothing worked. Then I started calling my teammates and trying to apply all the advice. There is no result. Before this I removed the drives twice, but on 402x. Even my dead drive came out relatively without problems. We turned the crooked starter for a very long time while simultaneously trying to remove the drive - it didn’t help.
I understand the simple methods, I tried everything. I don’t have a very good idea of what the next steps might be: remove the rocker arm axle, rods, take out the pushers, unscrew the timing gear cover and try with the three of you to turn the crankshaft, move the camshaft along the axis and pull out the distributor drive?
What else can be tried if the case turns out to be particularly advanced?
_________________ Laziness is the Great Engine of Technical Progress, and the Toad is its brake
Sha , Apparently you didn’t read the instructions well. especially the point where it says “Light blows of a heavy hammer.”
So if that doesn’t work out, then there may be several options.
1) The weight of the sledgehammer is not the same (select experimentally, carry out each subsequent iteration with a hammer at least half a kilogram heavier) 2) The blow is not light enough (try different blow forces with different hammers. From very easy, to “YES IT IS in %: ?)
PS. Yes, it is mandatory to thoroughly wipe everything with monitor wipes after each operation.
_________________ The further society moves away from the truth, the more it hates those who talk about it. A monstrous amount of false speculation is circulating around the world, and the worst thing is that half of them are pure truth.
_________________ The further society moves away from the truth, the more it hates those who talk about it. A monstrous amount of false speculation is circulating around the world, and the worst thing is that half of them are pure truth.
Merlin , stupid comment.
It’s one thing to put what you have in order, and quite another to buy yourself a new hemorrhoid.
Merlin , stupid comment.
It’s one thing to put what you have in order, and quite another to buy yourself a new hemorrhoid.
dimok24 , I was looking for a replacement engine to easily capitalize mine. Naturally, I’m greedy - I’m absolutely not ready to buy expensive 402 or 24d, because... The car is unlikely to cover 5 thousand kilometers on it. — I don’t travel much. They offered the engine cheaply. It’s working, but it’s been removed from the car, and the carrier has been sawn into scrap metal - it’s impossible to start it and measure the compression, for starters. I began to remember where my engine gave me trouble and went there. The first was the distributor drive. I really wanted to look at the teeth of its gear. In this case, the unscrewed drive moved on the studs by 1-2mm, and then rested. The engine turned easily and naturally with a crooked starter. The oil was not drained from the engine - the level is normal, in appearance - better than mine after 3 thousand km. But the adjusting screws in the rocker arms also turned out to be tightly tightened. Even with me they protrude more (adjusted for the smaller thermal gap for 24d) - I concluded that the camshaft has lived a long life.
In general, I was not ready for the investment of time and effort that this engine would require. I'll try to do without a replacement engine.
Sha , if it moves 2 mm then I don’t know what’s wrong with it. You need to remove the pan, oil pump and see what holds it there. Although there is one guess, perhaps the drive has already been rebuilt and the hex pin has been re-coiled, the cotter pin has been flared poorly or a long cotter pin has been taken, it came out and is now caught on the camshaft gear or the block casting. The devil knows, anything can happen.
The cleanliness of the oil for the 24th and 402nd engines is not an indicator; it can be replaced, but the engine is trashed. The first sign is that the engine is all covered in oil and the crankcase gas cleaning hose goes to the ground. The second sign is that the engine turns easily with the spark plugs screwed into the pump or crankshaft pulley.
Tightly tightened screws are not an indicator of camshaft wear, it indicates that the head is for 76 gasoline, and the rods are for AI-93.
Was. I turned it with a handle - it turns much easier than mine.
Time zone: UTC + 2 hours [Summer Time]
Who's at the conference now?
This forum is currently viewed by: no registered users and guests: 0
Source
Switch
The commutator is necessary to create an electrical impulse by interrupting the constant supply of current from the battery to the primary winding of the coil. The BSZ VAZ 2107 uses a switching device of type 3620.3734. The working elements in it are ordinary bipolar transistors, which open the circuit when a signal is received from the Hall sensor.
Switch 3620.3734 is built according to a simple single-wire circuit, in which the device body is connected to the vehicle ground and, accordingly, to the negative terminal of the battery. The advantages of using this unit instead of a traditional breaker include:
- no need for maintenance or adjustment;
- high spark energy, which makes it easier to start the engine in the cold season, as well as the ability to use gasoline with a lower octane number;
- the presence of a stabilization system that protects the Hall sensor from voltage surges.
This switch has one drawback - low production quality. It happens that the device fails after just a few months of use. Its design is non-demountable, therefore, repair is impossible. That is why experienced owners of “Sevens” and other VAZs with a contactless ignition system carry spare switches in their cars. Fortunately, the part is inexpensive - 400–500 rubles.
Prerequisites for failure
Please note that the engine control system malfunction warning lamp, located on the device panel in the signaling unit, is the first indicator of deviations in the operation of the VAZ 2107, where an injector is used. Some modifications of the VAZ 2107 provide for the location of the warning lamp on the upper insert of the radio panel. By starting the ignition, a system malfunction is tested, which means the lamp lights up and goes out after the engine starts.
A prerequisite for diagnosing the ignition system is that the lamp does not go out when the engine is running.
By starting the ignition, a system malfunction is tested, which means the lamp lights up and goes out after the engine starts. A prerequisite for diagnosing the ignition system is that the lamp does not go out while the engine is running.
In situations where there is a malfunction, VAZ 2107 owners replace the spark plugs. Old factory spark plugs are usually replaced with iridium spark plugs from NGK or Denzo. Do not forget that only those spark plugs that are designed for the appropriate type of injection are suitable here.
The type of ignition system is no less important in determining the parameters of the spark plug. Often such manipulation does not provide much improvement (plugs have a fairly long service life), so the non-contact ignition system undergoes a full diagnosis.
Do you want to know more about how to install
valve timing according to marks on VAZ 2101-
VAZ 2107
? And so.
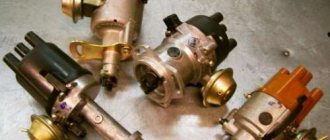
Which distributor is suitable for the VAZ-2107
On all carburetor rear-wheel drive VAZ cars, the device has almost identical components and a similar operating principle. Distributors for engines with a volume of 1200-1300 cc differ in that: - the drive rod is 7 mm shorter; - there is no vacuum ignition timing regulator;
DETAILS: Wiring diagram for the VAZ-2107 generator. Generator device
— the settings of the weights and springs of the centrifugal regulator are different. For engines with a volume of 1500-1600 cc, all distributors are suitable in terms of seating dimensions and characteristics. Only “Nivovskie” ones differ. They are tuned for stable traction at low speeds and the VAZ-2107 with such a distributor will accelerate slowly.
Coil
Next, you need to replace the ignition coil. Using a size 8 wrench, unscrew the nuts securing the wires to the coil contacts. Using a 10mm wrench, unscrew the mount of the coil to the body. Installing a new coil requires special attention - you should take into account the possible discrepancy between the locations of contacts “B” and “K”. For convenience, you can rotate the new electronic coil relative to the fastener, thereby placing the contacts in the same way as on the old one.
Having secured the coil, we connect old wires to its contacts (usually one blue, the other brown), and new ones, with connectors for connecting to the distributor and switch. They usually have the same colors as the standard ones. Typically, in a VAZ 2107, brown wires are connected to contact “K”, and blue wires are connected to “B”. It remains to connect the high-voltage wire that connects the coil and the distributor.
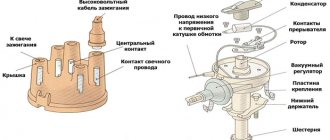
The main components of the distributor and a description of its operation
Device.
The distributor is assembled in a housing. Inside it, a contact group is mounted on a bearing: moving and fixed contacts or a Hall sensor (for contactless ignition). To correct the advance angle, the vacuum regulator can rotate the contact group at a small angle relative to the housing.
A capacitor is secured to the bottom of the housing with screws. A drive roller is installed on bushings in the center of the housing. Its bottom has splines with which it engages with the drive gear. In the upper part of the roller there are contact drive cams (for contact ignition) or a steel cup with four slots - a screen (for contactless ignition).
At the very top, on a steel platform, two weights and two springs of the centrifugal ignition regulator are installed. A plastic housing with a moving contact and noise suppression resistance of the high voltage distributor (slider) is screwed onto the top with two screws.
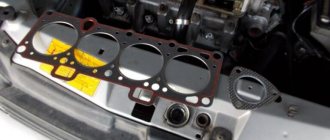
The entire structure is closed with a lid on two spring latches. The body and cover have a tongue and groove so that they fit together in only one position. The cover contains contact terminals for high voltage wires from the spark plugs and from the ignition coil.
Job.
The distributor is connected through the drive to the engine crankshaft and rotates with it. For two full revolutions of the crankshaft, the distributor shaft makes one revolution. This is due to the fact that our engine is four-stroke. When installing the distributor in place, the roller is oriented in strict accordance with the operating order of the engine.
This is done so that the contacts open and the spark jumps on the spark plug when the piston of each cylinder, compressing the combustible mixture, does not reach top dead center (TDC) by a few millimeters. This is called ignition advance. When the number of revolutions increases, the distance must be increased, and when it decreases, it must be decreased, which is what the centrifugal regulator does.
Its weights, under the influence of centrifugal force, which is greater the higher the engine speed, diverge to the sides and move the cams relative to the roller, making ignition “earlier.” When the engine speed decreases, the springs return the weights to their place and the ignition becomes “later”.
This is necessary to increase engine power and efficiency. In addition to the centrifugal one, a vacuum ignition timing regulator is also installed on the distributor. Its function is to fire “earlier” at low throttle opening angles and “later” at sharp throttle opening angles.
How to remove the distributor drive
I decided to set the ignition wisely and ran into the following problem: the distributor was installed at the factory in such a way that it does not spin in the direction I want it to, and apparently I will have to remove the drive and rearrange it. It is not clear from the books how to do this correctly; there is something going into the oil pump, some kind of plate... In general, I have never dealt with such an engine design. Therefore, tell me, are there any pitfalls in this operation?
What other ones? If the distributor drive plate does not get into the slot of the oil pump, then there will be no movement of oil through the lubrication system. So, write your letters in small handwriting. The engine will burn out. I’m not sure about this, but it’s better if this particular operation (installation of the drive) is performed by a motor mechanic at a service station or another experienced person. And you can set the ignition yourself on an already installed drive. Although, as I was told, “the drive won’t get in any other way than it should,” but here it’s better to be on the safe side. A very responsible operation.:roll:
I decided to set the ignition wisely and ran into the following problem: the distributor was installed at the factory in such a way that it does not spin in the direction I want it to, and apparently I will have to remove the drive and rearrange it. It is not clear from the books how to do this correctly; there is something going into the oil pump, some kind of plate... In general, I have never dealt with such an engine design. Therefore, tell me, are there any pitfalls in this operation?
There is no need to remove the drive. Just move the wires in the cover in the desired direction, one wire forward or backward, and turn the distributor.
Tell me urgently if anyone knows! This is the situation on the loaf. Before I removed the drive with the distributor, they were looking for the reason why it wouldn’t start. When I barely started it, problems appeared: the engine was not picking up speed, there was absolutely no oil pressure, the knocking in the engine depended on the crankshaft speed. Is this a bummer for the engine?
Remove the T, B, and the drive, it looks like the drive shank did not hit the oil pump. Check the drive for integrity of the pins. And then put everything right. Remove the sump, the seat on the pump may have rolled up, and install the drive with the sump removed (it’s clear whether it’s hit or not).
The drive was removed at the very end of the plate that is inserted into the pump; there is a bump, as if it had been licked off a little.
Kotska is the point of contact of the feather in the slot of the pump shaft. Everything is fine :) When installing the drive, don’t forget to set it according to the manual, otherwise you’ll then turn the distributor trying to start the engine: D
Distributor
The ignition distributor (distributor) is designed to transmit high-voltage current pulses that come from the coil to the spark plugs. The distributor consists of:
- aluminum body;
- shaft;
- Hall sensor;
- vacuum and centrifugal ignition timing regulators;
- runner;
- covers with four fixed contacts.
In “sevens” with contactless ignition, distributors of type 38.3706 are used.
Adjustment
Without any instruments, you can set the ignition timing experimentally. When warmed up to operating temperature (80-90 degrees), when driving at a speed of 40 km/h, you need to switch to speed 4 and depress the gas pedal. If the electronic contactless ignition was set correctly, a short-term detonation should occur, after which the engine should begin to gradually gain speed. If valve knocking occurs, you need to turn the distributor clockwise by about a degree. The operation is repeated until the knocking stops. If, during the check, a dip in engine speed appears, the distributor is turned in the opposite direction.
In addition to adjusting the ignition timing, the new system may require carburetor adjustment. The VAZ 2107 carburetor has two adjusting screws - quantity and quality. The adjustment is carried out as follows:
- By rotating the quantity screw, the engine speed is equal to 1200-1300. Next, use the quality adjustment screw to set the maximum speed.
- Repeat the operation described in paragraph 1 until, at a speed of 1200-1300, the quality adjustment screw is set to the position corresponding to the maximum engine speed.
When installing the BSZ, experts recommend performing not only adjustments, but also cleaning and purging of the carburetor in order to see the real effect of this modernization.
For normal operation of a gasoline internal combustion engine, the formation of a spark is necessary in a timely manner. For this purpose, a special device is used to ensure its appearance when the piston is in the TDC (top dead center) position, and sparking occurs in different cylinders at different times. Such a device is called a breaker-distributor, or in other words, a distributor. Without it, not a single gasoline internal combustion engine operates, and for many years it was an integral part of any ignition system, including VAZ 2109, 2106, 2107, 2108.
Installing an electronic BSZ instead of a contact one
Today it is very rare to find a “seven” with contact ignition. With the arrival on sale of switches, distributors and coils for electronic spark generation systems, owners of classics began to massively re-equip their cars.
DETAILS: Replacing the air filter on a Hyundai Solaris with your own hands
What is included in the BSZ kit
In addition, you will need spark plugs (preferably new ones) with a gap of 0.7–0.8 mm and a set of high voltage wires. Coil type B-117A (used in a contactless system) is not suitable for electronic ignition. Its characteristics do not correspond to those of other equipment in the circuit.
Preparation
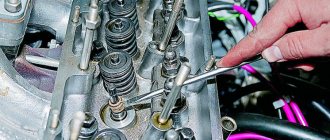
Before installing a new VAZ-2107 distributor for a contact ignition system, you need to adjust the gap between the contacts of the breaker. It is more convenient to do this with the device removed from the car. We check the gap with a flat feeler gauge. The value is set from 0.35 to 0.45 mm.
In this case, the protrusion of the cam should move the moving contact away from the stationary contact as much as possible. We adjust by slightly loosening the screws, and then tighten them more firmly and check the gap again. Contacts that have worked hard may have a protrusion on one and a depression on the other, which interferes with adjustment.
Before removing the old distributor, mark its position relative to the cylinder block with a marker. You also need to accurately mark the position of the moving contact (slider) relative to the body. If all this is not done, the settings will be violated and the engine will not start.
Installation
Having established exactly the same position of the roller in the body on the new distributor, carefully insert it into the hole in the block, slightly turning the roller to align the splines. Having “planted” the device in place by rotating the body relative to the block, we set the approximate advance angle, as on the old distributor.
Secure with a washer and nut, but not too tight. Now you need to plug in the high voltage wires. This is easy to do - each contact on the distributor cover has the number of the cylinder to which it needs to be connected. We connect the wire from the ignition coil to the central terminal.
The wires should fit tightly, with a slight tension, the protective caps should be pushed all the way down. Don’t get carried away, don’t bend the petals of the wire tips too much, otherwise later, when you try to remove them, you’ll tear off the wires “with their roots”! A wire goes from the contact wire to the “K” terminal of the ignition coil, usually it is green.
If your VAZ-2107 is equipped with a contactless ignition system, then you need to connect a connector with three wires. Having plugged it into the socket, check the fit of the wires; it happens that they “crawl out” of their places and the device does not work. Everything is done, the new distributor is installed and ready for use.
General tips for connecting high-voltage wires.
Checking high-voltage wires. To check the wires, you will need a multimeter tester. Check the resistance of the wires - it should be no more than 20 KOhms (in practice, the longest wire of cylinder 1 has a resistance of up to 10 KOhms). If the wire resistance is more than 20 Kom, it must be replaced. Carefully inspect the wires for chafing on parts of the motor or other wires. In case of significant abrasion, replace the wire. In case of minor abrasion, it is possible to lay the wire so that it does not rub and fix it in this position.
Laying wires. Do not try to connect the wires in a bundle. Disassemble the wiring harnesses, release the wires from the plastic holders. Connect the high-voltage leads to the corresponding cylinder spark plugs. Lay the wires so that they do not rub against each other, engine parts, or hoses. Avoid sharp bends and tension on the wires. After connecting all the wires, secure them into the bundle with special comb holders included in the delivery kit.
The procedure for connecting I/O wires to a VAZ carburetor (2108, 2109, 21099)
The central wire from the distributor cover always goes to the ignition coil (bobbin).
The outlet of the distributor cover, which faces towards the front of the car, is connected to the first cylinder.
The outlet of the distributor cap, looking down, is connected to the third cylinder.
The outlet of the distributor cap, looking rearward, is connected to the fourth cylinder.
The outlet of the distributor cap, looking up, is connected to the second cylinder.
The procedure for connecting high-voltage wires to a VAZ Classic, Niva with a carburetor and distributor.
Central wire from the ignition coil (bobbin)
1 cylinder - above the vacuum corrector. Next, clockwise, the order is 1-3-4-2.
Octane corrector
It's no secret that the gasoline we buy at gas stations often does not meet the standards provided by the car manufacturer for normal engine operation. As a result of using such fuel, clogging of the fuel system, an increase in the amount of deposits on piston parts, and a decrease in engine performance may occur. But the most dangerous thing for the power unit is detonation, which occurs due to the use of low-octane gasoline.
In cars with an electronic control system, detonation is eliminated using a special sensor and control unit. Such elements are found in injection “sevens”. The computer receives the signal from the sensor, processes it and automatically adjusts the ignition timing, increasing or decreasing it. The carburetor VAZ 2107 does not have such equipment. Drivers have to do this manually, turning the distributor in the manner described above.
But there is a special electronic device that makes it possible not to adjust the ignition angle after each refueling. It's called an octane corrector. The device consists of two parts: an electronic unit, which is installed in the engine compartment, and a control panel located in the car interior.
Noticing that the piston fingers begin to “ring”, the driver turns the knob on the control panel of the device, making the ignition later or earlier. Such a device costs approximately 200–400 rubles.
The “seven” distributor is indeed a complex device, but if you understand the design and operating principle, you can easily maintain, repair and adjust it yourself.