- MP3 player.
- Dashboard lighting control.
- Watch.
- Switches for external lighting, electric fan, fog lights.
- USB sockets for charging gadgets.
- Control devices for the operation of the vehicle's electrical network (voltmeter, ammeter).
- A compartment for small items, located near the gearshift lever.
The console is also covered with decorative trim, which serves as decoration for the standard interior of a production car.
How to put a beard on a VAZ 2107 with your own hands
On many cars, the front panel has a console in the middle part, which rests on the floor and serves to accommodate a wide variety of equipment. The so-called beard of the VAZ 2107 model is a fairly functional interior detail. The central console is an excellent stylistic solution for the developers of the VAZ 2107 car interior, and it is also very functional. Tuning enthusiasts often make this unit with their own hands and give it an original look. Additional elements are added to the design that increase the usefulness of this device and give it uniqueness. They often put on the beard:
- Watch.
- Radio or other multimedia device.
- Dimmer switch for instrument panel lighting.
- Switch block for electric fan, exterior lighting and fog lights.
- At the bottom of the gear lever there is a convenient pocket for small items.
Popular opinion
Lada seventh model received flattering reviews from owners. Many people love this car for its laconic design and powerful engines. However, the body is prone to rust and even a minor chip can “bloom.”
It is worth noting that car enthusiasts are trying to adjust this Russian sedan to modern standards of style and comfort, and therefore do-it-yourself tuning in its various manifestations is common among people.
Some are trying in every possible way to embellish the appearance of the car and install more comfortable seats or a powerful audio system in the interior, while others are upgrading the chassis and engines.
An example of tuning for every taste and budget can be found on the forum dedicated to this VAZ model or watch the corresponding video.
Materials and interior preparation
Making this unit yourself is usually done from a plywood sheet with a thickness of at least 6 mm. For exterior finishing, a wide variety of materials can be used, mainly leatherette, matched to match the upholstery of other interior parts. Advanced tuning enthusiasts go further; they cover the front panel, the inner surface of the doors, and some other parts with this material.
To make the center console for a VAZ 2107 car from the materials listed above, you use the following tools yourself:
- electric jigsaw;
- battery drill or screwdriver;
- angle grinder;
- tape measure, plumbing corner, pencil;
- assembly gun for glue;
- furniture stapler.
The beard, made by yourself, is installed in place of the standard unit. It must be carefully dismantled in order to free up a platform for a homemade console.
The procedure for dressing a beard
Each of the craftsmen develops their own design of this element for the VAZ 2107 car, allowing it to achieve its maximum uniqueness. A beard is a spatial structure of complex shape, made up of flat parts. When making patterns for the side surfaces, it is recommended to use hard cardboard. This will make it possible to achieve maximum precision in the manufacture of individual parts.
The shape of the central console of the VAZ 2107 car, which is made by hand, can be completely different. Most often, craftsmen prefer to combine it with a box that is installed between the front row seats. This part houses the handbrake lever.
Individual parts of the “beard” for the interior of the VAZ 2107 car are cut out of plywood using an electric jigsaw and connected to each other using self-tapping screws and glue. The finished unit is covered with leatherette or other material. Then the console is installed in its intended place and secured. All devices are installed in the panel cutouts and the car is ready for operation with a do-it-yourself updated interior.
Source of the article: https://7vaz.ru/tjuning/boroda-svoimi-rukami.html
Plastic beard VAZ 2107
Tuning enthusiasts make their own beard to place on this panel:
- watch;
- multimedia devices (radio, radio, etc.);
- knobs for adjusting the level of illumination of the dashboard;
- switch block for fan, fog lights, external lighting;
- pocket for small items;
- USB sockets for charging gadgets
- part of a car's control devices.
Before taking measurements for the manufacture of the center console, it is necessary to remove decorative trims from the existing part and anything that will interfere with the installation of the new part. In order not to be mistaken with the dimensions, you must first make blanks from cardboard and try them on.
Caring for a classic beard
Such a long and thick beard requires periodic shampooing. Occasionally you can use hair conditioner - this will make your hair softer and more manageable. To dry, just blot your beard with a towel; using a hair dryer can harm the delicate skin of your face. In addition, the beard must be combed throughout the day with a special comb. Make sure that there are no crumbs or other unnecessary objects stuck in the hairs. Even if you really want to grow a beard to your knees, still try to limit its length. Too much hair will age you and make you look more like a tramp than a fashionable guy.
Materials and tools
Console tuning usually consists of making a new VAZ 2107 beard, on which mounting locations for switches, indicators, control devices and other equipment are pre-provisioned. The most affordable material for making your own beard is plywood. The thickness must be at least 6 mm, otherwise it will not be possible to achieve the required rigidity of the product. For finishing, artificial leather is most often used, matched to the color of the interior elements, or, more recently, carbon fiber of a suitable color.
Sometimes tuning the beard of a VAZ 2107 is accompanied by a comprehensive redesign of the interior design with the replacement of finishing materials for the door trim and trim of the front panel with carbon fiber or leatherette. To make a tuned VAZ 2107 beard, in addition to finishing materials, the following devices and tools are needed:
- jigsaw;
- electric drill or cordless screwdriver;
- “grinder” (angle grinder);
- locksmith corner;
- pencil;
- ruler (roulette);
- glue gun (tube of glue);
- furniture stapler (for fastening leatherette).
The new console (beard) is installed in place of the standard one, which should be dismantled to free up space and take the measurements necessary to create the workpiece drawings.
Replacing the beard
Between the passenger and driver's seats of the "seven" there is a console where various equipment is located (radio, clock, cigarette lighter socket). This part of the panel is briefly and figuratively called the beard.
Car owners pay increased attention to this element, increasing its originality, visual appeal and functionality.
The standard “beard” of the VAZ 2107 interior looks simple and requires tuning
Improving the “seven” beard involves the introduction of various mechanisms and elements:
- radios with improved characteristics;
- backlight buttons;
- hours;
- switches for low and high beams, side lights;
- electric fan control buttons;
- USB connectors for connecting additional devices;
- devices for monitoring the operation of the electrical network;
- storage places for small items, usually placed below near the gearshift lever.
In addition, the panel is covered with trim from various materials, which performs a decorative function, improving the classic interior of the car.
The “beard” of the VAZ 2107 is trimmed with various materials to give style and individuality
Typically, tuning a “beard” is the manufacture and installation of a new console with provided cells for securing switches, indicators and covering it with decorative finishing materials. The simplest and most affordable material is plywood with a thickness of 6 mm or more. For decorative finishing, artificial leather or carbon fiber of the selected color is traditionally used. Replacing the “beard” can be combined with the trim of the doors, ceiling and dashboard.
The frame of the new “beard” can be made of plywood
To make a tuned VAZ 2107 “beard” you will need the following tools:
- electric jigsaw;
- screwdriver;
- Bulgarian;
- locksmith tools;
- pencil or marker;
- ruler or tape measure;
- glue;
- furniture stapler.
The work is performed in the following order:
- Dismantle the old beard.
- Before you start working with plywood, it is better to create a template from thick cardboard.
- Transfer each mark to the plywood.
- The locations of the buttons and indicators and all the parts are cut out of plywood with a jigsaw.
- Connect the parts using self-tapping screws or glue.
- After waiting for the glue to dry (at least 24 hours), install and secure the manufactured console.
- It is better to fix some buttons and devices on the “beard” in advance, as this may become impossible after installing it.
- Cover the beard with the selected decorative material.
The tuned “beard” differs from the standard one in its excellent ergonomics, economical use of space and stylish design.
The “beard” of the VAZ 2107 after tuning looks stylish, and it is much more convenient to use than the standard console
Making your own beard
A beard is a complex structure; it is made of flat parts. To make them you need to make patterns; it is best to make them from cardboard. It is necessary to achieve high precision of the console parts; rigid cardboard is quite suitable for this. If you are not confident in your skills, first make a mock-up of the console from cardboard. This will allow you to make sure that the drawings are made correctly and to estimate how the new beard will fit into the installation site.
After making the pattern, mark the details of the beard and cut them out of plywood with a jigsaw. All parts are connected using glue and screws. The latter will allow you to fix the console elements until the glue sets. This is the most reliable and easiest way to connect beard parts.
After the beard frame is ready, it is covered with carbon fiber, leatherette or fabric. For their fastening, finishing materials, furniture stapler and glue.
After the glue has dried, all that remains is to install the new console in place of the standard one. Attach switches and devices and secure.
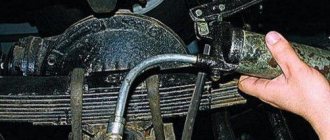
How to dismantle the instrument panel: step-by-step instructions
First of all, you need to open the hood of the car and remove the negative terminal from the battery in order to de-energize our dashboard. After this, the work is performed in the following sequence:
- unscrew the dashboard shelf and the glove compartment body using a special screwdriver;
- turn off the power to the light bulbs that illuminate the interior of the glove compartment in your car;
- We very carefully remove the additional dashboard along with the clock and other devices. To do this, you will need to pry the part with a screwdriver and pull it out of the special grooves;
- turn off the cigarette lighter and warning lamps by removing the corresponding wires located behind the additional panel;
- we remove the switches located in the immediate vicinity of the gearbox lever and disconnect them from the on-board network;
- We unscrew the screws that you will immediately see under the switches and the bolts intended for fixing the main console of the torpedo. After this, you can freely remove it without fear of damaging the wires;
- remove the steering column cover;
- remove the heating system cover together with the air duct deflectors;
- dismantle the heater control unit;
- unscrew the last nuts holding the torpedo. For this purpose you need to use a key of 10.
After this, you can dismantle the instrument panel in the car without any problems. Using this approach, you do not have to worry about accidentally breaking any parts or breaking wires, since they are all removed before unscrewing the fixing nuts. Assembling the torpedo is carried out in the reverse order and can be done even without experience. The most important thing is to carry out all the work as carefully as possible and not skip any of the steps described above.
Source of the article: https://21074.ru/kuzov-i-oborudovanie/boroda-svoimi-rukami/
What is tuning and how is it useful?
Car tuning (from English tuning - setting, adjustment) is a modification, technical improvement of a car, making changes to the factory characteristics in order to improve its characteristics. In simple words, tuning is a modification of a car to suit individual needs and tastes.
Almost everything in the car is subject to tuning: engine, transmission, suspension, wheels, brakes, seats, steering wheel, dashboard, lights, headlights, bumpers, mirrors and much more.
What can be placed on the center console
Tuning enthusiasts make their own beard to place on this panel:
- watch;
- multimedia devices (radio, radio, etc.);
- knobs for adjusting the level of illumination of the dashboard;
- switch block for fan, fog lights, external lighting;
- pocket for small items;
- USB sockets for charging gadgets
- part of a car's control devices.
Before taking measurements for the manufacture of the center console, it is necessary to remove decorative trims from the existing part and anything that will interfere with the installation of the new part. In order not to be mistaken with the dimensions, you must first make blanks from cardboard and try them on.
conclusions
The beard of VAZ cars makes it possible to significantly simplify driving comfort. Both the driver and the passenger will not have to reach for the radio. Depending on the design, you can also place additional cells here to store parts or small personal items. It usually takes several days to create a part. You need to be prepared for this right away. Under no circumstances should you start by cutting plywood, as there is a high chance that you will not be able to install it. A cardboard blank will allow you to modernize the design taking into account individual needs. Of course, in addition to creating a beard with your own hands, you can also seek help from a specialized car service. But why, if this method will save a lot of money? Therefore, feel free to take on interior tuning, starting with the console!
Tuning the interior of the VAZ 2107
Probably every owner of the “Seven” has ever thought about tuning his car. VAZ 2107 is the last model in the series of VAZ “classics”, discontinued relatively recently - in 2012. And now more than a million Russians continue to use it. The level of comfort of the “Seven” does not reach modern cars, which is why there is a desire to improve it. VAZ 2107 , like other “classic” models, is one of the most tuned Russian cars due to its outdated design and lack of many modern amenities.
Read about tuning VAZ 2107 headlights: https://bumper.guru/klassicheskie-modeli-vaz/tyuning/fary-na-vaz-2107-tyuning.html
Tuning the engine, suspension and other hardware is useful for those who want to turn their car into a racing car, or simply like to accelerate well on the track. In principle, the VAZ 2107 has a reliable engine, the power of which is sufficient for normal trips in city mode or on the highway. More attention should be paid to the interior, because the comfort of the driver and passenger directly depends on the quality of its design.
The standard interior of the VAZ 2107 requires modification and improvement
My brother drove a VAZ 2107 for 5 years. A classic “seven” with classic shortcomings: dim dashboard lighting, sticking window lift, freezing door handles in winter, creaky seats. For some reason, thoughts about tuning did not occur to me at that time, but it’s a pity, the car could have been made much more comfortable and interesting.
What applies to tuning the interior of a VAZ 2107
Interior tuning is making changes to its elements: seats, doors, ceiling, steering wheel, dashboard, power windows, etc. It may consist of:
- replacing elements with more comfortable ones;
- reupholstery with special materials (leather, velor, etc.);
- connecting additional functions not provided by the factory - electric windows, heated seats, air conditioning, heated windows, instrument panel lighting, sound insulation.
There are many options for tuning the interior, so you can make the interior of the car look the way you really want.
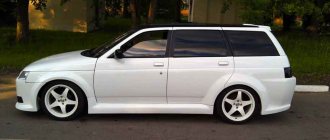
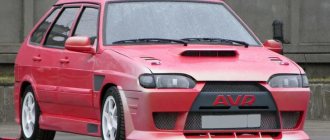
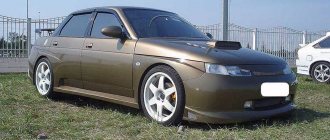
Photo gallery: examples of the tuned interior of the “Seven”
Ergonomic tuning of the interior in red and gray color gives the interior of the car a stylish and modern look. A bright interior is suitable for those who really love rich and contrasting colors. During the tuning process, powerful musical equipment and the most modern technology are often added to the interior. Good tuning can transform the interior of a VAZ 2107 in a luxury car Simple tuning of the interior can be done independently The interior of the VAZ 2107 can be made comfortable without installing unnecessary parts Tuning the interior in blue tones looks bright and “for everyone”
Price policy
At the time it went on sale, the “Seven” was the most expensive classic Zhiguli model. The new car was valued at nine thousand rubles, which was 600 rubles more expensive than the other “luxury” model of the Togliatti plant - 2106. Now this sedan is available to almost everyone.
| Car | Cost (rubles) |
| VAZ 2107 | from 12 to 190 thousand |
Standard beard
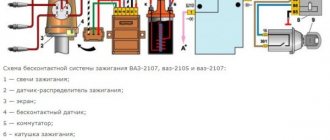
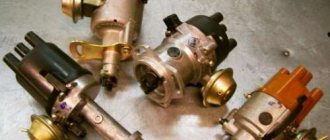
Do-it-yourself tuning of the VAZ 2105 interior, internal tuning of the VAZ 2107, tips for modifying the interior. Tuning is a change and modification of the car's factory settings. Upgrading vases with your own hands is a labor-intensive task, so we decided to share some instructions for modifying the VAZ 2105. It can be cheap and expensive, superficial and deep. First of all, when tuning a VAZ 2107, you should pay attention to the ignition system. The classic is a popular car that provides its owner with wide scope for manipulation.
The foreign ones disappeared immediately; there was only one travel option left (at that time), this was the control unit from the new GAZelle. The option, I tell you, is very good, but it has one drawback - its cost. I couldn’t find any used ones, but a new one cost quite a bit, not less than 1,300 rubles. (too much for a piece of plastic).
I was a little upset, but what should I do to find funds? But everything was resolved much easier and cheaper. I have a company car, a Chevy Niva. Somehow, during another trip, I noticed that same heater control panel, and immediately caught myself thinking: “If only it weren’t electronic”….
And what was my surprise that there were simple mechanics? I went to the store, found this block, studied it carefully.... and bought it. It turned out to be the best solution.
It was decided to make the frame itself from 9ka plywood (although during the production process I realized that it would have been 7ka). We also purchased: vinyl leather (with a texture like the main panel), epoxy resin and 2.5x2.5 bars (to create a frame). The production process began with cutting out a template from a piece of cardboard.
This was then transferred to plywood (with some modifications) and cut with a jigsaw. Next, bars were inserted (the length of which was later adjusted) and the whole thing was tightened with self-tapping screws
There was one serious problem here. In 6 cars, the distance between the front seats is very small, and since I decided to make a solid “beard” with an armrest, I had to somehow make the transition from a very wide part (in the area where the radio is installed) to a very narrow one (in the area of the armrest) . I had to abandon one bar that was previously installed.
Simple mechanical tightening of two walls is practically impossible... I had to resort to bending the plywood, first by simply heating it over the stove (which did not help), then by boiling it in water.
Thus, the basic shape of the structure was set, all this was twisted onto temporary partitions (in the photo, in the area of the armrest) and left until completely dry (about 2 days)
The next stage was the process of manufacturing a bent plywood insert with a hole for the VAZ 2105 gearbox lever. it has a bent shape. It bent as follows: It was boiled in the water, then pressed against the walls of the kitchen sink with pre-prepared plywood disks of a set radius, after which it was sharply cooled with snow.
Due to the poor quality of the plywood in factory conditions, during the boiling process, it naturally delaminated. I had to glue the layers again (PVA glue was used). After drying the plywood, it needed to be given greater strength, which was done as follows: the plywood was doused with epoxy and a piece of a lady's stocking was put on it... and so on in several layers.
Next, a hole was drilled for the gearshift lever.
The next step was the process of installing the heater control unit on the console. Due to its specific features, it was decided to glue this block (which is certainly not the best option, but still) into the console with epoxy resin... Holes were cut for installing the radio and the unit itself.
How to create a beard: step-by-step instructions
Creating a beard with your own hands is a rather difficult task that must be performed with extreme precision. After making the frame, you can create bars and then insert them into the designated place. Once their installation is completed, you can begin tightening the frame using self-tapping screws. Since we are creating a VAZ beard with an armrest, it is recommended to steam the plywood in hot boiled water before starting work. This will allow you to achieve better ductility of the material during processing. Steaming the plywood will also make it possible to solve the problem associated with the transition to a narrower part between the front seats and a wider one where the radio is located. As soon as the entire tuning structure is ready, it must be dried. This process usually takes about two days.
Next, the owner must create a bent plywood insert with his own hands, in which there is a small hole. It is used to create free space for placing a lever. The workpiece will have to be boiled to give it the desired shape. Some VAZ owners use a simple kitchen sink wall. Once the part is processed, the element will have to be completely dried.
Tuning seats VAZ 2107
Unlike earlier VAZ Seven models, the factory was equipped with anatomically shaped seats and headrests connected to the backrest. The front seats of the VAZ 2107 are quite fragile and quickly fail - the frame breaks, the backrests warp, and the upholstery wears off.
Standard VAZ 2107 seats are not particularly ergonomic or durable
On our “seven” the seats were exactly like this: wobbly and creaky. The adjustment mechanism also constantly jammed - before adjusting it to suit you, you had to spend a lot of effort.
The easiest way to tune seats is to install covers. Covers for VAZs are sold in almost any auto store; custom-tailoring is also possible.
Installing seat covers on the VAZ 2107 improves the appearance of the interior
Seat trim for VAZ 2107
After upholstering the seats, the interior of the car becomes very attractive. For this you can use:
- genuine leather;
- leatherette;
- suede;
- velvet;
- velours;
- flock;
- carpet;
- alcantara.
Natural leather is undoubtedly the most durable. But as you know, this is a very expensive material, and in hot weather it is uncomfortable to sit on leather seats. The most budget-friendly and fairly reliable upholstery is made from Alcantara and velor. Therefore, these materials are most widely used among car enthusiasts.
Based on the purpose of tuning and financial capabilities, you can do a complete reupholstery of the interior, including the ceiling, door trim, sun visors, steering wheel, and dashboard.
After you decide on the type of material, you need to choose its color. Traditionally, seat upholstery is made in the same color as the interior upholstery, but a harmonious combination of different shades can make the car interior more original and attractive.
The seats of the VAZ 2107, covered with artificial leather, look representative
Video: self-upholstery of VAZ 2107 seats
Changing seat mountings
When installing non-original seats on the “seven”, a situation may arise that the seats do not fit the mounts. In this case, you will have to resort to welding.
Experts believe that any seats that fit the dimensions can be installed on the “seven”. However, changing their mounting is a very labor-intensive job, so if possible, it is better to choose seats that do not require welding for installation.
Anyone who has ever driven a classic remembers well and knows which seats are in the front. In my case, taking into account the fact that the car is 20 years old, the seats have become unsuitable for use. After some thought, I decided to take a more complicated and expensive route, namely installing seats from a used foreign car. In general, I ended up taking it from the Passat, but only the front ones. In general, when I bought the chairs, I basically knew that the fastenings of the vv and the vase were different and very, very different. As you already understood, there were problems with this. We thought for a long time about how to get out of the situation and came to the conclusion that we needed to make some kind of swap of the sleds from the old chairs with new seats. In general, we started by completely cutting off the stand, the one near the tunnel, and making a new one in order to achieve the same level as the one near the door. When I brought them to the chairs, there were ears for fastening wheels for the sled, but they were too long (to be installed to the floor) and I had to cut them off and sacrifice the driver’s seat elevator mechanism. It’s unpleasant, of course, but what can you do?
RyslanZinchenko
https://www.drive2.ru/c/288230376152277729/
Installation of seats from another car on a VAZ 2107
Seat covers are a great tuning option, but if they are already loose, they will have to be replaced. On the “seven” you can install both new original seats and seats from foreign cars. Seats from a 1996 Mercedes W210 and a 1993 Toyota Corolla are suitable. Seats from SKODA and Fiat are suitable, but to install them you will need to make two additional holes.
In addition to the above, Peugeot and Nissan seats are used, but they do not match and require modification of the fastening. The seats from Volkswagen fit almost without modifications, but they are too high for the VAZ 2107, therefore, despite the increased comfort, installing them is not recommended.
Peugeot seats fit the VAZ 2107, but to install them you need to slightly modify the fastening mechanism
Replacing seats is considered a change to the design of the vehicle and, in accordance with Russian legislation, requires mandatory registration with the State Traffic Safety Inspectorate.
Trial
European accent
In its appearance, the seventh model Lada resembles many European analogues of those years, which, without a doubt, is a compliment to the domestic sedan. Attention is drawn to the harmonious proportions of the body, a large chrome-plated radiator grille, and bumpers with square contours. The optics, both front and rear, are combined into monoblocks.
Priority - amenities
Despite the fact that the “Seven” belongs to the category of ennobled “classics”, the quality of finishing materials is inferior to those in models 2103/6. Namely, the plastic of the front panel is very hard and explosive. The door cards are covered with rough dermantine, and the seats are covered with branded fabric.
Radio tape recorder
No upgrade of the “six” is complete without installing a speaker system or at least a simple radio. A standard place for a radio receiver in the beard of a small-sized “six”. It should be trimmed to standard 1DIN. This can be done with a metal file. Then sand the edges with sandpaper.
Installing a radio
The radio tape recorder is attached to the beard using a metal case. Radio installation steps:
- Having bent all the tabs, use special spatulas to remove the radio from the case.
- The metal base is inserted into the prepared hole.
- We fix it using special tongues.
Cables are included to connect the player. The most commonly used are:
- black - “earth”;
- red and yellow (often wound together) - ignition “+”;
- blue - power for the active antenna;
- white - front left (FL) speaker;
- gray - front right (FR) speaker;
- green - rear left (RL) speaker;
- purple - right rear (RR) speaker.
How to install
Model 2107 has 2 locations suitable for mounting a 1DIN head unit. The radio can be installed in a standard place on the center console; it is also possible to install equipment instead of the central vents. The first installation option requires trimming the mounting socket to the required size.
The second option reduces heating of the player body by the hot interior heater, providing comfortable control of functions. But at the same time, ventilation deteriorates and there is a risk of heating the head unit by direct sunlight.
Steering wheel improvement
The steering wheel is the main control element of the car, so it must be comfortable to operate and suitable in size. In the VAZ 2107, the main disadvantage of the steering wheel is its large size, which slows down the steering speed and impairs maneuverability.
The standard steering wheel of the VAZ 2107 makes it difficult to control the car due to its large size
I got behind the wheel of my brother’s “Seven” several times when I was studying at a driving school, and there was a catastrophic lack of lessons with an instructor. In my opinion, the steering wheel is really uncomfortable. It is large, but the rim is quite thin, and it is uncomfortable to hold. And it is not located very well - in the turning position it noticeably covers the dashboard and, unfortunately, is not adjustable. Our steering wheel also had a feature - either constructive, or the wheel alignment was poorly adjusted - the car drives straight not with the steering wheel in a straight position, but with the steering wheel turned slightly to the right.
The easiest type of tuning that will help cope with external defects of the steering wheel, for example, abrasions, is to install a braid on its rim. It also makes control more convenient, since your hands will no longer slide on the steering wheel.
With braiding, the steering wheel does not slip and looks more presentable
To replace the steering wheel, the old steering wheel must be removed. Car stores sell sports steering wheels for the VAZ 2107. You can also install a steering wheel from a foreign car on the “Seven”, but not from just any car; it must fit the mounts. Alternatively, you can go to an auto-disassembly shop with your steering wheel and choose the right one there.
A more technically complex tuning option is to install hydraulic or electric power steering.
Introduction
The domestic VAZ-2107 is in many ways inferior to its foreign counterparts; many car enthusiasts complain about the too simple interior decoration, which does not have original features. However, competent tuning of the VAZ-2107 torpedo allows you to transform the vehicle beyond recognition, raising the level of previous parts to standard elements of expensive foreign cars. Due to its simplicity and classic design, the dashboard can be modified by the owner as much and as desired. Let's consider the main points of improvements to the torpedo and beard of the domestic VAZ-2107.
Self-production: frame
Creating a VAZ beard entirely with your own hands may seem like a difficult task, but in reality this is not entirely true. It is enough to select special drawings on the Internet, stock up on materials for work and read the tuning instructions. Initially, the driver must work on the frame, choosing the optimal model as a template. Practice shows that birch plywood is the most popular. Its thickness should be seven millimeters. It has won positive feedback from owners largely due to its quality and increased level of strength as part of the tuning parts.
To do the work yourself, you will also need vinyl leather, wooden blocks with a cross-section of 2x2.5 centimeters and one tube of epoxy glue. Before you start processing plywood, you must first create a cardboard template. For this, cardboard material with good strength is used. Each mark must be transferred to the plywood. You can make adjustments before cutting the holes and shaping them into the desired shape. The phrase “measure twice, cut once” perfectly fits the description of this stage. After perfectly copying the applied dimensions, you can pick up a jigsaw and begin to carefully cut out the console structure along the contours.
Additional Helpful Tips
The owner of a VAZ car has the opportunity to make a beard himself from scratch. But before starting work, it is highly recommended to study the drawings on the Internet. A large number of other drivers of VAZ 2107, 2106 and 2105 have published their options for creating a beard with an individual appearance and corresponding drawings.
Be responsible in determining the optimal sizes. In addition to the dimensions of the radio, the amount of usable space in the cabin is also taken into account. The console should not create any discomfort for the legs of the driver and passenger. Under no circumstances should you proceed straight to cutting out the plywood. A do-it-yourself cardboard blank will allow you to accurately assess the degree of comfort. A custom console for a VAZ is created to simplify access to the radio, taking into account the location of the gear lever. But here you can also make convenient compartments for storing small personal items. Again, a pre-created blank made of hard cardboard will help with this.
Possible reasons for dismantling the shield
In what cases is it necessary to remove the dashboard of a VAZ 2107 car? There may be several reasons for this:
- panel tuning;
- replacing burnt out light bulbs;
- repair of individual devices that have failed.
VAZ 2107 is a legendary car, which hundreds of thousands of car enthusiasts have repaired independently.
Removing the panel
You can repair a VAZ 2107 with just a few screwdrivers in your arsenal. In particular, to remove the panel you only have to unscrew one Phillips screw.
Photo gallery: what tools should be on hand
A Phillips screwdriver is the main working tool for dismantling the dashboard
A slotted screwdriver is useful for releasing several latches on the panel. Work gloves to protect hands from contamination.
How to properly remove the instrument panel
To quickly dismantle the shield, you need to follow the algorithm below:
- Pry up and remove the plate located to the right of the stove. It shows the corresponding icon.
Using a screwdriver, remove the plate to the right of the stove
A screw is visible under the plate. Unscrew it with a screwdriver.
Using a Phillips screwdriver, unscrew the screw hidden under the plate.
Carefully remove the plastic handles from the stove control levers.
The lower heater control knob has already been removed
Now bend the right edge of the panel towards you.
The right edge of the panel is tilted to the right and towards itself
Disconnect the contacts from the stove switch button, marking them.
To remove the panel, disconnect the contacts from the heater switch button
Now you can bend the panel further and remove the speedometer sensor - a gray thick hose. Unscrew the nut on it and move the hose to the side.
The gray thick hose is pulled to the side and the wing nut on it is unscrewed
- After removing the nut and washer from the daily mileage reset handle, push the handle inside. It is located just below the panel, to the right of the alarm button (see photo in paragraph 4). Unscrew the nut from the daily mileage reset handle
- Now disconnect the large white plugs one by one, having previously marked them.
According to the experience of auto mechanics, there is no particular need to mark the plugs; it is almost impossible to plug them back in incorrectly. The first white plug is removed, the second, located a little deeper, is also removed - At this stage, the air duct is disconnected - the thick white wire in the right corner of the panel; in new cars, the econometer on the panel is connected to it (in the photo it looks above the gray wire). The white econometer wire is located a little further from the opposite edge of the panel
- After disconnecting all the wires, remove the red plug. He is there alone, the nest under him is yellow. The last of the three plugs is red and can also be removed
- At the final stage, slide the panel to the right so that it comes out of the latches holding the left side. The removed panel was in your hands - dismantling was carried out successfully
The panel remains in your hands. The entire operation usually takes a quarter of an hour.The panel is assembled in the reverse order.
The VAZ “Seven” became the last classic model of the Volga plant. Nevertheless, the owner of such a car can solve most problems on his own. He can even change the dashboard himself.
"Tuning" of the VAZ 2107 dashboard. Part 3. Assembly. — logbook Lada 2107 2007 on DRIVE2
Good day) So my tidy is assembled, not everything turned out as I planned, but I’m still happy with the result.
Although the iPhone has a good camera, even it couldn’t convey the real look of the panel, maybe I’ll take normal photos later)
In case someone suddenly forgot what a stock tidy looks like
If you looked into the log of my car, you already saw how and what the scales were made of, smooth ignition/extinguishing. All that remained was to overexpose and install the scales with arrows on my panel, speaking of the arrows, I had to leave them as factory ones, I just painted them red with varnish because The arrows on the VAZ 2114 dashboard seemed short to me.
- Well, let's start by removing the frame in which our tidy is imprisoned.
We take out all the parts of the mafon, remove the plastic levers of the stove and unscrew the 3 bolts
Of course, don’t forget to disconnect all the chips, the speedometer cable and the tube on the econometer. If everything worked out, just pull the entire panel towards the passenger and slightly towards you
- And this is the picture that appears before us))
By the way, I traveled for a day, how could I live without music)
We smoothly move to a convenient place where no one will disturb us, because personally, I’m very nervous when I’m doing painstaking work and someone is always distracting me, I just can’t stand it.
We disassemble the native panel
- To overexpose you needed an LED strip, a soldering iron, wires, and your hands were more or less straight)
I saw different options for the arrangement of the tape, and for myself I chose to cut 3 LEDs and solder them with wires in order to place it all under the scales; by the way, I covered the insides with mirror tape for greater light dispersion.
- Trying it on
Everything seemed to be fine, I made a backlight for the second half of the panel, screwed the scales to the instruments and was ready to install those treasured arrows from 2114 when I saw that I had broken off the rod for the arrow on the tachometer...
- By the way, it’s very important
, I saw many that they removed the arrows using a fork, I tried it and this is what happened. - I had to go buy a new tachometer, I found it for 450 rubles and was glad because most stores either didn’t have them, or the price tag on them was around 600 rubles.
Here the law of meanness played its role when I disassembled the donor panel, pulled out the arrows with pliers, but here I think I need to carefully do it with a fork, and then on you - I broke it. Well, here I already resorted to the proven method with pliers, (!)
If you remove the tachometer needle like I did, then pull it towards you and counterclockwise, it will come out easier. The scales are installed, the light is ready. And that’s all, it seems, but there are these lights on the sides.
- Take a computer mouse pad
- Without sparing, we cut it into strips and glue it to the panel with glass
Source: https://www.drive2.com/l/7428328/
How to dismantle the instrument panel: step-by-step instructions
First of all, you need to open the hood of the car and remove the negative terminal from the battery in order to de-energize our dashboard. After this, the work is performed in the following sequence:
turn off the power to the light bulbs that illuminate the interior of the glove compartment in your car;
After this, you can dismantle the instrument panel in the car without any problems. Using this approach, you do not have to worry about accidentally breaking any parts or breaking wires, since they are all removed before unscrewing the fixing nuts. Assembling the torpedo is carried out in the reverse order and can be done even without experience. The most important thing is to carry out all the work as carefully as possible and not skip any of the steps described above.
Source of the article: https://prometey96.ru/ustrojstvo/boroda-vaz-2107.html
How to connect
The correct connection of the radio on the VAZ-2107 and any other car is carried out through the contact group of the ignition switch. In this case, when the key is removed, the power supply to the equipment is stopped; only the memory unit is powered, which is supplied from the battery.
On carburetor cars it is necessary to modify the contact group:
- Disassemble the plastic steering column cover.
- Remove the connector from the ignition switch and unscrew the 2 mounting screws.
- Remove the lock from the column by squeezing the lock with a thin object (with the key inserted and turned to position 0).
- Remove the contact group that needs to be modified by soldering an additional element.
- Assemble the lock and install the parts in their original places.
A lock modified in this way receives the ACC position instead of 0, which is used to operate the head unit in the parking lot. An additional fuse is introduced into the connection circuit of the tape recorder to protect the circuits from overload. Connection with speaker cables is made through an adapter.
Speakers
The 2107 car has standard installation locations for front speakers, located in the corners of the instrument panel. When installing speakers in door panels, it is necessary to cut holes in the parts; diffusers and loudspeaker magnets are placed in standard recesses available on the inner metal part of the door. It is necessary to correctly route the speaker cables; for this, a special adapter sleeve is used, placed between the end of the door and the stand. The element protects the tourniquet from creases and damage.
For improved music playback, a pair of rear speakers are installed, which are located on the shelf behind the back of the rear seat. To install the parts, trimming of the metal panel is required; the cables are routed under the floor covering.
You can connect the radio on the VAZ-2106 only to the speakers located in the front doors and on the rear parcel shelf. There is no space in the instrument panel for installing speakers (except for the central oval-shaped loudspeaker, which was mounted in the console during the Soviet era).
Subwoofer
The low-frequency speaker on the VAZ-2107 is installed in the trunk. For connection in the car, separate speaker cables are used, connected to the head unit or additional amplifier. When using an active device connected to the on-board network, a protective fuse must be placed in the power circuit.
Antenna
The antenna on a VAZ-2106 or 2107 is installed on the roof or trunk lid; it is possible to use an active type device mounted on the windshield. The unit is connected to the car radio in a VAZ-2107 or 2106 using a standard plug or adapter.