- Sheinin: “I speak for myself, anyone can cure prostatitis, take the proven Prost...” Read until deleted >>
Replacing the coolant at certain intervals is a mandatory procedure for any car with a carburetor, gasoline or diesel engine. Over time, antifreeze or antifreeze loses its cooling properties, the liquid becomes cloudy, and visual contamination becomes noticeable. Replacing the coolant on the VAZ 2114 and other domestically produced models is carried out strictly according to the instructions, in compliance with the preparation rules, with complete or partial flushing of the system.
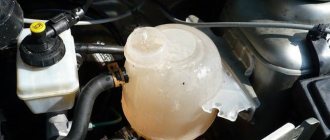
What's in it?
So, you purchased a car and don’t know what exactly is in the cooling system. If there is water or already used coolant there, this does not bode well for your engine.
Therefore, first of all, check whether there is any coolant in the engine at all, and what exactly it is. At the same time, make sure there are no leaks from the pipes or radiator.
It is not difficult to independently determine the type of fluid used by the old owner.
- Antifreeze almost always has a blue or blue color.
- Antifreeze is mainly available in red or green. Moreover, there are a huge variety of shades of red.
- It is not difficult to distinguish water from blue or green liquid.
- If the color of the coolant has a characteristic shade of rust, then this indicates the need for urgent replacement.
Mixing different coolants. Yes or no?
In some cases, the quality of the fluid is good enough that it is not necessary to replace it. Only the quantity is somewhat below the required level.
Let's say you have antifreeze filled, but you only have antifreeze on hand. What to do in such a situation? Many VAZ 2114 owners are interested in whether it is possible to mix different compounds.
There is no consensus on this matter. Let us say for sure that a disaster will not occur from mixing, antifreeze and antifreeze will not react and will not explode the car. But we definitely cannot recommend combining two types of coolant in one tank. Follow the instructions in your car's manual, fill in what the factory recommends, and then you won't have any problems.
Antifreeze is simply a type of antifreeze developed in Soviet times for Zhiguli cars. This was done due to the low quality of the antifreeze offered at that time. Since then, antifreeze is the number one choice for VAZ.
Cooling system elements
The process of draining coolant from the radiator
In order to understand how and why it is necessary to drain the coolant, you need to have a little understanding of the design of the car and the cooling elements. Also, you need to know how the coolant circulates in the engine and have an idea of the places where it can be drained.
So, let's look at the complete diagram of the engine cooling system and how the coolant circulates:
Cooling system diagram
1 – element in the form of a plug for the expansion tank; 2 – expansion tank; 3 – hose for draining liquid from the pipe; 4 – hose passing between the radiator and the expansion tank; 5 – hose leading from the radiator; 6 – tank to the left of the radiator; 7 – aluminum tube; 8 – plug systems; 9 – tank to the right of the radiator; 10 – drain plug; 11 – middle of the radiator; 12 – casing for electric fan; 13 – plastic wings of the electric fan; 14 – electric motor; 15 – toothed pump pulley; 16 – pump impeller; 17 – camshaft drive belt; 18 – engine block; 19 – pump pipe; 20 – radiator hose with supply function; 21 – heater radiator hose with drain function; 22 – hose supplying coolant to the throttle pipe; 23 – exhaust pipe; 24 – hose for refilling; 25 – heater radiator hose with supply function; 26 – thermostat; 27 – coolant temperature sensor; 28 – coolant level indicator sensor.
Coolant drain options
There are two options for draining coolant from the system. They depend on what operations the motorist intends to perform with the car. So, let's look at both options separately.
Draining without removing the engine
This method is often used to replace coolant in the system, as well as to change cooling elements. The procedure is quite simple. Let's look at how to properly drain the liquid from the cooling system completely:
- We find the cooling system plug on the cylinder block.
Location of the coolant drain plug on the cylinder block
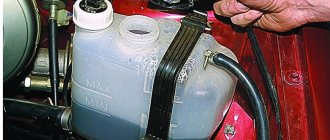
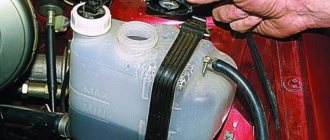
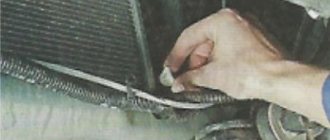
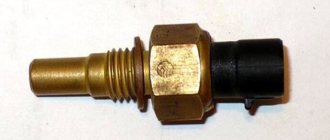
- Unscrew the expansion tank cap.
Remove the expansion tank cap
- Having previously placed the container, unscrew the plug on the cylinder block.
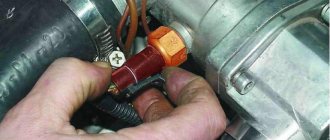
- When all the liquid has drained from the power unit, unscrew the plug, which is located in the lower right part of the radiator.
Unscrew the plug on the radiator to drain the coolant
- When all the liquid has flowed out of the radiator, you need to tighten the plug on it and on the block.
- Fill in new coolant.
Installation of faucet
Drain faucet
For the convenience of subsequent draining and repair work, you can install a faucet. Moreover, you have already unscrewed the standard plug.
Draining with engine removal
The second method is easier than the first and is used when the engine is planned to be removed. Let's consider the sequence of actions aimed at draining coolant from the system:
- Unscrew the plug on the expansion tank.
- We unscrew the plugs from the cylinder block and radiator.
- Next, when the liquid has flowed out, you need to unscrew the pipes leading to the radiator.
- Of course, some liquid remains in the system and must be drained completely. This can be done in two ways: by blowing it out with a compressor or by disassembling the engine.
Why do you need to drain the coolant?
This “slurry” has already served its term
Let's look at the main reasons why you will need to completely drain the coolant from the system:
- Development of a full resource of use . It is recommended to carry out once every 90-100 thousand km. This is due to the fact that the coolant, due to a constant temperature difference, which is its operating temperature, loses its technical and physicochemical properties. After such a mileage, it can no longer effectively provide cooling of the engine and its elements, which can lead not only to failure of the thermostat and pump (most often these are the spare parts that suffer), but also to boiling of the engine, which can have unpleasant and material consequences .
- During engine overhaul . When the engine is dismantled for major repairs, the coolant will need to be completely drained.
- Replacing the radiator will also require draining the coolant completely from the system, but it is done according to a simplified option (the second one, which is indicated above).
- Replacement of other individual elements that will require draining the coolant from the system.
How to check what kind of liquid is poured into the cooling radiator
Having bought a car secondhand, you just need to check the presence and level of coolant in the engine cooling system!
Its insufficient level can negatively affect the engine, not to mention the complete absence of fluid in the radiator. It is also worth checking if there are any leaks from the pipes, from the radiator, from the heater in the cabin.
If the old owner of the car forgot to say what liquid was poured into the radiator, you can try to determine its composition yourself. Antifreeze is almost always blue, antifreeze is usually green or red (red comes in different shades, even purple). If the color is unclear (rust color), then this composition must be changed. In general, after purchasing a used car, it is recommended to completely change the coolant.
Tools
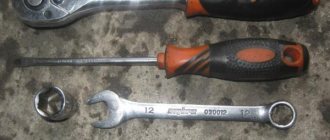
In order for the replacement of antifreeze on a VAZ-2114 to be successful, you will need:
- Key for 8.
- Keys for 13 and 17.
- Empty flat canister 10 liters.
It is better to carry out work in the presence of an inspection hole. But if there is none, it doesn’t matter - the work can be done “on your knees”. The only thing is that you need a flatter container so that it fits under the bottom of the car.
Stage of preparation and flushing of the system
In order for the next coolant you plan to install to function longer and better than the previous one, it is necessary to flush the system in advance. Scale, mucus, traces of oil and various contaminants can remain not only in cars with high mileage, but even in new cars. Therefore, flushing is a must before changing antifreeze or antifreeze.
As a rule, drivers do not use any special rinsing products, but ordinary water, the main thing is that it is clean (preferably distilled, but water from a filter can also work). This is because some chemicals in cleaning products can destroy not only dirt, but also corrode the pipe down to small holes. Only if you are sure that too much residue has formed there and water will not help, then it is better to use a cleaning product.
Step-by-step instruction
How to flush the cooling system correctly:
| Prepare a container for draining in advance. | Drive the car onto an overpass or other hill, opening up the view. | Remove the radiator cap and wait until the dirty antifreeze drains out. Just be careful! When you open it when it's hot, hot antifreeze may spray out under pressure. |
| Pour new antifreeze into the tank to its maximum. | Run the engine, not forgetting to put the radiator cap back. | Let the car run for no more than half an hour at idle speed. Check the temperature of the device. If nothing has changed, clean it again. |
Step-by-step instruction
- Before starting work, open the tap on the stove in the cabin. This is necessary so that during replacement the liquid comes out of the heater radiator.
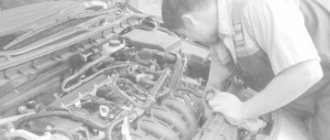
- Place the car on the pit. Next, unscrew the bolts securing the engine protection and casing. Wrench bolts for “10” and “13”. The location of the bolts is in the photo below.
Close the generator with a bottle and place a container to collect the liquid.
Unscrew the drain on the radiator and make sure that the fluid flows into the collection container.
In order for the liquid to come out faster, unscrew the cap of the expansion tank to allow air in.
Unscrew the bolt marked in the photo below to drain the fluid from the cylinder block cooling jackets. Before unscrewing the bolt, place a container for collection. We also recommend that you do not completely unscrew the bolt in order to collect all the liquid as much as possible.
Tighten the drain bolt on the engine block, as well as the plug on the radiator.
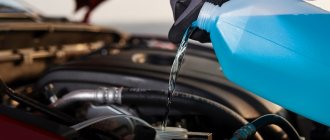
- Insert a funnel into the reservoir and fill the coolant to just above the level.
- Place a container to collect fluid under the hose that goes to the throttle assembly. Next, pressing on the hoses in the places marked below, expel the air from the system.
- Place and secure the hose to the throttle assembly. Next, add fluid to the level and start the engine. After warming up the engine to operating temperature, increase the crankshaft speed in jerks to 2-3 thousand (do this for 20-30 seconds). Stop the engine and let it cool. After cooling, add liquid according to the level if necessary.
The process of replacing antifreeze for VAZ 2113, 2114, 2115 is clearly shown in this video:
Comments and reviews
Not everyone has the same talent as you. For example, I changed antifreeze for the first time and the article helped me a lot. By the way, never mess with domestic blue antifreeze. They argued to me that this is a domestic car, which means it needs to be filled with domestic antifreeze. And then my pipes started leaking because everything inside was corroded. Plus, there was so much dirt that I couldn’t even imagine. That's why I switched to foreign Antifreeze. I only fill it with green and have already changed it twice, no problems yet.
You follow the markings, not the color.
This process of draining and filling antifreeze can be performed by even the most crooked driver, why describe everything in such detail?
What if the girl wants to do it?
Really. Everyone's situation is different. I don’t have such a specialist, I’ll go do it myself!
How to drain
To get started, stock up on all the necessary tools for the job:
- Key;
- screwdriver;
- container for draining;
- new fluid.
If your car has cooled down, then you can proceed to the first part.
- Place the machine on a level surface.
- Open the hood.
- Remove the cap from the tank.
Replacement frequency
The manufacturer prescribes three conditions for replacing the fluid (depending on what comes first):
- The coolant is replaced every 80-100 thousand kilometers.
- The fluid needs to be changed every 4-5 years, regardless of mileage.
- If the color of the liquid turns brown, it needs to be replaced urgently. When the fluid loses color, its chemical composition changes, and it has a detrimental effect on the cylinder head and other parts in the cooling system made of aluminum.
If it overheats after replacement
It also happens that after starting the car quickly gains temperature. The needle is steadily rising, and the electronic fan has not even turned on. What does this indicate? This indicates the presence of an air lock in the system. It can also form in the cabin radiator. Because of this, the stove does not heat properly. How to remove this plug? It is necessary to park the car on a slope (with the front part up), open the hood and unscrew the cap from the expansion tank. Next, you need to start the engine and wait five minutes until the antifreeze is circulated several times in a large circle (this also includes the cabin radiator). The air will tend to go up. And the highest point will be our tank. After this, the problem will solve itself.
Recommendations
And in order not to ask the question “how to remove the air lock after replacing antifreeze on a VAZ-2114,” experts recommend squeezing the radiator pipe by hand when pouring liquid. It is enough to do this with one hose, which is located at the top of the radiator. So the excess air will spontaneously flow out.
Replacing antifreeze and antifreeze on a VAZ 2114
First of all, you need to remember that replacement occurs only in a cooled car, where the engine will be cold. For your own safety, it is prohibited to carry out any actions if the mechanisms are not cooled down.
The eight-valve engine of a vehicle such as the VAZ 2114 has a liquid volume of one and a half liters. Therefore, manufacturers recommend using a volume of no more than eight liters to fill the required barrel with antifreeze or antifreeze.
To completely fill it, two small canisters of five liters each, or one large one containing ten liters of solution, will be enough. The liquid must be mixed according to the instructions included with the specific type of cooler.
Do not forget that if the antifreeze has not been used completely, then you need to add the same type that was used last time. Other manufacturers will not be suitable. It may happen that the model of the previous cooler may be unknown. In this case, special “additional” solvents are sold that will be compatible with other antifreezes (not with antifreeze). It is rated G12.
How to replace antifreeze on a VAZ 2114?
In this way, not only antifreeze is replaced, but also any other liquid that cools the apparatus:
How to replace antifreeze on a VAZ 2114
- The protection for the engine and other parts consists of four small bolts that must be removed. If there is other protection, you need to get rid of it too.
- On a cold engine, unscrew the plug from the expansion tank.
- In the cabin, change the heater indicator to the maximum available indicator.
- Remove old fluid (as stated above).
- Unscrew the ignition module, but do not remove it too far.
- The generator should be covered with something so that small drops of antifreeze do not fall on it.
- Using a special watering can (or the neck of a plastic bottle), pour in new antifreeze. There is no need to rush, it is better to pour slowly, in a thin stream.
As mentioned above, you should let the car idle for about half an hour until the heater fan turns off automatically. If any failure occurs, you should take the car for repairs or fix the problem yourself.
Why does it flow
Before you drain the old fluid and change it, you need to understand why it is leaking from your VAZ 2115. Sometimes it is quite difficult to determine. Try to look through all the pipes, there are several places where the element can leak.
- Clamps - they may not be clamped well.
- The pipe itself, which can crack over time.
- Radiator due to mechanical damage.
- A pump or pump that wears out over the years in VAZ cars.
- Leakage from under the head.
- When the leak occurs directly into the car's cabin.
When any type of leak is detected, you first need to repair the area so that this situation does not recur, and then replace it.