In our short article we will look at how to replace brake discs on a Chevrolet Niva. The brake system is the most important part of any car, because it allows you to stop traffic as quickly and safely as possible. Naturally, this affects road safety - the system allows you to avoid emergency situations. It is prohibited to operate vehicles with a malfunction of the braking system; this entails not only administrative punishment. After all, if this mechanism breaks down, you can get into an accident.
Replacing a brake disc on a Niva Chevrolet
The pads must be marked so that during subsequent assembly they can be installed in their places. Next, unscrew the bolt securing the protective casing.
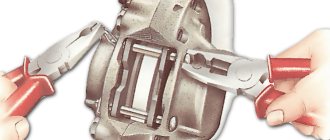
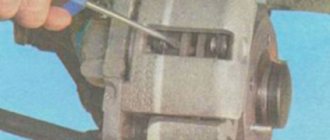
Using small pliers or a flat-head screwdriver, bend the tendril of the locking plate of the upper and lower pad guide to the steering knuckle. A visual inspection may reveal the appearance of cracks, chips and other defects.
Replacing Niva front brake discs
To understand how bad the level of wear is, you may need a caliper. To do this, you need to compare the length of the new pads and those used in the car. If the difference is more than 3 millimeters, then you definitely need to remove the brake disc on a Chevrolet Niva. How to diagnose breakdowns? Before replacing the Chevrolet Niva brake discs with your own hands, you need to diagnose the entire system.
The fact is that tubes and hoses can also become unusable, and this also affects driving safety.
But let's get back to the pads and discs. Checking them for malfunction is quite simple: Pay attention to whether there are any extraneous sounds when braking - grinding, noise, jerking, and others. Are there any cracks, gouges, or chips on the surface of the disc? It is also necessary to carefully inspect the pads and check the thickness of the friction layer.
Design of the working hydraulic system
In order to increase the reliability and safety of control, the hydraulic brake system of the Chevrolet Niva is built according to a dual-circuit diagonal design. The first hydraulic drive circuit drives the front right and rear left wheels, and the second drive drives the front left and rear right wheels. Thus, controllability is maintained in the event of failure of one of the hydraulic drive circuits. The hydraulic braking system includes:
- brake pedal located in the cabin under the driver’s right foot;
- vacuum pedal pressure booster;
- master cylinder with reservoir for filling brake fluid;
- dual-circuit hydraulic drive pipeline;
- working brake cylinders of the rear and front wheels;
- pressure regulator with actuating lever.
The pressure of the driver's foot on the brake pedal is increased by a vacuum booster and transmitted to the piston of the master cylinder, which, moving, compresses the brake fluid. The fluid pressure increases and is transmitted through pipelines to the working cylinders of the front wheels and the brake pressure regulator of the rear wheels. The pistons of the front calipers and rear working cylinders, under pressure from the brake fluid, extend and press the Chevrolet Niva brake pads to the surface of the discs and drums, slowing down their rotation.
About wear of brake discs and its detection
Unfortunately, a car does not last forever and all parts fail sooner or later. Brake discs are no exception. And water and dust bring this part closer to unusability even faster.
The first sign of disc failure is braking problems . You will feel it even without technical inspection. But it’s best if your fears are confirmed at the service station.
If you don’t want to go to specialists, you can try to identify the problems yourself by paying attention to the following signs of brake disc wear:
- When braking, extraneous noises and the car moves jerkily;
- Cracks and grooves appeared on the part in the form of grooves around the disk;
- The detail shows severe wear.
If any of the above symptoms are present in your car, then you need to replace the front brake discs as soon as possible.
Major mechanism failures
When using a car, natural wear and tear occurs on all elements. And the disc is no exception - the pads gradually erase it. It is also worth noting that the service life of the pads is much shorter than that of the disc. But driving on dusty roads and water will significantly reduce the life of the pads and disc.
The most obvious sign that some kind of breakdown has occurred is the appearance of problems when braking. Any driver can feel changes in performance, but it is still recommended to carry out diagnostics at a service station. This will allow you to identify all problems in the brake system and more. But you can try to identify faults yourself if you have the desire and opportunity.
Replacing the brake disc
To replace, you will need to prepare a set of new brake discs in advance, since when replacing only one side, the brake system may not function properly. You will also need the following set of tools:
- a set of keys for 10, 14, 17 and 27. For more comfortable work, it is advisable to use a ratchet wrench.
- screwdriver
- pliers or round nose pliers
- jack
- hammer/mallet
The replacement itself is carried out in several stages.
For more comfortable work, it is necessary to perform all actions in a pit or viewing platform. If this is not possible, you need to place the car on a level surface and raise the front part with a jack.
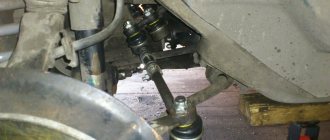
After this, the bolts holding the wheels are unscrewed. The calipers are removed. In order not to disconnect the hoses suitable for them, you can secure them with wire. It is not recommended to leave the caliper hanging from the hose as they may require replacement if damaged.
The next step is to remove the brake pads. If their condition does not allow replacement, it is better to mark them so that they are installed in the same position.
To remove the old disk you need to unscrew the bolt holding the casing. Then, using a screwdriver, remove the locking plate antennae that secure the pad guides. The bolts holding the pads are unscrewed.
Tools for repair
When replacing brake discs on a Niva Chevrolet, you need to use a standard set of tools; no scarce equipment is needed.
- Socket wrenches, open-end wrenches, socket wrenches for 10, 14, 17, 27. If you use socket heads, it is inconvenient without a ratchet.
- Pliers.
- Screwdrivers.
- Hammer.
- Jack.
- Wheel chocks and supports.
Which pads to choose for Chevy Niva?
The choice of pads depends on your budget and preferences. At the moment, at least 6 types of front pads from various manufacturers are offered.
- Finwhale pads /2121-2123/ V221 set price from 500 rub.
- Pads Beginning 2121-3501090 set price from 300 rub.
- ADR pads ADR010611 price from 350 rub.
- Nippon pads ADB0192 set price from 450 RUR
- ABS pads BEST ABS010611 price from 300 rub.
- Lynx BD-4602 pads price from 600 rub.
All of the above brake pads are suitable for Niva 2121, as well as Chevy Niva. They have the same calipers.
Purpose and design of the brake disc
Any driver knows that car braking is carried out due to friction. It is simply impossible to stop the car in any other way, so friction reduces the speed of the car. The main role in braking due to friction is played by the brake disc, which actually stops the moving wheels. The disc can be made of cast iron, carbon fiber or ceramic. Chevrolet Niva is equipped with a cast iron product.
Brake discs on the Chevrolet Niva are installed on all wheels, so there are front and rear discs. Their purpose is the same, only the design is different. The rear disc is predominantly called a drum, as it has the appropriate shape.
The front disk mainly has the form of a flat support, on which the working elements of the system are exposed. These elements heat up during braking, and therefore wear out. Heating indicates a wear process, so sooner or later, in addition to the pads, it is necessary to replace these products.
Malfunctions and their definition
During the operation of the car, all its parts wear out. The brake disc is no exception, although its service life is much higher than the pads. But any small particle, water or dust can significantly reduce its service life.
Naturally, the first sign of a malfunction of these parts is problems with braking. The driver will feel this phenomenon on his own. But the most objective is considered to be a check at a service station, where technicians will conduct a full diagnosis and report the slightest malfunctions.
If you don’t want to “drive” the Chevrolet Niva to a service station, and you want to save money, then you can determine the cause of the malfunction yourself at home. What will you need for this? A faulty brake disc can be determined by the following signs:
- If, at the moment of braking, unusual phenomena are felt: noises, grinding, jerking, etc.
- When cracks, chips, gouges, etc. form on the disk.
If such phenomena are noticed, then measures must be taken. Over time, the disc wears out, so its thickness is determined with a caliper, which should not exceed the norm. The difference in thickness of a new and used disk should not exceed 3 mm. If such a phenomenon is appropriate, then there is only one solution - a replacement is necessary.
If the disk has a normal thickness, but chips and cracks are observed on it, then you can try to sharpen it. After turning, the thickness of the product should not be less than 9.5 mm.
Removing and replacing the product
If the malfunctions described above occur, the brake disc will need to be replaced, but before that it must be removed. First of all, you need to prepare a standard set of tools, which include:
- wrenches for “10”, “14”, “17” and “27”. It is best to use a ratchet wrench;
- screwdriver;
- pliers;
- jack;
- hammer.
So, let's start removing the front brake discs of a Chevrolet Niva:
- Initially, we install the car on a flat surface, release the handbrake, put on shoes, and use a jack to suspend the front part.
- The nuts are unscrewed and the front wheel is removed.
- The caliper is removed. The process of removing it is quite delicate, so details of removal can be found in the relevant sections of this site. It is only worth noting that the hoses do not need to be removed, and after unscrewing the caliper, it is necessary to hang it on a wire.
It is forbidden to hang the caliper on the hose, as it may burst, and then it will need to be replaced.
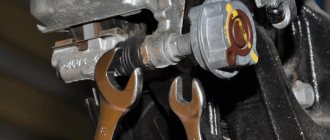
A nut screwed onto a bolt will not allow the thread to be damaged, since direct impacts will fall on its surface.
After the repair or replacement has been made, it is necessary to assemble all the elements in the reverse order of removal. During the assembly process, it is important not to forget to lock the bolts securing the guide pads. Correct pressing of the hub and disk is carried out using the method of screwing the nuts “crosswise”.
Thus, replacing the disc will prevent brake system malfunctions.
What to do if the disk gets hot?
During the operation of a Chevrolet Niva, moments arise when the brake discs heat up. And this is a normal phenomenon, because the physical process of friction is caused by heating of the rubbing parts. Heating the surface of a product is a negative phenomenon that entails many problems: the appearance of cracks and defects, abrasion. What to do if the brake elements get hot? Is there any adequate solution to this problem?
From the factory, Chevrolet Niva cars are equipped with cast iron brake elements that have a hollow surface. Currently, many manufacturers produce so-called ventilated products. What it is? Ventilated discs are products that have special holes or notches. With their help, thermal energy is removed, thereby preventing the element from overheating to a critical temperature. The notches reduce friction to a minimum, so the brake elements do not heat up as intensely. The reliability of such products has been proven in practice, so a solution to the problem if the brake elements get hot has been found.
How to install ventilated elements? You won't be able to simply buy new ventilated discs, because some minor modifications will be required. For this you will need:
- Replace wheel rims from R15 to R16.
- Buy ventilated discs, which heat up much less than the base ones during braking. You will also need a new set of pads.
- Install a new caliper and mounting bolts.
After this, all these parts are installed. The difference is noticeable immediately, so you will not regret this modification of the brake system. The photo below shows products that have ventilated properties.
Drawing a conclusion, it is worth noting that although sometimes brake discs have a long service life, it is very important to monitor their condition, since the life of the driver and passengers depends on their serviceability. By installing new modern ventilated brake elements, you can forever forget the phenomenon when they heat up and fail.
Installation of rear disc brakes with a mechanical drive of the parking brake (kit from “AST”)
Device Description
Rear disc brakes with a mechanical drive of the parking brake for VAZ 2121-2123 (Niva-Chevy Niva) cars are recommended for installation on cars in order to increase the safety, reliability and efficiency of the braking system, and reduce the braking distance. At the time of writing, the kit cost 20,000.00 rubles.
This kit is designed for installation on VAZ 2121-2123 cars. The device uses the parking brake principle used by many European and Japanese car manufacturers, which ensures their reliable operation.
The rear brake mechanisms are activated in a timely manner, increasing the information content of the brake pedal, which allows for more efficient use of the braking system during dynamic driving.
The device is connected to the standard hydraulic system and the original cables of the parking brake system (handbrake).
The standard pressure regulator performs the function of braking force distribution.
You can install this device yourself by carefully following these instructions, provided you have the appropriate qualifications, conditions and tools.
Equipment
- Brake discs – 2 pcs.
- Brake caliper – 2 pcs. (right and left)
- Guide bracket – 2 pcs.
- Brake hose – 2 pcs.
- Plan – mounting washer – 2 pcs.
- Protective disc cover – 2 pcs.
- Brake disc pads – 4 pcs.
- Parking brake cable – 1 pc.
- Brake tee – 1 pc.
- Fixing springs – 2 pcs.
- Fasteners:
- Bolt .M10x1.25 30 mm (4 pcs.)
- spring washer f 10 (4 pcs.)
- flat washer 10 x 25 (8 pcs.)
- caliper bracket guide pin – 4 pcs.
- copper washer – 8 pcs.
- brake hose fitting – 4 pcs.
- spacer ring (for axle shaft) – 2 pcs.
- bolt M6x1 (with collar) – 6 pcs.
- Instructions with warranty card
- Box
Required tools and materials for installation
- Jack, 2 stands (if there is no lift)
- Wheel key
- Open-end wrenches: 8,10, 13, 17mm.
- Socket wrench with 17mm head
- Socket and Phillips screwdrivers
- Pliers
- Hammer
- Wooden spacers (planks)
- Metal brush
- File
- Brake fluid
- Liquid for wetting threaded connections
- Graphite lubricant
- Sealant
- Bitumen mastic
- Split wrenches for dismantling and installing brake lines
Installation
First of all, it is necessary to dismantle the drum brake mechanisms of the rear axle, following the instructions for the maintenance of VAZ 2121-2123 vehicles. You will not need all the components of drum brakes, with the exception of the axle shaft with standard bolts.
Before installing the axle shaft, install a spacer ring into the rear axle housing
then place a washer on the axle shaft so that the concave side is oriented towards the brake disc, and the holes for attaching the caliper are directed upward at an angle of 45 degrees. back as shown in the picture
Secure the assembled assembly to the rear axle housing with the standard axle mounting bolts
Replacing a brake disc Niva Chevrolet
Engine 5. Transmission 6. Chassis 7. Steering 8. Brake system 9. Electrical equipment Body Vehicle design options Car care Purchase of spare parts Travel to a service station Winter operation of the vehicle Preparing for technical inspection We bring to your attention an address and telephone directory of automobile enterprises providing goods and services Chevrolet cars:.
Car disassembly, dismantling Auto parts stores Services, technical. Raise the front of the car and secure it on stands.
Selection of brake system components
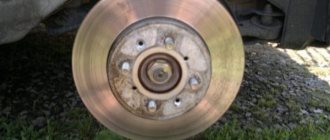
Remove the corresponding front wheel. Slowly rotate the brake disc so that it can be seen from both sides. If necessary, remove the brake pads. Measure the thickness of the brake disc using a micrometer. Brake disc wear from pads must be within acceptable limits. If wear exceeds the permissible limit or there are cracks on the disc, the disc must be replaced. If necessary, clean the perimeter of the disc from rust and brake dust.
Use a dial indicator to check the runout of the brake disc. Fix the dial indicator in any convenient place and, turning the disk, determine its runout at several points from its center. If the disc runout exceeds the permissible limits, the disc must be replaced. However, the cause of disk runout may be a failure of the wheel bearing.
Check the brake disc for cracks, especially around the wheel bolt holes. On models with Bendix calipers, remove the brake pads. On models with Girling calipers, unscrew the two bolts securing the caliper to the hub.
Remove the caliper and use a soft wire to tie it to the front strut. Do not deform or stretch the brake hose. Using chalk or paint, mark the position of the brake disc relative to the hub.
Unscrew the screws securing the brake disc to the hub and remove the disc. Installation is carried out in the reverse order of removal, taking into account the following points. Check that the working surfaces of the brake disc and hub are clean and not deformed. Align the previously made marks, install the brake disc and secure with screws, tightening them to the required torque.
If a new brake disc is installed, use a solvent to remove any protective grease from it.
Repair algorithm
And now you can start replacing the discs and brake pads on the Niva. The manipulations are not very complicated, follow these instructions:
- First, park the car on a level surface, squeeze the handbrake lever and hang out the entire front part. Be sure to place reliable supports under the car so that it does not fall. Place chocks under the rear wheels.
- Unscrew the nuts securing the wheel being repaired. Remove the wheel from the car.
- Remove the brake pads. If you plan to put them back, then mark which were on the outside and which were on the inside.
- Now you need to remove the caliper. There is no need to disconnect the hoses during removal. It is enough to unscrew the two bolts that secure the caliper to the steering knuckle, lift it and secure it with a wire to the car body. Try not to hang the caliper on the hose, as this may damage it.
- Now you can start removing the disk. To do this, just unscrew the casing bolt.
Replacing the front brake disc of a Chevrolet Niva
If the disc cannot be removed because the pins cannot be knocked out, then you have to pick up a grinder and cut off the excess parts. Below watch the video in which the author was unable to remove a disk using a homemade puller and used an angle grinder to remove the disk that was stuck on the hub.
Sometimes this is the only option for the Chevrolet Niva - brute male power. Niva's wheels are heating up - what to do in this case? Applying light blows with a hammer to the edge of the hub, we knock it out and separate it from the video of removing a Chevrolet Niva brake disc with a disc. At this point, the repair work on removing and replacing the brake disc on a Niva Chevrolet car has been completed.
Make the necessary repairs, then install in the reverse order.
Currently, many manufacturers produce so-called ventilated products. What it is? Ventilated discs are products that have special holes or notches.
With their help, thermal energy is removed, thereby preventing the element from overheating to a critical temperature. The notches reduce friction to a minimum, so the brake elements do not heat up as intensely.
The reliability of such products has been proven in practice, so a solution to the problem if the brake elements get hot has been found.
Replacing a brake disc on a Niva Chevrolet
How to install ventilated elements? You won't be able to simply buy new ventilated discs, because some minor modifications will be required.
To do this you will need: Replace the rims from R15 to R. There was no runout of the new rims, everything was spinning smoothly. Additionally, I pumped the brakes and checked the calipers for brake fluid leaks, since the pistons changed their position, but I did not change the cuffs.
But everything was fine there too. The appearance of extraneous sounds video of removing a brake disc on a Chevrolet Niva while braking: The car may pull to the side.
A visual inspection may reveal the appearance of cracks, chips and other defects. To understand how bad the level of wear is, you may need a caliper.
Finally
We discussed how you can install an HTD on a Niva. Such a solution will significantly improve the performance of the braking system, making it safer and more efficient. At the same time, to carry out this work you need to have a good understanding of the operating features of the vehicle. If you do not have the proper knowledge and skills, you should turn to professionals, because if you damage your brakes, you may find yourself in an unexpected situation on the road. Which is fraught with serious consequences.
Replacing Niva front brake discs
Experienced car mechanics remove the entire disc along with the fist and squeeze out the disc using a press. If there is no puller, people often start hammering on the disc from the back side - sometimes this helps, but we do not recommend doing this.
The edges of the brake disc simply break off from impacts. If the disc cannot be removed because the pins cannot be knocked out, then you have to pick up a grinder and cut off the excess parts. Below watch the video in which the author was unable to remove the disk using a homemade puller and used an angle grinder to remove the disk that was stuck on the hub.
Sometimes this is the only option for the Chevrolet Niva - brute male power. Niva's wheels are heating up - what to do in this case? It happens that during operation the car wheels begin to heat up.
This may indicate either their poor quality or breakdown.
Lada Priora Hatchback USiK › Logbook › ZDT AST with ABS
Immediately after I bought USiK I wanted a ZDT, but somehow I didn’t have the funds. And only a year later I decided to buy it. I thought for a long time about which company to take. I just wanted a ready-made kit. In the end, I settled on two options: Lucas and AST. Lucas seems to be a well-known company, and AvtoVAZ puts them on the Kalina sport. They also have a 2108 disc - you can buy it anywhere. AST has all its own spare parts, but they provide a certificate and conclusion from US. This outweighed Lucas. I will only hope that the office will not burn out and that I will still be able to buy consumables.
I won’t describe the packaging; I did a very good description of the RZ296 in my magazine: Review of rear disc brakes.
I'll tell you how I installed it. There is no ditch in the garage, only a jack is available for help. I took the winter kit, lifted each side and put two wheels on it.
Now everything is ready for dismantling and installation. First, we unscrew the 2 nuts of the handbrake equalizer, there is very little space there - the muffler is in the way, it took me about 40 minutes to unscrew - everything is sour. We take out the standard parking brake cables. Then we throw off the drums, remove the pads, unscrew the ABS sensor and brake pipe. (this is, in principle, well described in the Murzilka).
Next, take a 8mm hexagon (mine had to be filed with a grinder to remove the bolts) and unscrew the hub from the beam.
The bolts are then unscrewed, BUT the hub does not fall off. Great! Well, never mind, take a heavier hammer and a small board. A couple of hits and everything flies off with a bang!
We clean the beam from rust and dirt, and I lubricated it with a thin film of lithol so that it does not rust. (And in general, it’s better to wash everything from sand and dirt before starting work, and spray WD40 everywhere. A couple of bolts were not easy.)
Next, we begin installation. The instructions, I’ll be honest, are not entirely successful. It’s written too cleverly and instead of photos it’s better to have a diagram. Well, it’s okay, after reading it several times, you get into what’s written and it goes like clockwork.
We take the plates, attach a strip to them through the pinion and the bushing - the ABS sensor mount. We secure the ABS sensors with standard fasteners. The main thing is not to confuse the plates - they should have their convex side facing outward. It turns out that the inscription “AST” on the left hub is on the inside, and on the right hub it is on the outside.
Then you need to secure the hub, brake shield and plate. For Priora, the shield is placed between the hub and the plate.
I tightened the hub with the bolts from the kit, although I really wanted to use standard hexagon bolts, but it is written to use only the fasteners from the kit. Tighten with great effort. Next, we attach the brake disc and caliper assembly. We fasten the brake hoses and brake pipe.
ATTENTION! Now let's pump. I didn't succeed the first time
It is necessary to pump as follows: 1. We take a smart assistant (in my case, an assistant), a 30 cm transparent tube (suitable for a washer), a transparent bottle.2. Pour some brake fluid into a bottle, start with the right rear wheel, attach the tube to the bleeder fitting and prepare the key for 10.3. The assistant first presses the pedal several times and holds it, and only then you need to turn the fitting with a key and bleed the air. Then we tighten the fitting and repeat until all the air comes out (you can see it by the bubbles in the bottle). 4. In the same way, the left wheel. Is the pedal tight? All OK! if not, then step 3 again. By the way, you don’t need to reset any terminals, you don’t need to turn on the ignition either - everything is the same as on a car without ABS. Just don't forget to add brake fluid.
For me, the most difficult thing was to crawl under the car and insert the cables into the equalizer. It was already faster than when I was filming.
Dirty and happy with the result, I went to wash myself.
The first time I pumped it poorly, so the result was zero. I pumped it again - it felt great! It’s still getting used to it, but you can already feel the difference - it’s like a parachute being opened from behind)))