Timing mechanism stands for gas distribution mechanism. The belt of this mechanism replaced the chain that was previously installed on car engines. Now the connection between the crankshaft and camshaft is carried out by a rubber belt. It's called a timing belt.
It is important to monitor its condition and replace it on time. In case of severe wear, there is a serious risk of this belt breaking and stopping the machine at the point of the break. Further movement is only possible using a tow truck for service. The task of the timing belt is not just to connect the shafts, but also to ensure the synchronization of their operation.
Most often, the timing belt is replaced at a service center during scheduled maintenance, or separately when wear is detected. However, you can replace the timing belt on a diesel and gasoline engine yourself if you understand the principle of its operation and understand how long it takes to replace the timing belt.
Preparing the machine and tools
Before you start work, you need to prepare everything you need in advance. This means stocking up on tools that may be needed, a new replacement kit, and also carrying out all the preparatory work.
First of all, prepare the place of work and the car itself:
- the working area must be level and normally lit;
- put the car on the parking brake;
- under the wheels - always stops;
- the engine must be completely cool;
- The car is de-energized and the battery terminals are removed.
Before starting to work on the engine itself, the car needs to be jacked up and everything that might interfere with getting to the timing belt must be removed.
List of necessary tools:
- standard set of open-end wrenches;
- a set of socket heads with a “ratchet”;
- fork key;
- a pair of screwdrivers (flat and Phillips);
- jack;
- sealant.
And finally, you need a new set of timing belt with rollers (its configuration depends on the car model), as well as clamps for the shafts (which ones depend on the engine itself, and this can be found in the service book), a flashlight, overalls, gloves and rags . And, of course, a phone with a camera, which will have to record the position of all the elements before they are dismantled. Believe me, this is important!
Visual inspection and work procedure
How to check the belt for rupture if the car “knocked” during the trip? For this purpose, some car owners just need to bend the timing cover and visually assess the condition of the part. And such actions are a simple method for the Priora series, although some foreign cars are already equipped with detectors about such a breakdown, located right in the car’s interior. It is interesting to note that both Russian and foreign cars are susceptible to belt breaks on Russian roads, often regardless of the correct selection of the studio or their mileage.
How to install a new timing belt on a Russian Priora car? For this purpose, you will mainly need:
- Remove the fastening screws from the front top cover using a “5” hexagon;
- Remove the mudguard from the engine compartment;
- Using the socket at “17”, turn the crankshaft clockwise (by the bolt from the drive pulley leading to the generator). Inspect the timing belt for damage or contamination;
- Unscrew the pair of screws that secure the bottom cover from the timing drive using a hexagon to “5”;
- Remove the cover, additionally the generator drive belt;
- How to avoid violation of the gas distribution order? For this purpose, you need to place both the crankshaft and the gas distribution shaft in the top dead center position for the compression stroke of the first cylinder (turn the crankshaft by the pulley mounting
bolt clockwise until the torque is correctly set until the marks on the pulleys align with the marks on the rear timing cover); - To check the position of the crankshaft, you need to pull out the rubber plug located at the top of the clutch housing (here the antifreeze temperature sensors, the wiring harness from the sensors, and the radiator hose need to be disconnected). Then it’s worth looking at how the risk is placed on flywheel “one”. It must be positioned so that it is opposite the second slot on the top cover of the clutch housing on the Priora.
- What action should be taken next, so as not to disrupt the valve timing when the bolt is unscrewed from the fastening on the pulley at the generator drive
? Then you will need an assistant who will fix the flywheel by placing a slotted screwdriver of huge diameter through the hole in the clutch housing into the teeth of the flywheel. - Next, you need to remove the generator drive
, having previously loosened
the fastening bolt
and its support washer. - Using a spanner wrench, as the heads on “15” are also called, you need to loosen the fastening bolt from the tension roller of the belt itself (the roller turns - the tension weakens).
Return to contents
Step-by-step, do-it-yourself timing belt replacement
The replacement process is individual for each car model, but there is a certain algorithm of work that is typical for all cars. Clearly shown in the figure below.
Step-by-step timing belt replacement
So, everything is ready, we can start. An example is shown on 16-valve models VAZ 2110, 2111, 2112.
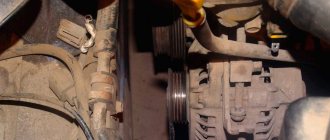
- First you will have to remove the alternator belt, which interferes with access to the timing belt.
Loosen the generator and remove the belt - Additional units that interfere with further work must be dismantled or moved, after loosening the fastenings. This applies, for example, to the adsorber, which may prevent the belt from being removed.
Remove the adsorber - Next, dismantle the protective covers and casings covering the timing mechanism. Their number depends on the car model: in some places everything will be limited to one casing, in others you will have to remove a dozen separate elements to get to the belt itself. The more complex the design, the more pictures you will have to take so that there are no unnecessary details left later. In this case, everything is extremely simple.
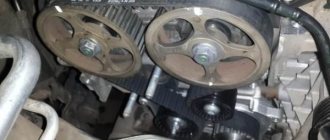
Unscrew the casing bolts - Next, you need to align the marks on the camshafts and the casing. This can be done by turning the jacked wheel, after putting it in 5th gear.
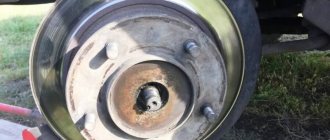
Place marks on camshafts - Also check the mark on the crankshaft.
Check the mark on the crankshaft gear - Secure the crankshaft and camshafts. To do this, you may need slats or brackets prepared in advance.
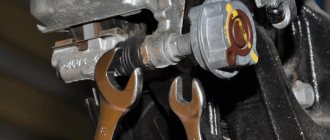
- Loosen the tension roller. To do this, you will need a hex or socket wrench, which moves the roller to the side, allowing you to remove the belt.
Loosen the tension roller - Remove the timing belt. After removal, you need to inspect it for oil or antifreeze stains. If there are stains, you need to find the leak and fix it.
Remove timing belt - Unscrew the mounting bolts of the tension and idler rollers and remove them. Inspect the seats for oil contamination and clean if necessary. Install new videos.
- Replace the remaining elements that are included in the timing belt kit: vibration damper, brackets for mounting the rollers, mounting bolts. If the pump is in poor condition, it will also have to be replaced (a worn-out pump begins to vibrate, which damages the timing belt. And to replace all these “dances” you will have to start all over again, so it’s better to do everything at once). Check the labels again for consistency.
- Install a new set, first bending the tension roller. Depending on the car model, the tension roller will need to be moved to the side or loosened. Please note that a new timing belt should not be contaminated with oil if it gets on your gloves. You will need a clean rag or napkin to dry your hands with. Next, we check the marks again.
Install a new timing belt and check the marks again - Check belt tension. After this, tighten the tension roller.
- Install the remaining parts in reverse order.
If all this seems complicated, then the video below clearly shows the whole process.
What is a timing belt?
With the help of this mechanism, a fresh charge of the combustible mixture is promptly introduced into the cylinders and exhaust gases are released. The timing belt includes: a camshaft, a mechanical programmer, drives, links, valves and other elements. In principle, knowledge of this information is not required to perform a belt replacement, but for general awareness it will not be superfluous.
Subscribe to our Telegram channel
It is worth understanding that the camshaft and crankshaft must work synchronously, since the coherence of their actions affects the quality of the timing, which controls the gas distribution stages of a car engine. In turn, the timing belt plays a key role - it ensures that the camshaft rotates at a given speed, which is half the angular speed of the crankshaft. In addition, it smoothes out the pulsation of the internal combustion engine and guarantees uniform operation of the shaft pulleys.
What ensures the rotation of the timing shafts?
If you look under the camshaft pulley, you can see a pair of rollers located on the right (support) and on the left (tensioner). The support roller has a hole slightly offset from its axis. If you are repairing a car yourself, then you need to take this into account during adjustment. This way you can properly debug the operation of the engine using the belt.
When setting the valve timing, pay attention to the special marks applied to various parts - pulleys, oil pump housing, etc.
How often should it be changed?
As you can see, the replacement procedure is still a “holiday”. It’s clear that you want to do this less often, but bringing your car to an accident is also not the best option.
What is the optimal replacement frequency?
The answer can be found in the service book, it clearly states: a condition check is done at every service, routine replacement is done every 80 (100, 120, 180 , etc.) thousand km. But there are two small “buts”.
- Firstly, the manufacturer indicated the procedure for replacing the original belt. Yes, if a car is purchased with zero mileage, it will pass its regulatory period without any problems, even the longest one. But the quality of non-original belts from different manufacturers may vary. So even products from the best brands require supervision and often early replacement.
- Secondly, the service life is shortened by the following factors:
- variable climate, in which elastic materials wear out faster;
- engine malfunctions that may cause damage;
- when contaminated with oil or antifreeze (yes, this is why it is recommended to install a new kit with clean hands);
- long-term downtime of a car, during which it also ages, but not from mileage, but from time;
- incorrect installation.
So you can’t always count on the belt to last until the scheduled time. Often 50 thousand km is the maximum limit for it, after which experts recommend replacement.
Features of the Priora car
Motor of the newest Lada
The engine on the Priora belongs to the class of so-called DOHC engines (Double overhead camshaft), which have two shafts, each for its own row of valves (two for exhaust, two for intake). The valves are driven by pushers, which gives the main advantage of gaming slots in terms of power delivery.
The timing belt on a Priora car is a rubber-mechanical product with teeth along the inner edge. On its rim the type of motor to which the part is suitable is indicated, and additionally there is a marking indicating the number of teeth (137) and width (22 mm). When purchasing a timing belt, it is worth checking its quality by pressing on a non-toothed surface. Natural disadvantages of the product include the occurrence of longitudinal or transverse cracks, delamination, and excessive roughness on the teeth.
KEY-DOP
The timing belt passes through a tension roller, a toothed pulley on the crankshaft, a pulley for the antifreeze pump, a pulley (toothed) for the exhaust camshaft, a pulley for the intake camshaft, and a guide roller. The system also has marks on the crankshaft pulley, oil pump, belt cover (rear), and on both camshafts.
In the factory configuration, the car is equipped with a Gates Kit timing belt with plastic rollers, which are not of good quality, so experienced “prior mechanics” prefer to change this part without performing a high-quality installation, once the recommended period has expired.
Signs that replacement is needed
The main signs of abnormal timing belt operation can be identified either purely visually or by listening to the engine. You need to pay attention to the following points:
- The engine starts to run unstably and the power drops. One of the reasons may be the belt stretching or slipping by one tooth;
- engine vibration appeared;
- extraneous noises are heard from the running engine;
- the color of the exhaust has changed, becoming darker, black;
- During inspection, wear of the rollers was revealed;
- the belt has external signs of wear: protruding threads, frayed edges, cracks on the outside, “licking” of the teeth;
- there are traces of technical fluids on it.
If it was installed incorrectly (tensioned too tightly or too loosely, touching other elements with the side edge, etc.), it will wear out long before the end of its designed service life. That is why even if it is “freshly installed”, it needs to be checked after 8-10 thousand km.
Consequences of a broken belt
Timing belt failure can be gradual or sudden.
With gradual failure, when the belt stretches, teeth are cut or broken, the valve timing shifts, which leads to difficult engine starting, increased exhaust smoke, increased vibration and the appearance of extraneous noise during engine operation.
If the timing belt suddenly fails, if it breaks, the valves freeze in the position at the moment of the break, the crankshaft continues to rotate by inertia, moving the pistons upward. At a certain point in time, contact between pistons and valves occurs, which leads, at best, to damage to the valves, in some cases to damage to both valves and pistons, in the worst case, in very rare cases, to damage to the cylinder head, crankshaft and even cylinder block. The engine then requires an expensive overhaul.
In some engines, the pistons have special recesses that prevent contact between the valve and the piston, but such engines are rare because they have reduced efficiency. The vast majority of cars produced today do not have such a recess and are in no way protected from contact of the pistons with the valves.
How to choose the right timing belt, which brand is better, what are the prices on the market?
On the one hand, the timing belt is a simple thing, so it won’t create any special problems when choosing. On the other hand, each engine model has its own, correct one, with special technical characteristics.
Therefore there are three options:
- Select by VIN code or technical data of the car. This is the most accurate method that all specialists use. It is especially relevant if you need not only a belt, but also the entire replacement kit.
- Select according to certain characteristics. That is, knowing the width and number of teeth, choose exactly the same one.
- Knowing the individual number (the one indicated by the manufacturer), choose the same one or an analogue (catalogues of analogues are available in any online store).
All three methods have the right to exist, but specialists mainly use the first and third, and ask for technical specifications only for verification.
In terms of brands, there are three categories of recommended brands:
- OEM, that is, belts with the brand of the automaker. This is an ideal, albeit the most expensive option, since their quality is almost the same as that of the factory ones. It runs quite well throughout the entire regulatory period and presents almost no unpleasant surprises (almost - because a defect can slip through even two or three stages of quality control, nothing can be done about it). OEM prices go up to $200 (per belt, not per set), but this is perhaps an extreme option. On Lada, for example, branded ones cost from 25 to 100 dollars.
- Premium brands are manufacturers who make spare parts to order from automobile concerns (that is, they produce OEM products) and release them under their own brand. The quality is high, reliability too, prices are lower than the original, but not by much. These are, for example, Contitech, Lemforder, Gates. Prices start from 10 and go up to the same 200 dollars.
- Mass market brands are those manufacturers that are in greatest demand. Prices are usually average, but the quality is quite decent. For example, the most popular brands among buyers are Bosch, Dayco, SKF and Blue Print, prices for which start from 5 and end at 100 dollars.
Do the rollers need to be changed at the same time as the belt? After all, the difference in price between a separate timing belt and a complete set is very, very noticeable, so is it worth the expense?
The answer to this question is very simple - the more fuss with replacement, the more arguments there are for replacing the entire set, including the water pump. The rollers wear out and begin to vibrate, this vibration shortens the service life of the belt itself. Even if you don’t change it yourself, but go to a service station, it’s still better to pay once for the work than twice with a short interval.
However, if the belt is replaced for any reason long before the end of its standard service life (for example, it was incorrectly installed and frayed, or was initially of very poor quality and quickly cracked), then it may be enough to replace only it, and not the whole set.
Kit for 2.0 TDI engine
I recommend using a belt from the manufacturer CONTITECH or INA/LUK, which are suppliers of the VAG concern (essentially this is the same original at a lower cost ).
Replacing the coolant pump (pump) at the same time as the belt will reduce the cost of reinstalling the timing belt in the future.
| For 2.0 TDI gen.2 engine | |||
| Name | OEM number | Qty. | Price |
| CONTITECH set width 25 mm. | CT 1139 K2 | 1 | RUB 11,850 |
| Coolant pump | P 662 | 1 | 4,600 rub. |
| Antifreeze | G A13 A8J M1 | 3 l. | 1,500 rub. |
| Total set with pump | 17,900 rub. | ||
| CONTITECH set width 30 mm. | CT 1134 K1 | 1 | 13,000 rub. |
| Coolant pump | P 654 | 1 | 4,400 rub. |
| Antifreeze | G A13 A8J M1 | 3 l. | 1,500 rub. |
| Total set with pump | RUB 18,920 | ||
| For 2.0 TDI gen.3 engine | |||
| CONTITECH set width 25 mm. | CT 1168 K1 | 1 | 8,000 rub. |
| Coolant pump | 04L 121 011 N | 1 | 13,500 rub. |
| Antifreeze | G A13 A8J M1 | 3 l. | 1,500 rub. |
| Total set with pump | RUB 22,900 | ||
Original kit for 2.0 TDI without coolant pump
| For 2.0 TDI gen.2 engine | ||
| Original. timing kit | 03L 198 119F | RUB 20,200 |
| Kit contents | ||
| Toothed belt Z=160 | 03L 109 119 J | 1 |
| Tension roller | 03L 109 243 F | 1 |
| Idler roller (small) | 03L 109 244 G | 1 |
| Idler roller | 03L 109 244 D | 1 |
| Idler roller | 03L 109 244 J | 1 |
| M8 collar nut | 038 109 454 A | 1 |
| M8 collar nut | N 106 092 01 | 1 |
| Bolt M10×45 | N 106 999 01 | 1 |
| Bolt with internal star M8×16 | N 911 854 01 | 3 |
| For 2.0 TDI gen.3 engine | ||
| Original. timing kit | 04L 198 119 K | RUB 17,700 |
| Kit contents | ||
| Timing belt Z=145 | 03L 109 119 J | 1 |
| Timing belt tensioner | 03L 109 243 F | 1 |
| Timing Belt Tensioner Hex Nut M8 | 03L 109 244 G | 1 |
| Timing belt deflector pulley (lower) | 03L 109 244 D | 1 |
| M8 idler roller hex nut (lower) | 03L 109 244 J | 1 |
| Timing belt deflector pulley (upper) | 038 109 454 A | 1 |
| Idler roller fastening screw (upper) M8*35 | 04L 109 119 D | 1 |
On what engines do valves bend?
On cars with an 8-valve engine, it bends least often, but with 16 and 20 valves, be it gasoline or diesel, bending occurs in most cases. True, sometimes it can be one or more valves, and if the engine was idling, then trouble will come. But there are few such cases, mostly the consequences are irreversible. A table with a list of engines on which the valves of all popular cars bend when the timing belt breaks.
However, there is a small chance that the valves remain intact when the timing belt breaks, especially if the engine is old. Previously, they had special grooves for valves just for such a case. In the design of the new engines, this was sacrificed in order to increase power.
Therefore, if your timing belt breaks while driving, you should expect the worst - such repairs will be very expensive.