A car generator is an important element of the electrical system. With its help, mechanical energy is converted into electrical energy. This energy occurs when the engine rotates. The unit serves to supply electricity to all electronic components of the vehicle. The device is also needed to recharge the battery.
They replace this part when it is not possible or makes no sense to repair it. Often, replacing a car generator is required for vehicles with significant mileage. Experienced motorists often decide to replace the generator themselves. However, this operation is quite a difficult undertaking. Let's figure out what the algorithm of the procedure is.
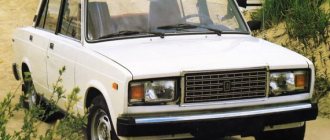
Where is the generator located on the VAZ 2107
The generator on the VAZ 2107 functions in close connection with the battery. As with any other car, this device generates electricity to power all elements of the car. In this case, the generator performs its function only when the engine is running.
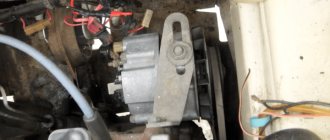
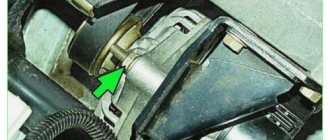
On the VAZ 2107 this mechanism is located directly on the surface of the power unit on its right side. This position is due to the fact that the generator is started by the movement of the crankshaft through the V-belt.
The generator housing is adjacent to the right side of the engine
What's wrong?
After eliminating possible problems with the car's electrical system and other defects, you can proceed to a detailed check of the starter and/or generator.
Diagnosis of a dead starter is simple. It is disassembled and defective. In addition to dead parts, it is important to update elements with significant wear so that you don’t have to open the unit again soon. Along the way, check the resistance of the windings of the solenoid relay and the Bendix for failure.
With modern generators it is more difficult. In their design, the relay-regulator is connected via a separate bus to the “brain” of the engine, providing a smart charging function. The trouble is that to check a relay from a specific manufacturer, you most often need an individual diagnostic device with an oscilloscope. It also allows you to check the regulator separately from the generator - this saves repairmen from defective relays.
The generator is also checked on the stand. Its behavior under load, in idle mode and during heating is assessed. Additionally, the noise of the bearings is listened to with a stethoscope.
Bench tests are carried out before and after generator repair.
Selecting a generator for VAZ 2107
An assistant will be needed to carry out the inspection. Controls the generator output voltage of the regulator relay, which is an electrical circuit. You will need to disassemble the generator and replace the bearings. If the diodes fail, the rectifier unit is replaced with a new one.
Engine compartment lamp.
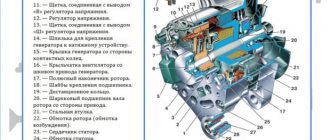
Main components of the generator Structurally, it consists of the following main elements: Rotor - a moving part that rotates from the engine crankshaft.
How to remove the generator To carry out dismantling you will need the following tools: Spanners 10, 13 and an engine compartment lamp.
It also happens that the wire simply oxidizes and the contact is lost, but this needs to be identified at an early stage, otherwise you won’t be able to go very far with a dead battery.
The stator is the stationary part of the generator and also has a winding.
With the required tension, the deflection should not exceed 10 mm. how to connect generator 2108,2109,21099 to 2101 (classic) part 2.
Article number and cost of the original VAZ 2107 generator and its analogues
The original VAZ 2107 generator has an article number 21013701005 or 2101370300. The cost of the G-221 is in the range of 3500-5200 rubles. At the same time, there are a large number of used units on sale. They are sold at prices starting from 450 rubles.
G-221 is a very good and reliable unit with high maintainability. It is capable of delivering only 42 A, which was enough for standard equipment. The installation of acoustic systems, heating and other electricity consumers led to an increased load on the unit.
Because of this, the battery is often undercharged, which negatively affects its service life. Therefore, owners purchase more powerful generators from third-party manufacturers. The best analogues for G-221 are presented in the table below.
Table - Well-proven alternatives to the original VAZ 2107 generator
Manufacturer Article number of the generator Approximate cost, ruble
| Eldix | ELDA2101 | 2400-2700 |
| Startvolt | LG0101 | 3200-4000 |
| Motorherz | ALR0130WA | 3690-3720 |
| Fenox | AL11201O7 | 4400-5200 |
| Lucas | LRA00533 | 7000-7500 |
This is interesting: Adjusting doors on a Lada Granta - what to do if the front door does not open from the outside: do-it-yourself repairs
Malfunctions
The main malfunctions of the VAZ 2107 generator include:
- brush wear;
- failure of the diode bridge (rectifier unit);
- failure of rotor bearings;
- short circuit in the excitation winding;
- break or short circuit in the stator winding.
Signs of a faulty generator are:
- no indicator light on the dashboard comes on;
- the voltmeter needle is in the red zone;
- sparking inside the generator;
- noise during operation (hum or howl);
- smoke and burning smell coming from the generator.
Replacing a VAZ 2107 generator with your own hands
Replacing a generator set is required in cases where the device no longer produces the required amount of current for consumer systems. The most common reasons for replacing an installation are the following malfunctions and breakdowns:
- burnt winding;
- interturn short circuit;
- deformation of the generator housing;
- resource development.
It is almost always easier and more profitable to replace the generator with a new one than to repair it.
Most often, generator sets fail due to short circuits and severe wear of the windings.
If you do not want to overpay for the work of installing a new generator, you can install it yourself, especially since there is nothing complicated in this procedure.
Required tools:
- a socket wrench with a “cardan” for 17 (for models 372.3701) or the same for 13 (for models 9412.3701);
- socket wrench 19;
- 10mm socket wrench.
Tool preparation
To dismantle and subsequently install the generator on a VAZ 2107, you will need a standard set of tools, which every driver usually has in his garage:
- wrench 10;
- wrench 17;
- wrench 19;
- a pry bar or a special shovel for installation work.
No other devices or devices are required.
Work order
- Place the car on an overpass or car inspection pit and secure it with the parking brake.
- Raise the hood, disconnect the ground wire from the battery.
- For easy access to the generator mounts, remove the battery using a 10 mm wrench;
- Using a 17 or 13 socket wrench (depending on the model), unscrew the nut securing the generator to the adjusting bar.
- Go down into the inspection hole and remove the engine protection.
- Remove the alternator belt from its pulley.
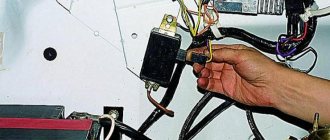
- Disconnect the wire block from the generator contacts.
- Move aside the rubber protective cap and, using a 10mm wrench, unscrew the nut securing the ends of the electrical wires to the “positive” terminal of the generator connected to the corresponding battery terminal.
- Using a 19mm socket wrench, unscrew the nut securing the generator stator to the cylinder block bracket.
- Remove the retaining bolt and remove the generator from the bottom of the engine compartment.
- Install the new generator in place.
- Place the belt on its pulley, as well as on the water pump and crankshaft pulleys.
- Secure the generator and attach the engine protection.
How to remove a VAZ 2107 generator
The VAZ 2107 generator is located in a rather inconvenient place. To make it easier to access, it is better to carry out work on a lift or pit. Before starting work, it is necessary to de-energize the vehicle's electrical systems by disconnecting the battery terminals. Further actions are performed in the following sequence:
- Remove the engine protection and the right front fender liner.
- Disconnect the wires from the generator (you must remember how they were connected.
- Loosen the nut holding the generator and remove the belt from it.
- Unscrew the nut from the bolt securing the generator to the bracket. If it is rusty, use WD-40.
- Remove the mounting bolt. If it does not come out, it must be treated with WD-40 and carefully knocked out.
- Remove the generator.
This is interesting: How to replace Nissan Teana spark plugs
If, despite your efforts, you cannot disconnect the generator from the bracket, you will have to remove it along with it. To do this, you need to unscrew 2 (or, depending on the design, 3 bolts) securing the bracket to the engine.
Next, in order to ensure the removal of the VAZ 2107 generator along with the bracket, you will have to move the radiator. There is no need to drain the antifreeze, disconnect the pipes and remove the radiator from the car. It is enough to unscrew its fastenings and move it, providing free access to the bracket and generator.
When removing the generator, you can do without an inspection hole or lift by removing the generator through the wheel arch. This method is only suitable if the bolts and nuts are not rusty and it is possible to remove the generator without a mounting bracket.
How to install a VAZ 2107 radiator
Installing the generator is not particularly difficult, since there is no need to deal with rusted bolted connections. The procedure for installation is the reverse of removal. After installing the generator, you need to install the belt and tension it. If you tighten it too loosely, the belt will slip when the generator is loaded, producing a characteristic whistle. Excessive belt tension will cause premature wear of the alternator bearing. It is easy to check the correct belt tension: it must be turned by hand along the longitudinal axis by 90 degrees. If the angle is smaller, the belt will be tightened. If more, it is weakened.
After installing the generator, connecting the wires to it and tensioning the belt, you can connect the battery terminals.
Everything is ready for testing. You can start the engine. The functionality of the generator can be checked with a voltmeter by measuring the voltage on the battery. When the car engine is running, the on-board voltage should be 14 volts.
Difference between single and three phase connection
All connections, whether in a single-phase or a three-phase network, are made completely identical, with the exception of the number of power wires. The only important nuance concerns the so-called control phase - if you connect the starter to the network, then its main contacts connect and disconnect the power wires from the network, and the power for the electromagnetic coil must also be taken from somewhere.
In a single-phase network there are no problems - there is only one phase and such a question simply does not exist, but in a three-phase network everything is somewhat more complicated - there are L1, L2 and L3. Without going into technical details, there is only one answer - for control circuits you can use any of the phases, but only one. That is, if the KM1 coil is powered from phase L3, then the control of the remaining starters, the “Start” and “Stop” buttons must also be “hung” only on it.
This is not difficult to do - just note what color the wire is on the desired phase, and if the cable has single-color conductors, then stick or draw markers on them.
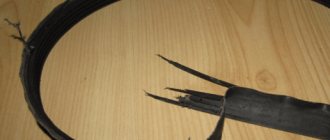
Alternator belt VAZ 2107
Quite often the belt on a generator breaks or becomes deformed (stretched), so it is very important to know how you can replace it yourself in any situation, even an emergency.
Alternator belt sizes
All parts used in the design of the car must have markings and manufacturer numbers. Design numbers and sizes of belts for the VAZ 2107 are specified in the operational documents for this model:
- 2101–1308020 (smooth surface), dimensions - 10.0x8.0x944.0 mm;
- 2107–1308020 (toothed surface), dimensions - 10.7x8.0x944.0 m.
How to properly tension the belt on the generator
When installing a generator on a VAZ 2107 yourself, the most difficult moment is considered to be proper belt tension. After all, it is through the belt that the generator mechanism will be launched, therefore, any errors and miscalculations when tensioning the rubber product will affect the performance of the car.
This is interesting: What types of lubricants are there for calipers and guides: what to look for when choosing
The belt tension is performed as follows:
- Place the new generator in its regular place, placing it on the studs.
- Tighten the fixing nuts only halfway, without over-tightening.
- Use a pry bar to install into the gap formed between the generator wall and the pump. Secure the mount in this position.
- Place the new belt on the alternator pulley.
- Hold the pry bar and begin tensioning the belt.
- Tighten the fixing nut in the upper part of the mounting of the generator unit housing.
- Afterwards, carry out a preliminary diagnosis of the degree of tension - the rubber product should not sag downward much.
- Tighten the lower stud nut until it ends without overtightening.
The diagram shows places for checking the tension quality.
Next, the quality of the belt tension is checked. Using two fingers, press firmly on the free part of the belt and measure the existing deflection. Normal sagging should not be more than 1.5 centimeters.
The service life of a typical belt for a VAZ 2107 generator is usually 80 thousand kilometers. However, it is recommended to change the belt drive earlier if the generator set is being replaced.
Thus, the generator on the “seven” can be replaced with your own hands, but you must adhere to strict rules and observe safety precautions. If you have problems with the operation of the motor after replacing the device yourself, it is better to contact a professional.
How to install headlights on a walk-behind tractor
Headlights are installed on large walk-behind tractors. The generator power is sufficient for installation of equipment and operation of devices. To install headlights, you can purchase a lighting device at an auto parts store or make one yourself.
To do this you need to buy an element for the headlights. If the house has a moped or a car that has spare headlights, then they can be used for installation on a motor cultivator. Then you need to prepare the wire and switch.
First of all, you need to install the switch. Then install the headlight on the steering column or on the front of the engine and install the wiring. If the unit has holes for connecting a headlight, then it must be connected to it. Then the cord is connected to the switch, and from it leads to the headlight. After this, the wiring is connected to the steering column using insulating tape and a prepared clamp.
Will you be able to install (change) a walk-behind tractor generator yourself, or would you prefer to seek help from professionals?
Generator repair
Generator repair should begin with identifying the fault. To do this, it is recommended to disassemble the unit. The pulley is unscrewed first.
Unscrewing the pulley
After removing the pulley, the generator should be halved.
Disassembly process
Defects of each element should begin with a visual inspection.
Components of the VAZ 2107 generator
If there are extraneous sounds and jamming of the shaft, special attention should be paid to the bearings.
Removing the plate that hides the bearing
New bearings
Pressing in the bearing
The weak point of the generator is the brushes and slip rings. If there is damage or signs of heavy wear, they must be replaced.
Brushes
Slip rings
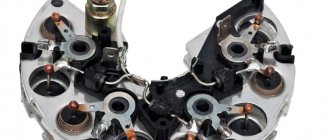
The diode rectifier test is shown in the image below.