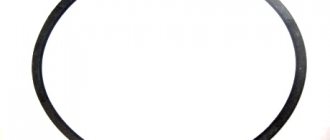
To replace the alternator belt on the fourteenth yourself, you don’t need to be a seasoned specialist. Anyone who has ever opened the hood of their car will figure out how to remove the alternator belt and install a new one. This item is for sale. part in any store of domestic auto parts at VAZ, the price is reasonable - from 100 to 400 rubles depending on the region of the country - which does not break the bank.
BOSCH alternator belt
Having learned that the price of a VAZ 2114 alternator belt is small, you should not rush headlong to the store. Important: before you buy it, find out its size (you can remove it and try it on, or come to the store with the old one); for different cars of the same manufacturer and even the same model, the belt can be of different lengths!
Changing the alternator belt on an 8-valve VAZ-2114 with your own hands: tips, adjustment
The alternator belt on the VAZ-2114 is the very connecting link that unites the electrical part of the engine and the physical and mechanical part. You can easily verify this if you bring the generator belt to a state of clinical death: the engine will run for an hour at most. Therefore, it is impossible to break the mechanical connection between the source of electricity and the source of torque under any circumstances.
Originals, analogues, prices, articles
| Catalog item | Serial number | Price | |
| KATEK ELD-A-2114-90A (original) | BOSCH (9402.3701) (original) | From 3500 – 4000 | |
| 9402.3701 | FINWHALE 6РК-698-05 | 6202 2RS / 180202 | From 3500 – 4000 |
| KZATE 9427.3749 | Electromash 977.3701 | SKL 2114-6202 2RS | From 3500 – 4000 |
| 2114-3701010 (HORT) | KATEK 2114-3701010 | Contitech 6PK-1115 | From 3500 – 4000 |
| PRAMO-Electro 2114-3701984 | PRAMO- 3701953 | PRAMO-Electro 2114-3701747 | From 3500 – 4000 |
| *prices are as of July 2022 |
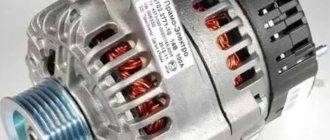
Operating principle of the electrical energy source
There are 8 coils installed in the GU housing. The material is copper, the connection method is “star”. The rotor is a steel shaft, on the back surface of which magnetic circuits are pressed, between which a winding is installed.
What is needed to replace the alternator belt on a VAZ-2114
On a VAZ-2114 car, replacing the alternator belt takes place quite quickly and without the use of special tools. Depending on the replacement method, we will select the necessary tool, and work on replacing the alternator belt on a VAZ-2114 can be done either from under the hood or from the wheel arch.
In terms of time, both methods are almost identical, so if the work is carried out in Murmansk and in December, then it’s easier to do everything from under the hood, and if it’s warm and dry outside, then you can slowly remove the wheel, it’s a little more convenient, or you can replace the belt from -under cars.
Apart from the standard tools and a new belt, you won’t need anything else, except for unforeseen circumstances, such as rusted fasteners, but this happens extremely rarely. In these cases, either WD-40 spray or brake fluid will come in handy. If everything is ready for replacement, all that remains is to install the car on a flat surface, and if we change the belt by removing the right front wheel, then a jack with a wheel wrench will also come in handy. Now that's it, let's go.
Belt removal algorithm
The replacement procedure itself will not create any difficulties, but you should adhere to some general rules, and here is the first of them.
God protects those who are careful, so when doing any work on the on-board electrical system, you need to turn off the power to the car. The easiest way to do this is using a ground switch, and if there is none, then you just need to remove the negative terminal from the battery. This will reduce the risk of an accidental short circuit.
Precautionary measures have been taken, the tool has been prepared, a new belt has been purchased. You can get to work.
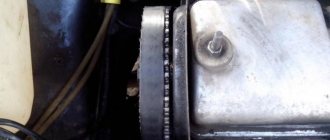
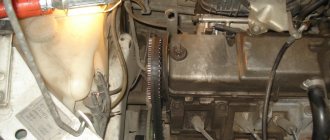
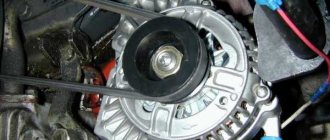
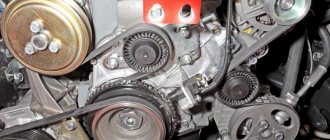
Loosen the nut of the bolt securing the generator housing to the cylinder block
We loosen the belt tension by rotating the bolt counterclockwise
Having moved the generator to the cylinder block, install a new belt
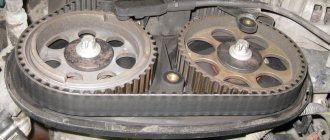
We diagnose the timing belt ourselves
If you decide to carry out diagnostics yourself, when disassembling the system you should pay attention to indicators indicating that the timing belt has failed
Check the condition of the teeth on the belt. After removing chemical contaminants such as oil or gasoline particles, inspect the cleaned section and check its tension properties. Pay attention to the presence of antifreeze on the belt. This chemical must not leak
Its presence can cause irreparable damage to the surface of the belt and render it unusable in a short period of time. If a leak is detected, it is recommended to immediately eliminate its cause. Inspect the belt for various chips, cracks, or areas of change in surface structure. Check the stretch value along the entire length. Determine wear and, if possible, replace the tensioner and rollers. Experts recommend that when changing the timing belt, you also replace components in order to ensure stable operation of the system.
If any of the described signs of timing belt failure are detected, the part must be replaced, this will extend the life of the remaining components of the mechanism. It is easy to calculate that the cost of a new battery, which may break, is several times higher than the price of a belt.
Soon, owners who purchased the domestic Lada Kalina model are faced with the question of replacing the belt that drives the on-board power generator. This is equally interesting to owners of both eight and 16-valve versions of the practical “Russian”. Due to the fact that Kalina motors are endowed with different design features, there are differences in replacing the specified consumable component. The service life of a belt is primarily influenced by factors such as the quality of the product itself and the intensity of use of the vehicle. And only after learning many details can you judge when the alternator belt needs to be replaced.
There are quite a lot of handwritten works on the network about replacing the generator assembly belt, but in our material we will try to explain as clearly as possible all the points that interest the owners. This will be clear even to inexperienced owners of their Lada Kalina, since the work will not require special equipment, expensive tools and “gigabytes” of experimental information. All actions can be carried out, as they say, “on your knees in the yard.”
Adjusting the tension of the generator belt
The belt is installed, but the work is not finished yet. It needs to be tightened and adjusted correctly. In this case, they make two common mistakes - either they tighten the belt until it turns blue, or they don’t tighten it enough. Both one and the other are bad for the engine:
- if the belt is not tightened enough , it will slip on the generator pulley, and the latter, in turn, will not give the required charge to the battery, as a result of which the battery will discharge and quickly fail;
- if the belt is overtightened, the load on the bearings of the VAZ-2114 generator will be too high, which will lead to their premature wear or destruction.
This is why it is very important to correctly adjust the belt tension immediately after installation. Initially, we tension the belt as required by the instructions, after which we start the engine, turn on the maximum consumers of electricity on board and listen to the generator (see “selecting a generator”) - it should not emit an excessive hum or squeak, and with a sharp change in engine speed, the belt does not should slide on the pulley with a whistle.
If everything is normal, turn off the engine and collect the fender liners and mudguards. The new belt may stretch slightly, so after a few kilometers it is worth checking the belt tension again.
Checking the tension of the generator belt
There is another way to calculate the correct belt tension. It is more accurate in terms of generator output. The method is simple and easy to check, and then anyone who has ever used a multimeter can tighten or loosen the belt.
We connect the multimeter to the battery terminals in voltage measurement mode, after which we change the belt tension; if the multimeter readings are unstable, the belt slips along the pulley and needs to be tightened. We tighten the belt until the device readings stabilize. After this, you can verify the correct tension of the alternator belt in the usual way.
In this way, you can quickly and without unnecessary hassle replace the generator on a VAZ-2114 and similar VAZ models. Stable tension and good travels to everyone!
Source
Replacing the alternator belt on a VAZ 2114
To replace the alternator belt on the fourteenth yourself, you don’t need to be a seasoned specialist. Anyone who has ever opened the hood of their car will figure out how to remove the alternator belt and install a new one. This item is for sale. part in any store of domestic auto parts at VAZ, the price is reasonable - from 100 to 400 rubles depending on the region of the country - which does not break the bank.
Having learned that the price of a VAZ 2114 alternator belt is small, you should not rush headlong to the store. Important: before you buy it, find out its size (you can remove it and try it on, or come to the store with the old one); for different cars of the same manufacturer and even the same model, the belt can be of different lengths!
Removal and installation
First of all, you need to remove all unnecessary things, make room for work: it’s good to remove the wheel on the left, the fender and crankcase protection, although many people remove the belt without such unnecessary movements. VAZ is spacious, there is room to turn around under the hood.
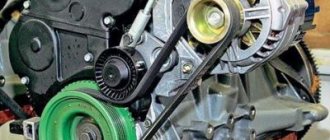
- We start by relieving the belt tension on the generator (to do this, loosen the nut that secures the belt tensioner to the generator).
- It is important to remember (draw, photograph) how the belt is located on the generator, what it is attached to, and how it lies. We will install a new one in the image and likeness.
Installing the alternator belt:
- We remember that we go to the store with the old one and buy the same new one. Also, we take out our sketches and remember how the previous non-working belt lay, what it clung to. The new one must stand in strict identity.
- There is no special installation scheme, everything is already transparent: just install the new one in the same way as the old one, observing all its hooks to the elements of the unit.
- When installed, check how the belt hangs: one or one and a half centimeters is considered the norm.
- Next, there is the process of tensioning the belt on the generator, which is, in principle, similar in complexity to the replacement process (but that’s a different story).
LOCATION
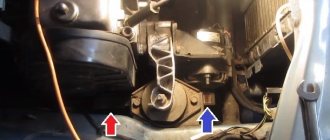
Finding the Alternator belt in a VAZ 2114 is not difficult; when you open the hood, it is immediately visible. There are 2 criteria by which you can easily see it - firstly, it differs from all other belts in that one of its sides is toothed, and secondly, it connects not only the crankshaft and camshaft, but also passes through several small auxiliary parts . If you still don’t understand where it is, let’s first find the generator itself, it is located to the left of the car engine, not far from the right front headlight, on the right side of the passenger compartment - accordingly, the belt is located on the generator itself (logically).
Also, before talking about changing, it is necessary to mention that in any case, no matter how carefully the car is operated, and no matter how often you drive it, the alternator belt will begin to deteriorate. Perhaps it will slide, or maybe it will be eaten away, it doesn’t matter, the main thing is that in any case it will become unusable. Therefore, its condition must be monitored very carefully, because no one wants it to break on a long journey.
You also need to check
On a VAZ 2114, replacing the alternator belt takes no more than half an hour, but you also need to check how the new spare part will work. Part.
— turn on the ignition and start the fourteenth.
— turn on all the electronics that are in the car.
— look at the reaction of the belt: it should not whistle or make noise at maximum load on the generator.
- everything you included should work!
If you install something incorrectly, it can have serious consequences: incorrect operation of the components and those parts on which it is attached, and even disruption of the smooth operation of the engine!
Simple zap. part may whistle - this means that the voltage drop is not well adjusted (for this you need to check the condition of the generator).
A lot of things in a car depend on a properly functioning unit, including a properly functioning alternator belt. You can check your generator quickly, without putting in titanic work and enormous experience:
You need a tester and a faithful friend who will help you press your slippers into the floor while you carry out the measuring work:
- We turned on the ignition - checked the electronics, started it - checked the instrument panel.
- When the engine warms up, turn on everything you can at fourteenth gear: high beams, heater to maximum, and so on.
- The tester is set to voltmeter mode, a friend revs in the range from 3000 to 3500 rpm, you measure, if the device is working properly, the tester will produce a minimum of 13 volts. If it is less, there is a possibility that the belt is loosely tensioned (or there are other breakdowns in the generator circuit or itself, which is not new).
It may make noise due to improper tension (the noise is similar to squeaking).
Naturally, you need to maintain a golden mean in tensioning the belt on the unit. A good indicator is considered to be one that falls within the deflection interval from a centimeter to one and a half, as mentioned above, but this is not for all types of generator, but only for model 37.3701, a smaller range interval - from six millimeters to a centimeter - is typical for the generator model 9402.3701 (the test is passed if you apply approximately ten kilograms of force).
What to choose?
When choosing new protection, it is important to pay attention to the individual characteristics and features of your particular car.
The design of the selected element directly depends on the type of body, the gearbox used, the engine and other parameters. Therefore, when going to an auto parts store, collect all the necessary information.
Sheriff
Based on the experience of VAZ 2114 owners, devices from two brands are excellent for this model.
- Sheriff. Despite the foreign name, it is actually a company from the Russian city of St. Petersburg. To make the protection, the manufacturer uses high-strength steel 2 millimeters thick. The design of the element completely replicates the parameters of the factory device, but has higher reliability and durability. Plus, the Sheriff device is offered with auxiliary wings made of plastic or metal. They allow you to additionally cover the engine space from dirt, dust and other “pests”. Another important advantage of Sheriff devices is two hatches. One is for replacing the filter, and the second is for draining the oil. This will allow you to change the oil or oil filter without removing the protection.
- Titanium. Also a Russian manufacturer that uses hot-rolled steel to produce protection for the VAZ 2114. The thickness of the element can be up to 2.5 millimeters. The popularity of the company is largely due to the fact that for production they use hot rather than cold rolled products. This has a positive effect on the performance characteristics of the part, which are superior to analogues made from cold-rolled steel. Titanium uses stamping, that is, the protection structure is monolithic and not welded. Consequently, we get a durable, reliable design.
Price issue
Despite the fact that replacement is a simple spare part. Generator parts are not a troublesome task, and can be done by mere mortals who want to figure it out; many car owners take their car to a service center. How much does it cost to change an alternator belt is a frequently asked question; the price ranges from 200 to 400 rubles, almost identically coinciding with the price of the spare part for the car itself. Interesting fact: almost all work on replacing, repairing or installing small parts of a VAZ costs the price of these parts.
You don’t have to wait until the strap wears itself out, bursts, or something else happens to it. For example, if you have decent mileage or spare. some cost more than 2 years. In general, a sudden breakdown of the generator does not bode well, especially if you are stuck on the highway. So, timely tech. Inspection and self-diagnosis of the machine’s condition is the best prevention of such dangerous moments.
Source
Replacing the alternator belt on VAZ 2113, VAZ 2114, VAZ 2115
Welcome! Alternator belt - thanks to it, the generator begins its work when the car’s engine starts, and the generator is a very important part in which electric current is generated when the engine is running and this current that is generated in it is sent to the entire on-board network, including the battery (Therefore especially the battery is not discharged when the engine is started, but on the contrary, it is recharged from the generator), thus all devices burn stably (This is if the generator is working) and voltage surges are not observed in them (For example, the dashboard shines either brighter or weaker, perhaps You’ve even seen this in some cars, and it indicates that the alternator voltage regulator is faulty), but if the belt is removed, then the entire load will immediately be applied to the battery (the car will start without the alternator belt, but it will only drive a little and as soon as the battery completely discharged, then all the devices will first turn off in the car and you won’t be able to start it with the key) and therefore you must definitely monitor this belt and, if necessary, change it to a new one when necessary.
Fighting methods
If you are thinking about fighting saffron milk caps on your own vehicle, you need to know about the existing options.
Essentially, all available methods are divided into 2 main categories.
- Mechanical method. This is a set of special measures, the task of which is to clean damaged surfaces, perform priming, puttying and painting of the vehicle body;
- Chemical method. Here we are talking about a slightly different approach. The method is based on special converters and kits aimed at treating damaged areas with anti-corrosion agents.
There is a lot of debate and talk regarding these two methods.
Some adhere exclusively to the mechanical method of processing. Others are sure that there is nothing better than chemical control of saffron milk caps.
In fact, both methods are really good. Moreover, each of them is relevant for certain situations.
It is only important to understand which category your situation falls into.
- Mechanical restoration methods are relevant in situations where corrosion has managed to penetrate quite deeply into the metal elements of the machine. That is, you will have to completely remove all traces, clean the surface and get to clean, intact metal. Here you will need the appropriate tools and devices;
- Chemical options are best used when it is not possible to use the mechanical method. When the area is treated, the rust turns into foam. To remove it, just apply water pressure. Some products help the corrosion harden, after which the area can simply be covered with a layer of paint.
Before choosing one option or another, be sure to study the nature of the damage and its depth. Simple chemistry is not always enough to cope with the problem.
Practice clearly shows that in case of serious metal defects, the use of chemicals gives only a temporary effect, after which rust appears again. Therefore, the optimal solution would be to use a mechanical processing method.