Alternator belt tension VAZ 21214 injector
We check the belt tension by its deflection between the pulleys of the units.
1. With normal belt tension, its deflection under a force of 98N (10 kgf) should be 10–15 mm between the pump pulleys and the generator
2
. . or 12–17 mm between the pump and crankshaft pulleys. We adjust the belt tension by shifting the generator (with its fastening nuts loosened): from the engine to increase the tension or to the engine to decrease the tension.3. To replace the belt, loosen the nut securing the generator to the tension bar with the “17” head on the carburetor engine.4. . or a “13” head - on an injection engine. We move the generator towards the cylinder block to loosen the belt tension.5. We move the generator, acting on it with a screwdriver as a lever in the slot of the tension bar:
on a carburetor engine;
6. on a VAZ-21214 engine.
Install the belt in reverse order. Turn the crankshaft clockwise two turns and check the belt tension. Excessive belt tension causes increased loads on the generator and pump bearings.
The original alternator belt on a VAZ 2121 can serve the driver for about 100 thousand kilometers on domestic roads, such messages came from many owners of the people's favorite. But it is not always possible to find an original alternator belt on the automobile market; the problem is that sellers tend to deceive gullible customers and the service life of the basement belt can be reduced by 2-3 times. Today we will tell you how to replace the alternator belt on a Niva with your own hands in a garage.
When you already have a new alternator belt in your hands, you need to prepare a 17-mm open-end wrench and a convenient place for repairs. As people say, I'll leave this video here.
Video. DIY alternator and drive belt replacement
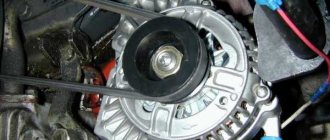
1. The image shows how to properly loosen the alternator belt tensioner nut.
2. When the nut is slightly loosened, you need to move the car's alternator to the side to have good access to the belt. The arrow in which direction you need to move the generator is shown in the photo.
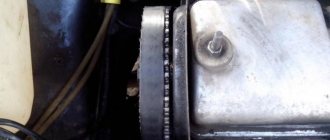
3. Remove the belt from the pump pulley, see the image for more details.
4. The alternator belt has been completely removed, now you can begin installing a new one.
The cost of a new belt is about 100 rubles. We carry out the installation in the reverse order, also do not forget about tensioning the alternator belt, you can watch the video above about this operation.
Insufficient tension on the alternator belt can also lead to its failure. If the belt slips, its full effectiveness is not used. And as we know, this particular part is the connecting link between the generator and the battery, which transfers energy from one unit to another. In simple words, if the belt is not fully used, the battery charge drops.
If you suddenly hear an incomprehensible whistle coming from under the hood of your vehicle, you should know that water has gotten onto the stretched alternator belt. This means that you need to replace it and tighten it well. To do this, you will need a 17mm ratchet wrench and a 19mm socket wrench.
How to tighten the VAZ 2121 alternator belt
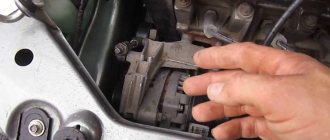
1. Open the hood and unscrew the nut that secures the generator and tensioner plate.
2. Do not loosen the fastening nut too much.
3. Now you can tighten the belt. This is done like this: grab the tensioner nut with your hand and move the generator down. If you move it up, the belt, on the contrary, will loosen.
4. When the correct position is found, tighten the tensioner nut. 5. Tighten the bottom bolt and start the engine. If you hear extraneous noises or see that the belt is slipping, you need to repeat the procedure.
6. Testing must be carried out with the maximum number of electrical appliances turned on. 7. If in this case the battery produces at least 13 Volts, then everything is done correctly.
Many drivers overdo it and tighten the belt too much, forgetting that this can lead to bad consequences. Among them is belt stretching and, as a result, slippage and bearing wear. Pay close attention to your car and pay attention to extraneous sounds. Let's remember that in the previous article we talked about
Nuances
When replacing a generator with a Niva 21213, 2121, 21214, a number of subtleties arise, and one of them is the location of the generator unit. It is located at the bottom of the engine compartment.
Actually, this is why problems arise with the operation of the structure: while driving, various contaminants get on the generator, and coolant drips. If you don’t want to constantly change the generator unit, it is recommended to move it upstairs.
To ensure that no problems arise during the operation of the car, it is important to monitor the condition of the car. First of all, it is recommended to regularly inspect the generator.
So, when the “battery” light blinks on the dashboard, if suspicious noises or creaking sounds occur, you should be wary and think that the generator is not working correctly.
Timely inspection will help to avoid unpleasant situations in the form of breakdowns of the constituent elements of the generator, and as a result, failure of entire electrical systems.
Read news about the new Niva
Do-it-yourself replacement and tensioning of the alternator belt
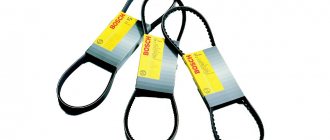
The service life of the belt in the field is 50,000 - 100,000 thousand kilometers, then it is recommended to replace it with a new one to avoid breakage and rattling, of course there is nothing terrible in this when it whistles, but it is slightly annoying, and the generator works worse. The most important thing is to supply an original, high-quality belt, which is not so easy to find now. But there are good imported manufacturers Bosh and Gates size 940x10.
Possible causes of whistling:
- Liquids, antifreeze, oil, etc. get on the generator pulley.
- Bearing wear in the generator.
Examination.
The correctly tensioned alternator belt on a Chevrolet Niva can be checked by pressing on it at point P indicated in the figure. With a force of 75N, the permissible deflection should be 1-1.2 centimeters.
It is possible to more accurately measure the tension level only in a service station that has the necessary equipment for this. The same applies to tightening the nuts. The manufacturer recommends tightening with a force of 20-25 N*m. A special torque wrench is used for this.
The need for periodic inspection.
The main feature of the Chevrolet Niva engine is that in addition to the generator, this belt also drives the cooling system pump. If it is weakened, then over time it may slip and, in addition to insufficient voltage supplied by the generator, there is a risk of engine overheating as a result of the pump stopping. The risk of higher wear and tear on the pulleys it drives also increases due to increased vibration.
An overtightened belt also leads to severe wear of the bearings. In addition, you may notice a whistling sound when the engine is running, which indicates that it is experiencing strong friction and as a result is overheating.
DIY replacement process.
The tool you need is a 17mm wrench or a ratchet wrench.
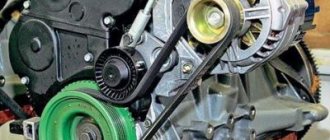
First of all, unscrew the belt tensioner nut as in the picture below.
Next, you need to remove the engine protective sheet and unscrew the lower nut.
Now it is weakened and you can try to move it. The arrow shows the direction of movement.
The belt is free and can now be removed.
Adjustment
To start adjusting the Niva Chevrolet alternator belt, you need to loosen 3 nuts. They don't unscrew completely. 1-2 turns are enough to begin further work.
The adjustment assembly fastener is indicated in the image above and marked with an arrow. To carry out this procedure you will need a key number 13.
The adjustment is made with the same key set to 13. By rotating the screw in the direction of unscrewing, loosening occurs; if you rotate it in the other direction, tightening, then tension occurs.
How to tighten the alternator belt on Niva 21214
In winter, the generator belt began to whistle from time to time. And the further, the stronger and more often. I was going to tighten everything up, but I couldn’t get around to it. And then I decided to replace both the alternator belt and the power steering belt. So to speak, for prevention. I don’t know if the previous owner changed it, and if so, when. And yesterday I decided to go for a ride and play Ingress, the belt whistled loudly. I started monitoring the voltage level in the network using the dashboard. The level was low, sometimes dropping to 12.5 V. I thought it was time to go home, but after warming up the engine everything became more or less so. I decided not to tighten it, buy belts and change them. This is what I did today.
After reading reviews on belts, I decided that I would take Bosch or Gates. Our stores offer Balakovo BRT and Gates. Sellers speak positively about both. I decided to take Gates, 140 rubles. Belts of the same length for the generator and power steering: 938 mm. Balakovo 944 and 838 mm for the generator and power steering, respectively. However, the difference is not significant.
In order to replace the alternator belt on 21214, it is necessary to remove the protection. On 21213 with the old protection it seems that you can get to it anyway. Also, for ease of operation, it is necessary to remove the crankshaft position sensor. Oh, and I tinkered with this protection when installing it in place. It’s not very convenient for one person, but without a pit. =)
So, remove the protection, loosen the nuts on the generator and power steering. We remove the power steering belt, remove the crankshaft position sensor, remove the generator belt. Install in reverse order. We tighten the belts and fix them. The main thing is not to over-tighten.
I replaced the belts, all is well. After 50 kilometers I will check the belt tension.
Lada 4x4 (VAZ-21214):
Checking the condition and replacing the accessory drive belt
In accordance with the maintenance regulations, we check the condition of the drive belt of auxiliary units every 10 thousand km.
To check the condition of the belt.
. press the belt with your finger in the middle between the generator and coolant pump pulleys.
With a pressing force of about 8.0 kgf, the belt deflection should be 12 ± 1 mm.
To adjust the belt tension, remove the rubber hoses for supplying air to the throttle assembly.
Using a 13mm socket, loosen the three nuts securing the tension roller bracket.
Location of the accessory drive belt and tension roller bracket mounting nuts (shown for clarity with the engine cooling system radiator removed)
Using a 13mm wrench or socket, rotate the adjusting bolt clockwise, tensioning the belt.
Tighten the nuts securing the tension roller bracket. We start the engine, stop it and check the belt tension again. Do not overtighten the belt! Excessive belt tension leads to premature failure of the alternator belt and bearings, coolant pump and power steering pump. We replace the drive belt for auxiliary units when cracks, ruptures and detachments of rubber from the fabric base are detected on it. On a car with air conditioning, remove the air conditioning compressor drive belt (see “Checking the condition and replacing the air conditioning compressor drive belt,” p. 42).
Loosen the nuts securing the tension roller bracket
(see above) and rotate the adjusting bolt counterclockwise, loosening the belt tension.
Marking of the auxiliary drive belt (five-strand, 1888 mm long).
We install the new belt in the reverse order, putting it first on the crankshaft pulley, and last on the tension roller. After installation, adjust the belt tension (see above).
Insufficient tension on the alternator belt can also lead to its failure. If the belt slips, its full effectiveness is not used. And as we know, this particular part is the connecting link between the generator and the battery, which transfers energy from one unit to another. In simple words, if the belt is not fully used, the battery charge drops.
If you suddenly hear an incomprehensible whistle coming from under the hood of your vehicle, you should know that water has gotten onto the stretched alternator belt. This means that you need to replace it and tighten it well. To do this, you will need a 17mm ratchet wrench and a 19mm socket wrench.
How to tighten the VAZ 2121 alternator belt
1. Open the hood and unscrew the nut that secures the generator and tensioner plate.
2. Do not loosen the fastening nut too much.
3. Now you can tighten the belt. This is done like this: grab the tensioner nut with your hand and move the generator down. If you move it up, the belt, on the contrary, will loosen.
4. When the correct position is found, tighten the tensioner nut. 5. Tighten the bottom bolt and start the engine. If you hear extraneous noises or see that the belt is slipping, you need to repeat the procedure.
Removal and installation of the generator of the injection engine Niva 2121, VAZ 2131, Lada 4x4
Generator device Niva 2121, Niva 2131, self-repair
Disconnect the negative cable from the battery. Remove the oil sump protective plate and the right fender of the Niva 2131 engine (see Removing the oil sump protective plate and mudguards of an injection engine).
Disconnect the wire from terminal “D” of the generator.
Sliding the rubber cover, use a “10” wrench to unscrew the nut that secures the wires to terminal “B”...
. and shoot him.
Remove the VAZ 2131 coolant pump drive belt (see Adjusting the tension and replacing the coolant pump drive belt).
Using a “13” socket, unscrew the nut of the bolt securing the generator to the tension bar.
Using a “13” wrench, unscrew the nut of the lower bolt securing the generator to the bracket on the cylinder block and remove the bolt. Remove the generator from the engine compartment.
Having freed the three protrusions of the body,...
. with them.
Use a Phillips screwdriver to unscrew the two screws...
. and remove the voltage regulator using the brush holder.
Disconnect the cable and remove the voltage regulator with brush holder.
Using a “10” wrench, unscrew the nut...
Replacing the NIVA alternator belt. Alternator belt after 25 km on NIVA 21214
The alternator belt on a VAZ 21214 NIVE with power steering is replaced after removing the belt from the power steering
Replacing the NIVA VAZ 21214 power steering belt. Tensioning the NIVA power steering belt
Replace the NIVA power steering belt for 5 minutes. The pump bearing and oil seal fail faster if...
... Remove the bushing and capacitor terminal.
Unscrew the screw with a Phillips screwdriver...
...Remove the capacitor.
Using a Phillips screwdriver, remove the screw that secures the rectifier unit and the three screws that secure the ends of the stator windings.
Insulating washers are placed on the screws securing the ends of the Niva 2121 stator windings.
We remove the ends of the stator windings...
. and remove the rectifier.
Using the “21” wrench, unscrew the pulley fastening nut, holding the rotor with the “8” hexagon.
Remove the washer and pulley parts.
Remove the washer from the rotor shaft.
Using a Phillips screwdriver, remove the four screws that secure the covers.
Using a sharp scratch or paint, we mark the relative positions of the covers and the stator for subsequent assembly.
Lifting it with a screwdriver...
... Disconnect the front cover with stator and the rear cover with rotor.
Using a screwdriver, pry up the stator of the VAZ 2131.
. remove it from the front cover.
A punch placed strictly at the end of the rotor shaft (so as not to damage the plastic sleeve located under the slip rings)…
... Remove the rotor with bearing from the back cover.
Use a puller to squeeze out the bearing from the rotor shaft of the Niva 2121 generator.
We press the new bearing to the shaft with a suitable piece of tube, applying force to the inner ring.
Using a tester, we check the stator and rotor windings of the Niva 2131 generator for an open circuit or short circuit on the housing.
Replacing the alternator belt VAZ 21214 injector
PS. Now I’m thinking of trying to install a 110-120A generator that comes with a VW Passat or other Germans. An electrician from a car repair shop recommended this to me. He has crazy music and he thinks that the current reserve will not hurt. True, the new GENA from VW is expensive, 280-340 USD. depending on the model. They are made by BOSCH. Maybe I'll find a used one.
Welcome, friends, to the DIY car repair website. Owners of VAZ cars often encounter a situation where the alternator belt whistles when starting the engine.
In such a situation, most beginners see only one way out - replacing the allegedly worn-out element. In reality, you shouldn't make rash decisions.
Sweetness can be caused by a number of reasons that can be eliminated with your own hands and at minimal cost.
Niva Chevrolet
This car is significantly different from the classic Niva, therefore. and its components are completely different. In the Chevy Niva, the air conditioning compressor is driven by a separate belt. The alternator belt rotates the power steering, alternator and pump. Due to the large amount of equipment, the belt length is quite long.
| Model | Equipment | Belt type | Belt size, (mm) | Belt number | vendor code |
| Chevrolet | Pump, Generator, Power Steering | Poly-Vline | 1888 | 5PK1888 | 2123-1041020-30 |
Niva Chevrolet air conditioner belt dimensions
Source
Features and possible causes of alternator belt whistling
To “cure” the problem, you must clearly understand the intricacies of the generator and the likely causes of the malfunction. Also read the article on how to check the diode bridge of a generator.
The main purpose of the generator is to power the electrical equipment of the car. But how is constant rotation of the rotor ensured?
There are special pulleys on the engine crankshaft and the generator shaft on which the belt is tensioned. After starting the engine, the crankshaft begins to rotate, driving the generator rotor.
The appearance of a squeak is due to increased friction of the belt on the generator pulley (crankshaft) or normal slipping.
In practice, the causes of squeaking and whistling may be the following:
- Increased belt wear. Sometimes even additional tension does not help.
- Contact of various liquids (antifreeze, oil, etc.) on the generator pulley (crankshaft) or directly on the belt.
- Poor quality belt.
- Bearing wear in the generator.
This malfunction most often occurs at increased loads. The bearing may whistle or rattle. In such a situation, only replacement with your own hands or at a service station can help out.
Rollers
Drive belt tension roller and parasitic roller. Here, perhaps, only one thing needs to be said: the cause of failure of drive belts in most cases is the rollers. As soon as the bearing or the plastic on the bearing begins to play, immediately after this the belt begins to “eat”. I didn’t see all kinds of rollers in the store: both blue and green ones))) I’ll just say that while GM controlled deliveries to the assembly line, rollers from the German company INA were installed on the engines. You can find a German video in stores and sellers, but be careful. The INA manufacturer's name must appear on both the bearing and the plastic part of the roller.
Source
Diagnosis and elimination of alternator belt whistling
Is the alternator belt whistling in your car? - Don't panic. The first thing you need to do is do a little diagnostics. Inspect the belt for obvious damage.
Check that it is well tensioned and that there is no obvious shift in the pulley line. Pay special attention to the surface of the belt - there should be no liquids on it.
After the inspection, you will be able to draw preliminary conclusions and make a decision on further repairs:
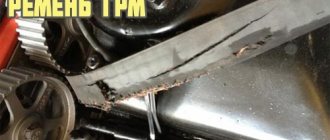
If the belt is visually damaged, there are serious cracks on the surface, and the edges are frayed, then you cannot do without replacing the belt. At the same time, buy only original parts for your VAZ model.
Otherwise, after a couple of thousand kilometers you will encounter this problem again. By the way, low-quality Chinese fakes often “whistle” immediately after installation.
Is there obvious contamination on the belt (oil, antifreeze)? — Carefully clean the belt from excess dirt (if possible). If dirt has become embedded in the product and cleaning does not produce visible results, then it is better to replace the alternator belt.
If no external problems are found, move on to the mechanical part. Check tension. To do this, press the belt at the midpoint between the crankshaft and generator pulleys.
The optimal level of deflection is about 6-8 mm. If this parameter turns out to be larger or smaller, adjustment is necessary.
Let us immediately note that for each VAZ model the setup process may be slightly different. We will consider the general case.
Prepare a ratchet handle, a spanner set to “19”, a deep socket set to “17”, and also reserve 15-20 minutes of personal time.
Old-style power steering pump drive pulley (V-belt) for VAZ Niva
Alternator toothed belt 10.7x8x944 for VAZ 2101-2107 and VAZ 2121, 21213, 21214, 21213, 21214, 21218, 2131 Niva cars without power steering.
Catalog number: 2107-1308020.
VAZ-2121, 21213-15, 2129-31 are a famous family of SUVs that have gained enormous popularity from the first day the production model appeared in 1977. The VAZ-2121 Niva is a basic model, which is based on a monocoque three-door station wagon and a transmission with permanent all-wheel drive.
During the production of this car, many different modifications were designed and manufactured regarding the body structure, appearance, engine used and many other elements of the car. For example, the VAZ-21213 “Taiga” is a redesigned restyled version of the base car, the VAZ-21214 is a model with a domestic 1.7-liter engine, and the VAZ-21215 was equipped with the French Peugeot XUD 9SD engine. A special place is occupied by specimens converted for commercial use. In particular, the VAZ-2129 “Utility” is a model extended by 500 mm with two front seats and a cargo body, and the VAZ-2131 is an extended five-door station wagon.
Due to the huge number of modifications, it is difficult to talk about a specific group of spare parts that are in greatest demand. However, it should be noted that for many years there has been a steady interest in the details of the classic basic version of the Niva.
Replacing the alternator belt on a VAZ 21214 Niva injector
Alternator belt tightening sequence
Using a “17” wrench, slightly unscrew the upper fastening nut connecting the generator to the bracket.
Loosen the fastening nut at the bottom (just unscrew it a few turns).
If you need to loosen the belt, grab the generator and pull it towards you (if you need to tighten the belt, pull it away from you). After which it is necessary to tighten the nuts and check the operation of the generator.
Before starting the engine, turn on several main consumers, for example, the stove, high beams and heating. If the whistle disappears and the charging level remains at a normal level, then the work can be considered successful.
At the same time, remember that over-tightening is also unacceptable (this can lead to increased wear on the pulleys and belt).
If replacement is necessary, the sequence of actions is similar. Loosen until the belt is removed from the pulleys. Don't forget to read the article about replacing the timing belt.
There are situations when the alternator belt whistles from time to time, for example, when the temperature drops or humidity increases outside.
In this case, you can use special additives (sold in standard cans). The method of application is very simple.
Drive tension
The ignition must be turned off. After this, open the hood and remove the plastic trim. Then loosen the air duct clamp. You can use a regular screwdriver for this.
Then use a 10 mm socket wrench to unscrew the screw holding the air filter. After this, remove the air duct from the filter housing. At this point the preparation stage can be considered complete.
Removing the timing belt
The manipulations that we will discuss below should be carried out only on cars equipped with Opel engines.
When replacing the timing belt on a Chevrolet Niva, follow these steps.
- Remove the air conditioning and cooling radiators completely. Before this, of course, you will have to drain the liquid from the cooling system and bleed off the freon. There is no need to remove the fans from them.
- Remove the A/C compressor and alternator drive belts. Be sure to remove the tension mechanisms as well.
- Remove the upper part of the timing housing.
- Place marks on the shaft gears. They must definitely match. There is a notch on the engine crankcase that should match the mark on the pulley.
Remove the air purification filter housing.