What are the consequences of incorrect timing belt tension for the VAZ-2114 engine?
The timing belt has almost slipped. Pay attention to the gap from the belt to the engine, it is uneven
If the belt is significantly displaced, a picture similar to its complete break may be observed. Therefore, it is necessary to pay serious attention to the correct tension of the timing belt, both when replacing it and during operation of the vehicle. You can do this yourself, but be careful and be sure to follow the instructions below.
Proper tension (order and process)
Before you begin tensioning the timing belt, you must turn off the engine after idling in neutral gear. In this case, the engine crankshaft will stop in a position where all the forces acting on it will be balanced. Now let's start tensioning.
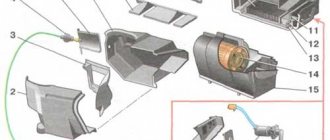
- Remove the belt protective cover.
The casing has been removed. We inspect the belt
Video of replacing and tensioning the timing belt on a VAZ-2114
Recommendations
Excessive belt tension causes increased wear on the water pump bearings and tension pulley. If the belt tension is weak, the valve timing may be disrupted due to the belt jumping over the teeth on the camshaft pulley. In addition, improper adjustment leads to increased belt wear.
Rotate the crankshaft only by the bolt securing the pulley to it (do not turn the crankshaft by the camshaft pulley).
The tension roller is turned with a special key. If it is not available, you can use a screwdriver and two suitable pins ∅ 4 mm (for example, drills) that fit tightly into the holes of the roller.
Correctly tensioning the timing belt on production vehicles is a simple procedure, but it requires certain special knowledge.
The algorithm of actions may vary slightly depending on the model of the power unit, and not on the make of the car. There are differences in the procedure for replacing and tensioning the belt on 8-valve and 16-valve engines. Read on to find out how to tighten the timing belt on both types of car hearts.
Four-cylinder eight-valve power units are more often found on:
Sixteen-valve engines are mainly used:
A number of cars of the Samara 2 family were also equipped with 16-valve engines. In addition, such engines were also installed on models 2110-2111.
conclusions
Incorrect timing belt tension will lead to accelerated wear.
Accelerated wear of the timing belt due to incorrect tightening.
The engine on a VAZ-2114 does not bend the valve when the timing belt breaks, but still, there is a risk of getting up at night in a dark field in our big country. You will be lucky if the belt breaks at home or at work, and not on a long trip. To prevent this from happening, you need to set the timing belt correctly, as we wrote above!
Source
When to tension the timing belt
The timing belt of the VAZ-2112 and other VAZ models is tensioned in the following cases:
If the cause of the intervention is a broken or “slipping” belt, you must first ensure the integrity of the valves. A broken gas distribution mechanism (drive) leads to engine damage on 16-valve 1.5-liter power units. However, in cases of drive failure at high speeds, valves and CPGs are also destroyed on other engines.
They check the operation of the timing belt on the VAZ-2114 and other models equipped with 8-valve units by turning the camshaft manually. A working mechanism should turn with some effort. A faulty one, as a rule, cannot be affected.
During the procedure, it is necessary to check the compression in each of the cylinders. The easiest way to do this is to tightly cover the spark plug hole with paper. If there is pressure in the cylinder, the plug is knocked out of its seat at a certain stage of camshaft rotation. » alt=»»> A similar check on 16-valve engines is not recommended. The risk of damage to an initially good valve mechanism is too great. There are no grooves in the pistons of one and a half liter engines of this type. Therefore, valves that move down bend when they contact the piston surface.
Quick replacement of the timing belt on a VAZ 2114 with an 8-valve engine
Today I came to visit my old friend, barbecue and all that, and in between, a small maintenance on his freshly painted VAZ 2114, replacement of the timing belt, rollers and pump. This car has a standard eight-valve engine and this greatly simplifies the matter, since on this engine the procedure for replacing the timing belt takes 30 minutes. In our case, the timing belt was eating up a little on the inside and one of the oil pump bolts was to blame for this, we’ll talk about this at the end of the article.
On the VAZ 2114 engine there are 8 valves, if the timing belt breaks, the valve does not bend.
Under standard conditions, the timing belt replacement interval is 60 thousand kilometers or four years of operation, whichever comes first. The replacement interval can be increased to 80 thousand with periodic monitoring of the condition of the belt, roller and pump.
Stories from our readers
“Fucking basin. "
Hi all! My name is Mikhail, now I’ll tell you a story about how I managed to exchange my two-wheeler for a 2010 Camry. It all started with the fact that I began to be wildly irritated by the breakdowns of the two-wheeler, it seemed like nothing serious was broken, but damn it, there were so many little things that really started to irritate me. This is where the idea arose that it was time to change the car to a foreign car. The choice fell on the melting Camry of the tenth years.
Yes, I had matured morally, but financially I just couldn’t handle it. I’ll say right away that I am against loans and taking a car, especially not a new one, on credit is unreasonable. My salary is 24k a month, so collecting 600-700 thousand is almost impossible for me. I started looking for different ways to make money on the Internet. You can’t imagine how many scams there are, what I haven’t tried: sports betting, network marketing, and even the volcano casino, where I successfully lost about 10 thousand ((The only direction in which it seemed to me that I could make money was currency trading on the stock exchange, they call it Forex. But when I started delving into it, I realized that it was very difficult for me. I continued to dig further and came across binary options. The essence is the same as in Forex, but it’s much easier to understand. I started reading forums, studying trading strategies. I tried it on a demo account, then opened a real account. To be honest, I didn’t manage to start earning money right away, until I understood all the mechanics of options, I lost about 3,000 rubles, but as it turned out, it was a precious experience. Now I earn 5-7 thousand rubles a day. I managed to get the car buy after half a year, but in my opinion this is a good result, and it’s not about the car, my life has changed, I naturally quit my job, I have more free time for myself and my family. You’ll laugh, but I work directly on the phone)) If If you want to change your life like me, then here’s what I advise you to do right now: 1. Register on the site 2. Practice on a Demo account (it’s free). 3. As soon as you get something on the Demo account, top up your REAL ACCOUNT and go to REAL MONEY! I also advise you to download the application to your phone, it’s much more convenient to work from your phone. Download here.
As a result, if the timing belt tension is correct, then when the casing is removed, its long part will fluctuate within 1 cm. from the axis.
Step-by-step instructions for replacing the timing belt
- And one in front, remove the cover. Key for 10.
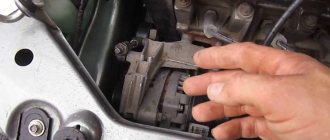
- Remove the generator drive belt. Loosen the locking nut, set the wrench to 13 and unscrew the tension bolt, set the wrench to 10. Move the generator towards the cylinder block.
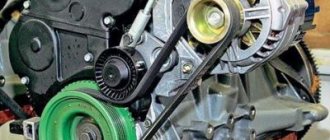
Alternator belt tensioning mechanism.
- If you cannot move the generator, you need to loosen the fastening nut from below. The key is 17.
Generator mounting.
Set the top dead center
- We ensure that the mark on the camshaft toothed pulley (hereinafter referred to as simply an asterisk) matches the mark on the metal casing.
Camshaft mark.
- The mark on the crankshaft sprocket should also coincide with the low tide on the oil pump.
Crankshaft mark.
- We unscrew the crankshaft pulley bolt, having previously locked the crankshaft. We block the rear wheels, engage fifth gear and insert a screwdriver into the ventilation hole of the brake disc below the caliper. 17mm head with extension and pipe as a lever.
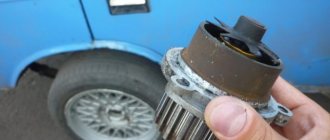
- Unscrew the nut securing the tension roller and remove it along with the old timing belt.
Fastening the tension roller.
Replacing the pump
Put one round of electrical tape around the camshaft, this will prevent you from losing a key!
Usually it gets very stuck, so a pry bar will help us here.
- Lubricate the pump gasket with a thin layer of sealant and install the pump in place. We install the protective casing and tighten all the bolts evenly.
Pump mount.
Installation process
The timing belt itself is a rubber product closed with teeth inward, which synchronizes the torque between the camshaft and crankshaft. Ignoring its wear will not lead to anything good, because in the best case, your engine will stall while driving, and in the worst case, the entire wheelbase will jam, which can lead to the most unpredictable incidents on the road.
The replacement and debugging itself is carried out in two stages, in the first stage the main repair and debugging work is carried out, and the second stage carries the function of monitoring the work done.
First stage
- The assistant gets into the car and puts 5th gear in the gearbox, and at this time you remove the front belt protection.
- Insert the ratchet into the place allocated for it and begin to turn the crankshaft, you need to do this until you see that the mark located on the camshaft has not moved to remove several teeth from the control antenna of the rear cover. (this action is necessary to reduce the degree of belt tension).
- We dismantle the drive pulley on the crankshaft and return the mounting bolt to its place.
- The assistant switches the gearbox to “neutral”.
- Again, we begin to carefully turn the crankshaft until the mark on the VAZ 2114 flywheel is in the central position.
Second stage (control-final)
- Before checking the timing marks on the VAZ 2114, you need to fix the pulley on the generator and tension the belt with a roller to the maximum.
- Now we check all the matches, if nothing is wrong anywhere, then we install the protection back and clean the workplace.
Looking under the hood of your car, with knowledge of this information, you will understand that there is nothing difficult in this procedure, but its success is quite dependent on the skill of the performer. Therefore, if something doesn’t work out the first time, just repeat the operation, you may even need to do it twice. Don’t be discouraged, because after the difficult first time it will only take you a few minutes, like a seasoned professional.
Installing a new timing belt
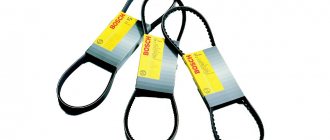
- We get a new timing kit, in our case from Gates.
Gates timing kit.
- For a VAZ 2114 engine with 8 valves, it contains a toothed belt and a tension roller.
- If anyone needs it, the article number on the box is as follows.
- We check that all marks match. We install the tension roller in place, but do not tighten the nut. Next, install a new timing belt, put it first on the crankshaft sprocket, then on the camshaft sprocket, tension roller and pump. We make sure that the descending branch of the belt is tensioned.
- Using a special wrench, turn the tension roller and tighten the timing belt. Tighten the nut.
- The correct tension is considered to be one in which, with two fingers, we can turn the timing belt in the longest section by a maximum of 90 degrees.
A new timing belt has been installed.
- We install all parts in the reverse order of removal. Fill with antifreeze.
This procedure is so simple that you can do it yourself even without a garage, just in the courtyard of your house.
Causes of toothed belt wear on VAZ 8 valve engines
- Wear of the timing belt on the front side is the main cause of a worn pump, but sometimes it can also be the tension roller stud and, in very rare cases, the camshaft sprocket. To eliminate this problem, replace the worn part.
- Wear on the rear side is much less common. The main reason is the bolt on the oil pump. Over time, the belt tension weakens a little and, vibrating, it begins to reach this bolt. It’s very easy to fix this problem; we replace the Torx sprocket bolt with a regular 10mm socket, its head is smaller and the timing belt is no longer missing. The photo shows wear from the belt.
How to check and adjust the timing belt on a VAZ 2113, 2114, 2115
It is recommended to check the timing belt every 15,000 km during the next maintenance.
To perform this work, you will need a timing belt tensioner.
Using a 10mm wrench, unscrew the 3 bolts securing the front timing belt cover.
Lift it vertically up and remove it from the engine.- We turn the crankshaft and visually check the condition of the belt. The crankshaft can be turned with a 17 or 19 wrench using the pulley bolt. Visually the belt should be clean. If the belt shows signs of wear, cracks, or delamination, it definitely needs to be replaced.
Try turning the belt 90 degrees with two fingers. You need to pull in the area between the crankshaft and camshaft pulleys, applying a force of 15–20 N m (1.5–2.0 kgf m). If you can’t turn it, it means the belt is too tight. If the belt can be turned to a greater angle, it is loosely tensioned. Attention! The belt must be adjusted on a cold engine. An overtightened belt will shorten the life of the belt itself, the tension roller bearings and the coolant pump. Weak belt tension can cause the belt to jump over the camshaft teeth.- In order to check the relative position of the camshaft and crankshaft, you need to install the piston of the 1st cylinder at TDC of the compression stroke. For this:
a) It is necessary to remove the plug in the upper part of the clutch housing.
b)
In this window, use a screwdriver to turn the crankshaft by the teeth of the flywheel ring
until the mark on the camshaft pulley and the protrusion of the rear timing belt cover align.
In this case, the mark on the flywheel should align with the center of the scale.
If the relative position of the crankshaft and camshaft is disturbed, then turn the crankshaft until the mark aligns with the center of the scale. Loosen the belt tension and remove it from the camshaft pulley. Turn the camshaft until the mark on its pulley aligns with the protrusion on the rear cover. Without changing the relative position of the shafts, put the belt on the camshaft pulley and adjust the belt tension.
7. Use a 17 mm wrench to loosen the tension roller mounting nut.
8. By turning the roller with a special wrench, we adjust the belt tension and, holding the roller in this position, tighten the nut that secures it.
9. Check the belt tension (see above) and, if necessary, repeat the adjustment.
10. Finally tighten the roller fastening nut to a torque of 33.2–41.2
11. Reinstall the front belt cover and tighten its fastening bolts.
In conclusion
Correct operation of the timing system is the key to reliable and proper operation of the engine. Therefore, you should be very careful both in caring for this system and the belt, and in protecting it. Many domestic car enthusiasts like to drive without a protective cover, which should not be done under any circumstances if you do not want to reduce the replacement cycle by half.
Afterwards it should be tensioned correctly. Let's talk about this. Timing belt tension VAZ 2110, 2111 (8 cl.) To adjust the belt tension, turn the crankshaft counterclockwise so that the mark on the camshaft pulley moves down from the rear cover antenna by two teeth. Checking the timing belt tension means that the front branch of the belt is twisted 90° with the thumb and index finger of the hand with a small force of 1520 N (1.52.0 kgf). Here the questions arise: how to calculate the force? Everyone's finger strength is different, how to find the appropriate strength? It is necessary to tighten the timing belt so that at the longest section, try to turn it 90 degrees with 2 fingers; if you practically succeed, then the belt is tensioned normally. Try to tighten the timing belt and keep in mind that if the belt is too tight, you won’t be able to turn it 90 degrees with your fingers. if you didn't make it. the belt will dangle and hit the plastic casing (this should not happen). We tighten it until the sound disappears at idle and when accelerating. For this reason, if the timing belt is tensioned correctly, then when the casing is removed, its long part will fluctuate within 1cm. from the axis. Tensioning the timing belt VAZ 2112 (16 cells) Using a special wrench, tension the timing belt with a tension roller. If it is not there, then there is an option to tighten the timing belt using 2 nails and a screwdriver, which will be installed on them. There is also an option to transform a table fork into a suitable tool by breaking off 2.7 central teeth, and shortening and bending the last ones. Having turned the crankshaft two turns in the direction of rotation, we check the alignment of the installation marks. We check the tension of the toothed belt in the middle part of the branch between the camshaft pulleys. The belt deflection should be 5.4–0.2 mm. under a load of 100 N (10 kgf). And how to check the timing belt tension without a special tool? How do you figure out how much pressure you need to put on the timing belt? Method 1. Use 10kg. weights and ruler. Place a ruler on the belt between the pulleys, and a weight on the ruler. We pull so that the deflection from the plane is already 5mm. Method 2.4. Use steel scales. Attach the hook of the scale in the center of the belt between the pulleys and pull them upward until the reading on the scale is 10 kg. Then we measure the distance by which the timing belt has deviated (should be 5.4–0.2 mm). When, the same tool is used to tension the generator belt and nuts: Similarly with 8kl. motors: if you didn’t make it. the belt will dangle and hit the plastic casing.
How to check and adjust the timing belt on a VAZ 2113, 2114, 2115
It is recommended to check the timing belt every 15,000 km during the next maintenance.
To perform this work, you will need a timing belt tensioner.
- Using a 10mm wrench, unscrew the 3 bolts securing the front timing belt cover.
- Lift it vertically up and remove it from the engine.
- We turn the crankshaft and visually check the condition of the belt. The crankshaft can be turned with a 17 or 19 wrench using the pulley bolt. Visually the belt should be clean. If the belt shows signs of wear, cracks, or delamination, it definitely needs to be replaced.
- Try turning the belt 90 degrees with two fingers. You need to pull in the area between the crankshaft and camshaft pulleys, applying a force of 15–20 N m (1.5–2.0 kgf m). If you can’t turn it, it means the belt is too tight. If the belt can be turned to a greater angle, it is loosely tensioned. Attention! The belt must be adjusted on a cold engine. An overtightened belt will shorten the life of the belt itself, the tension roller bearings and the coolant pump. Weak belt tension can cause the belt to jump over the camshaft teeth.
- In order to check the relative position of the camshaft and crankshaft, you need to install the piston of the 1st cylinder at TDC of the compression stroke. For this:
a) It is necessary to remove the plug in the upper part of the clutch housing.
b)
In this window, use a screwdriver to turn the crankshaft by the teeth of the flywheel ring until the mark on the camshaft pulley aligns with the protrusion of the rear timing belt cover. In this case, the mark on the flywheel should align with the center of the scale.
If the relative position of the crankshaft and camshaft is disturbed, then turn the crankshaft until the mark aligns with the center of the scale. Loosen the belt tension and remove it from the camshaft pulley. Turn the camshaft until the mark on its pulley aligns with the protrusion on the rear cover. Without changing the relative position of the shafts, put the belt on the camshaft pulley and adjust the belt tension.
7. Use a 17 mm wrench to loosen the tension roller mounting nut. 8. By turning the roller with a special wrench, we adjust the belt tension and, holding the roller in this position, tighten the nut that secures it.
9. Check the belt tension (see above) and, if necessary, repeat the adjustment.
10. Finally tighten the roller fastening nut to a torque of 33.2–41.2
11. Reinstall the front belt cover and tighten its fastening bolts.
Video on the topic:
How to determine that the belt twisting force is 2 kgf?
I remembered that I read somewhere a long time ago that you can tighten the belt with a household dynamometer using a special key. I bought a key on the market for 50 rubles, but it turned out to be impossible to work with it. I had to bend it into an “G” shape, screw the sector in place and make recesses for the dynamometer hook. The length of the arm from the key pins to the point of application of the torque force is 80 mm.
Special key for adjusting the timing belt tension. The distance from the pins to the groove for the dynamometer hook is 80 mm. As it turned out later, the key can be used without an additional sector
And then everything is simple. We put the x17 key on the driven gear nut and, lightly tapping it with your hand, select the slack in the drive belt branch. Next, we insert a special key into the holes of the roller axis, engage the key rod with a dynamometer and create a force of 2.5...3.0 kgf. Holding the special wrench by the sector, tighten the roller nut. The main thing here is not to overdo it and not tighten the nut with a torque of more than 4.2 kgcm, otherwise the stud may bend and the belt will subsequently slip.
Before adjustment, it is necessary to select the slack of the pulling belt branch
The force on the dynamometer should be 2.5…3.0 kgf
Having removed the dynamometer and holding the key by the sector, tighten the roller nut
If you don't have a torque wrench, you can use the same dynamometer to control the force. I did just that, only I had to put a pipe on the key, otherwise the dynamometer scale was missing. There are no photos of this action, because there were not enough hands to hold the key with the pipe, the dynamometer and the camera.
I checked the quality of tension with the engine running: when revving, the radial runout of the pulling branch of the belt was 10...12 mm, which corresponds to the norm.
Yes, I forgot: before adjusting, I turned the loosened pin with pliers and a rag wrapped around the thread by almost 2 turns and tightened it; It's holding up for now.