The serial models VAZ 2114 and VAZ 2115 are equipped with generators of domestic and foreign production, namely: Russian KZATE and German BOSCH.
Many car enthusiasts preferred to choose a car with a pre-installed German-type PG, since the service life of the latter is 30 - 45 thousand longer than the domestic one.
The process of repairing and do-it-yourself maintenance of a generator on a VAZ 2114, VAZ 2115 is not complicated, but it requires basic knowledge in the field of vehicle maintenance. If any difficulties arise, please consult a service station specialist.
Generator device VAZ 2114, VAZ 2115, VAZ 2113, Lada Samara 2
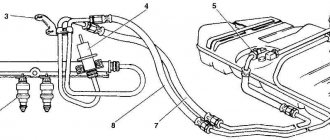
Generator type 94.3701 alternating current, three-phase, with built-in rectifier unit and electronic voltage regulator, right rotation (drive side). Generator system connection diagram: 1 – battery; 2 – generator; 3 – mounting block; 4 – battery charge indicator lamp, located in the instrument cluster; 5 – ignition switch
Generator connection diagram. The voltage to excite the generator when the ignition is turned on is supplied to terminal “D+” of the regulator (terminal “D” of the generator) through indicator lamp 4 located in the instrument cluster. After starting the engine, the excitation winding is powered by three additional diodes installed on the generator rectifier block.
The “W” output of the generator is not used on cars of the Lada Samara 2 family. The operation of the VAZ 2114, VAZ 2115, VAZ 2113 generator is controlled by a warning lamp in the instrument cluster. When the ignition is turned on, the lamp should be on, and after starting the engine, it should go out if the generator is working. A brightly burning lamp or glowing at full intensity indicates a malfunction.
WARNINGS The negative of the battery should always be connected to ground, and the positive should always be connected to the B+ terminal of the generator. Failure to turn the battery back on will immediately cause increased current through the generator valves and damage them. It is not allowed to operate the generator with the battery disconnected. This will cause short-term overvoltages to occur at the “B+” terminal of the generator, which can damage the generator voltage regulator and electronic devices in the vehicle’s on-board network. It is prohibited to check the functionality of the generator “for spark” even by briefly connecting the “B+” terminal of the generator to ground. In this case, significant current flows through the valves and they are damaged. The generator can only be checked using an ammeter and voltmeter. The generator valves are not allowed to be checked with a voltage of more than 12 V or with a megohmmeter, since it has a voltage too high for the valves and they will be broken during testing (a short circuit will occur). It is prohibited to check the vehicle's electrical wiring with a megger or a lamp powered by a voltage of more than 12 V. If such a check is necessary, you must first disconnect the wires from the generator. The insulation resistance of the generator stator winding with increased voltage should be checked only on a stand and always with the terminals of the phase windings disconnected from the valves. When electrically welding components and parts of the car body, you should disconnect the wires from all terminals of the generator and battery
Source
Device for mounting AvtoVAZ electric generators
Sometimes, to check the functionality of such devices, it is necessary to completely dismantle them. Before checking a generator removed from a VAZ 2110 and other cars from the same manufacturer with a multimeter, you should understand the structure of the generating unit.
The design may differ slightly depending on the modification of the device. But the main components of electric generators include the stator, rotor, aluminum covers, pulley, brushes, and bearings.
Rotor design features
The part is made in the form of a shaft with a corrugated surface, pressed steel bushings, and beak-shaped poles. Together these elements form an electromagnetic core.
Between the poles on the bushing there is an exciting winding protected by a plastic housing. A cooling impeller and a generator pulley are attached to the front of the shaft. The rotor is installed on bearings. The rear ball bearing is pressed onto the shaft. The front one is fixed with special washers on the cover.
Generator stator structure
This device is made of thin plates (up to 1 mm thick) made of electrical steel. The inner surface of the stator has grooves for laying three-phase windings. Each winding includes 6 coils.
Mounting the VAZ electric generator
When servicing such devices, it is often necessary to remove them. The generating units are fixed using special brackets secured with bolts. It is more convenient to unscrew this mount while under the car.
Drawing of the VAZ 2108-2115 generator
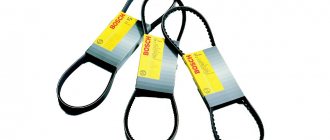
The electric generators are also attached to the drive belt tensioner plate. Fixation is carried out using a nut. Different AvtoVAZ vehicles are equipped with different types of drive belts. For example, model 2108 (and its modifications) has V-belts, and VAZ 2111 has poly-V-belts.
This difference is due to the different configuration of the internal combustion engines of VAZ cars. Newer models (for example, 2114b 2115) are equipped with powerful air conditioning systems and electric power steering. Therefore, they require better adhesion of the belt to the pulleys, as well as a current output of 80 A or more.
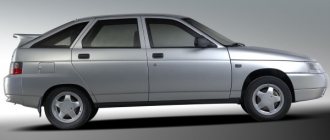
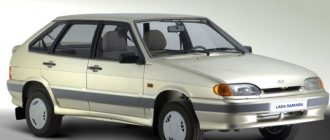
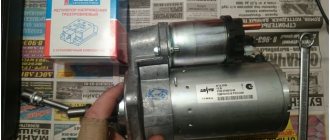
Generator VAZ 2114 and VAZ 2115
The serial models VAZ 2114 and VAZ 2115 are equipped with generators of domestic and foreign production, namely: Russian KZATE and German BOSCH.
Many car enthusiasts preferred to choose a car with a pre-installed German-type PG, since the service life of the latter is 30 - 45 thousand longer than the domestic one.
The process of repairing and do-it-yourself maintenance of a generator on a VAZ 2114, VAZ 2115 is not complicated, but it requires basic knowledge in the field of vehicle maintenance. If any difficulties arise, please consult a service station specialist.
Recharging the battery
Sometimes a generator malfunction is associated with overcharging the battery. It can be identified by its characteristic signs: the headlights shine brighter than usual, the battery charge indicator is constantly on. If the voltage exceeds the norm, this may cause the battery to boil over. Overcharging is most often caused by a broken voltage regulator. In a VAZ 2115 car, this part can be easily replaced by yourself.
Which generator is installed on the VAZ 2114 and VAZ 2115
The standard AC power source has the following characteristics:
| Name | Indicators |
| Maximum voltage | 13.18 V - 14.70 V |
| Maximum current | 80 Amps |
| Belt drive deflection | 0.8 cm per 10 kg |
| Weight | 5.0 kg |
| Electrical energy source | KATEK 2114 / 15 |
| Rated voltage | 12 Volt |
| Power | 450 W |
Description
Welding diesel generator DGW-300E is designed for Manual Arc Welding in conditions where there is no power supply network. Widely used at construction, installation and repair sites. For welding work, it is recommended to use a Welding Generator, because it is much more practical, reliable and economical than using a couple of devices: an electricity generator and a welding machine. In addition to the main Welding Function, this welding generator can also be used as an Autonomous Source of Power Supply to connect energy consumers. GENERAL CHARACTERISTICS
| SERIES | Welding diesel |
| TYPE OF WELDING CURRENT | Constant |
| WELDING CURRENT, AMPERE | 50 — 300 |
| ELECTRODE DIAMETER, MM | 1,6-6 |
| PV (40°C), % | 80 |
| ELECTRICAL POWER, kW | 5.0 |
| ENGINE'S TYPE | Diesel, V-shaped, two-cylinder, 4-stroke, air-cooled |
| ENGINE MODEL | SV292F |
| ENGINE POWER, KW/HP | 14/19 |
| ENGINE DISPLACEMENT (L) | 0,997 |
| CRANKSHAFT SPEED (RPM) | 3000 |
| TYPE OF FUEL | Diesel |
| FUEL CONSUMPTION L/HOUR | 3.5 |
| FUEL TANK CAPACITY (L) | 25 |
| RECOMMENDED OIL TYPE | SAE10W30, SAE10W40 |
| COOLING SYSTEM | Air |
| LAUNCH TYPE | Electric start |
| INSTALLED AH/V BATTERY | 36/12 |
| BATTERY CHARGING UNIT | Eat |
| NUMBER OF PHASES | 1 |
| POWER FACTOR | 1 |
| VOLTAGE (V) | 230 |
| FREQUENCY HZ | 50 |
| VOLTAGE REGULATOR | AVR, electronic, automatic |
| CONTROL DEVICES | Voltmeter, ammeter, load, frequency, engine hours, fuel level, low oil pressure sensor |
| WELDING CURRENT DISPLAY | No |
| REMOTE CURRENT ADJUSTMENT | Yes |
| AUTOMATIC PROTECTION | Yes |
| PREHEATER | No |
| LOW OIL PRESSURE STOP | Yes |
| NUMBER OF OUTLETS 230V | 2 |
| OUTPUT 12V (AMP) | 8,3 |
| EXECUTION | Open |
| NOISE LEVEL (DB/7M) | 77 |
| DEGREE OF PROTECTION | IP23 |
| EQUIPMENT | Wheels, short-circuit current remote control, electric motor, tool, oiler, 2 forks, spare parts, manual, warranty card. |
| WEIGHT, KG | 226 |
| OVERALL DIMENSIONS (L;W;H;MM) | 890x650x750 |
| PACKAGE | Cardboard |
| GROSS WEIGHT, KG | 241 |
| OVERALL DIMENSIONS OF PACKAGING (L; W; H; MM) | 890x650x750 |
| GROSS VOLUME, M3 | 0.44 |
| WARRANTY, DURATION (MONTH) | 12 |
Originals, analogues, prices, articles
| Catalog item | Serial number | Price | |
| KATEK ELD-A-2114-90A (original) | BOSCH (9402.3701) (original) | From 3500 – 4000 | |
| 9402.3701 | FINWHALE 6РК-698-05 | 6202 2RS / 180202 | From 3500 – 4000 |
| KZATE 9427.3749 | Electromash 977.3701 | SKL 2114-6202 2RS | From 3500 – 4000 |
| 2114-3701010 (HORT) | KATEK 2114-3701010 | Contitech 6PK-1115 | From 3500 – 4000 |
| PRAMO-Electro 2114-3701984 | PRAMO- 3701953 | PRAMO-Electro 2114-3701747 | From 3500 – 4000 |
| *prices are as of July 2022 |
Operating principle of the electrical energy source
There are 8 coils installed in the GU housing. The material is copper, the connection method is “star”. The rotor is a steel shaft, on the back surface of which magnetic circuits are pressed, between which a winding is installed.
Excitation winding wires and copper-graphite brushes are soldered to the shaft rings. After the ignition is activated, the current from the battery passes through the brushes and winding, forming a magnetic field.
Thus, the rotor is driven, and the alternating current is converted into direct current through the coils.
On the back side of the GU there are two terminals marked “+” and “–”. Accordingly, the terminals with the indicated polarity are connected to the battery.
To rotate the PG you need a battery. When the actual voltage during operation of the unit is higher than the battery voltage, the generator will begin to supply power to the battery consumers. Thanks to this, the on-board network current is maintained within a specified range.
Characteristic reasons for the failure of the main control unit on the VAZ 2114 (2115)
- insufficient tension of the drive belt;
- contamination of contacts on rings;
- mechanical damage to the rectifier unit;
- excessive wear of brushes;
- jamming (freezing) of brushes;
- short circuit in the winding;
- power supply interruption;
- the voltage regulator is faulty;
- roller bearing wear;
- pulley fixation is loose;
- Fan blades are damaged.
Methods for troubleshooting generator VAZ 2114 (2115)
- carrying out preventive measures;
- replacement of the PG assembly (in a comprehensive manner);
- drive belt tension;
- centering the fan blades;
- installation of new brushes;
- replacement of the rectifier bridge;
- voltage regulator prevention;
- inserting a new roller bearing;
- replacing the fuse in the mounting block.
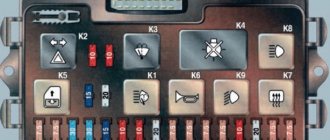
Typical signs of a faulty control unit on a VAZ 2114 (2115)
- the battery charge lamp on the dashboard flashes periodically (systematically);
- indication of battery overcharging, GU does not charge the battery;
- dim headlights;
- weakened sound of the horn, as there is little current, the reason is low voltage;
- the appearance of extraneous noise when the power source is running.
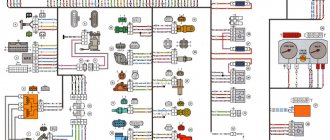
Electrical circuit diagram
Below is a diagram of the generator electrical circuit:
Types of mechanical failures
Failure in the technical part of the generator - wear of the bearings, bending of the pulley (if it is not bent too much, the device will work with a whistling belt), failure of the fasteners.
Attention! Mechanical breakdowns appear after an accident; they rarely occur during operation.
- Unnatural noises when the generator is running.
- Voltage drop.
- The car drives faster, then slows down sharply when you press the gas pedal with the same amount of force.
Replacement and repair of generator on VAZ 2114 (2115)
Location: engine compartment, to the left of the power unit, at the end.
- a set of keys, heads, cranks;
- a torque wrench to check the tension of the drive belt;
- mounting spatula to remove the belt;
- flat head screwdriver
Step-by-step replacement instructions:
- We fix the vehicle on a level platform.
- Squeeze the parking brake.
- Turn off the ignition.
- Open the hood.
- Disconnect the terminals from the battery.
- Unscrew the fastening of the “+” and “-” terminals from the generator set.
- We turn out the coupling bolt of the support bracket.
- We lower the unit down and remove the drive belt from the groove.
- We unscrew the studs and turn out the coupling bolt.
- To change the GU, we remove it from its regular place.
Do-it-yourself dismantling of the control unit on the VAZ 2114 (VAZ 2115) is completed. We carry out comprehensive preventative maintenance of the equipment, clean the housing and elements from dirt and dust, blow through the windings with a stream of compressed air, and dry the contacts.
We replace worn parts and components with new ones as necessary, if defects are detected. The generator must be completely replaced if cracks are detected in its housing.
In this case, further use of the equipment is strictly prohibited.
We measure the resistance of the excitation winding with a multimeter and check the diode bridge for operability. We also inspect the fuse for integrity and replace it with a new one if damage is detected.
DIY generator installation:
- We fix the GU on the support brackets, put on a pin and a spring washer.
- Place the belt in the groove.
- We screw in the fastening bolts.
- We move the GU body up, tighten the mounting bolts of the bar.
- We tighten the generator fasteners with a torque wrench with a force of 28.0 Nm.
- We check the belt deflection; the range should not exceed 12 mm. tighten as needed.
- We clamp the power cables on the installation.
- We put on the battery terminals.
To reduce the frequency of replacing power units, some car owners install generators from Priora (injector, 8 valves). The equipment is more powerful in terms of technical characteristics, which means it ensures stability in the generation and supply of current to the motor.
A new generator set is 500 - 750 rubles more expensive than a standard one. The holes for fasteners completely coincide with the factory ones on the VAZ 2114 (VAZ 2115).
Source
Useful video
You can watch a video on replacing the generator below:
- We disassemble and remove the instrument panel on a VAZ 2114
- On-board computer VAZ 2114: purpose, functions, main errors
- Diode bridge VAZ 2114: what you need to know about it
Hello, tell me, what do you think about 135A Startvolt generators? I'm choosing between Pramo 130a and Starvolt 135a. Ours is actually 300 rubles more expensive.
- We guarantee fast processing of your order during business hours (we work from 11-00 to 20-00, Saturday and Sunday are days off).
- We guarantee reliable packaging of your order (when sending it by Russian Post or transport company).
- We guarantee the fastest possible dispatch of your paid order (within 2-4 business days after receipt of payment).
- We guarantee a refund or exchange for another product (with recalculation) within 14 days from the date of receipt of the order (the product must be in good condition, without traces of installation, delivery costs are not reimbursed).
- We guarantee a free exchange of goods (transportation costs at our expense) if the purchased goods turn out to be defective.
Payment Methods
Delivery options
Pickup options
Maintenance and repair of the VAZ 2115 generator
The purpose of the generator set is to convert mechanical energy into electrical energy and supply it to all electrical consumers. In addition, it charges the battery. Alternator malfunctions or breakdowns affect the operation of the entire vehicle. To fully service the VAZ 2115, you must be able to diagnose generator unit malfunctions and make repairs. If it fails, you need to know how to replace it.
Basic device malfunctions and troubleshooting methods
The VAZ 2115 is equipped with 3-phase alternating current generator sets with a voltage regulator and rectifier.
The node elements are shown in the diagram:
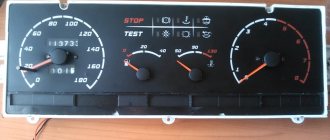
During startup, a special light comes on to help control the operation of the generator. It goes out as soon as the engine starts. If it continues to light, this indicates that the unit is faulty. There are a number of other signs by which you can judge whether the generator is faulty.
After turning on the ignition, the warning lights on the instrument panel do not light up and the sensors do not work:
- The electrical wiring may be broken. Diagnosed by checking the neutral wire for a break.
- The fuse has blown. The part needs to be replaced with a working one.
- There is a break in the electrical circuit that connects the mounting block with fuses and the ignition switch. The integrity of all wires is checked.
All instruments on the dashboard are working properly, only the indicator does not light up:
- The indicator is broken. Replacement required.
- The brushes are worn or stuck. It is necessary to remove the damaged parts and replace them with new ones.
- The spacer rings have oxidized. It is necessary to remove oxidation.
- There is no current in the network. Contacts and all wiring are checked.
- The voltage regulator is faulty. Replaced with a new one.
When the ignition is turned on, the control lamp lights up brightly, after starting the engine it dims:
- Poor drive belt tension, slipping is possible. Tension is adjustable. If it is worn out, install a new one.
- The valves of the rectifier unit are faulty; the diode elements supplying the excitation winding may have failed. Parts need to be changed.
- Broken stator winding or short circuit. The stator assembly is completely replaced.
If the control light continues to light during operation of the power unit, the reason is the voltage regulator, which must be replaced.
The appearance of extraneous noise during operation of the unit:
- There is a short circuit on the valves. The rectifier is being replaced.
- Bearings are damaged. They cannot be repaired, so replacement is necessary.
- The stator winding has shorted to ground. The stator is changing.
How to independently diagnose generator faults
To carry out the procedure, you will need a multimeter and an assistant. Diagnostics of the generator unit is performed without removing it from the machine using the following algorithm:
- We start the engine and warm it up to operating temperature.
- We turn on all electrical appliances and equipment that can be used while driving: stove, heated glass, radio, DVR, etc.
- We turn on the multimeter in voltage measurement mode and connect one of its probes to the battery terminal.
- The assistant in the cockpit presses the accelerator pedal, bringing the engine speed to 3200. The voltage on the multimeter should exceed 13 V. This indicates the serviceability of the generator.
- If the readings are below 13 V, then most often the reason is a loose alternator drive belt or there is damage in the on-board network. The ground contacts may have oxidized and need to be cleaned. The cause may be wear on the brush assembly and a malfunction of the regulator. In most cases, the cause may be the generator itself, but this option should also be considered.
- Now we turn off all electrical equipment and measure the voltage again at the same speed. The reading on the multimeter should not exceed 14.7 V.
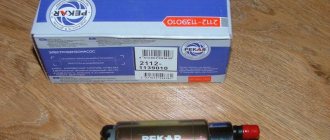
Repair of generator (Eltra) VAZ 2115.
Detailed generator repair instructions
Unit repair consists of the following stages:
- dismantling from the car;
- disassembly;
- replacement and repair of elements;
- assembly.
To carry out the work, you need to prepare a set of keys, a wrench, a 17mm socket, a screwdriver and WD-40 for unscrewing stuck fasteners.
Dismantling
The removal process is a sequence of steps:
- We de-energize the car to avoid a short circuit. Remove the negative terminal from the battery.
- Remove the crankcase protection.
- We treat the connections with WD-40.
- Loosen the nuts securing the unit.
- We turn out the adjusting bolt and loosen the belt tension. We move the generator set to the cylinder block and remove the belt.
- We take the rubber boot aside. Unscrew the nut securing the positive terminal from the “B+” terminal. Disconnect the power wire from terminal “D” of the generator set.
- Completely unscrew the nut from the bottom. We dismantle the nut together with the spacer sleeve.
- Supporting the generator set, remove the mounting bolt and lift it down.
Disassembling the unit
Unscrew the bolts that secure the covers of the VAZ-2115 generator. After this, carefully unscrew the bolts securing the phase winding and capacitor to the rear cover of the unit. If necessary, the capacitor is disconnected from the rectifier. After that, do not forget about the four bolts, remove the back cover along with the rotor and stator.
The rotor is clamped in a vice and completely disassembled by unscrewing the nuts and removing the pulley. All elements that have failed must be replaced - bearings, capacitor, diode bridge of the VAZ-2115 generator, brushes and voltage regulator. After replacing faulty components, the entire unit is assembled in the reverse order.