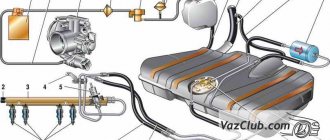
Schematic sketch of the VAZ-2112 engine
Detailed diagram of the VAZ-2112 engine.
1 – engine sump. 2 – front crankshaft oil seal. 3 – crankshaft. 4 – crankshaft pulley. 5 – oil pump. 6 – generator drive pulley. 7 – timing belt. 8 – front cover of the timing mechanism drive. 9 – coolant pump pulley (pump). 10 – tension roller. 11 – camshaft toothed pulley. 12 – rear cover of the timing mechanism drive. 13 – camshaft oil seal. 14 – exhaust camshaft. 15 – hydraulic pusher. 16 – valve spring. 17 – valve guide sleeve. 18 – exhaust valve. 19 – receiver. 20 – camshaft bearing cover. 21 – guide pipe. 22 – cylinder head cover. 23 – plastic cover. 24 – spark plug. 25 – intake camshaft. 26 – inlet valve. 27 – cylinder head. 28 – coupling. 29 – fuel rail. 30 – crankcase ventilation hose. 31 – nozzle. 32 – intake manifold. 33 – flywheel. 34 – crankshaft rear oil seal holder. 35 – rear crankshaft oil seal. 36 – cylinder block. 37 – oil dipstick. 38 – piston. 39 – connecting rod. 40 – connecting rod cover. 41 – crankshaft main bearing cover.
Scheduled maintenance procedure
With a transverse arrangement, the internal combustion engine device requires a slightly modified maintenance schedule in comparison with engines of previous generations 2101 - 2106.
| Maintenance object | Time or mileage (whichever comes first) |
| Timing belt | replacement after 100,000 km |
| Battery | 1 year/20000 |
| Valve clearance | 2 years/20000 |
| Crankcase ventilation | 2 years/20000 |
| Belts that drive attachments | 2 years/20000 |
| Fuel line and tank cap | 2 years/40000 |
| Motor oil | 1 year/10000 |
| Oil filter | 1 year/10000 |
| Air filter | 1 – 2 years/40000 |
| Fuel filter | 4 years/40000 |
| Heating/Cooling Fittings and Hoses | 2 years/40000 |
| Coolant | 2 years/60000 |
| Oxygen sensor | 100000 |
| Spark plug | 1 – 2 years/20000 |
| Exhaust manifold | 1 year |
The official manual for the 2108 engine contains a description of the internal combustion engine parameters and recommends the type of oil and coolant.
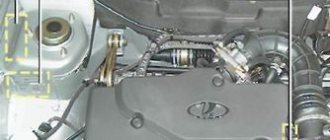
Engine device
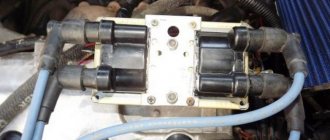
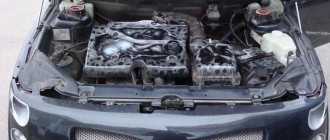
16-valve 124 engine under the hood of a “two-wheeler”
- The engine is a sixteen-valve, in-line, four-stroke gasoline engine, consisting of four cylinders. The operating order of the cylinders is: 1-3-4-2 – starting from the crankshaft pulley. With a power supply system – distributed injection, controlled via a Bosch, “January” or GM controller.
- The engine is secured in the engine compartment using four elastic supports, of which the front and rear are rods that are fixed from the engine to the body, and the left and right are identical to the VAZ-2110(11).
- On the engine, on one side there are camshaft and crankshaft drives, a coolant pump (about checking the pump and choosing a pump - note), a generator, as well as a timing belt (about replacing it here), on the other side there are sensors: coolant temperature, pressure oil, starter, thermostat, front: ramp with injectors, intake manifold, oil dipstick, knock sensor, crankcase ventilation hose, phase sensor. On the reverse side: oil filter, crankshaft position sensor, exhaust manifold. Top: spark plugs, high-voltage wires. More details about all sensors are written here.
- The cast-iron cylinder block has the same index “21083” with engines from the VAZ-2110 (11), however, they have different screws for the cylinder heads M10x1.25 in contrast to M12x1.25, as well as their smallest entry depth.
- Each engine has its own serial number.
Cylinders
This is what the cylinder block looks like with the engine removed.
The engine cylinders are bored directly into the block. The initial diameter is 82 mm and during repairs can be increased by 0.4 or 0.8 mm. The class of the cylinder is marked on the bottom plane of the block in Latin letters.
Crankshaft
This element practically does not fail.
The crankshaft is made of high-strength cast iron, and is equipped with five main journals, four connecting rod journals, and eight counterweights cast together with the shaft. The difference between this crankshaft and its analogues with the VAZ-2112 is due to its increased strength and wear resistance, so installation from younger models is completely excluded. The flywheel is secured to the back of the crankshaft using six self-locking bolts.
Pistons
These pistons apparently already have grooves for the valves. They won't be driven down anymore.
The piston in the engine is made of aluminum alloy, the piston skirt is conical in the longitudinal section, and oval in the transverse section. A distinctive feature of the pistons for the VAZ-2112 is that they have four recesses for the valves to avoid bending and subsequent replacement of the valves, whereas on younger models they are flat. For one engine, pistons should be selected based on weight, not allowing a difference of more than 5 grams, to reduce the imbalance of the crank mechanism (approx.). There are three rings mounted on the piston: the upper ones are compression rings that prevent gases from breaking through into the engine crankcase; they also help remove heat from the piston to the cylinder. The lower ring is an oil scraper ring (about replacing it here).
Connecting rods
As a rule, they are changed along with the pistons.
The connecting rods are made of steel and are divided into weight classes - they are marked with paint or a letter on the cover. On the covers, as well as on the connecting rods, the cylinder number is stamped (it should be on one side of the connecting rod and the cover).
Piston pins
This is what a piston pin looks like.
The piston pin is steel, tubular in section. It is secured from falling out by two retaining spring rings, which are located in the grooves of the piston bosses. Based on their diameter, they can be divided into three different classes: 1 – 21.978-21.982 ; 2 – 21.982-21.986 ; 3 – 21,986-21,990 . The piston class is also stamped on its bottom. The piston and pin must be of the same class.
cylinder head
View of the cylinder head on a dismantled engine.
Cylinder head - made of aluminum alloy, common to all four cylinders, centered on the block with two bushings and secured with ten screws. On the top of the cylinder head there are camshaft supports, five on each side.
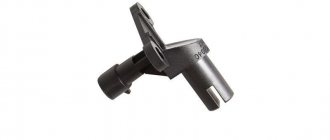
Camshafts
Camshafts and their pulleys
The camshafts are cast, cast iron, five-bearing, each with eight cams. The camshafts are driven by a toothed belt from the crankshaft. Due to increased loads on the timing belt, its width in the VAZ-2112 engine, compared to analogues 2110(11), has been increased from 19.0 to 25.4 mm (accordingly, the width of the toothed pulleys and rollers has been increased). Therefore, the timing belt tension has also changed. There is a support roller under the intake camshaft pulley, and a tension roller under the exhaust camshaft.
Valves
These valves are not afraid of bending if there are grooves on the pistons.
The valves are made of steel, while the outlet is made of heat-resistant steel with a directional chamfer, and the inlet area is larger than the outlet. If we compare in size, they are smaller than the analogues of the “tenth” model. They are arranged in two rows in a V-shape. They are driven by cams using hydraulic pushers, which in turn are very sensitive to the purity of the oil and its quality. And in the presence of mechanical impurities, premature failure of these elements is possible, which will be accompanied by increased noise during the operation of hydraulic pushers. How to replace these elements is described in detail in this article.
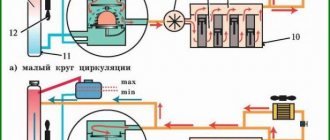
Lubrication system
The VAZ-2112 engine is lubricated using a combined method. Main and connecting rod bearings, camshafts and hydraulic tappets are lubricated using pressure. By spraying, oil is supplied to the cylinder walls from them to the piston rings and pins, at the bottom of the pistons, to the camshaft cam-pushrod pair and valve stems. The remaining components are lubricated by gravity.
More details in the material: diagram of the lubrication system of the 16-valve VAZ-2112 engine.
Pros and cons
Taking into account the characteristics of the engine, in particular the small volume of 1.3 liters, immediately after launch into production the following shortcomings were revealed:
- leaks through the block cover gasket - the error has not been corrected;
- Solex carburetor - required frequent adjustment of the idle modes;
- pump - intensive wear of polymer blades.
Carburetor for 2108
Since the 2108 engine was the first with a transverse arrangement under the hood of a car, the default exhaust manifold changed its design in comparison with previous generations of AvtoVAZ internal combustion engines. However, the intake manifold remained the same.
Engine tuning
- direct-flow exhaust system - spider circuit 4/2/1 and resonator with banks;
- sports camshaft – gas distribution modes change.
Tuning 2108
Tuning is usually used to add about 10 horsepower. With. by replacing the carburetor with an injector or a direct-flow muffler. There is a time-consuming option to replace the crankshaft with the following crank diameter. The piston stroke increases by 2 mm, but a KShG kit, precise calculation and adjustment of the mechanism are required.
Thus, the 2108 engine uses advanced technologies from the German automobile industry. The weight and dimensions of the engine have been reduced for transverse placement under the hood of a front-wheel drive car. In two versions, 1.1 l and 1.5 l, the modernization was carried out by employees of the manufacturer's plant.
If you have any questions, leave them in the comments below the article. We or our visitors will be happy to answer them
Modifications
If the 2108 engine, according to the contract, was developed by German craftsmen, then its two modifications, 1.1 liters and 1.5 liters, were finalized by domestic designers:
- 21081 – gasoline consumption is reduced to 5.7 liters in the combined cycle, cylinder 76 mm in diameter, piston stroke 60.6 mm;
- 21083 – piston stroke 71 mm, cylinder diameter 82 mm, torque 100 Nm.
In the first version, the cylinder head was lowered by 5.5 mm, and the maximum speed of the vehicle dropped to 140 km/h. This modification was created for export cars with restrictions on the volume of internal combustion engines of small cars (Belgium and Portugal).
The second modification was recognized as the most successful, allowing for increased power. Factory tuning is always preferable to changing the design yourself; major repairs do not have to be done more often.
Conversion of carburetor to injector VAZ 2109
First you need to choose a good injection system for the VAZ 2109. Bosch M 1.5.4 is perfect for installation due to its reasonable cost. We installed the injection system without additional upgrades or improvements. This is better than installing an external fuel pump and purchasing additional parts from General Motors.
- air filter box;
- receiver;
- collector;
- gas tank, etc.
Various bolts, clamps and other consumables are not a problem to purchase at any store.
Tank replacement
Before disassembling the carburetor system, wash and dry the new gas tank and install an electric fuel pump. Remember that the arrows on them must match in both places. Make sure that the float of the sensor indicating the fuel level in the gas tank.
Holes for mounting the module and sensor
Next, you need to make a hole in the cylinder block for mounting a bracket designed for an ignition module with a depth of 20 mm, and another one for the knock sensor (16 mm). To do this, drain the antifreeze and remove the radiator along with the bumper.
Sometimes such holes can be made at the factory. If they are not there, then special grooves are provided for the module and sensor. Be careful not to drill through the block! If in doubt, let a master do it for you.
Cooling, generator
Among other things, you need to install a new coolant pipe, and change the temperature sensor in the radiator. After this, you need to drain the oil and remove the pan from there, remove the toothed pulley and belt, and install a special generator damping pulley instead of the standard one.
Then it is necessary to install a new generator, since the new system requires more voltage than usual. Here you can’t get by with just a regular pulley replacement. We need to install a new generator in our VAZ 2109 - this is a must. Otherwise, the generator will simply become unusable.
Wires, connecting devices
- Next, you need to roll out the gasoline - the tank should become lighter.
- Then, before proceeding with further manipulations, remove the battery.
- After this, remove the distributor and fuel pump with all accessories, air filter, carburetor and cables (gas and air supply).
If everything is done, disconnect the ignition wires. They are under the hood. We also remove the fuel pipes, switch, gas tank and vacuum booster hose, which needs to be made longer. It can be taken from one of the previous versions of the VAZ.
Also disassemble the instrument panel. There is a check engine light on it that needs to be connected to a wire. You need to bring the ignition harness out from the engine into the cabin, and connect the wires responsible for the injection harness to the wiring box.
The wires that remain from the carburetor fan relay must be short-circuited together with the fan switch sensor.
We attach all the fuses, relays and controller in the designated places
It is also important to connect the fuel pump to the dashboard. This is necessary for correct fuel level readings (we just remove the standard one)
The block has a head on the side with a plug on which you need to secure the mass of the harness responsible for fuel injection
It is also important not to forget to install the receiver and manifold, as well as the throttle pipe and fuel rail
Installation of the fuel line
What takes the most time and effort is the fuel line, which needs to be laid along the bottom of our VAZ. It is very difficult to run the fuel line under the steering wheel. After all, secure the fuel hoses and filter. There are special bolts for the filter at the bottom of the car. Finally, replace the gas tank and connect the fuel line, and also replace the ignition, sensors and high-voltage wires in their places.
At this stage it is important to securely secure all hoses and ground. If you don't do this, you won't have any problems later.
All that remains is to install the pipe (its hose) and heating for it, an air filter, as well as hoses for crankcase ventilation. After starting the car, and the engine should run smoothly, connect the gas analyzer and DST-2 (diagnostic scanner-tester). It is necessary to reset the errors and adjust the idle mixture.
Replacing a carburetor with an injector for UAZ and Gazelle cars is slightly different. The differences are due to the characteristics of the Gazelle engine.
Typical faults
Since the transmission of rotation is carried out by a toothed belt, if it breaks, the motor is guaranteed to bend the valve. By default, the 2108 engine has the following “diseases”:
- poor valve cover design - periodic replacement of the gasket is required;
- low service life of cooling system components - the pump and hoses should be changed frequently;
- detonation - the problem is solved by the use of high-quality fuel;
- Solex carburetor - replacement with Ozone modifications.
Valve cover
But the 2108 engine is not picky about the quality of the lubricant - it is not so important for the owner which engine oil to use.
Design
Any DXH provides air flow inside the engine when the throttle valve is closed. Moreover, if previously the idle speed sensor of the carburetor VAZ 2109 functioned as a shut-off valve, the calibrated hole of which could only be either open or closed, then the new idle speed sensor VAZ 2109 injector is capable of independently, depending on the position of the throttle valve, reducing or increasing the amount air, which is needed at different periods of time. That is why experts consider the new version of the IAC not to be a sensor, but a measuring device, and recently it has received the name idle air controller (hereinafter referred to as IAC).
The idle speed control of the VAZ 2109 injector is structurally reminiscent of a miniature module; in addition to the stepper motor, its body contains a rod with a needle with a cone-shaped tip.
The IAC is secured to the throttle body housing with two screws.
The device is also equipped with a 4-pin connector designed to connect the device to the car's ECU.