Below watch the video about installing the EUR on the Lada Granta Standard and express your opinion about it in the comments to the article.
Video quality: HDTV
The video was uploaded to the admin from the user Agrippa: for immediate viewing on the portal.
To give the correct answer to the question Installing the EUR on the Lada Granta Standard, you need to watch the video. After viewing, you will not need to seek help from specialists. Detailed instructions will help you solve your problems. Enjoy watching.
Humor in the subject: – I am an honest and decent girl! During registration, I told my friend at the registry office: “I promise to love you, remain faithful to you, respect and care, take care of you and believe you... until some interesting man separates us.”
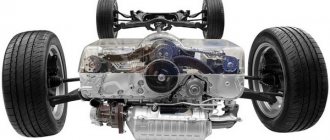
Cars of the Lada Grant family are equipped with power steering as standard. Electromechanical power steering (hereinafter referred to as EPS) is installed individually by the owners.
Electromechanical power steering
ESD is a relatively new development of modular control, which, like power steering, has advantages and disadvantages.
Operating principle of the EUR
Every time you turn the steering wheel, the torsion shaft twists. Information about this process is transmitted from the torque sensor to the control unit online.
Based on the information received, the electronic control unit (hereinafter referred to as the ECU) accumulates information and reads readings from other sensors. The ECU transmits a signal to the electric motor, which increases the torque of the steering rack shaft by activating the electric motor.
Information is processed so quickly that tenths of seconds pass from the moment of transmission to the moment of reading.
Is it worth installing electric power steering?
Driving a car without electric power steering is, of course, possible. But if you have previously driven a car equipped with such a system, you may experience serious discomfort. You will be deprived of the usual electric motor support.
Installing such a mechanism has certain difficulties and is also associated with costs. But they will all pay off in a comfortable ride and increased safety for you and your passengers.
Thus, the answer to the question “Is it worth installing?” - this is a definite “Yes”. Even if you don't want to do it yourself, contact a car service.
In the video below you will find a comparison of the advantages of power steering and power steering (the author of the video is AVTOTEMA TV).
Possible malfunctions of the EUR
It happens that after installation the EUR does not work at all or intermittently.
This can be caused by various reasons, among which two most often stand out:
- Speed sensor failure. The electric power steering operates in connection with the speed sensor. At high speeds, the extra force from the mechanism is reduced to give you more control. If data from the sensor stops flowing, the EUR will automatically turn off. The problem is solved by replacing the sensor.
- Incorrectly installed engine crankcase. If there is a violation in the installation of the engine crankcase (casing), vibrations from the engine will be transmitted to the amplifier. It will begin to buzz, and in some cases even turn off.
Possible malfunctions of the EUR on the Lada Grante Liftback (Sedan)
| Malfunction | Diagnosis | Elimination method |
| The diode on the side pillar glows due to a faulty speed sensor. | Checking the serviceability of the speed sensor by dismantling it and ringing it with a multimeter. | Replacement of the sensor with a new one, since the design is not subject to repair (partial, complete). |
| Low voltage in electrical wiring. | Checking the integrity of the insulating layer and contact terminals. | Replacement of damaged cable sections, insulation of connection points. |
| The electric amplifier rotates slowly. | Checking the voltage supply to the input contacts from the relay regulator. | Replacing the relay regulator. |
| During rotation, a characteristic creaking, metallic grinding sound is heard. | Dismantling the EUR, disassembling it into its component elements, checking the condition of the rolling bearings. | Replacement of two rolling bearings with new ones. |
Removing the steering gear
If a knock does occur, the car owner will have to dismantle the mechanism. It is more convenient and faster to carry out this work when the vehicle is on a lift. To carry out the work you will need the necessary tools, which in this case include:
- socket wrench or socket wrench 13;
- flat screwdriver;
- durable knife;
- special 24mm wrench for the steering rack;
- hexagon 6 with wrench.
Before starting work, the battery is disconnected, thereby taking the necessary safety measures. At the initial stage, you need to first loosen the bolts securing the front wheels. The wheels themselves should be left in the “straight” position before lifting the car onto the lift. Next, the steering wheel driveshaft is disconnected from the rack and pinion drive shaft.
This work is carried out from the salon. Therefore, the car is not raised high. The swing rods can now be released by unscrewing them from the swing arms. And as soon as this work is completed, you can begin to dismantle the steering mechanism. Using a 13mm wrench, unscrew the nuts securing it and remove the mounting clamps.
The steering mechanism is removed along with the disconnected steering rods. The next stage of repair work is disassembling the removed device. Here you should free the steering rack from all protective covers that are put on the mechanism. For this purpose, cut off all the fixing clamps, which will subsequently need to be replaced with new ones.
Review of prices of manufacturers of electric power steering for the Lada Granta
| Name/article | Price, rub.) |
| OJSC "AVTOVAZ" 11117-3450008-02, voltage 13.5 V, current 55 A, weight 9.0 kg. | From 23500 |
| OJSC "AVTOVAZ" 11186-3450008-02 | —/— |
| OJSC "AVTOVAZ" 2172-3450008-02 | —/— |
| JSC "Prosport" RE-49114 | From 24000 |
| RE-49113 | —/— |
| OJSC "LadaCenter" FR-00001716 | From 25000 |
| JSC "Autoelectronics", 11186-3450008-02 (122.3405010-02) | —/— |
Lyrical digression
In Lada Kalina, the steering rack never makes a knock when we are talking about a new car. This is also true for the break-in period. Let's say in your case this is not done. Then, do not try to repair anything, but go straight to the dealer. According to reviews, the defect in question is covered under warranty, and most car dealers do this: the steering rack assembly is replaced with a new one.
There is a logic here. At the factory, adjustments are made correctly (this is true in 99.9% of cases). If a defect appears, the dealer replaces the assembly without expecting that adjustment will solve the problem. The owner does not need to hope for this either. The choice is yours.
List of online stores, addresses of companies providing services
| № | Name | Contacts, address |
| 1. | STO "A1-Motors" | Moscow, st. 1st Dubrovskaya, 13a, building 4, phone: 8 (495) 120-15-38 |
Reviews of companies
- Vasily: six months ago I installed a servo drive on Grant at the A1-Motors service station. The guys did everything quickly and professionally. My recommendations.
- Ivan: after buying the Lada, I replaced the power steering with an electric steering system. I ordered the work from the service station “Auto Service on Sedova”. New equipment, many repair boxes, work professionally.
- Innokenty: comrades recommended installing an EUR. I bought it at the Motel Varshavsky parts store. Good quality, reasonable prices, bonuses when purchasing.
- Vladlen: I drove the power steering for two years and decided to switch to the electric power steering. They advised to buy from Expert-Auto. Six months have passed since installation, no complaints, my recommendations.
- Vyacheslav: I’m leaving my positive review about the auto parts store “Spare Parts on Wheels”. Professional advice, reasonable prices, friendly staff.
A little theory: front suspension design
Before attempting to fix any problem, there is a tendency to look at the blueprints or repair manual. It is known that the VAZ-2192 parts catalog contains the following object:
This is what the steering rack looks like in the drawing
Whether the knock will remain in the steering rack of Kalina-2 depends on the following: how accurately element “14” is adjusted. The adjusting nut, marked “14”, looks almost invisible here. But first impressions are deceiving. In the catalog, by the way, the element is called “Stop Nut”.
It is important to know that the thrust nut has external threads. And it spins clockwise. And the words “tighten the rack” mean screwing in the specified nut, and nothing more.
Now let's move on to practice and see what the node in question looks like in reality:
The nut has a non-standard notch, and it can only be rotated with a special tool. By the way, the recess will be closed with a cap. In the catalog it is designated by the number “15”, and now, let’s look at the appearance of the special key:
Rack adjustment key
The thrust nut is turned at small angles. We are talking about values of 10-15 degrees. What happens if you overdo it with tightening the rack? The knocking noise will disappear, but the steering wheel will turn with difficulty. Therefore, if necessary, the nut can be pulled back.
Preparatory stage before installing the EUR on the Lada Granta
Note to the driver! There are no differences in installing the EUR on the Lada Granta Sedan and the Lada Granta Liftback. Factory mounts are identical.
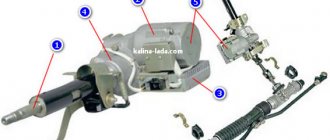
- EUR (11186-3450008-02): synchronous power unit, control controller, brackets, shaft, gearbox;
- intermediate bracket (11186-3403172-00);
- non-separable intermediate steering shaft (72780);
- blocks with wires for connecting to the central power circuit (2110-3724155);
- LED indicating the good condition of the amplifier;
- plastic clamps;
- fasteners;
- set of automotive tools;
- insulation;
- clamps.
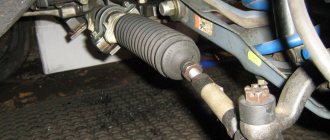
Steering rack adjustment
The unit knocks for various reasons. In fact, this is a real disease of the control mechanism, inherited from the Lada Kalina, since the components are identical on these cars. You can adjust the rack yourself.
To do this you will need a minimum of tools:
- steering rack calibration key;
- socket heads for 10 and 13;
- shaped screwdriver.
To tighten the slats, you can use two methods. The first involves using a special key that can be inserted into the gap of the arch on the left side. The second method is more labor-intensive and is suitable if it is not possible to stick your hand into the gap. To do this, you will need to dismantle the battery and its platform; this is the only way to get to the nut for tightening the gearbox. The first method is simple, so it’s better to consider the second option.
To do this, you need to disconnect the battery terminals and remove it, and then remove the platform under it. Now you can get to the nut located on the inside of the gearbox housing. You can buy a combination wrench for tightening, on the one hand - for tightening the rack, on the other - for tensioning the timing belt.
To tighten the nut, turn it clockwise.
Reviews
| 2. | Motel Varshavskiy – Spare parts store: Hyundai, LADA | Moscow (metro Annino), metro Annino, 32 km. MKAD (on the territory of Kashirsky Dvor 3). Telephone, |
| 3. | "Expert-Auto" - Spare parts store: Renault, LADA | Moscow (metro station Tulskaya), Zagorodnoye shosse, 7A, phone: (916) 838-00-62, |
| 4. | “Spare parts on wheels” – Spare parts store: Renault, LADA | Mytishchi, Volkovskoe highway, 13, phone, (968) 409-30-19 |
| 5. | Service station "Car service on Sedova" | m. Elizarovskaya, Sedova street, 11AB, box C |
| № | Positive |
| 1. | Ignat: six months ago I installed the servo drive myself. I bought a domestic one, it works properly, no complaints. |
| 2. | Vasily: my garage mates recommended buying a servo drive. We installed it ourselves last weekend. Control with minimal effort. My advice to motorists. |
| 3. | Kirill: I heard a lot of positive reviews about the servo drive, so I decided to install it. I've been actively using the car for over a year now and have no complaints. |
| 4. | Victor: I ordered the installation of the EUR at a service station, the guys handled it quickly and provided a one-year warranty. |
| Negative | |
| 1. | Gennady: I’m dissatisfied with the quality of manufacturing of the domestic servo drive. Three months after installation it had to be removed and repaired. |
| 2. | Slavik: the EUR I installed lasted six months, after which the bearing flew. |
| 3. | Sergey: I used the servo drive for six months, after which I returned the power steering. Broke too often. |
Conclusion
Installing an EUR on Granta Standard is completely justified and necessary. To prevent breakdowns and incorrect operation of the mechanism, order services from certified service stations, where they provide a quality guarantee.
Negative reviews addressed to the EUR are caused by violation of operating conditions by the owners and unprofessional installation.
It was necessary to transfer my wife from Kalina to Grant, and therefore difficulties arose with the steering, since Kalina has an ESD, but Grant does not and the tires cost 195.
As a result, a kit was ordered for installing the EUR on the Grant:
1. Gearless electric power steering manufactured by JSC Avtoelektronika, 11186-3450008-02 (122.3405010-02); 2. Intermediate bracket for installing the EUR, 11186-3403172-00; 3. Intermediate non-separable steering shaft “TAYA”, 72780. 4. Wiring harness for connecting the EUR, 2110-3724155;
Assignment of EUR contacts
According to fragments of the diagram from the document “ELECTRICAL CONNECTION DIAGRAMS OF LADA GRANTA CARS”, the following contacts of connectors X1 and X2 of the EUR are used:
X1-1 - power +12V. Connect to the positive terminal of the battery through a 50A fuse; X1-2 - power mass of the electric power steering. Connects to the ground point of the body EUR;
X2-1 - signal +12V. Used to power control circuits. Connects to pin 56 of the fuse block; X2-2 - ECU tachometer signal output (X2-F4); X2-3 - ECU speed sensor output (X2-E3); X2-4 - instrument panel ESD malfunction lamp (pin No. 20 of the instrument panel connector); X2-5 — K-line output for connection to the OBDII diagnostic block (pin No. 7); X2-6 - L-line output. It is not used in the circuit, but it may be present in the harness - just pull out the terminal with the wire from the connector so as not to get tangled. By closing the 6th contact to ground or the 7th contact, the EUR diagnostics is started. The error code is generated by the number and duration of flashes of the dashboard ESD malfunction lamp; X2-7 - signal mass of the electric power steering unit. According to the diagram, it is connected to the S22 twist, which is connected to the car body, but I could not find the connection point, so it was connected separately to the center console.
Equipment:
- Electric amplifier manufactured in Kaluga;
- Warranty card/passport for electric power steering.
1 year warranty.
This amplifier is installed instead of the standard one, as well as on vehicles not equipped with electric power steering (EPS) from the factory.
Important information for ordering! If the car was not equipped with electric power steering from the factory, you will need: a mounting plate to the body, a set (harness) of wires for connecting the power steering and a steering column driveshaft. If you purchase an EUR to replace your factory one that has failed for some reason, then in this case you do not need to purchase additional components!
When ordering, please indicate which vehicle you need the EUR for!
Note! By installing the EUR, you are making changes to the steering, the reliability of which you need to be completely sure of. The online store Motorring.ru sells EUR ONLY manufactured in Kaluga . Such power steering units are installed on the AVTOVAZ assembly line.
Some online stores sell EUR manufactured in Kizlyar or EUR made in Korea, which AVTOVAZ refused due to the possible spontaneous steering of a car with such an EUR. Such EUR, as a rule, are sold at prices of 1000-5000 rubles. cheaper.
We kindly ask you not to risk your safety!
Weight, kg: 9.5 Dimensions, cm: 48 x 16 x 11 Volume, m3: 0.00845
Select vehicle modification to search for hydraulic booster
Engine: volume - 1.6 liters, power - 82 hp, type - petrol, model - VAZ-11183. Drive: front. Year of manufacture: 2011-present time
Engine: volume - 1.6 liters, power - 87 hp, type - petrol, model - VAZ-11186. Drive: front. Year of manufacture: 2011-present time
Engine: volume - 1.6 liters, power - 98 hp, type - petrol, model - VAZ-21126. Drive: front. Year of manufacture: 2011-present time
Engine: volume - 1.6 liters, power - 106 hp, type - petrol, model - VAZ-21127. Drive: front. Year of release: 2013-present time
In the next step, for an expanded selection, you can enter the vehicle's Vin code to go to illustrated catalogs, where you can find the layout of parts down to the bolt and duplicates that are not in the catalog of analogues.
Cars of the Lada Grant family are equipped with power steering as standard. Electromechanical power steering (hereinafter referred to as EPS) is installed individually by the owners.
Electromechanical power steering
ESD is a relatively new development of modular control, which, like power steering, has advantages and disadvantages.
Preparatory actions, dismantling unnecessary parts
To remove the crankcase protection, you need to unscrew 4 screws located in one row near the bumper. Also, unscrew two screws having a standard size of M6x16. In some configurations, the protection consists of two parts, but in this case they are attached only with self-tapping screws. These words are illustrated by the following photo:
First, unscrew the “10” screws, and then the two “18” screws. In the second case, there will be more screws (eight).
Now let's look at how to remove the battery. First of all, disconnect its terminals. Then, you need to move the additional fuse box to the side. In general, actions are performed according to the photo:
You also need to remove the mounting platform itself, for which you unscrew 4 screws. You will need a 13mm wrench, as well as a 10mm spanner. We will repeat the entire sequence again:
- Unscrew the nuts holding the battery terminals using a wrench 10;
- Remove both terminals;
- Move the fuse box to the side by unscrewing 2 fastening screws;
- Unscrew the nuts with a 10mm wrench and remove the battery;
- Unscrew the screws with a 13mm and remove the metal plate.