Some car enthusiasts have come across the concept of when the voltage in the on-board network drops or a hum appears in the area of the VAZ-2112 generator. This is due to the fact that the bearing of this part has failed. Not all motorists will be able to change it themselves, so this article will focus specifically on the replacement process.
Video about overhauling the generator and its repair on cars of the VAZ 2110-2112 family:
The video material will tell you about replacing the bearing of the VAZ-2112 generator, and will also indicate the nuances and give some recommendations.
The generator does not work on the VAZ 2112
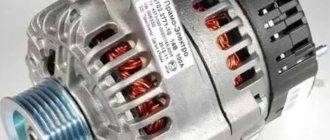
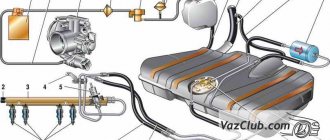
When the engine is running, the electrical equipment of the VAZ-2112 passenger car receives power from the standard right-hand rotation generators installed on AvtoVAZ, type 94.3701 (13.2-14.7V, 80A). The generator is constantly monitored by the battery charge lamp, which is located on the instrument panel. When the ignition is turned on, this lamp should light up and go out immediately after the engine starts, which will indicate that the generator is working. When this lamp continues to light while the engine is running, this is a signal to the driver that some kind of generator malfunction has occurred, and the consumers are currently being supplied with electrical energy from the battery.
In order to make sure that the generator is faulty, you need to start the engine and, by pressing the gas pedal, raise the crankshaft speed to just over 3000 rpm. Then, turn on the high beams and all other consumers of electrical energy, and use a tester to measure the voltage at the battery terminals. If it turns out to be below 13 volts, then your assumption about a generator malfunction is correct.
Troubleshooting begins by checking the condition of the voltage regulator relay and the graphite brushes, which are located in the brush holder housing. To do this, you will need to remove the plastic cover from the back of the generator and unscrew a couple of screws to remove the brush holder. We check the brushes visually, and the voltage regulator, using a test lamp with a power of 1 to 5 watts, which is connected to the brushes. A voltage of +12 volts from the battery is supplied to the regulator relay contacts “ground” and “D+”. If the lamp does not light, it means that there is a break in this electrical circuit, and since the relay regulator is not repairable, it will have to be replaced.
But if the control lamp is on, then you will have to add a pair of 2 volt batteries connected in series with the battery to this circuit to increase the voltage in the circuit to 16 volts. If, during this check, the control lamp goes out, it means that the voltage regulator relay is working. And if the lamp continues to light, this will mean a breakdown of the voltage regulator, which will have to be replaced.
If the voltage regulator relay is working properly, then you will have to check the valves of the diode bridge, as well as the rotor and stator windings. But it is better to entrust this to an auto electrician, since the generator will still have to be removed from the car engine.
Source
Principle of operation
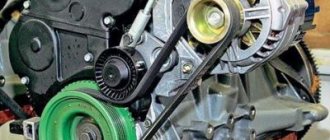
The rotor, whose main task is to create a magnetic field, is a shaft on which the excitation winding is located. Each half of it is placed in special pole parts. The slip rings supply current to the winding. The rotor rotates due to a belt drive from the drive. The stator consists of a core and a winding. Here, alternating current is generated, which is sent through the rings further along the electrical network. However, it must first be removed from the frame. In order to supply current to the rings, a brush assembly is used. Then comes the rectifier unit, which converts the alternating sinusoidal voltage generated by the generator. In different cases, different circuits for connecting the excitation windings are used. For example, another separate pair is applied. Current simply cannot flow through the battery if the engine is not running. When connecting the winding in a star configuration, you can increase the generator power by 15%. The generator relay maintains the voltage of the device within the specified limits. It changes the frequency and duration of electrical current pulses. A relay is a set of several sensors and actuators. Their task is to determine how long the field winding should be in the network. If the relay is faulty, then an unstabilized voltage will be supplied to the battery.
Possible malfunctions and their diagnosis
Generating equipment is exposed to a variety of adverse effects during operation.
The main negative factors causing generator failure:
- aggressive liquids, dirt, condensation;
- temperature changes, overheating,
- mechanical wear;
- transient processes in on-board wires, contributing to electrical breakdown;
- ugly, ill-conceived exploitation.
Some faults can only be fixed by a professional auto electrician. Most breakdowns are discovered on their own and repaired by an ordinary car owner with the correct hand anatomy.
External signs that draw the motorist's attention to unstable operation of the generator.
- After starting the engine, unpleasant noises of various nature are heard in the engine compartment, and the smell of burnt rubber is felt.
- The instrument panel shows that the battery is discharged and is not charging well.
- There are difficulties starting the engine, the battery has been checked and charged.
- The light bulbs burn at full intensity, flicker, and change brightness depending on the crankshaft speed. The lighting of the panel and interior is dim.
- An external inspection reveals mechanical damage to the housing and generator elements.
Possible breakdowns
- insulation destruction, short circuit, winding wire breakage;
- overheating, belt rupture;
- leakage of lubricant, knocking, destruction, jamming of ball bearings;
- malfunction of electronic parts of the rectifier circuit, regulator.
Troubleshooting Methods
Two diagnostic methods are usually used:
- Visual control.
- Metrological testing.
The first option allows you to identify contamination, traces of mechanical and chemical influence. Exceeding the temperature regime is determined by physical contact. After turning off the ignition, you need to lift the hood and slowly move your hand towards the generator. The increased temperature will be felt at a minimum distance, before touching.
To implement the second activity, you need to equip yourself with a measuring device and acquire basic skills in measuring resistance, voltage, and current.
Checking the VAZ 2112 generator with a multimeter
A classic pointer tester, a modern electronic multimeter with a liquid crystal screen, is suitable as a testing device. Set the switch to the “DC voltage measurement” position, limit 0-30V.
- First step. The ignition is turned off. Battery voltage measurement. The norm is 12.5-12.7V.
- Second step. The engine is running at idle speed. Consumers are disabled. The measurement shows 13.8-14.5V.
- Third step. Turn on the lights and music. Normal range is 13.7-14V. Pressing the gas pedal does not raise the voltage by 0.5V. A value exceeding 15V indicates a regulator failure. A faulty generator will not produce more than 13V.
Checking the diode bridge
The tester is in the “resistance measurement” position. The straightener consists of two parts. One clip contains three diodes with anode contacts on the body. The other is with cathode ones. The whole valve in the forward direction will show 0 ohms. The reverse resistance is 600 kOhm. An infinite value means a break; a zero value means the diode is broken.
Winding measurement
To check the field windings, you need to touch the slip rings with the probes of the device. The working value is from 1.8ohm to 5ohm. Readings outside the specified numbers indicate a malfunction.
The stator windings are checked in two modes - among themselves, for ground. In the first case, a value of several ohms is accepted as correct. In the second option, an infinitely large reading satisfies.
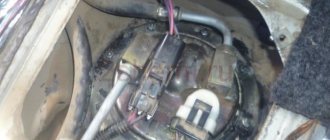
Bearing check
Many motorists know that often the cause of generator problems is problems with bearings. Diagnosis of this part begins with a careful external examination. Serviceable bearings should rotate easily. If damage is found, such bearings require replacement.
Typically, these situations include the following:
- if the generator makes howling sounds, it must be dismantled in order to troubleshoot the stator;
- if the generator does not make characteristic sounds, then it is enough to tighten the fastening nut;
- if after tightening the generator begins to make howling sounds, it means that the brushes and contact rings require wiping with a rag previously soaked in gasoline;
- If even after all the manipulations the generator is noisy, then replacement is inevitable.
How to check the rear and front bearing:
- To check the rear bearing, it is carefully rotated to detect whether the mechanism is sticking or if there is any abnormal noise.
- Checking the serviceability of the front bearing is carried out by holding the pulley with your hand. If this results in malfunctions or extraneous noise, then this part requires replacement.
Removal and installation of VAZ 2112 generator
The process of removing the unit will require a minimum list of tools:
- standard set of open-end wrenches, heads, wrenches;
- flathead, Phillips head screwdrivers:
- pliers;
- rags.
In hard-to-reach places it is more convenient to work with a ratchet wrench. Fasteners for machines with different configurations and year of manufacture differ. The most suitable equipment should be used.
Step-by-step instructions for replacing the generator on a VAZ 2112
- Place the car over the inspection hole.
- Raise the hood.
- Loosen the mounting bolt and disconnect the negative terminal of the battery.
- While under the car, remove the protective sheet and provide access from below.
- Disconnect the wires. If the protective rubber cover is torn, consider replacing it.
- Unscrew the alternator belt tension adjusting bolt on the bracket.
- Remove the top mounting bolt. The lower fastener is released from the inspection hole.
- Move the generator towards the cylinder block, reduce the tension, remove the belt.
- Completely dismantle the bolts, bushings, nuts, and remove the product to the workbench.
- After performing repair and maintenance work, insert, secure, and adjust the belt tension in the reverse order.
Improvements to the regulatory mechanism
Work to modernize the VAZ-2110 generator consists of:
- Removing a special tablet from a standard device, and taking a similar part from a foreign-made relay, followed by its installation in a standard device. The contact parts of the mechanism are welded to the body.
- Before carrying out modification work, it is necessary to bend the leads of the components. The mechanism parts are secured using standard screws. Soldering is done so that the element is completely covered with tin.
- Finally, the nuts are sealed to prevent them from loosening during the movement of the regulatory mechanism.
Using the tips given in this article, any motorist can easily carry out repair work on the VAZ-2110 generator with his own hands. To do this, you must carefully carry out in detail, step by step, all the necessary steps to dismantle and replace the generator mechanism on the car.
Therefore, we wish all motorists good roads and less hassle associated with car repairs.
Source
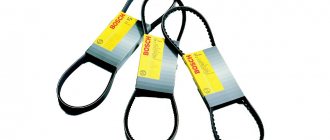
Replacing the alternator belt
The rubber ring used on the VAZ 2112 is available in two modifications.
The car model equipped with air conditioning has a larger diameter belt that rests on three pulleys. Motivation for installing a new belt:
- The warranty period ends, approximately 40 - 50 thousand kilometers;
- During the next maintenance, critical signs of product destruction (scuffs, tears, severe stretching, delamination) were discovered.
The procedure is carried out according to the method described above, with the exception of:
- there is no need to completely remove the bolts; it is enough to allow the generator unit to be tilted freely;
- no need to disconnect wires.
Tension the belt using the adjusting bolt. The normal value is considered to be a deflection of 1 - 1.5 cm when pressing the tape in the middle between the crankshaft and generator pulleys.
Replacing the diode bridge, relay-regulator, brushes
External signs of a defect in the diode bridge are rapid discharge of the battery, strong heating of the generator housing.
Symptoms of voltage regulator failure are described above. On the VAZ 2112 generator, the regulator and brush assembly are structurally combined.
Fixing the breakdown will not be difficult. Remove the device to a workbench. The electronics are hidden under a plastic cover. Carefully disassemble the rear part with a screwdriver and wrenches. Defective elements are replaced. The main requirement is extreme care.
Choosing a new generator
Despite the similarity of generators produced by different manufacturers, it is necessary to take into account a number of important factors.
The main arguments are the number of consumers, generation, and vehicle equipment. You should pay attention to the trade article, rated power, and originality of the product. It is more logical to provide a power reserve. Any device that does not operate at maximum loads will live longer. We should not forget about the wire cross-section and battery capacity. An increase in power entails an increase in current loads and overheating of the wiring. When choosing a new generator, you have to search for the golden mean. If energy consumption has not increased, additional consumers have not been connected, it is more correct to look for an analogue of the factory generator according to the article number. Source