Has the fuse blown? You need to look for the VAZ 2114 fuse box. We will tell you where it is located on the VAZ 2114.
This page presents a diagram of the VAZ 2114 fuses. Using it, you can easily determine which fuse in the VAZ 2114 has blown. See the location of the fuses on the VAZ 2114 here.
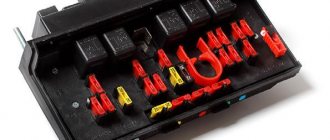
The first block is located under the hood near the windshield.
fuse box relay injector vaz 2114
Mounting block 2114-3722010-18
Circuit breakers
F1 (10A)
- Headlight cleaners (when turned on)
- Headlight wiper relay (contacts)
- Headlight washer activation valve
F2 (10A)
- Turn Signals and Relays - Hazard Light Interrupter (in Hazard Mode)
- Hazard warning lamp
F3 (10A)
- Tail lights (brake lights)
- Interior lighting
F4 (20A)
- Rear window heating element
- Relay (contacts) for turning on the heated rear window
- Socket for portable lamp
- Cigarette lighter
F5 (20A)
- Engine cooling fan electric motor and its activation relay (contacts)
- Sound signal and relay for its activation
F6 (30A)
- Power windows for front doors
- Power window relay
F7 (30A)
- Headlight cleaners (in operating mode)
- Relay for turning on headlight cleaners (coil)
- Heater fan motor - heater fuse
- Window washer motor
- Rear window wiper motor
- Rear window washer timing relay
- Windshield and rear window washer activation valves
- Relay (winding) for turning on the electric fan of the engine cooling system
- Relay (coil) for turning on the rear window heating
- Rear window heating indicator lamp
- Glove compartment lamp
F8 (7.5A)
- Left fog lamp
F9 (7.5A)
- Right fog lamp
F10 (7.5A)
- License plate lights
- Engine compartment lamp
- Instrument lighting lamps
- External lighting indicator lamp
- Heater lever illumination display
- Cigarette lighter lamp
F10 (7.5A)
- Left headlight (side light)
- Left rear light (side light)
F11 (7.5A)
- Right headlight (side light)
- Right rear light (side light)
F12 (7.5A)
- Right headlight (low beam)
F13 (7.5A)
- Left headlight (low beam)
F14 (7.5A)
- Left headlight (high beam)
- Indicator lamp for high beam headlights
F15 (7.5A)
- Right headlight (high beam)
F16 (15A)
- Turn Signals and Relays - Turn Signal and Hazard Light Interrupter (in Turn Signal Mode)
- Turn signal indicator lamp
- Rear lights (reversing lights)
- Gearmotor and windshield wiper activation relay
- Generator field winding (when starting the engine)
- Brake fluid level warning lamp
- Oil pressure warning lamp
- Carburetor choke warning lamp
- Parking brake warning lamp
- Signal lamp "STOP"
- Coolant temperature gauge
- Fuel level indicator with reserve warning lamp
- Voltmeter
Relay
K1
- Headlight wiper relay
K2
- Relay-breaker for direction indicators and hazard warning lights
K3
- Windshield wiper relay
K4
- Lamp health monitoring relay
K5
- Power window relay
K6
- Horn relay
K7
- Heated rear window relay
K8
- High beam relay
K9
- Low beam relay
Purpose of the relay in the main fuse block of the VAZ 2114/2115:
| K1 | Cooling system fan relay (On cars with an injection engine and an additional relay unit in the passenger compartment, there may be a jumper) Also, there may be a headlight washer relay |
| K2 | Turn signal and hazard warning relay |
| K3 | Wiper (Windshield Wiper) Relay Without this relay there will be no intermittent operation |
| K4 | Relay for monitoring the health of brake light lamps and side lights. Also, there may be three jumpers |
| K5 | Power window relay |
| K6 | Horn relay |
| K7 | Heated rear window relay |
| K8 | High beam relay |
| K9 | Low beam relay |
The easiest way to test most relays is to replace them with another known good one. However, not all relays are interchangeable; all relays can be exchanged with each other, except for the wiper relay, turn signal relay and lamp control relay
Mounting block 2114-3722010-60
Circuit breakers
F1 (10 A)
- Fuse for fog lights VAZ 2114, 2115 - rear fog light lamps and rear fog light indicator lamp
F2 (10 A)
- Direction indicators
- Relay-breaker for direction indicators and hazard warning lights (in hazard warning mode)
- Hazard warning lamp
F3 (7.5 A)
- Front interior lamp
- Central interior lamp
- Luggage compartment lamp
- Ignition switch illumination lamp
- Engine control lamp
- Brake lamps
- Trip computer (if installed)
F4 (20 A)
- Portable lamp connection socket
- Rear window heating relay (contacts)
- Rear window heating element
F5 (20 A)
- Sound signal
- Horn relay
- Cooling fan motor
- Fan fuse
F6 (30 A)
- Electric windows
- Power window relay (contacts)
F7 (30 A)
- Heater motor
- Heater fuse
- Windshield washer motor
- Electric motors for headlight cleaners (in operating mode)
- Cigarette lighter
- Glove compartment lamp
- Rear window heating relay (winding)
F8 (7.5 A)
- Fuse for fog lamps VAZ 2114, 2115 - Right fog lamp
F9 (7.5 A)
- Fuse for fog lamps VAZ 2114, 2115 - Left fog lamp
F10 (7.5 A)
- Side light lamps on the left side
- Side light indicator lamp
- License plate lamps
- Engine compartment lamp
- Instrument lighting switch
- Fuse for backlight lamps of switches, instruments, cigarette lighter, ashtray, heater control levers
F11 (7.5 A)
- Side light lamps on starboard side
F12 (7.5 A)
- Right headlight (low beam)
F13 (7.5 A)
- Left headlight (low beam)
F14 (7.5 A)
- Left headlight (high beam). High beam indicator lamp
F15 (7.5 A)
- Right headlight (high beam)
F16 (15 A)
- Direction indicators
- Relay-breaker for direction indicators and hazard warning lights (in turn indication mode)
- Reversing lamps
- Lamp health monitoring relay
- On-board control system display unit
- Instrument cluster
- Low oil pressure warning lamp
- Parking brake indicator lamp (brake lights)
- Brake fluid level indicator lamp
- Low battery indicator lamp
- Trip computer (if installed)
- Generator field winding (in engine starting mode)
Reasons for cooling fan failure
The occurrence of malfunctions in the 2114 car is common, especially when using the car every day. Problems with the cooling system occur in every third car. It is impossible to allow the motor to constantly overheat due to the fan not working. There are several reasons for airflow failure:
- Broken wiring in the motor connection circuit;
- Malfunction of the relay responsible for turning on the electric motor;
- Burnt fuse in the mounting block;
- Destruction of mechanical elements in the motor housing. Wear of the winding, destruction of the housing, moisture getting inside - all this leads to failure;
- Problem with contacts or wire blocks. Oxidation or breakage of wires at the connection point is a common situation.
You should always start checking the causes of a breakdown by connecting the electric motor directly. Next is to check the pre and relay. If the reason is not found, “dig” towards the wiring.
Fuse F5 20 Ampere
Frequent blowing occurs in the warm season, while in winter the device practically does not turn on. During movement through mud and puddles, the contacts on the motor body may oxidize. It is recommended to check the condition of this system before the onset of warm weather.
Source
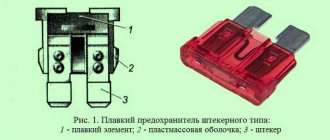
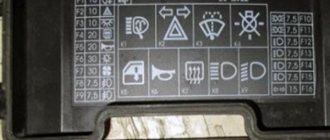
Difference in fuses by color
There are different numbers of fuses. They differ not only in rated current, but also in color. Each fuse rating has its own color.
| Fuse color | Denomination (A) |
| Light brown | 5 |
| Dark brown | 7,5 |
| Red | 10 |
| Blue | 15 |
| Yellow | 20 |
| White | 25 |
| Green | 30 |
| Orange | 40 |
| Red | 50 |
We hope our article was useful to you.
How to properly replace a burnt out element
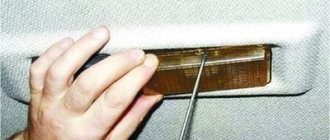
You need to pull the fuses out of the corresponding sockets using special plastic tweezers, which can be found here, in the upper right corner of the VAZ 2114 mounting block. You cannot pry fuses on non-energized circuits with any metal objects due to the risk of a short circuit. It should be taken into account that the electrical circuits of the sound signal, alarm, etc. are always energized. To ensure safety when repairing the circuits, the circuit must be de-energized - you just need to disconnect the wire from the “negative” terminal.
It is not always possible to visually accurately determine the performance of fuses. It will be possible to make a clear decision only after the “ringing”. To do this, you will need a regular tester, which will need to be set in advance to the “dialing” mode. After this, it will be enough to simply attach two terminals of the tester to the terminals of the suspicious fuses. If a characteristic sound is heard, the fuse is good - the cause of the malfunction of the car’s equipment is not in it, but probably somewhere further in the wiring or in the device itself.
VAZ cooling fan connection diagram
All the main electrical circuits and modifications for connecting the liquid cooling fan (CO) in VAZ cars of various models are provided. What is the essence of VO’s work? An electric motor with an impeller on a shaft is installed inside a rectangular metal frame, with which it is attached to the back of the radiator. When voltage (12 V) is applied to the contacts of the drive, it begins to work, rotating the blades and creating a directed stream of air, which, in fact, cools the antifreeze or antifreeze.
If the cooling fan does not work, do not rush to contact a car service. You can determine the cause of the malfunction yourself. Moreover, it is not at all necessary to have special skills for this - just study the reference material from 2shemi.ru and follow the instructions for checking/replacing it.
How to get to the right fuse
Almost the entire electrical circuit of the VAZ 2114 is protected by knife-type fusible elements. The most powerful consumers such as headlights, electric fuel pump, etc. are already mounted via a relay. Most fuses can be found in the so-called. fuse box VAZ 2114. However, this diagram has exceptions:
- Next to the battery in the engine compartment there is a fog light relay;
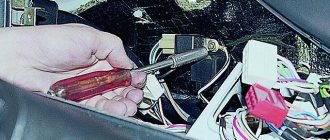
- The fuses for the injection system are mounted under the instrument panel.
No special tools are required to dismantle VAZ 2114 fuses. Therefore, first of all, look at the VAZ 2114 fuse box, which is located under the hood of the car opposite the driver next to the left pillar. In order to open the fuse box, protected by a plastic cover, you need to lightly push a couple of cover latches towards you, lift it and remove it. After this, you will immediately be able to see the modules responsible for the electrical safety of various vehicle systems.
The fan on the VAZ 2114 does not work - how to fix it? Pro Tips!
Overheating of the engine leads to serious problems: the pistons may jam, the cylinder block gasket may break, which leads to the need to overhaul the engine. To protect the power unit from overheating, it is important to maintain stable operation of the cooling fan. In this article we will discuss the operating principle of the device, its connection diagram, independent diagnostics and repair, as well as modernization of the control circuit. The instructions are fully suitable for VAZ 2115 and VAZ 2113 cars.
The fuse blows
If fuses are blowing frequently, then you have a wiring problem that needs to be fixed. In this case, it is better to entrust the electrical check to a specialist.
The domestic car VAZ 2114 (Samara-2) is built on the VAZ 21093 platform and is an improved version of it. The interior features a new instrument panel, a new steering wheel, an adjustable steering column, power windows and a new heater. All diagrams are taken from open sources and are intended to help in self-repair of the electrical equipment of this car. Enlarge images by clicking. The VAZ 2114 fuse box is located in the passenger compartment under the dashboard. When checking the electrical circuit of a VAZ-2114 car, you cannot check the serviceability of the circuits for a “spark” - this can lead to burnout of the current-carrying paths of the mounting block.
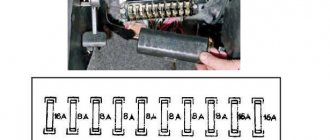
Description of fuses and relays on the ECU
Fuse order from top to bottom
- Fuse for fuel pump (15A).
- Fuse for the radiator electric fan relay, canister purge valve, DS, DC, mass air flow sensor (7.5A).
- Fuse for the electronic control unit, ignition module (7.5A).
It is worth noting that on the first models all fuses near the ECU were rated at 15A.
Relay order from top to bottom
- Fuel pump switch relay.
- Relay for turning on the electric radiator fan.
- Main relay.
How to make a replacement
If you are convinced that the cause of the malfunction lies in the fan motor, then the easiest way to carry out repairs is to completely replace the device. In this case, there is no point in spending money on a new casing. It will be cheaper to just buy a new electric motor.
Necessary tool
No special tool is needed. The work is carried out simply using 8 and 10 socket wrenches and a Phillips screwdriver.
Step-by-step algorithm of work
You can replace the cooling fan motor without removing the radiator.
- Disconnect the connector and device wiring harness from the casing.
- Unscrew the mounting bolts using a 10mm wrench.
- Unscrew the lower fastening nut.
- Using a 10 mm socket wrench, unscrew the mounting nut from the radiator.
- Using a size 8 socket wrench, unscrew the two pressure plate nuts.
- Remove the plate.
- Remove the electric fan along with the casing.
- Let's start dismantling the electric motor. Using a 10 mm wrench, unscrew the three mounting nuts and remove the engine along with the blades.
- Using a screwdriver, pry up the lock washer.
- And take it off.
- Remove the impeller.
- Put the impeller on the new motor. Make sure that the shaft pin fits into the impeller groove.
- Reassemble in reverse order.
How to check the fuse?
Next you need to find the faulty one. There are two ways (depending on the type of fuse).
We either simply take it out and see if the middle part is intact (in the photo - burnt out on the left, serviceable on the right).
The second method is more accurate. The fact is that the human eye may not notice a burnt jumper.
We do the following: Turn on the non-working circuit (for example, dimensions), without removing the fuse, look at the voltage at one end of the fuse, then at the other. If there is voltage at one end, but not at the other end, then the fuse has blown.