Almera G15 is provided with mounting blocks that include fuses and relays. Let's look at where they are located and what each element is responsible for.
Plug fuses
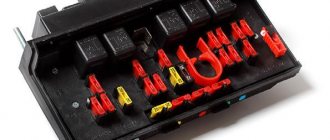
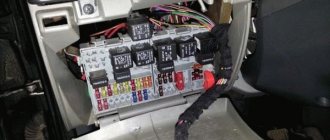
Fuse box under the hood of Almera G15
Fuse box under the hood
In the engine compartment, the Almera G15 mounting block is located on the left side, directly behind the battery. It contains fuses to protect the following sections of the electrical circuit:
- F1 – not used;
- F2 – power unit ECU, main relay coil of the engine control system (5A);
F3 – ignition coils, fuel pump, power unit control system (30A);
- F4 – radiator fan, for Almera G15 without air conditioning (30A);
- F5 – air conditioner and its cooling fan with low and high speed (40A);
- F6, F7 – anti-lock braking system (25 and 50A);
- F8 – equipment receiving power through the ignition switch and the left steering wheel switch (60A);
- F9 – interior mounting block (60A).
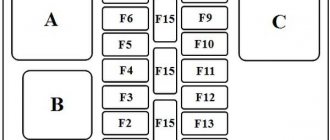
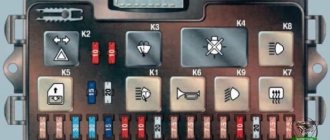
Fuse diagram in the block under the hood
Relays are also used:
- K1 – accelerated operation mode of the air conditioner cooling fan;
- K2 – air conditioner;
- K3 – slow operation of the cooling fan of the air conditioner or engine radiator for the Almera G15 without air conditioning;
- K4 – ignition coils, fuel pump;
- K5 – power unit control programs;
- K6 – cigarette lighter;
- K7 – fog light;
- K8 – heating complex.
Blown and good fuses
What are the fuses for the Nissan Almera N16 - we are studying the question
Any modern car is simply “stuffed” with electronics, without which a basic operation—a transport plant—would not take place. The electrical equipment itself is connected to all the parts and components of the machine. To protect the latter, special fuses will be used - they will “save” system consumers from possible serious damage. We will talk about a Nissan Almera classic car (versions 15 and 16).
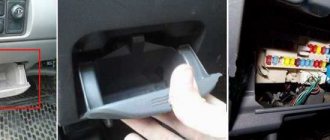
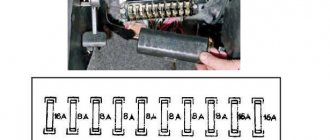
Fuse block in the interior of Almera G15
On the inside of the cover of the passenger compartment fuse box there are spare fusible links and pliers for removal.
In the interior of the Almera G15, the mounting block is located behind a protective plastic casing at the end of the dashboard on the left. It most often uses fuse links with a nominal value of 10A: F3, F4, F7, F9-F12, F15, F18, F19, F21, F39 . Fuses are responsible for the operation of the following elements:
Location of the fuse box in the passenger compartment
- F1 – wipers, switching unit, heated rear window (20A);
- F2 – fuel pump and ignition coil relay, engine ECU, instrument panel (5A);
- F3 – brake lights;
- F4 – turn signals, switching unit, diagnostic connector, immobilizer;
- F5, F8, F22, F24, F25, F29, F30, F31 – not used;
- F6 – automatic transmission (5A);
- F7 – reversing lights;
- F9 – left low beam;
- F10 – right low beam;
- F11 – left high beam;
- F12 – right high beam;
- F13, F14 – electric lifts of front and rear windows (30A);
- F15 – anti-lock braking system;
- F16 – heating of the front row of seats (15A);
- F17 – signal (15A);
- F18 – license plate illumination, dimensions for the left front and rear headlights;
- F19 – illumination of the glove box and instrument panel, dimensions for the right front and rear headlights;
Fuses in the cabin block Almera G15
- F20 – rear fog lamp (7.5A);
- F21 – heated external mirrors;
- F23 – connector for connecting power to the trailer (20A);
- F26 – airbags (5A);
- F27 – windshield washer complex (20A);
- F28 – heated external and rear windows (15A);
- F32 – lighting in the cabin and luggage space, instrument panel, multimedia system (30A);
- F33 – turn signals, hazard warning lights, central locking, wiper speed control, connector for diagnosing the power unit (15A);
- F34 – switching unit, central locking (20A);
- F35 – front fog lights (15A);
- F36 – heating system fan (30A);
- F37 – electric regulator of the position of external mirrors (5A);
F38 – multimedia system, cigarette lighter (15A);
- F39 – heating fan relay.
Main causes of burnout
To avoid having to change such “defenders” too often in the future, it is best to know the reasons for their breakdown (otherwise the new one will not “live” for long either). The most common include:
- frequent contact of the electrical circuit with moisture (and subsequent oxidation);
- poor contact of the protection element itself with the terminals (defective product);
- failure or break of the wire (you will need to resolder the broken section).
The only thing I would like to warn against is installing amateur elements instead of normal factory relays (usually paper clips or wire). Such “know-how” can negatively affect the operation of the entire electrical circuit and even lead to a fire in the fuel pump.
Previous article: Electrical equipment Nissan Almera classic, n16, n15 Next article: Replacing the cigarette lighter Nissan Almera classic, n16, n15
Purpose, types and colors of electrical fuses
Almera G15 fuses are a protective element of various electrical equipment from the following phenomena:
- short circuits;
- current overloads.
Their circuit can be made in one, two or three blocks. Moreover, each of them is responsible for the operability of the equipment complex, and a separate element is responsible for the protection of a specific device.
The following types of fuses are distinguished:
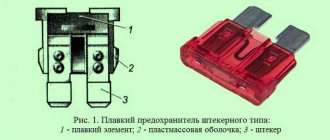
Plug fuses
Plug-in - the most common, consist of two plugs, between which there is a fuse-link for a certain amount of current. It is closed with a plastic casing. When the maximum value of the current flowing through the insert is exceeded, it burns out.
Bimetallic - in the specified type of fuses, the fuse-link is replaced with bimetallic plates with silver-plated contacts that fit tightly to each other. If an abnormal mode occurs, the plates heat up and open. Their further contact will occur after the metal has cooled.
Plug and bimetallic fuses with spring
Spring bimetallic - the principle of operation is identical to the previous type. The difference is that the bimetallic plates do not return to their original position on their own. This is achieved by introducing an additional spring into the design, which holds the plate in the off position. To restore the electrical circuit, you will need to press a button that will release the spring.
Fuses are produced with different current ratings. At the same time, manufacturers give each denomination a specific color. In most cases, the following colors are used:
- black – 1A;
- gray – 2A;
- purple – 3A;
- brown-yellow – 5A;
- dark brown – 7.5A;
- red – 10A;
- blue – 15A;
- yellow – 20A;
- white – 25A;
- green – 30A;
- orange – 40A;
- blue - 60A;
- brown – 70A;
- light yellow – 80A;
- lilac – 100A.
Color shades may vary
Most consumable item
If you look at the diagram showing the fuses for the Nissan Almera n16, you can see that element number 22 is responsible for the operation of the cigarette lighter. In fact, this one turns out to be the most “problematic”, since it breaks down most often. In itself, it turns out to be incredibly relevant even for those who do not smoke because it is used to recharge and power a wide variety of consumers. These include both DVRs and laptops (the latter, however, work using special converters).
Correct replacement of fuses
Before replacing the fuse in the Almera G15 mounting block, you will need to purchase a new high-quality element. Upon inspection, there should be no nicks or differences in the cross-section of the fusible insert. To finally verify the quality of the fuse, you will need to perform the following steps:
- Connect two wires to the fuse plugs.
- Connect one of them to the negative terminal, and the second to the positive terminal of the battery.
- If the insert burns out, then the protective element is of adequate quality. When observing the melting of the insert, we can conclude that the fuse is of poor quality.
A fuse of poor quality can cause a fire.
The procedure for changing the fuse in the Almera G15 is very simple. It is enough to remove the damaged element from the seat with special pliers or your hands. After this, install a new fuse.
You will first need to identify and eliminate the cause of the failure of the protective element. Work must be carried out with the negative terminal of the battery disconnected.
Removing the fuel pump
First you need to remove the rear seat element. The gasoline pressure must be relieved in the fuel line. The fuse box, which is located under the dash on the driver's left side, must be open. There is usually a marking on the top (cover) that makes this fuse easy to find as it is labeled FUEL PUMP. It should be in the second column (fourth from the top), and also have the designation 15A. The fuse must be removed from the socket. Start the car, and after 3-5 seconds the engine will stall on its own. This action must be repeated until the engine no longer starts (this usually works after 3-5 attempts). After that, wait a minute and repeat the steps. If everything is done correctly, the pressure will be released almost to the limit, that is, to the end.
If you do not want to find the fuse, you should disconnect the connectors from the flange (located under the seat) of the fuel tank. There is no need to remove the hoses immediately.
You need to remove the filler cap and then relieve the internal pressure in the gas tank. We unscrew the three black plastic bolts and remove the hole cover for inspection. Afterwards, the large plastic nut must be unscrewed by hand. We should be able to see a white glass, where the fuel pump is installed. This is a cylinder measuring 10 by 3 centimeters. Some models have an internal mesh, which is usually yellow with dirt.
The return hose must be removed by accurately pressing the plastic latch. This hose extends from the beginning of the engine, as well as an arrow that is directed to the fuel pump. With a little pressure, approximately one small glass of gasoline will flow out of the hose. The second hose will also need to be disconnected, but in this case nothing will leak out. The most important thing is that you need to be careful so that they are not damaged when removing them.
The connector with the harness must be removed and the fuel level meter, that is, the float located in the tank, disconnected. And then you need to remove the fuel pump itself.
Now you can start cleaning the fuel pump itself.
contact Group
If the starter relay does not turn on, it is worth inspecting the wire of the ignition switch contact group.
The “disease” of the Nissan Almera Classic is a frayed wire between the air filter and the left pillar. If the ignition switch contact wire is damaged, the car will not start.
Ignition switch contact group
What does the manufacturer testify to?
The fuel tank for Lada Kalina 2nd generation can be made of metal or a plastic product. The regulatory tank volume, which the manufacturer describes in its manual, is 50 liters. This figure would be a useless figure if owners were not aware of the actual fuel consumption.
Here the manufacturer claims a figure varying from 6.7 liters to 7.8 liters. The indicated “run” of values is directly influenced by factors such as:
- type of motor used;
- installed transmission option;
- driving mode;
- level of equipment (consumption increases in more expensive versions due to the use of a greater number of auxiliary comfort systems);
- driving style (taken into account by the owners themselves).
By the way, the manufacturer regulates the use of only 95 gasoline for all types of Lada Kalina units.
Today there is no owner who would not be “scared” by increased fuel consumption. For small cars in the budget category, to which Kalina actually belongs, the psychological barrier appears at around 10 liters per “hundred”. After this, the owner needs to contact the service to find out the reasons for such an excess from the manufacturer’s standards.
“We catch the problem by sound and smell”
It is rare for a starter to break down right away - it continues to work until the last minute. It is important to feel how it works. If you hear that it is having a hard time cranking the engine (as if it is chewing something inside itself), the reason may be the bushings. Because of this, the shaft is crooked relative to the axis and the starter needs more effort to start.
Worn and new starter bushings
If you hear a characteristic burning smell when starting the car, you should sound the alarm. This could be a burnt winding. After disassembly, you can find a faded layer of varnish on the winding. Having discovered the problem in time, there is a chance to get to the repair site without a tow truck.
Almera N16 starter repair
The Almera N16 starter is a starting mechanism that allows you to crank even a cold engine. Since the device requires significant force, the battery must provide a good charge. Drivers note situations when the trigger mechanism needs to be serviced. This may be indicated by a characteristic grinding noise when starting the internal combustion engine.
Before undertaking repair work, you need to understand where the device is located. If you look from below, from the pit, and stick your head between the gearbox, drive and lever, you can see the trigger mechanism to the left of the oil filter.
Removing the starter
To remove the starter, the Nissan Almera H16 car is placed above the inspection hole. This will make it easier to get to the device. It is fixed in place with two bolts (top and bottom). The top bolt can be tightened with a “14th” head. Due to the inaccessibility of the unit, you will have to tinker with the fastening.
Further manipulations are carried out under the car. If the crankcase protection is removed, then the view will be approximately the same as in the photo. You need to unscrew the negative terminal, the lower bolt. The housing of the triggering mechanism (its rear part) is moved upward, and the device is removed from its seat.
We disassemble and service the starter
Analysis of the device responsible for starting the engine on the Nissan Almera H16 begins with unscrewing two “10” screws and the terminal. The structure will be divided into two parts. There is a protective cover on the right side; you need to pry it off and remove it. The further procedure looks like this:
- The motor housing is tightened.
- The brush assembly is checked. To get to it, two screws are unscrewed. Depending on the length of the brushes, a decision is made about replacement or cleaning.
- From the second half, the main gear and three driven gears are removed.
- There is a gasket under the parts that needs to be saved.
- The Bendix together with the shaft, as well as the solenoid, are pulled out. The Bendix is removed from the shaft by pulling the bushing to the right side. The retaining ring goes to the left. You can pry it out with a screwdriver, and when returning it to its place, clamp it with pliers.
- The removed starter parts are wiped with a dry cloth. When cleaning, a good effect can be achieved if you use carburetor flushing liquid.
- The final touch is that the rotating elements are lubricated with lithol, and the structure is assembled in the reverse order. The main thing is to return the removed parts to their place, otherwise the breakdown of a unit that is not properly assembled may become even more serious.
Brushes require replacement if their length is less than 7 mm. Once you know the size of the part, you can determine whether you should buy a new one, or whether replacement can be put off for now. It may be necessary to repair individual elements of the device, replace failed consumables (the same brushes, for example). Unipoint brush code SH3301.
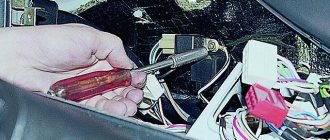
To remove the fuse, use tweezers-puller, which is located in the same mounting block
A faulty fuse can be identified by its blown jumper
How to change the oil in a Renault Duster box
Which is better, Nissan Almera or Nissan Almera Classic
Duster manual transmission oil is replaced every 10-15 thousand km or at the next maintenance. To carry out the work, take socket heads, a wrench, and a clean rag. To top up, use a pressure syringe. Lubricant should be purchased with characteristics similar to those already filled.
Servicing a manual transmission with your own hands is not difficult; every experienced driver can handle the task.
They begin changing the oil in the Duster gearbox by analyzing the fluid level in the system. It’s easy to do this yourself, although some motorists also turn to service stations. Sequencing:
- Drive the car onto a viewing hole, overpass or lift.
- Make a check from the side through the inspection hole onto which the threaded plug is screwed. The simplest option is to thoroughly wipe the manual transmission crankcase around the plug using a clean rag and remove the plug.
- Place your finger in the hole and assess the amount of liquid in the system, immediately check the aroma, shade, degree of contamination. When the level is very low, a control sample is removed with a suitable object such as a clean screwdriver.
If there is a deficiency, but the general condition is normal, adding lubricant will suffice. If the waste is dirty, has changed in smell or appearance, drain the oil completely.
Regular maintenance is necessary for the smooth operation of the manual transmission.
The transmission is topped up until the oil begins to pour out through the control hole. Then the threaded plug is returned and tightened sufficiently tightly. When measuring the aroma, shade of a lubricant, or the presence of a large number of foreign inclusions, a partial change will not solve the problem. You can get to the ventilation plug by removing the battery and preparing the site.