Many car owners unwittingly became acquainted with the mysteries of the idle speed sensor on their VAZ 2114. The real name of the controller is the idle speed controller (IAC). This is a complex unit in the system of injection engines, which is commanded by electronics (among motorists, “brains”). In case of incidents with IAC, the engine begins to “act up”, causing discomfort and troubles to the driver. Next, we will tell you where the idle speed sensor of the VAZ 2114 is installed, what signs indicate its error, and how to change the IAC yourself.
Purpose, device, operating principle of pxx
The idle speed sensor functionally plays the role of a stabilizer, an automatic engine speed controller in modes without traction (in neutral gear, when shifting gears).
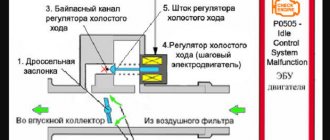
The mass flow sensor analyzes the amount of incoming air and transmits information to the electronic control unit, which dispenses the required volume of fuel through the nozzles. The crankshaft position sensor provides the number of revolutions. The electronic unit processes the message and generates control signals for the idle speed controller. The increase in revolutions of a cold engine occurs due to IAC. The engine is warming up. Starting movement (not recommended) without raising the temperature to normal is possible due to the participation of this regulator.
What does the pxx sensor on the VAZ 2114 consist of: 1 - valve; 2 — regulator body; 3 - stator winding; 4 — lead screw; 5 — plug terminal of the stator winding; 6 — ball bearing; 7 — stator winding housing; 8 - rotor; 9 - spring
The adjustment device is made in the form of a cylinder with two mounting ears. A spring-loaded conical needle is built into one end. Inside the housing there is a DC stepper motor containing two windings. Supplying control signals to the first circuit extends the conical needle, and retracts it to the second circuit. There is a detachable block on the side surface.
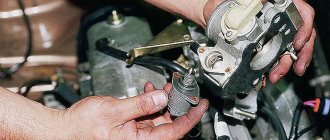
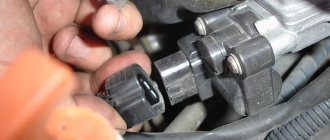
The device is located on the throttle body body, under the air duct hoses. Adjacent to the throttle position sensor.
Where is the pxx on the VAZ 2114
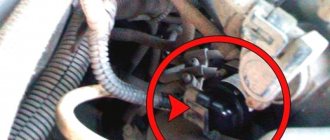
If you don’t know where the pxx sensor is located on a VAZ 2114, then I hasten to describe the situation to you in the photo below.
Where is the pxx on the VAZ 2114
Purpose of the idle speed controller
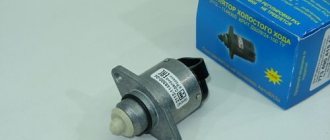
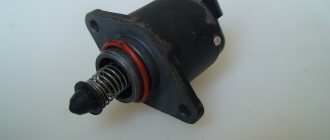
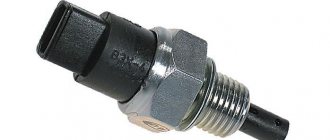
Standard idle speed sensor VAZ 2114
In different documentation, this mechanism has different names. It is sometimes called the idle air control valve. In cars with carburetor engines - an electromagnetic valve, with an injection engine - a sensor or idle air regulator (IAC).
The VAZ 2114 uses an IAC with a stepper electric motor and a spring-loaded conical needle. This needle, when moved, regulates the amount of air supplied through the throttle fitting. The sensor is located on the throttle assembly, secured with two screws.
The IAC is connected to the electronic control unit, and the engine can operate in a cold state, and this provides additional air supply. This is how the mixtures combine when the throttle valve is closed.
The important role of a small device in a serious unit
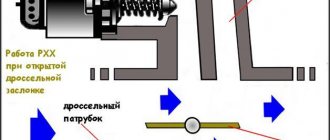
Participating in the general algorithm of operation of the vehicle’s electronic system, the IAC is designed to automatically supply a certain amount of air when the throttle valve (DZ) is closed. Thus, it maintains the set idle speed (ISR) of the engine, preventing it from stalling when the gas pedal is released and the gearshift lever is in neutral position. The operating principle of the UDS is as follows:
- the amount of air entering through the remote control is controlled by a mass (total) air flow sensor - mass air flow sensor;
- receiving information from it, the controller (electronic control unit) regulates the supply of the required amount of fuel to the fuel injectors (Fuel Injection) of the car;
- he, using the data from the crankshaft position sensor (DPKV), controls the IAC in accordance with the required speed;
- automatically sets the speed when the engine warms up.
Having safely got out of the intersection, you need to make sure that this regulator is working. Since it does not have a self-diagnosis system, the VAZ 2114 computer may not generate errors. You will have to check it using a general analysis of engine operation.
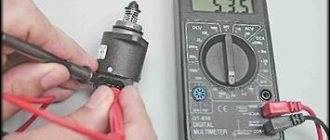
Method for checking the sensor using a multimeter
The most reliable and common way to check the functionality of the sensor is to use a multimeter. But to do this, the regulator must first be removed. Typically, it is secured with several screws near the throttle sensor, but on some cars it can be secured with a special solution or varnish.
It is impossible to dismantle the IAC using force, since there is a high risk of damaging the intake system. In such a case, you will have to remove the entire throttle assembly.
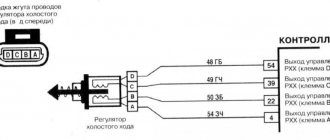
To check the electric motor, it is necessary to measure the resistance of the windings. The multimeter contacts must be connected in turn to each of the windings A and B, C and D. If everything works properly, the data obtained will fall in the range of 40–80 Ohms.
As an additional check with a multimeter, the contacts can be swapped. The sensor, in this case, should indicate an open circuit.
Main functions of IAC
The device is designed to control the crankshaft speed in the engine.
- This is a valve with a cone-type shut-off needle that can be moved using a stepper motor.
- The valve is located in the throttle channel.
- The IAC determines the required amount of air and supplies it bypassing the throttle valve.
- In this way, the engine speed is adjusted.
- Depending on the operating conditions of the engine, the sensor in question increases or decreases the engine speed to optimal values for idle mode.
In addition to the main functions of the device, this sensor also indirectly affects the reduction of engine exhaust emissions.
The process looks like this:
- When engine braking occurs, the throttle valve closes sharply.
- The sensor works to increase the supplied air bypassing the damper.
- The result of this is the combination of the fuel mixture with air, which reduces the toxicity of exhaust gases.
The idle speed sensor is located next to the throttle sensor and is secured with two screws or simply fixed with glue.
Device Features
The idle mode is activated if the gear shift lever is in the neutral position and the gas pedal is not pressed at this moment, but the engine is turned on and the throttle valve is closed. The VAZ idle speed controller (hereinafter referred to as IAC) maintains the operating condition of the engine at this moment. It helps the engine gain the necessary power even without preheating the unit. The design of the device is quite simple:
- Regulator.
- Electrically stepper motor.
- Cone-shaped needle.
It all works something like this: when you turn the ignition key PPX, the VAZ begins to advance the needle, opening or closing the hole in the throttle pipe. This allows you to enrich or, conversely, combine the air-fuel mixture in the combustion chamber. In other words, as long as the throttle valve is closed, the idle mode is activated, and the engine steadily increases speed without active load.
The IAC is located inside the throttle valve assembly in a special seat. Removing it is quite simple, unscrewing just a few fasteners using a Phillips screwdriver. The first reason for checking the regulator may be interruptions in the operation of the machine at idle.
Appearance and location
DXX is responsible for adjusting the idle speed. Hence the other name - idle air control. Externally, the device is a miniature electric motor, at the end of which there is a small cone-shaped needle.
Where is he located? The IAC is attached to the throttle body using two screws or regular varnish. Next to the DHW there is a throttle position sensor. Therefore, there should be no problems finding the sensor.
Repair rules
The idle speed regulator is a special executive function that is necessary for the engine to operate in normal mode. If it turns out to be faulty, the indicator that indicates this fault will not light up. This means that identifying the problem can be quite simple. All that remains is to eliminate it as soon as possible.
The regulator is a stepper motor that makes it possible to guarantee a certain level of air flow that bypasses the closed damper.
The flow level is set by the car's electronics. Such a complex system allows the motor to operate as evenly and stably as possible. Also, the electronic system of the machine performs the function of protecting against external factors, because the engine operates normally under almost any circumstances.
Signs of malfunctions of the VAZ 2114 px
Manufacturers of the VAZ 2114 did not provide diagnostics for the idle air regulator.
The on-board display will not display a message indicating an error in the operation of this mechanism. Inscriptions about low and high speeds do not guarantee breakdown of the IAC. The driver may notice changes in engine operation and suspect a malfunction based on indirect signs. The following symptoms are usually called:
- the engine suddenly “stalls” at idle;
- idle speed “floats” (randomly increases or decreases);
- when starting a cold engine, it is not possible to increase the speed;
- at the moment of changing gear, switching to “neutral” gear.
Such signs are caused by the unstable functioning of several sensors that take a direct or indirect part in preparing the fuel mixture (for example, a throttle position sensor).
Checking the RXX multimeter on a VAZ 2114
If you have a question about how to check the pxx multimeter on a VAZ 2114 car, then you have come to the right place. You need to take a multimeter and take several measurements; see the photo for what conclusions you need to check.
Checking the RXX multimeter on a VAZ 2114
Check engine
Modern injection engine control systems are capable of recording some malfunctions of the idle speed sensor. As an example, let’s look at the recorded deviations indicated in the error mask (list of malfunctions that cause the Check engine to light up) of the VAZ M7.9.7 engine control unit under EURO III toxicity standards:
- P1509 - IAC control circuit overload;
- P1513 - IAC control circuit, short to ground;
- P1514 - IAC control circuit, open or shorted to +12 V.
Also, when decrypted, the error code may appear as “IAC malfunction.” In this case, you should not immediately buy a new regulator, as the problem may be in the power wires.
Error codes can be read through the diagnostic connector using a special scanner. Decoding codes can be easily found on the Internet. In most cases, thorough cleaning will help delay replacement. The most accurate and quick way to determine a faulty idle speed control is by monitoring its operation in real time. This will require an oscilloscope, as well as diagnostic skills. It will not be possible to apply voltage to the sensor terminals to observe the movement of the rod. The IAC is controlled by Pulse Width Modulation (PWM). There are special devices on sale for quickly checking the IAC of VAZ cars. But their cost is too high if we talk about the frequency of use when repairing a personal car. On amateur radio forums you can find testers made by yourself.
Checking the sensor circuit
- Before you start checking the sensor, make sure that the multimeter is working and ready for use.
- The idle speed sensor and its “wires” are below the throttle sensor. The throttle sensor is marked with an arrow. The block has been removed from the idle speed sensor.
- Next, open the hood and disconnect the power supply from the sensor.
Please note that on cars equipped with a 1.6-liter engine, it is necessary to remove the throttle assembly mount and move it away from the receiver itself by about a couple of centimeters.
Take a multimeter
- Then, on the multimeter, set the “voltmeter” test mode.
- We connect the black probe to ground, and fix the red one to the terminals of block A - D.
- With the help of an assistant, turn on the ignition and look at the parameters given by the multimeter. The readings must be at least 12 volts . If the voltage is lower, then there are problems in the battery, and when there are no values at all, then the problem should be looked for in the wires or the motor control unit.
If after checking it is determined that the circuit is working properly, then you can proceed directly to the sensor.
FAULTS
There are certain signs of a malfunction of the IAC, by which you can understand that the IAC sensor is faulty:
- The idle speed is constantly changing - it either increases or falls (the speed floats).
- When you shift the throttle when you release the gas pedal, the engine stalls. It may also be that the internal combustion engine does not idle at all.
- The engine is unstable at 20 rpm.
- On a cold internal combustion engine there is no warm-up mode, that is, increased speeds are not set.
- Elevated speeds are maintained all the time (for example, 1500 rpm).
These signs of a malfunction of the air flow sensor do not always indicate a bad sensor; it is quite likely that the mass air flow sensor is not working.
What error codes appear when the IAC is faulty?
If the idle air control is faulty, the on-board computer may display the following errors:
- P1509 - IAC control circuit overloaded;
- P1513 - IAC control circuit, short to ground;
- P1514 - IAC control circuit, open or shorted to +12 V.
When deciphering fault codes via the Internet or in the vehicle's operating manual, you may sometimes encounter definitions indicating problems with the operation of the IAC. They often indicate a regulator failure. Errors can be seen not only on the on-board vehicle, but also when diagnosing a car using a scanner. Sometimes they indicate not sensor defects, but contact failure.
Signs of breakdown
- Unstable idle (floating speed).
- Spontaneous increase or decrease in engine idle speed.
- The car stalls when you let off the gas.
- After starting a cold engine, there are no warm-up speeds. Regardless of the throttle position, to reduce the ECU catalyst warm-up time by 200-300 rpm. raises idle speed. If the IAC is faulty, the stepper motor will not be able to adequately shift the position of the rod with the conical needle, thereby increasing the flow area of the bypass channel of the throttle assembly.
- When powerful current consumers are turned on, the speed drops or begins to float. Turning on the air conditioning compressor, cooling fan, or combination of electrical devices that load the generator increases the load on the engine, which leads to a drop in the number of revolutions. Therefore, in idle mode, the ECU, using a regulator, increases the flow area of the bypass channel, thereby equalizing the speed.
Diagnostic methods
Before proceeding with the replacement, we recommend that you really make sure that the cause of all problems with your VAZ 2114 is the faulty IAC. To do this, there are two main ways to check the status of the device.
Explore both to see which diagnostic option is best for you.
Visual inspection
First you need to conduct a visual inspection. In this way, you can detect body defects, needle wear, and carbon deposits. If deposits form, you can clean them with carburetor cleaner. It is also recommended to clean the entire throttle body as it is in a similar condition.
Using diagnostic programs
The operation of the IAC can be checked using a diagnostic adapter and special programs. For example, you can use the simplest ELM327 adapter and the OpenDiagMobile program. In the program menu you need to select the desired position of the XX regulator and watch the operation of the valve. It is better to set it at least 20 steps more than the current position.
Checking the regulator resistance
To do this, we will need to measure the resistance between terminals A, B, and C and D after disconnecting the sensor terminal. We move the multimeter to the position of measuring resistance at the limit of 0-200 Ohms (Ω).
The normal value is within 50-55 Ohms. The resistance between A and C, B and D must be infinity.
Checking with throttle assembly
There is another way to diagnose IAC. To do this, you will need to remove the throttle assembly from the studs along with the sensor.
By connecting the valve connector and turning the ignition on/off, you can observe the operation of the IAC live. See how the needle works, if it is rubbing somewhere, check the evenness of the stroke, hear suspicious sounds.
Wiring check
For this we need a multimeter. With the engine off, remove the connector from the sensor. We set the measurement limit on the measuring device to 0-20 V DC voltage. We measure the voltage at the connector. Normally it should be 12V.
How to check the functionality of the device?
You can independently check the operating condition of the IAC; there are several ways to do this. They are as follows:
- Using measuring instruments. We arm ourselves with a multimeter or tester. We remove the regulator from its seat and connect the battery. We connect the block with wires to the IAC, and then turn the ignition key. We measure the voltage at the terminals, it should be no less than 12 V. The ideal value is 13.5 V. If the voltage is less, check the battery; if there is no voltage at all, it is an open circuit. Check the integrity of the contacts, there may be a problem with them.
Diagnosis of IAC mechanics
The mechanics may be broken. The main thing that is checked during diagnosis is the mobility (length) of the bolt cone. The 100% condition of the device can only be determined with a special stand or a special tester, but an eye check can also reveal the cause of the problem.
Checking the sensor for mechanical service involves removing it. Procedure:
- We put the vehicle in handbrake.
- Remove the “–” terminal from the battery.
- Disconnect the block from the valve.
- We clean, wipe the place where the product was located, the fastenings.
- Unscrew the fasteners and remove the part.
Instructions on how to check the idle speed sensor on a VAZ 2110 (injector, 8 or 16 valves) after removing it:
- We connect the sensor to the block.
- We connect the battery.
- We activate the ignition - the cone shutter should move forward. If this is not observed, there may be a malfunction of the rod (possibly coking) or the motor. The norm for the protrusion of the needle (cone) from the body of the product is 23 mm. When operational, if power is supplied, the rod changes position.
Which sensor should you choose?
In order to correctly approach the selection of an idle speed sensor for a VAZ-2114, you should know that the last two digits on the sensor article number have a special meaning. Because if the article number of the old one ended with “ 01 04 will be replaced , then there will be no sense in this, because it simply will not work properly.
Native sensor and analogue
Sensors from numbers “ 01 ” to “ 02 ” and “ 03 ” to “ 04 ” are considered interchangeable, respectively.
When choosing this device, also pay attention to counterfeit goods, because there are plenty of them on the modern market.
Cleaning, repair or installation of new
To carry out any of these activities, you will have to partially disassemble the UDS.
Before starting work, you need to prepare consumables and tools:
- carburetor cleaning fluid;
- WD-40 lubricant;
- rags and cotton swabs;
- slotted screwdriver;
- 13 mm socket wrench with ratchet;
- dismantle the VAZ 2114 engine casing;
- remove or loosen the fasteners of additional commutations that are located on the UDS; air filter pipe;
- throttle cable;
- in case of a critical malfunction, replace it with a new one, similar to the faulty one;
- when disassembling the IAC, it is necessary to monitor the integrity of the electrical wiring connections;
On the VAZ 2114, like on any other car, there are no insignificant or unnecessary parts and components. When carrying out repairs or maintenance of some of them, you should not miss the opportunity to check the serviceability of other mechanisms and devices that are functionally related to them.
Examination
There are several ways to check the functionality of the flow sensor. But first you need to determine where the desired object is located.
And our hero is in the engine compartment. Find the air filter pipe there. It is on this that the mass air flow sensor is located, which monitors the air flow passing through the filter. Replacing it is simple - just dismantle the device by removing it from its fasteners and putting a new one in place.
Now regarding the verification.
- Disconnect the sensor by disconnecting the wiring harness from the connector. Press the latch at the bottom and you'll be good to go. Now start the engine and raise the speed to at least 1500 rpm. By turning off the sensor, the car will perceive this as an emergency condition, so the mixture will be prepared depending on the current throttle position. Drive a short distance. If the car accelerates faster than usual, the mass air flow sensor has definitely failed.
- Replace the firmware. The original firmware of the electronic control unit is often changed. Therefore, we cannot find out which sensor operation algorithm was prescribed in the case of the first verification method. The throttle valve has a stop; a plate approximately 1 millimeter thick should be placed under it. This will increase the speed. Now the chip with the sensor is disabled. If the mass air flow sensor does not work, the engine will stall. If this does not happen, then the firmware is not original, the steps of the idle speed control are written incorrectly.
Checking with a multimeter
To do this, you will have to use a multimeter. And how can I check the functionality of the sensor using this method? Select the DC voltage measurement mode on the device and set the maximum value to 2V.
Check with a multimeter
Separately, you should familiarize yourself with the connection diagram in the case of the VAZ 2114.
Subsequence
Wire color
Meaning
Power output
Main relay output
In some cases, the color may differ, but the sequence always remains the same. This will prevent you from getting confused.
Homemade IAC tester
In some cases, checking the idle speed control with a multimeter is borderline useless. For example, on injection VAZs. In this case, the multimeter data will not be informative, since the main problem is coking of the screw pair. This problem leads to the sensor becoming stuck, causing it to simply not provide a constant flow of air.
Some craftsmen independently manufacture devices for checking IAC in such a situation. For a homemade tester, you need to have a 6V AC phone charger transformer on hand. If you use the controllers alternately, you can check the forward and reverse stroke of the regulator. The working device will illuminate the indicator light with a dim light, and the opposite effect will indicate jamming and the need for repair.
Calibrating a new IAC
What should I do if the test reveals that the sensor needs to be replaced? It needs to be calibrated.
- We check the distance from the end of the rod to the mounting plate, it should be no more than 23mm.
- We disconnect the minus from the battery, de-energizing the ECU.
- Install the regulator.
- We connect the battery back.
- Turn on the ignition for 5 seconds without starting the engine. At this time, the IAC calibration occurs.
- Turn off the ignition to complete the calibration.
- We start the engine and observe the idle speed.
Now you know how the idle air regulator works, how to check it and, if necessary, replace it. As you understand, there is nothing complicated about this and all operations are accessible even to a novice car enthusiast.
How does this device work?
When the ignition is turned on, the rod completely blocks the air channel and returns to its original position. At the moment of his return, the controller counts his steps. Their number may vary, but depends mainly on the controller firmware. When the engine warms up, it opens the idle valve one gap, and while the warm engine is running, it supplies a portion of the air mixture depending on the need.
Signals for determining the required amount of air come from the mass air flow sensor. The controller reads and determines its need in order to issue a control pulse to the pxx. The engine crankshaft position sensor and its signals also participate in the control; the position of the sensor’s conical needle is adjusted through the control unit.
Replacing pxx on a VAZ 2114
Replacing pxx requires preliminary preparation, eliminating possible surprises.
To replace pxx you need:
- perform a preparatory inspection,
- determine the essence of the problem,
- explore possible repair methods,
- stock up on the required spare parts, tools, and consumables.
Required Tools
To work you will need:
- working regulator;
- Phillips screwdriver;
- M13 head, ratchet driver;
- can of VD-40;
- rags;
- liquid for flushing carburetors;
- multifunctional measuring device;
- source of air flow (compressor, industrial hair dryer, special spray can).
Repair procedure for idle speed sensor
Typically, repair work is carried out in several ways. The reasons for the differences may be the vehicle’s equipment, level of training, style, habits of the mechanic, unforeseen breakdowns that occur along the way.
Changing the sensor can be done in two ways:
- with disconnection of preparation elements, air supply,
- without detailed disassembly.
Below we will consider the second option, which includes a minimum number of technological operations. If it is not possible to provide convenient access to the dismantling site, there will be an additional need to service, replace, or clean other adjacent parts, it is worth using the first method.
Step-by-step instructions for replacing the idle speed sensor on a VAZ 2114
- Raise and secure the hood.
- Turn off the power to the car - loosen and remove the negative terminal of the battery.
- Remove the engine casing.
- Carry out an external inspection of the fastening hardware, if necessary, clean it, treat it with a penetrating agent, and wait for the rust to break down.
- Unscrew the nuts securing the throttle assembly.
- Remove the remote control from the studs and carefully move it slightly to the side, freeing access.
- Disconnect the connector from the IAC block.
- Use a screwdriver to unscrew the screws and pull out the idle air control. There are cases of rigid fixation of mounting screws (cross-shaped grooves are painted over and drilled). This option will require dismantling the entire assembly, followed by continued disassembly on a table or workbench.
- Inspect the sensor. Check the windings with a tester to make sure there is a malfunction. Replacing a working device with a new one will not bring success. We'll have to look for another culprit for the car's unstable behavior.
- The wires of the first winding go to contacts A, B of the connector block, the second - C, D. The normal resistance AB (CD) is 53 Ohms. There should be no electrical communication between the two circuits (AC) - the device will show infinity.
- The serviceability of the device will raise suspicions about the integrity of the wiring. With the ignition on, measure the supplied voltage at the cable connector suitable for the IAC. The value should be at least 12V. Absence is a sign of a wire break or a problem with the control unit. Understatement - the need to charge the battery.
- Clean, rinse with carburetor fluid, wipe the assembly seat. Dry with air flow - no moisture should get inside the regulator.
- The surface of the cone should be flat, smooth, excluding bumps, sagging, and dirt. Otherwise, the calibration hole in the housing will not close tightly, and the fuel mixture will receive excess air.
Attention! On the new sensor, the spring-loaded needle can be extended to its full length. Before installation, the needle should extend to a distance of no more than 23 mm from the edge of the housing.
Trying to push the needle in manually is strictly prohibited. Such actions will cause the mechanism to malfunction. It is logical to use a special stand at a service station. Fans of radio engineering and electronics will be able to independently assemble an electronic device that supplies step control pulses to the sensor windings, extending and retracting the needle. You should first test the assembled device on an old sensor.
- Lubricate the O-ring on the device body with engine oil (for example, using a dipstick).
- Insert the working sensor into the seat.
- Reassemble in reverse order, lubricating the threaded connections.
- Reinstall the battery terminal and tighten it.
- Turn on the car's power with the ignition key. Wait 5 seconds. The on-board electronic control system will calibrate the needle extension.
- Start the engine and let it run without pressing the gas pedal. Observe the instrument arrow on the panel. As the engine warms up, the speed changes smoothly, without jerking.
- A negative result indicates the presence of an arc fault.
- The physical performance of components and mechanisms leads to the need for computer diagnostics, settings, and programming of engine operating modes.
Removing a faulty device
- Place the car on a flat surface with the handbrake on;
- Raise and secure the hood cover;
- Turn off power. This moment is not on duty - it is mandatory!
- Remove the motor protective cover;
- Loosen the clamp and remove the rubber tube coming from the air filter;
- Remove the fastening of the VF pipes and the corrugation;
- Unscrew the mounting bolts and pull out the cable running from the throttle valve to the gas pedal.
Designation of the idle speed sensor - Clean the entire surface around the throttle assembly with a rag;
- Lubricate the mounting screws of the remote control and idle air control with WD-40 so that they can be easily unscrewed;
- Unscrew the nuts by 13 mm and pull out the throttle assembly;
- Disconnect the IAC and remove it from the terminals;
- If there is dirt in any places, it must be wiped off thoroughly;
- Use a screwdriver to unscrew the mounting bolts of the remote control and IAC;
- Remove the valve from the mounting socket.
Sources
- https://provaz2114.ru/elektrika/priznaki-neispravnosti-rhh-na-vaz-2114.html
- https://vaz-remzona.ru/rhh-vaz-2114/
- https://ladaautos.ru/vaz-2115/gde-raspolagaetsya-datchik-xolostogo-xoda-vaz-2115.html
- https://www.vazzz.ru/zamena-rhh-vaz-2114-8-klapanov/
- https://ladafakt.ru/datchik-rhh-vaz-2114-priznaki-neispravnosti.html
- https://carfrance.ru/kak-proverit-datchik-xolostogo-xoda-na-vaz-2114/
- https://vaz-2114.info/9-priznakov-neispravnosti-datchika-holostogo-hoda-vaz-2114/
- https://elm3.ru/diagnostika/regulyator-holostogo-hoda-rhh
- https://osensorax.ru/rashod-uroven/datchik-holostogo-hoda-vaz-2110
- https://pricurivatel.ru/proverka-regulyatora-xolostogo-xoda-multimetrom.html
- https://remontvazov.com/rxx-zamena-remont-priznaki-neispravnosti
Replacement
To work you will need:
- New regulator suitable for your VAZ 2114;
- Rags;
- Crosshead screwdriver;
- 13mm wrench;
- Carburetor cleaner;
Having the necessary tools and materials available, you can get to work.
- Place the car on a level surface and turn on the handbrake.
- Raise the hood and secure it firmly to avoid unnecessary injury.
- Disconnect the negative terminal from the battery. IAC is an electrical device, therefore this event is mandatory.
- Remove the protective casing from the power unit.
- Loosen the clamp slightly to disconnect the rubber tube from the air filter connection. This is necessary so that the tube does not interfere.
- Remove the clamp that holds the air filter pipe. The corrugation is disconnected and moved slightly to the side.
- The fastening screw of the cable going from the gas pedal to the throttle valve needs to be loosened slightly.
- Use a rag to remove all dirt near and on the throttle assembly itself.
- Treat the throttle assembly mounting nut, as well as the IAC mounting screws, using the almighty WD40. This will make dismantling easier.
- Remove the throttle assembly completely. To do this, unscrew two nuts using a 13 mm wrench.
- Remove the sensor connector from the terminals.
- If there is dirt at the contact points between the DHH and the throttle assembly, be sure to remove it with a rag.
- Using a screwdriver, unscrew the two fasteners that connect the throttle assembly and our desired sensor.
- Remove the regulator from the mounting socket.
- Clean the entire throttle body with carburetor cleaner.
- Install the new regulator in the same position as the newly dismantled DXH was in.
- Use engine oil to treat the new rubber gasket, which should come with the IAC.
- Replace the two screws and make sure the adjuster is firmly seated in the throttle body.
- Return the remote control to its place and check how securely the nuts are secured.
- Connect the connector to the device terminals.
- Reinstall the cable, pipes and tubes. Tighten all clamps properly.
- Reinstall the engine protective cover.
Replacement procedure
After assembly, a very important stage remains - calibration of the new IAC. To do this, you need to connect the battery and turn on the ignition. 10 seconds is enough. During this time, the electronic control unit will perform calibration on its own.
That's it, the new regulator is ready for use. To avoid problems with replacement, watch the training video.