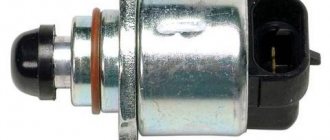
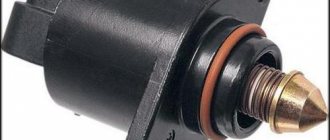
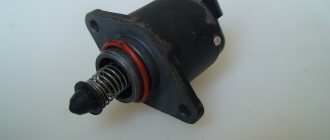
In the VAZ 2114 device, the IAC (idle speed regulator) is a mechanism that allows you to automatically stabilize and regulate the idle speed of the vehicle’s internal combustion engine. The XX VAZ 2114 sensor is essentially an electric motor with a conical needle mounted in the housing.
Moreover, if the engine is idling unstably, the possibility of failure of the idle speed controller should be taken into account. The breakdown can be identified through diagnostics or by some visible performance indicators of the car.
However, taking into account the technical and design features, eliminating the breakdown will be quite simple. Next, we will look at how to check the idle air regulator and replace the specified element.
Idle air control on VAZ 2114: signs of IAC malfunction
If instability occurs in the idle speed, the first thing car owners are advised to do is check the condition of the idle speed sensor. Instability of the operation of the DXX or the XX regulator is manifested in the following:
- When driving, the car stalls when changing gears;
- The revolutions then drop sharply, then begin to increase again.
If you find one of these problems, the IAC will most likely have to be replaced. But first, let’s figure out what kind of device this is.
Where to buy car accessories
Spare parts and other products for the car are easily available for purchase at auto stores in your city. But there is another option that has recently received significant improvements. You no longer need to wait a long time for a parcel from China: the AliExpress online store now offers the opportunity to ship from transshipment warehouses located in various countries. For example, when ordering, you can specify the “Delivery from the Russian Federation” option.
Follow the links and choose:
| UTRAI starter 4 in 1 air compressor 24000mAh | Idle air control valve for Daewoo | Car Inverter 6000W Peak DC 12V/24V AC 220V |
| Automotive compass AUTOOL X95, horizontal inclinometer | 12V car heater | EVA mats in a VAZ Lada Samara car |
Appearance and location
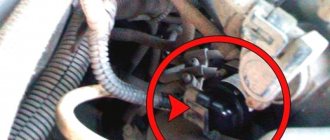
DXX is responsible for adjusting the idle speed. Hence the other name - idle air control. Externally, the device is a miniature electric motor, at the end of which there is a small cone-shaped needle.
Where is he located? The IAC is attached to the throttle body using two screws or regular varnish. Next to the DHW there is a throttle position sensor. Therefore, there should be no problems finding the sensor.
Causes of failure
The most common IAC breakdowns on the VAZ 2114:
- Air leaks from joints;
- Cap contamination;
- Failure of the IAC armature;
Air leaks from joints
This problem occurs due to a violation of the sealing of engine joints due to rivets falling out or the sealing ring becoming obsolete, which leads to the leakage of unaccounted air. Unaccounted air leads to an incorrectly composed fuel mixture and, consequently, to incorrect operation of the internal combustion engine intermittently.
Contamination of the cap (valve)
Contamination occurs due to crankcase gases entering the throttle assembly, which leads to the formation of carbon deposits on the IAC valve. Crankcase gases appear in the remote control due to a worn-out CPG, and small ventilation (breather) is connected to the intake corrugation.
Armature burnout
In a permanent motor, the armature has a winding, which, due to jamming, burns out and disables the IAC. This kind of breakdown occurs quite often.
Malfunctions
The peculiarity of the idle speed sensor is that it is impossible to trace the occurrence of a malfunction due to the operation of the on-board computer. The system does not recognize a breakdown, so everything has to be done manually.
There are several characteristic signs that can tell you about problems with the XX sensor:
- The car often stalls when idling;
- A phenomenon called floating speed occurs;
- There are no increased speeds when starting a cold engine;
- If the gear is switched off, the engine may stall spontaneously.
There are also a few errors on the on-board computer, but you shouldn’t rely solely on them.
| Error code | What does it mean |
| 0505 | DXX error |
| 0506 | Low idle speed |
| 0507 | Increased idle speed |
Many people confuse the signs of IAC failure with the throttle position sensor. The symptoms are indeed very similar. But the point is that the on-board computer signals a breakdown of the position sensor, but regarding the IAC it is silent.
Description of RZH
Now we suggest that you familiarize yourself with the basic information regarding the reverse control. Where is it located, how to check the device and replace it? Read on.
Location and purpose
The main purpose of the RZH is to activate the white lights in the rear headlights, which indicate that the vehicle is starting to reverse. Thanks to this, other drivers know that the car will make a maneuver. Correct operation of the RZH allows you to prevent a possible collision on the road. As for the location, the device itself is installed on the gearbox - looking at the box, you can see two controllers - speed and RZH.
Principle of operation
The main component of any RZH is the limit switch. When the driver engages reverse, this switch is activated and powered by the battery. The device closes the electrical circuit, resulting in voltage being supplied to the lighting sources located in the rear lights. If the driver disengages the reverse gear, the limit switch is pressed out, as a result, voltage is no longer supplied to the light bulb and it goes out.
Possible problems and methods for eliminating them
A breakdown of the RZH can be recognized by the absence of light from the lamps when reverse gear is activated. Before checking the sensor itself, you need to make sure that the lamps installed in the headlights are working properly.
There may be several reasons for problems:
- The contacts on the rear headlights have oxidized. If such a problem occurs, it is necessary to clean them, which will most likely help solve the problem. If the contacts are severely damaged, they will have to be replaced.
- Over time, when operating under vibration conditions, the regulator may become loose. If the device is working, then simply screw it on and check that it is securely installed.
- There is no contact with the electrical circuit in the box itself. It is necessary to restore the contact of the device and check the wiring.
- In some cases, the reason lies in the lack of contact between the connector, as well as the mounting block with fuses. In this case, you need to check all contacts for signs of burning or damage. If burning occurs, then you should find out the reason why power surges occur in the on-board network.
- In "Fours" it often happens that the safety device in the block burns out (we are talking about any fuses), and this contributes to disruption of the contact circuit. It is necessary to check all safety devices and replace the failed element (the author of the video is the channel In Sandro's Garage).
First way
- Get a tester if you haven't had one before.
- Disconnect the DXX from the block with wires.
- If you have a 1.6-liter engine, then be sure to disconnect the throttle assembly fasteners and move it from the receiver about 1 centimeter.
- Use a voltmeter to check if voltage is being supplied to the regulator. The minus is connected to ground, and the plus goes to the block - use the AD pins.
- With the ignition on, the tester should show at least 12 W.
- If there is no voltage, then there is a problem in the power circuit or electrical unit of the car.
- If there is voltage, but it is significantly less than 12W, then this indicates a low charge level of your battery. Be sure to recharge the battery.
- After checking the circuit for efficient operation, proceed to study the DXR itself. At this stage the ignition is turned off.
- In turn, connect the terminals to the tester to pairs A-B and CD. The normal resistance should be approximately 53 ohms.
- Change the pairs to AC and BD. When measuring them, the resistance should turn out to be infinitely large.
If the check shows that the readings do not meet the standards, then several actions can be taken:
- Clean the contacts, throttle body, needle needle and other sensor components using carburetor cleaner. It is not difficult to find, and it is cheaper than specialized cleaners;
- If possible, try to repair the IAC;
- If it is impossible to carry out repairs, replace the old sensor with a new regulator.
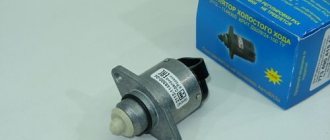
Faulty sensor
Second way
For this testing option, you will need a simple tester that you can easily make yourself. We offer corresponding video instructions
Now we proceed as follows.
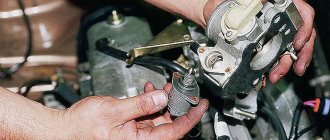
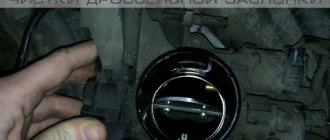
- Unscrew the fastening screws of the regulator and remove it from its seat.
- The location of the DXX is already well known to you.
- Disconnect the regulator from the main block, and apply the finger of your right hand.
- And the index finger. You don't need to put a lot of effort into creating a set.
- The nuance of placing a finger lies in the features of the regulator itself, at the end of which there is a cone-shaped needle.
- If the engine stops working, then if the IAC is working properly, the needle comes out completely.
- Your finger will allow you to feel a slight jolt when you turn on the ignition.
- If this push is absent, then the device has failed.
The maximum distance from the protruding rod head to the flange is 23 millimeters. When buying a new IAC, be sure to take this fact into account.
A Question of Choice
When checking the sensor, we found out that the device was faulty and needed to be replaced. But what should we choose in its place?
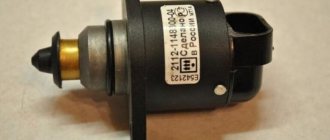
Today, two types of devices from different manufacturers are in particular demand for the VAZ 2114 - OMEGA and KZTA.
In the case of OMEGA, pay attention to number 2112-114830. If you decide to choose KZTA, then the option that suits you has catalog number 2112-1148300-04.
The last two digits may be different, and this is a very important point. If your IAC number ends in 01, you should not change it to 03, otherwise you will simply waste your money. The device is replaced with a similar one or with a subsequent number - 01 is changed to 01 or 02, etc.
The cost of the IAC is around 300-400 rubles, depending on the region and the specific store. Be careful, as there are now an impressive number of fakes on the market.
Do-it-yourself IAC cleaning
How to clean the IAC? The procedure for cleaning the device begins with removing the device, we described this above. Once you have the device in your hands, you first need to clean it with a dry cloth and cleaning fluid, which is usually sold in aerosol form. Alternatively, you can use WD-40. In addition to the controller itself, you should also clean the seat. Press the canister with the product several times, with the aerosol stream directed towards the tip of the IAC, which is also called the needle.
It is best to use carburetor cleaning fluid.
Depending on the design features of the IAC, this needle can be either plastic or metal. Clean the sensor needle directly, since liquid should not be allowed to get under the spring into the inside of the device . If you do hit the spring, the regulator will have to be purged with a large volume of air; for this you can use a pump or compressor. If liquid gets into the device mechanism itself, it can damage the lubricant inside it, and this, in turn, will cause a quick breakdown of the device. Choose the correct dosage of the product and do not dose the liquid too much, as this will also force you to clean the spark plugs in the future.
Replacement
To work you will need:
- New regulator suitable for your VAZ 2114;
- Rags;
- Crosshead screwdriver;
- 13mm wrench;
- Carburetor cleaner;
Having the necessary tools and materials available, you can get to work.
- Place the car on a level surface and turn on the handbrake.
- Raise the hood and secure it firmly to avoid unnecessary injury.
- Disconnect the negative terminal from the battery. IAC is an electrical device, therefore this event is mandatory.
- Remove the protective casing from the power unit.
- Loosen the clamp slightly to disconnect the rubber tube from the air filter connection. This is necessary so that the tube does not interfere.
- Remove the clamp that holds the air filter pipe. The corrugation is disconnected and moved slightly to the side.
- The fastening screw of the cable going from the gas pedal to the throttle valve needs to be loosened slightly.
- Use a rag to remove all dirt near and on the throttle assembly itself.
- Treat the throttle assembly mounting nut, as well as the IAC mounting screws, using the almighty WD40. This will make dismantling easier.
- Remove the throttle assembly completely. To do this, unscrew two nuts using a 13 mm wrench.
- Remove the sensor connector from the terminals.
- If there is dirt at the contact points between the DHH and the throttle assembly, be sure to remove it with a rag.
- Using a screwdriver, unscrew the two fasteners that connect the throttle assembly and our desired sensor.
- Remove the regulator from the mounting socket.
- Clean the entire throttle body with carburetor cleaner.
- Install the new regulator in the same position as the newly dismantled DXH was in.
- Use engine oil to treat the new rubber gasket, which should come with the IAC.
- Replace the two screws and make sure the adjuster is firmly seated in the throttle body.
- Return the remote control to its place and check how securely the nuts are secured.
- Connect the connector to the device terminals.
- Reinstall the cable, pipes and tubes. Tighten all clamps properly.
- Reinstall the engine protective cover.
Replacement procedure
After assembly, a very important stage remains - calibration of the new IAC. To do this, you need to connect the battery and turn on the ignition. 10 seconds is enough. During this time, the electronic control unit will perform calibration on its own.
That's it, the new regulator is ready for use. To avoid problems with replacement, watch the training video.
The important role of a small device in a serious unit
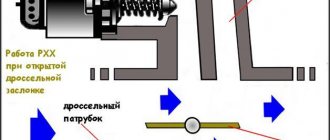
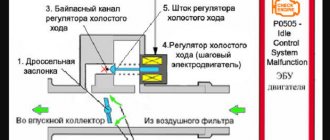
Participating in the general algorithm of operation of the vehicle’s electronic system, the IAC is designed to automatically supply a certain amount of air when the throttle valve (DZ) is closed. Thus, it maintains the set idle speed (ISR) of the engine, preventing it from stalling when the gas pedal is released and the gearshift lever is in neutral position. The operating principle of the UDS is as follows:
- the amount of air entering through the remote control is controlled by a mass (total) air flow sensor - mass air flow sensor;
- receiving information from it, the controller (electronic control unit) regulates the supply of the required amount of fuel to the fuel injectors (Fuel Injection) of the car;
- he, using the data from the crankshaft position sensor (DPKV), controls the IAC in accordance with the required speed;
- automatically sets the speed when the engine warms up.
Having safely got out of the intersection, you need to make sure that this regulator is working. Since it does not have a self-diagnosis system, the VAZ 2114 computer may not generate errors. You will have to check it using a general analysis of engine operation.
Repair
It is not always possible or even the desire to spend money on buying a new device. Regardless of the reasons, it is quite possible to try to solve the problem of a failed or poorly functioning idle speed sensor using a repair method.
- Try cleaning the old sensor.
- To do this, you should dismantle it and thoroughly clean all contacts using a cotton swab soaked in carburetor cleaner.
- Next, the rod, needle and spring are generously treated with cleaner.
- A toothbrush can easily clean areas smeared with carburetor cleaner.
- Rinse the device again and then return it to its place.
- Not infrequently, such events made it possible to achieve excellent results; idle speed began to work again as before.
But this is the simplest repair option, which is not always worth counting on. There is a more complex, but at the same time more effective option for self-repairing a failed idle air control:
- Remove the sensor, clean its external elements, as indicated in the previous repair method;
- Remove the three pins securing the sensor housing;
- Remove the regulator housing as carefully as possible. Really slow and careful not to damage the contacts;
- After disassembly, you may notice the presence of broken solder. In this situation, the wire is soldered in place, and the soldering area is treated with a special anti-corrosion varnish;
- If there are gaps in the body of the gap adjuster, they are eliminated using sealant. This will prevent air from being sucked in through the valve.
If, when disassembling the device, problems are discovered on the winding or the needle is worn out, repair will not help. You will have to change the IAC completely.
The issue of malfunctioning idle air control is quite common in the case of the VAZ 2114. This element cannot be called the weak point of the car, but no one wants to face such a breakdown. As, indeed, with any other malfunction. But where can you get away from them?!
Didn't find the information you are looking for? on our forum.
What error codes appear when the IAC is faulty?
If the idle air control is faulty, the on-board computer may display the following errors:
- P1509 - IAC control circuit overloaded;
- P1513 - IAC control circuit, short to ground;
- P1514 - IAC control circuit, open or shorted to +12 V.
When deciphering fault codes via the Internet or in the vehicle's operating manual, you may sometimes encounter definitions indicating problems with the operation of the IAC. They often indicate a regulator failure. Errors can be seen not only on the on-board vehicle, but also when diagnosing a car using a scanner. Sometimes they indicate not sensor defects, but contact failure.