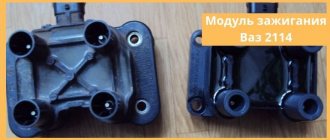
What to do if the ignition module fails? When does it need to be changed, for what symptoms? These questions are often found on the Internet. In our article we will try to cover in detail all the nuances associated with replacing the ignition coil on a VAZ 2114. In addition, we will tell you how to check the device with a multimeter, and also consider in detail the process of replacing this part.
This video clearly shows the process of replacing the ignition module on a VAZ 2114:
Symptoms of a faulty ignition coil
The module's task is to transmit voltage to the spark plugs through high-voltage conductors. In this case, the electronic control unit (ECU) controls the transmission process by sending charged pulses to the winding. As a result, a spark is formed necessary to ignite the fuel inside the combustion chamber.
If this circuit is broken, the engine will run intermittently, which will affect the safety of the car. There are several signs that make it clear to the car owner that the coil and the ignition system as a whole need to be checked:
- Insufficient engine power when accelerating the car;
- When you press the gas pedal, the car does not pick up speed, especially when overtaking;
- When the car is idling, the engine runs intermittently;
- The spark plug does not produce a spark.
Advice. When the first signs of a vehicle malfunction appear, the first thing you need to do is look at the spark plugs, then make sure the crankshaft position sensor is working, and only then move on to the module.
Ignition switch and features of its replacement
ZZ plays an important role in the vehicle's SZ, both for an 8-cl and 16-cl engine. It is activated when the starter is working, thanks to it the lighting, turn signals, and power windows work.
Replacement or repair of the VAZ 2115 ignition switch may be required if:
- lost or broken keys;
- the lock was damaged during an attempted theft;
- the 3Z cylinder is faulty;
- The contact group does not work.
To replace you will need: a set of keys, a hammer, screwdrivers, a thin chisel.
The replacement procedure consists of the following steps:
- The car's power is turned off by disconnecting the negative terminal from the battery.
- We remove the steering wheel.
- Next you need to remove the steering column switches.
- Then you need to loosen the bolts securing the clamp that holds the ZZ on the steering column. If the heads are cut off, the bolts should be carefully knocked out using a hammer and a thin chisel.
- Now you need to disconnect the wiring harness.
- Next, you need to completely unscrew the bolts from the 3Z housing and you can remove it.
- A new device is installed in place of the old one.
- Assembly is carried out in reverse order.
After assembly, you should start the engine and check the operation of the switch (the author of the video is the MY LADA channel).
Checking the ignition coil on a VAZ 2114
You can make the module work independently if you have the appropriate equipment at hand. The simplest solution is to carry out diagnostics using a multimeter:
- Set the device to ohmometer mode.
- The resistance between the high-voltage terminals is measured. To do this, the probes are installed first between wires 2 and 3, then 1 and 4.
- The corresponding number will appear on the display. If it does not exceed 5.5 kOhm, then everything is in perfect order and the coil does not require replacement.
Important! The measurement result in both cases should be the same. The error is allowed within 100 ohms.
Checking module 2114 using improvised methods
- There is a reliable way to determine that the ignition module is faulty. You need to take a working module and try to start the engine on it. Not every module may be suitable. If you are lucky and the engine is working, this means we send our module to the trash heap and install a new one. In addition, there is a fairly high probability that there is damage in the high-voltage wires and this will not only prevent us from testing our hypothesis, but may also damage the donor ignition module. This means that before checking the module itself, you need to make sure that the high-voltage wires are not damaged, do not break through to ground, and hold the current well.
- Checking the high-voltage circuit of the module for an open circuit. To do this, you need to take a micromultimeter and set it to resistance measurement mode. In the ignition module, the ignition coils are connected in parallel - the first with the fourth, the second with the third. To check, take a micromultimeter and install the probes into the connectors for high-voltage wires on the module when the ignition is turned off. First the 1st and 4th, then the 2nd and 3rd cylinders. The resistance between parallel coils should be 5.0-5.6 Ohms. If the resistance is infinite, then the network is broken and the module must be replaced.
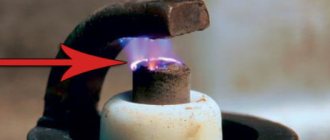
- There is also an old-fashioned way of checking - to hit it well. This may help wake him up for a while, oddly enough. And it will give you time to pick up a new part at an auto parts store.
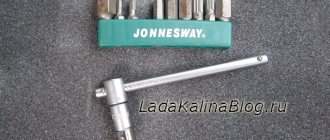
Necessary tool
To replace the ignition module on a VAZ 2114, no special equipment is required. To change a part, just prepare the following tool:
- Set of socket wrenches;
- Hexagon 5;
- Screwdrivers;
- A rag or rag.
The process of replacing the ignition module
The entire procedure is carried out on a horizontal surface in the garage or on the street. The procedure for replacing the ignition coil of a VAZ 2114 is as follows:
- Raise the hood and disconnect the battery. To do this, use a 10mm wrench, slightly loosen the nut securing the minus terminal, and remove it from the battery.
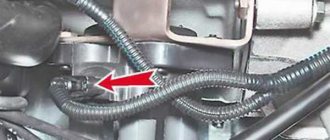
- We take out the high-voltage wires. Here it is important to remember (you can take a photo) where and which wire was connected. For your convenience, we have written a separate article about the order of high-voltage wires. It is strictly forbidden to swap wires so as not to damage the ignition module the next time it is turned on.
- Disconnect the four high-voltage wires.
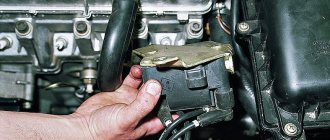
- Using a 13 mm socket wrench, unscrew the nuts that secure the module to the engine.
- After removing the nuts, we dismantle the equipment.
- Unscrew the screw securing the coil to the motor using a hexagon.
- Next, the installation site of the coil should be thoroughly wiped from accumulated dirt. To do this, you can use a rag or a clean rag.
- We install new equipment in the cleaned area in reverse order.
- Correctly connect high-voltage wires. Their numbers must be indicated on the block.
Advice . To ensure reliable contact, the mounting of the coil and the motor housing should be thoroughly cleaned.
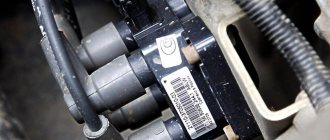
Connection diagram
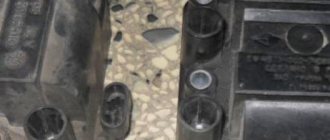
The ignition module is part of the space under the hood, it’s easier to find it by the position of the high voltages, they go from the spark plugs straight to it.
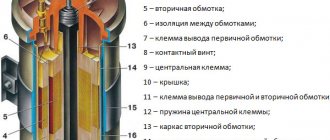
Ignition coil diagram:
VAZ 2114 ignition coil diagram
This diagram is good to follow when you have to replace the ignition coil of a VAZ 2114. In principle, everything is transparent: from contacts with the controller (ECU) to high-voltage wires. The name of the circuit is often common under the name ignition coil pinout: the pinout is a visual representation of the functionality of the device's contacts, which are numbered according to their purpose.
Basically, the most necessary knowledge about what the pinout of the ignition coil is is carried by high-voltage wires (abbreviated as HF (contacts). Because it is through the HF contacts that, in fact, the ignition module is connected to the engine system.
It can be connected in two different ways: when the ignition system coil is removed and when it is directly in its place in the car engine.
If you are holding the module in front of you:
- Let us recall the diagram: the first and fourth contacts are on one winding, the second and third – on the other (they are numbered in the diagram!)
- Then, the lower explosive contact (left) goes to the first cylinder
- On the second - upper explosive contact (left)
- The third cylinder goes to the upper explosive contact (right)
- On the fourth – lower explosive contact (right)
If the module is plugged into the engine, then pinouting the explosive contacts will be more difficult, because the device stands at an angle (as if in a diamond):
- We throw the central lower contact onto the first cylinder
- On the second - left contact
- We put the upper contact on the third cylinder
- On the fourth - right contact
Of course, the first installation option is more convenient, especially since the explosive wires require increased care in the nature of the connection (mixed up and won’t start, in the worst case, the entire engine system is ruined). Speaking to the point, it is clear that the connection diagram for the VAZ 2114 ignition module is not complicated.
By the way, buying an ignition coil is not a cheap pleasure; the price of an ignition module for a VAZ 2114 ranges from seven hundred to a thousand rubles, depending on the location of your city on the map of our country (for more information about how much an ignition module for a VAZ 2114 costs, you can find out by calling a disassembly service or a spare parts store, the running part is almost always in stock).
How to choose an ignition module?
On a VAZ 2114 car (8 valves), it is recommended to install an original part with a catalog number 2112-3705010.
The market value of such a module ranges from 2800 to 4000 rubles. However, some car owners select non-original spare parts from another manufacturer for their car. This may be fraught with consequences for the further operation of the vehicle, since the presented analogues may be of poor quality.
ABOUT THE POSSIBILITIES OF MODULE REPAIR
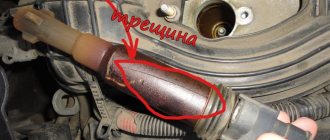
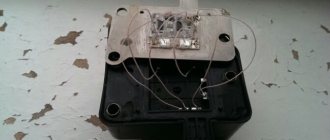
Most breakdowns of this device lead to its replacement, but sometimes it is possible to repair the ignition coil to return it to service. This is especially true in cases where moving or tapping changes the behavior of the motor. If you have the ability to use a soldering iron and a multimeter, you can try to get it back into operation.
You need to remove the metal back cover, under which the electrical parts of the module are filled. You need to try to carefully get rid of the silicone and its “insides” will be revealed to your eyes. Find broken or “bad” contacts and solder them.
The conductors in the block are aluminum, so special solder is needed to solder them.
After this, close the back cover and check its functionality. If the repair result is positive, you need to open it again and fill the inside with silicone.
If the result is negative, then the block must be replaced. True, owners with extensive amateur radio experience continue to “dig” further. You can try replacing the electronic switches. Basically, these two elements become the culprits of failures of the engine starting system.
Why does the ignition module often fail?
Main sources of malfunction:
- The engine has spark plugs that do not meet the specified parameters. The gap does not meet the manufacturer's requirements. Excessive contamination of the spark plug contact, presence of carbon deposits. A visual inspection will help prevent parts from malfunctioning.
- The ignition coil operates when the high-voltage wire is disconnected. In this case, the engine may not operate correctly.
- If the device is not sufficiently secured to the motor body, then excessive vibration will eventually lead to failure of the coil. The internal soldering of the equipment is broken, which leads to a malfunction of the module.
- Poor contact of low-voltage wires can also cause a malfunction of the ignition system.
- A defective module has been installed. You may not notice this right away, but after a certain time the module will make itself known. Such parts cannot be repaired; it will have to be replaced with a new one.
- Condensation appears inside the module housing, which leads to a short circuit in the system and its failure.
Common faults
Any experienced car enthusiast will answer that the main symptoms of failure of the MH include the absence of a spark on the candles. This is partly correct, but there are several other symptoms.
The main symptoms of a faulty MZ on an 8-valve injector engine are as follows:
- when accelerating, the car's dynamics deteriorated;
- Difficulties in the operation of the internal combustion engine began to appear, this is especially felt when you sharply press the gas;
- another symptom is a drop in the power of the power unit, a deterioration in its traction;
- floating idle speed;
- There is no spark on one of the spark plugs.
In addition, when the module begins to work poorly, an error appears on the dashboard - misfire in the cylinders.