Print this article Font size 16
Many people underestimate the importance of sensors or idle air control. But in fact, the speed stability depends on the correct operation of the IAC. It also prevents the car from stalling when the gearshift lever is in an intermediate position.
In this material we will talk about the meaning, device, and signs of malfunction of this device. We’ll also tell you how you can easily replace the IAC with your own hands.
Appearance of the device
Preparing for replacement: choosing a sensor and the necessary tools
Before you begin replacing the sensor, you need to carry out some preparatory measures. First of all, this is the purchase of a new spare part. You can find quite a lot of sensors on the market that are suitable for the VAZ-2114, but there are two of the most proven and affordable :
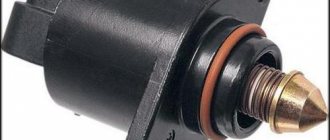
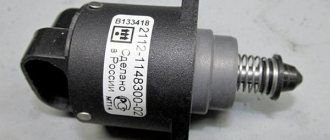
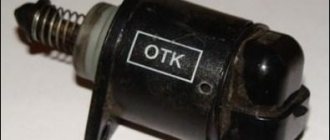
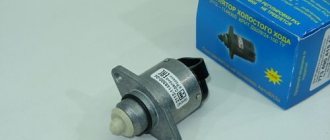
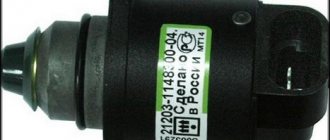
Idle speed sensor
- sensor from K3TA – marking: 2112-1148300-04;
- and a device from OMEGA - marking: 2112-114830.
Important! When choosing, pay attention to the needle rod exit indicator; it should not exceed 23 mm.
You will need few tools for replacement. In most cases, it is enough:
- pairs of Phillips screwdrivers of different sizes;
- wrench size “13”;
- any unnecessary rag;
- lubricantsWD-40;
- and cleaner for carburetors or injectors.
Important! Use only clean tools that are in good condition. Otherwise, there is a risk of damaging the edges of the fasteners of some components that are removed during replacement.
Possible causes of malfunction
There are several reasons that can provoke disturbances in the functioning of the IAC, but the most common include:
- problems with electrical wiring, represented by power failure and oxidation of the contact group;
- incorrect rod stroke as a result of contamination;
- failure of the electric motor;
- wear of the o-ring;
- rod breakage.
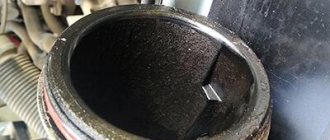
The shutter of the working IAC sensor moves without biting or slipping, but during constant operation, a significant amount of dirt deposits accumulates inside the channels of the throttle assembly, which disrupts the functioning of the IAC.
Features of the sensor
One of the features of determining a malfunction of the idle speed sensor on a VAZ-2114 is that the on-board computer is not able to recognize a breakdown in this unit.
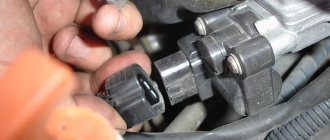
Disassembled
With rare exceptions, it will display some errors (0505, 0506, 0507), but you should not rely on them alone, as they may indicate other malfunctions in the vehicle’s fuel system.
On-board computer readings
Due to this specificity of the work of the part, it is easier to pay attention to some signs that appear in the operation of the car and can help in diagnosis, more precisely:
- frequent spontaneous shutdown of the engine when idling;
- unstable (floating) idle speed;
- starting the engine “cold” is not accompanied by an increase in speed;
- turning off the gear at idle is accompanied by the fact that the engine stalls.
Sensor diagnostic methods
If such symptoms appear, you can finally make sure that it is the sensor that is faulty using a couple of proven methods:
- First. Remove the sensor and connect it to the system. Turn on the ignition, lightly touch the needle, it should seem to push forward. There are no shocks - the sensor is faulty.
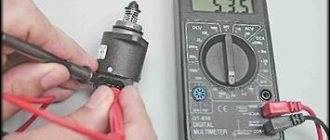
- The second one is more reliable. Purchase a special tester to check the voltage and resistance in the electrical circuit. They need to check the voltage supply to the sensor; it must be at least 12 Volts. If voltage is supplied, but the problem still exists, it is advisable to check the sensor itself for operation. To do this, attach a tester to its paired terminals (AB and CD) and check the resistance, which should be about 53 Ohms. Then change the pairs to AC and BD - the resistance should be infinitely large.
Checking the resistance on the idle speed sensor
Important! If there is a deviation from the norm, the sensor is faulty. Of course, you can try to clean the terminals, contacts and check the condition of the electrical circuit, but often this does not produce results and replacement is required.
Replacement of IAC on VAZ 2114 was successfully completed
There are situations when, for one reason or another, it is not possible to buy a new regulator. Then there is a need to repair the old device.
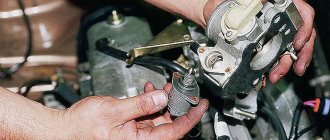
Replacing the IAC on a VAZ 2114
The first thing you need to do is try the sensor. To do this, you need to remove it, dip a cotton swab in carburetor cleaner and rinse the contacts. After this, generously lubricate the needle, rod and spring with cleaner. Take a toothbrush and thoroughly clean the greased surfaces. After washing the IAC again, install it in place. It happens that this is enough for the speed to stop “floating”.
A more complex way to repair the device is as follows:
- take the sensor and clean its outer part from dirt;
- remove the three pins that secure the regulator body;
- the case is removed in the most careful manner so as not to damage the contacts;
- if, after removing the case, a break in the solder is detected, then it is necessary to solder the wire to the fastening point and cover this place with a special varnish, this is done to avoid corrosion;
- If gaps are found in the IAC housing, they must be eliminated using sealant to avoid air being sucked in through the valve.
If needle wear or problems with the windings are detected, this sensor must be replaced with a new IAC.
After cleaning the throttle body the speed fluctuates
So, it would seem that the whole procedure is over. The damper was cleaned with a cleaner, the air filter was replaced with a new one, the sensors were reconnected, that is, everything was assembled and tightened. Now you can proceed to starting the engine. If the engine starts after cleaning the throttle valve and then runs normally, then the procedure can be considered successful.
It should be added that this is not always the case. Many people are faced with the fact that after cleaning the throttle valve, high engine speeds remain constant and do not drop. Also, many drivers notice that after cleaning the throttle valve, fuel consumption has increased. A likely cause could be an error in connecting some sensor during reassembly, but this rarely happens.
Most often, after cleaning, the throttle also needs to be additionally calibrated and adjusted, which not everyone knows about or does it incorrectly. In other words, high idle speeds after cleaning the throttle valve are a clear example and at the same time an answer to the common question of whether the throttle valve needs to be trained after cleaning this unit. Let's figure it out.
Let's start with the fact that in some cases a pure throttle valve really needs to be adapted (trained). Typically, throttle valve adaptation is often necessary when the electronic throttle valve has been cleaned before. There are fewer problems with a mechanical damper, but they still exist. In systems with an electronic throttle, the ECU independently sets the throttle position; in mechanical systems, the idle air control is set. To put it simply, after removing the layer of dirt, the position of the cleaned damper changes, but the ECU does not know about this and continues to supply fuel in accordance with the previous parameters before cleaning. To solve the problem, it is necessary to set the idle speed using diagnostic equipment, since it is possible to reset the previous parameters.
You can also try teaching the throttle manually. The simplest way to learn without diagnostic equipment or a scanner for adaptation is to unscrew the negative terminal of the battery from a few seconds to 10 minutes (depending on the make and model of the car). This allows you to reset the settings, that is, the existing adaptation is reset and returned to the factory settings. After connecting the terminal to the battery and restarting the engine, the idle speed should stabilize.
Note that this method works on a limited number of cars. In such a case, you can take advantage of another opportunity to train the throttle assembly without a computer. This method is suitable for a range of vehicles from different manufacturers. Let's consider such an adaptation using the example of a Japanese Nissan car.
- First, the engine must be warmed up to operating temperature, after which the engine should be turned off.
- Next, you will need to wait 5-10 seconds, then turn on the ignition for 3 seconds.
- Now you need to press the gas pedal all the way and immediately release it. This is done 5 times, you need to do it in 5 seconds (one press per second). The interval should be timed using a stopwatch so as not to get lost.
- After the last press, you should wait 7 seconds, after which the gas pedal is again pressed “to the floor” and held in this position until the “check” begins to blink on the dashboard, and then this light comes on constantly.
- After the moment when the check code starts to light up constantly, you need to wait another 3 seconds. Now the gas pedal can be released.
- Next, the engine needs to be started, the idle speed should return to normal.
Let us add that during such adaptation of the throttle valve it is important to accurately maintain the timing at each stage, as well as to fit into all time intervals. In this case, we can talk about successful training.
It is also recommended to clarify the features and the possibility of manual adaptation for a specific car model.
Tips for extending the service life of IACs
To increase the service life of the sensor, you need to follow simple rules:
- The air filter device must be replaced on time.
- You cannot park your vehicle for long periods of time in winter. At low negative temperatures, the car owner must periodically start the power unit, warm it up and perform gas changes. This will allow the valve to be designed to prevent it from sticking.
- Do not allow foreign liquids to enter the throttle mechanism area. Sprays for quick starting of the engine usually do not pose a danger to the sensor, but it is better not to overdo it.
Video “Self-calibration and removal of the rod from the IAC”
User Ruslan K talked about how to remove the needle from the regulator at home and calibrate it without special equipment.
Do you have any questions? Specialists and readers of the AUTODVIG website will help you ask a question
Was this article helpful?
Thank you for your opinion!
The article was useful. Please share the information with your friends.
Yes (100.00%)
No
X
Please write what is wrong and leave recommendations on the article
Cancel reply
Rate this article: ( 2 votes, average: 5.00 out of 5)
Discuss the article:
Checking with a multimeter
More accurate diagnostics are carried out using a tester. First of all, the quality of the power supplied to the connector is checked. To do this, the multimeter probes are connected to the terminals of the block (chips). The voltage supplied to the dhx is within 20 V, the permissible deviation is 1–2%.
The regulator is checked by measuring the resistance on the winding. The multimeter is switched to resistance measurement mode, the tester probes are connected, the operating voltage is 52–53 Ohms, the permissible deviation is 1–3%.
In most cases, the DXH cannot be repaired, since the main malfunction is a breakdown of the electric motor and wear of the needle. The node is replaced with a new one. After replacement, it is necessary to “register” the regulator in the IAC control circuit. Original components are sewn into the ECU independently after the second engine start. It is necessary to reinstall the sensor, start the engine, stop the ignition and start the engine a second time.
Self-checking and replacing the controller takes up to 15 minutes and can easily be done in the garage. When choosing spare parts for the Niva, it is recommended to use only factory components or original replicas.
Throttle position (DZ position)
Despite all of the above, measuring the throttle position plays, although not the main, but very important role in the process of engine control. It helps you manage processes more accurately.
For example, an engine operating mode such as forced idling or cut-off mode (engine braking). The throttle position helps the ECU assess the situation and enable this mode.
Let's say the car speed is 55 km/h and the engine speed is 2600 rpm. We release the accelerator pedal, the throttle position becomes minimal, the ECU sees this and turns on the cut-off mode, turning off the fuel supply through the injectors. This allows you to use engine braking more effectively, increasing safety and extending the service life of the braking system, as well as saving fuel and significantly reducing the emission of harmful substances into our atmosphere.
But I’m lying if I don’t say that the ECU will already see that we have closed the damper due to a sharp drop in pressure in the intake manifold (with a DBP system) or a sharp decrease in the mass of air consumed (with a mass air flow sensor system). As we can see, in this case too, measuring the throttle position only helps to more accurately determine the cutoff or engine braking factor.
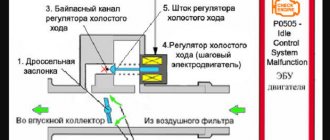
Operating principle
In carburetor engines, the problem of enriching the mixture when starting the internal combustion engine was solved by a starting handle and shims. With the advent of electronic ignition, this is done by the idle air regulator in conjunction with other sensors and the computer. Its operating principle is as follows:
- IAC calibration is performed by the ECU controller automatically after detecting this sensor in the system;
- in fact, the IAC is a stepper motor with a conical needle in a special hole in the throttle valve bypass channel;
- The IAC contact does not transmit any signals to the “brain” of the machine, but receives them from the controller, therefore it is not a sensor, but an actuator - an electric valve;
- in turn, the on-board computer “sees” that there is not enough air in the fuel mixture based on the signals from the mass air flow sensor, compared with the signals from the air flow sensor;
- Voltage is applied to the XX regulator, the needle leaves the channel, and the missing amount of air enters the mixture for mixing.
Operating principle of IAC
In addition, the ECU receives signals about the temperature of the coolant and oil in the system. When starting in the cold season, it is necessary to warm up the engine to operating temperature in order to reduce wear on friction parts, so the IAC channel opens slightly to enrich the mixture for the injector, even without the driver pressing the gas pedal.
At the moment of start, the operating algorithm is as follows:
- the key turns, the ignition turns on;
- the rod extends all the way, the needle blocks the bypass channel;
- at the moment the rod rests against the calibration hole, the computer counts the steps backward;
- voltage is applied to the windings, the valve returns to the open position.
The number of reverse steps is programmed in the device firmware. For example, for Basch modifications on a warm internal combustion engine it is 50 steps, January – 120 steps, respectively. In total, the stroke of the rod is divided into 250 steps; the further it extends from the windings of the stepper motor, the greater the number of steps the ECU will count. When purchasing a new IAC, the distance from the mounting flange to the rod needle should be exactly 23 mm.
Injector
Pure gasoline is not suitable for operation of an injection engine, so a throttle valve with an individual sensor of its position at each moment of time is installed at the inlet of the manifold. When starting the engine or stopping the machine with the engine running, the following occurs:
- the computer receives information about the engine shaft speed;
- analyzes how the motor works, that is, clarifies the intended purpose;
- then the readings of the throttle position sensor and the air are compared, that is, the controller “understands” that the damper is closed and a lean mixture enters the cylinders;
- The IAC valve opens, air is supplied bypassing the damper to maintain the speed at the programmed level
In fact, several electronic ignition system devices are involved in the process. If the car stalls or there are symptoms of other malfunctions, diagnostics are performed manually, since this device does not have feedback (self-diagnosis).
In a diesel engine there is no throttle valve, the idle speed regulator is useless, other methods are used to regulate low speeds.
Resetting ECU Adaptations Using a Chevrolet Explorer
I have already described this process in the section on self-diagnosis of Chevrolet. But let's repeat here too.
What do we need for this:
- Laptop
- Diagnostic adapter
- Diagnostic program, for example, Chevrolet Explorer
How to download, install and configure the program, as well as install the adapter drivers step by step and in detail, is described in the Chevrolet Diagnostics section
We connect the adapter to the diagnostic block and to the laptop
Launch the Chevrolet Explorer program and turn on the ignition.
We connect to the engine control unit, choosing from the list the one that is installed on your car
Attention! Adaptations are reset with the ignition ON and the engine STOP. In some cases, for vehicles equipped with an MR-140/HV-240 ECU, it is necessary to perform “Learn DPKV”. After clicking on the “Learn DPKV” button, instructions with the necessary actions will be displayed on the screen
Go to “Service” – “Service Functions” – “Reset Adaptations”
That's the whole simple process that takes no more than a minute of time.