The design of the gas distribution mechanism on the VAZ 2115 car is identical to the previous modifications 2114, 2112, 2110. The main purpose of the timing gear is to transmit torque from the crankshaft to the camshafts for the subsequent movement of the car.
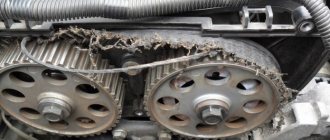
During the systematic operation of a technical device, the drive often fails. At high speeds and rpm, the belt breaks into pieces, blocking the operation of the cylinder head and valve mechanism. There are frequent cases of holes in the block and valve bends.
ATTENTION! A completely simple way to reduce fuel consumption has been found! Don't believe me? An auto mechanic with 15 years of experience also didn’t believe it until he tried it. And now he saves 35,000 rubles a year on gasoline! Read more"
The process of replacing the drive yourself is not at all complicated, but it requires attentiveness on the part of the technician. Violation of technology is not acceptable. If you encounter any difficulties with repairs, contact a service station specialist for help.
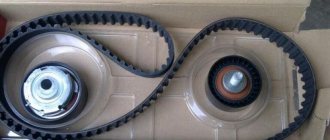
On VAZ 2115 cars a toothed belt is pre-installed. Unlike wedge and poly-wedge, it has a long service life. The cost of the belt is 10% higher than analogues.
Early models of VAZs were equipped with chain drives, but they are not as efficient and have a higher noise level during operation.
Causes of timing belt failure
There are several reasons for this breakdown on the VAZ-2115:
- natural wear and tear;
- pollution;
- ingress of oil and foreign objects;
- pump failure;
- changing the position of the tension roller;
- camshaft or crankshaft jamming.
The role of the timing belt installed on the injector of a VAZ-2115 car is to ensure that the engine valves open at the right time. It synchronizes the camshaft pulley with the crankshaft. Therefore, it is important to change it in time when it wears out so that problems with the engine do not arise.
Which timing belt is better to choose for VAZ 2114 8 valves
The material used to manufacture modern timing belts is dense metal rubber. The reliability, wear resistance and service life of the product directly depend on its quality. If it is necessary to replace it, the car owner is faced with a difficult question: which belt to choose, which manufacturer and brand to give preference to.
The situation is complicated by the presence of a large number of counterfeits of well-known brands on the market. Due to high-quality imitation of appearance, including packaging, inscriptions, holograms, it is almost impossible to distinguish them from original products.
For example, some manufacturers, such as Gates, increase the service life of belts by increasing the resistance of materials to significant temperature changes, exposure to technical fluids, and oil.
This happens due to the use of nitrile instead of neoprion. Unscrupulous manufacturers use simpler and cheaper materials.
If you buy an outwardly identical fake, you may end up with premature failure of the belt, roller, pump, and be undeservedly disappointed in the brand.
To avoid such a risk, it is better to buy from official services and trusted suppliers.
According to test results, belts from domestic manufacturers perform no worse than foreign ones, for example BRT. Given the affordable price, this is a big plus.
Imported ones - Contitech and Lemforder - have good quality. Slightly more expensive and stronger than Dayco. Also Roulunds and Bosch, but much more expensive..
Articles
- 2108-1006120 – video. Attention: parts 2108-1006120 and 2112-1006120 are not interchangeable!
- 2108-1006129 – pin for the roller;
- 2108-1006040-10 - belt;
- 2108-1006149 – seal under the casing;
- 2108-1006146 – plastic casing.
Analogs of belts
- GATES 5521 or 5521XS (heavy duty), recommended
- FINWHALE BD-111
- BOSCH 1 987 949 559
- LEMFORDER 58-111-19 or 14458 01
- CONTITECH ST-527
- GOOD YEAR G1474 (semicircular tooth) or G1485 (trapezoid tooth)
- DAYCO 111x190/1
Show all articles
- HANSE HZ 011 008
- BRTI 21080-1006040-10
- TOYOTA 13568-19035
- RENAULT 7701462019
- OPEL 636359
- ROVER GTB1124
- AYWIPARTS AW2110560
- PROCODIS FRANCE 05CD27
- FAI 40305
- GK 791170
- MAGNETI MARELLI 340018181434
- MAPCO 43080
- HEPU 29-0165
- OPTIMAL R-1113
- SCT G124
- WILMINK WG1151273
- VEYANCE G1474
- OPTIBELT ZRK 1123 (3 pcs.)
- TRISCAN 8645 5521 (2 pcs.) or 8645 5124 (2 pcs.)
- FLENNOR 4410 (2 pcs.) or F904410 (belt + roller)
- LYNXauto 111CL19 (1 piece) or PK-1236 (belt + roller)
Analogues of the video
- GATES T42042 or T42042A (2 pcs.)
- MAPCO 23081
- FLENNOR FS99018
- LUK 531 0671 20
- OPTIMAL 0N1917
Show all articles
- BREDA LORETT TDI3009
- TORQUE 830900AE2
- ESPRA 2108-1006120/ES0108
- INA 531075010
- CORAM C747
- VPZ-23 830900AE1
Timing and frequency
According to the regulations for carrying out technical work, on the VAZ 2114 the procedure for replacing the timing belt and rollers should be carried out every 120 thousand kilometers. However, in reality this deadline usually comes earlier. Many car enthusiasts advise preparing for replacement after 90 thousand kilometers. Do not forget about regular inspection of the components of the gas distribution system. If you notice the slightest problem, the defective components should be replaced immediately. Failure to promptly replace faulty parasitic rollers will sooner or later lead to a broken timing belt. During a break, desynchronization of the valves and piston occurs, which leads to breakdowns and deformation of these components.
Preparatory work
You can change the timing belt on model 2114 yourself. Before starting repair work, you need to do the following:
- so that during repair work the car does not roll back (when lifting the front end with a jack), it is necessary to place stops under the rear wheels;
- then you can begin to loosen the bolts on the right front wheel hub;
- Remove the wheel completely.
That's all, now the car is ready to replace the worn timing belt. This should be done on a VAZ-2114 (8 valves, injector) in the same way as on 16-valve power units. The only difference is that on recent installations the belt is longer, so it is installed one more notch.
Belt replacement
Required tools:
- socket wrench 10 or similar size ratchet head;
- open-end wrench 13;
- open-end wrench 17;
- slotted screwdriver (large);
- special tension wrench for the tensioner pulley;
- jack, wheel wrench;
- a little machine oil.
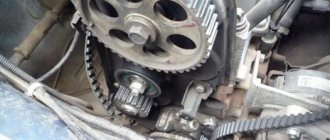
First you need to set the timing gear and engine flywheel in accordance with the existing marks.
1. Place the car on a level surface and engage any gear.
2.Use a jack to lift the front right wheel so that it can rotate.
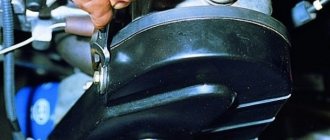
3.Open the hood, use a 10mm wrench to unscrew the 3 bolts securing the timing belt protective cover.
4.Using a 13 key, loosen the generator belt tensioner and remove it.
5. On the camshaft gear we find a mark in the form of a rectangular protrusion on the edge. It should align with the protrusion on the belt cover mount.
6.If it doesn’t match, put the car in gear and turn the right wheel until the marks match.
7.After this, we find a rubber plug on top of the clutch housing. It is located to the right of the cylinder block. Pry it off with a screwdriver and take it out. Below it is the flywheel crown, which also has a mark that should coincide with the triangular protrusion on the left.
8.If there is no such coincidence, use a 17 wrench to loosen the fastening of the tension roller, and using a tension wrench, turn the roller counterclockwise, loosening the belt.
9. Having removed the upper part of the timing belt from the timing gear, use a 17 mm spanner to turn the crankshaft until the flywheel marks coincide.
10.Fix the flywheel in this position by inserting a screwdriver between its teeth. It’s great if you have an assistant who will additionally hold it.
11. Dismantle the front right wheel, remove the arch protection.
We recommend: Winter off-road tires - what can be installed, look at studded and non-studded models
12.Using a 17 wrench, unscrew the nut securing the generator pulley, making sure that the flywheel does not rotate.
13.Remove the generator pulley and take it out.
14.Now the timing belt can be removed from the crankshaft pulley.
15.Using a 17 wrench, completely unscrew the tension roller fastening and remove it; you can simply loosen it and the belt will come out.
16. Without disturbing the position of the marks, put a new belt on the crankshaft pulley, install the generator drive pulley in place, having first put the belt on it.
17. We put the belt on the timing gear.
18.Install a new tensioner roller, lubricating it on both sides with machine oil (if removed).
19. We tighten the belt by rotating the tension roller with a special wrench (if you don’t have one on hand, you can insert two pins or screws into the grooves and secure them with a screwdriver) counterclockwise. The tension at which one plane of the belt can be rotated 90 degrees horizontally using your fingers is considered normal. In this position, tighten the tension roller mounting bolt.
20. We carry out further installation in the reverse order; if your marks are lost, then you definitely need to set them again.
Timing belt 2108.10 - 8kl (slips and wears off, after tension there is extraneous noise)
Many have encountered such a problem as the belt slipping and being “eaten”. Sometimes such a car is bought second-hand, or during scheduled maintenance when replacing a belt, rollers, or pump, this happens.
Also, all this is overgrown with numerous myths: like the tension roller pin is bent, the timing gear is worn out - well, to manage to bend the M10 pin, of course you need to try (!); wearing out the timing gear with a rubber belt is probably(!) only possible in a million kilometers, but not in 100,200 or even 400 thousand km.
Let's figure out why this happens.
Belt slippage occurs:
1. poor-quality belt
(after replacement, it moves outward/inward) - you can determine by turning the belt over to the other side
2. Pump
- misalignment and, as a result, the belt moves out (if the pump is worn out or when installing a new pump, the mating surface to the block was poorly cleaned of the old one gaskets, sand, dirt)
3. The tension roller wears out the bearing
and, as a result, the roller is skewed.
4. banal tugging of the belt!
A very common case - you may not even notice it. In the case of operations with the timing belt, when the belt begins to slip (and before that everything was fine), check the belt tension, barely tighten it and look - if it doesn’t slip, it means the belt was tightened too much!
When changing the pump and rollers, you need to thoroughly clean the mating surface on the block and on the mating mechanism (roller/pump); there should be no sand or dirt, otherwise there will be distortion.
Sometimes everything is simpler than it seems!
By the way, I can’t understand who came up with the story about the fact that timing gears need to be changed...even the factory doesn’t regulate their replacement - they are eternal; a rubber belt in life will not erase an iron gear; 9 cars from the 80s to this day have the original gears and nothing has worn off and it works with a bang (and they have mileage even under 400 thousand) - most likely this story came from crooked services where they usually change everything just to squeeze more money out of the client...
You do not need to tighten the belt too much so that its part from the timing gear to the crankshaft can be rotated 90 degrees with a little finger effort, but does not dangle. If you tighten the belt a little, the pump will start howling. You need to grasp this fine line.
By the way, there are those who pull the roller in the other direction - i.e. clockwise is not correct! Tension only counterclockwise!
All this information posted by me is based only on personal experience, trial and error + consultations with competent people. Miracles don't happen; if the mechanism doesn't work, then you made a mistake.
Naturally, all this is provided that your crankshaft/camshaft is not hanging out in bed!
Source
Timing belt tension method
Hello, dear visitors of Drive! The other day I noticed that the timing belt started clicking. I immediately went into the garage and removed the top half of my sawed-off drive cover. Indeed, the belt turned out to be very loose. Inspection showed that the tension roller had moved.
The belt is clearly loose
The fact is that during the previous adjustment of the belt tension, the pin began to rotate along with the roller nut. Having read horror stories about the fragility of the stud, I decided not to touch it, and, having adjusted the tension, I was afraid to tighten the nut too much. I clearly tightened it weakly, and this is the result. It's good that the belt teeth didn't jump. I realized that it is undesirable to touch this unit again, and in order not to unnecessarily rotate the nut, and with it the stud, I need a reliable way to check and adjust the tension. The method proposed in many manuals for checking belt tension by twisting it 90 degrees with a force of 2 kgf does not provide for measuring this force. It is very difficult to evaluate it subjectively. As a result, the belt is either loose and slams, threatening to jump, or it is overtightened and howls like a shot down Messerschmitt in Soviet films.
How to determine that the belt twisting force is 2 kgf?
I remembered that I read somewhere a long time ago that you can tighten the belt with a household dynamometer using a special key. I bought a key on the market for 50 rubles, but it turned out to be impossible to work with it. I had to bend it into an “G” shape, screw the sector in place and make recesses for the dynamometer hook. The length of the arm from the key pins to the point of application of the torque force is 80 mm.
Special key for adjusting the timing belt tension. The distance from the pins to the groove for the dynamometer hook is 80 mm. As it turned out later, the key can be used without an additional sector
And then everything is simple. We put the x17 key on the driven gear nut and, lightly tapping it with your hand, select the slack in the drive belt branch. Next, we insert a special key into the holes of the roller axis, engage the key rod with a dynamometer and create a force of 2.5...3.0 kgf. Holding the special wrench by the sector, tighten the roller nut. The main thing here is not to overdo it and not tighten the nut with a torque of more than 4.2 kgcm, otherwise the stud may bend and the belt will subsequently slip.
Before adjustment, it is necessary to select the slack of the pulling belt branch
The force on the dynamometer should be 2.5…3.0 kgf
Having removed the dynamometer and holding the key by the sector, tighten the roller nut
If you don't have a torque wrench, you can use the same dynamometer to control the force. I did just that, only I had to put a pipe on the key, otherwise the dynamometer scale was missing. There are no photos of this action, because there were not enough hands to hold the key with the pipe, the dynamometer and the camera. I checked the quality of tension with the engine running: when revving, the radial runout of the pulling branch of the belt was 10...12 mm, which corresponds to the norm. Yes, I forgot: before adjusting, I turned the loosened pin with pliers and a rag wrapped around the thread by almost 2 turns and tightened it; It's holding up for now. Goodbye, peace and goodness to everyone!
Signs of a faulty timing belt and their causes
The main signs that the timing belt will soon fail are:
- cracks on the outer surface;
- stratification of the working fluid;
- lack of teeth on the inner surface of the belt;
- excessive stretching.
Reasons for this may include:
- long service life;
- contact with process fluids (oil, fuel, coolant) on the belt;
- violation of the geometry (deformation) of the teeth of the crankshaft or camshaft gears;
- liquid pump bearing failure;
- manufacturing defect.
Timing belt on a VAZ 2115 car
The belt drive on the VAZ 2115 is identical in size to the VAZ 2110 - 2114. Technical characteristics of the drive: length 1306 x number of teeth 116 x width 9.5 mm.
| Name/article | Price in rubles |
| Original | |
| VAZ-2112 / 2110 engine 16 valves, 2112-1006040-83 | From 1600 |
| VAZ 21120 (2110)-1006040-00 | From 1600 |
| VAZ 2112 (2110)-1006040 (16 valves) | From 1600 |
| GATES K015644XS | From 2000 |
| GATES K015536XS (16 valves) | From 2000 |
| GATES K055781XS, K015587, K015564 | From 2000 |
| Analogs | |
| BOSCH 2112-1006040 | From 1200 |
| INA 530055410 | From 1200 |
| CONTITECH CT996 | From 1200 |
| GATES 5539 | From 1200 |
| BOSCH 1987948286 (16 valves) | From 1300 |
| BOSCH 1987946329 | From 1300 |
| CONTITECH CT527K2 | From 1800 |
| CONTITECH CT1137K1 | From 1800 |
| LYNXauto 137FL22 (16 valves) | From 1500 |
| Hola TH1372 (16 valves) | From 1500 |
| BOSCH 198798527 (tension rollers) for VAZ 8 and 16 valves | From 450 |
We recommend: How to replace the instrument panel lamps on a Lada yourself?
*check prices with an authorized dealer at the time of purchasing parts.
Before purchasing components, check the compatibility of the part with your technical device. Check the article numbers with the data specified in the operating instructions.
When replacing parts, do not forget to place marks on the crankshaft and camshaft. Many car enthusiasts neglect the rule, as a result of which the engine does not start, operates unstably, and the ignition timing shifts.
Which manufacturer is better: domestic or foreign? Russian analogues are not inferior in quality to imported ones. Whether it’s worth overpaying for “delivery” - decide individually, but you need to listen to the opinion of experts.
Causes of timing belt wear on VAZ 2115
- Duration of vehicle operation without intermediate prevention and diagnostics;
- Installation of non-original parts, poor workmanship;
- Mismatch in length, width, number of teeth;
- Aggressive driving style, speed limits;
- High, low temperature conditions, climatic features of the region where the technical product is used.
Prices for timing belts, their articles, originals and analogues, replacement cost
Today, a timing belt for any VAZ-2114 engine can be purchased without any problems at any auto store. Price tags for these parts vary depending on the manufacturer and on average range from 500 to 1000 rubles. However, when replacing a belt drive, it is better to immediately change the rollers, the price tags for which start at 400 rubles apiece.
The approximate cost of replacing a timing belt complete with rollers is from 1000 rubles at service stations. However, this repair can be done with your own hands. Of course, first you need to buy a new timing belt and pulley, and it is better to do this in a kit, the price of which also varies in the range of 1000 rubles.
Considering possible malfunctions caused by a broken timing belt, as well as the complexity of subsequent repairs, you should purchase products from even well-known companies with extreme caution so as not to fall for a fake.
The original spare parts used for the 2114 are unified with many other VAZ cars, mainly with the “ninth” and partly with the “tenth” models. A branded timing belt for the VAZ-2114 complete with a roller will cost an average of 1,300 rubles.
- The cost of analogues is also not high. For example, a timing belt kit with a pulley from Gates (article - K015521XS) for a VAZ 2114 (1.5-1.6 l., 8 valves) costs 1,200 rubles.
- The timing belt kit from Contitech - CT527K1, will cost more, from 2000 rubles, however, like products from the brands BOSCH (art. 1987949095), DAYCO (art. 94738) and GOODYEAR (art. G1474).
How to determine when it's time to change the timing belt
The most prudent thing to do would be to install a new spare part on your VAZ-2115 before the belt breaks. The following signs may indicate that urgent replacement is necessary:
- hum and extraneous noise during operation of the power unit;
- mileage on one belt is over 60 thousand kilometers;
- oil getting into the timing belt.
In a situation with a belt, it is best to spend money on a new spare part and replace it several times than to pay later for a major engine overhaul. Manufacturers often assure that you can drive up to 100 thousand kilometers on one belt on a VAZ-2115; in fact, it is better to change it every 60 or a little earlier.
Check the belt tension regularly; if it sag or distributes the load unevenly, this component may soon need to be replaced. Remember that in this part of the timing belt there is no such thing as self-adjustment during operation. Uneven tension will inevitably lead to breakage. This part of the gas distribution mechanism must be replaced immediately after the first time it is tightened.
Be sure to monitor the battery and ignition system of your VAZ-2115, since starting the engine “from the pusher” has a detrimental effect on the condition of the timing belt. The fact is that with this type of launch, the shafts begin to move with a strong jerk, which stretches the belt and leads to a decrease in its service life.
When is replacement necessary and what is needed for this?
During the depreciation period, the timing belt begins to peel, tear or slip. If a breakdown occurs while the engine is running, it stalls and becomes impossible to start. When operating a VAZ 2114 with an engine equipped with an injection device for supplying fuel, an indicator on the instrument panel will light up, notifying you of a phase sensor error.
If the car is equipped with a 1.5 liter, 8-valve power unit, then the repair itself will only require the purchase and replacement of a belt. If a 1.3 liter engine is installed, this breakdown will lead to damage to the entire gas distribution mechanism. Major renovations will be needed. The timing belt replacement on a VAZ should take place after 45 thousand km of vehicle operation. Constant monitoring of the mechanism is necessary for the purpose of prevention. The sequence of actions is as follows.
- Purchase and replace the tension roller.
- Eliminate possible play in the pump.
- Lubricate the roller mechanism.
https://youtube.com/watch?v=OT_YOtxXIoM
If you have simple plumbing tools, replacing the timing belt is possible at home. List of tools needed to repair the unit in question.
- Wrenches in sizes 10, 13, 17,19;
- Socket wrench with pipe.
We change the belt ourselves (on the 8 valve model)
Replacing the VAZ 2114 timing belt is strictly regulated in the car's operating instructions. It is recommended to change this part after 30-45 km. But you can’t rely only on recommendations; over time, without running the required kilometers, it slips off the gears, eats, bursts, and may even rupture.
For a car with a 1.5-liter 8-valve engine installed on it, a belt break will not have serious consequences: the car will simply stop and will not start. And in a 1.3 liter engine, the valves may become damaged, which will lead to breakdown of the entire engine. If an injector is installed on the VAZ2114, then when the belt slips, eats or breaks, the dashboard will display: “headlight sensor error.” Solve the question after how many km. This part should be changed after a visual inspection and a replacement should be made if it is in poor condition. Which strap is better to choose is written in the manual for the VAZ 2114.
Required Tools
To carry out the replacement yourself, you need to prepare new spare parts and tools:
- a set of keys;
- new timing belt;
- new tension roller.
New consumables for installation
Stages of work
The DIY replacement sequence consists of the following steps:
- The car must be set to the handbrake.
- Set to 4th or 5th gear.
- After unscrewing the three bolts, remove the cover that protects the camshaft drive.
- Next, you need to loosen the generator drive belt and remove it from the crankshaft along with the pulley, leaving the bolt that holds it in place.
- Now the car should be put into neutral gear.
- The next step is to take care of the marks. To do this, rotate the crankshaft in a clockwise direction, observing the marks and the flywheel. The shaft should be rotated until the mark is parallel to the middle division of the scale.
- After making sure that the mark on the pulley is opposite the mark on the protective cover, you need to slightly loosen the fastening nut on the tension roller. If necessary, change the tension roller.
- Using a roller, you need to loosen the tension of the strap to remove it.
- Next, you need to install a new product on the crankshaft timing pulley.
- Then you need to pull the leading branch of the product onto the camshaft pulley so that it does not sag.
- Then turn the crankshaft 1.5-2 turns and set the marks. If the marks do not match, the belt should be removed and the installation procedure repeated again.
- After setting the marks, you need to unscrew the bolt on the crankshaft and put the generator pulley in place, securing it with the bolt.
- By turning the tension roller counterclockwise, it is necessary to adjust the timing belt tension and put on the alternator belt.
Nut for loosening and tightening
- After completing all the work, you need to start the engine and determine by the sound whether it is necessary to adjust the belt tension.
Why you should change the timing belt yourself: you will save time and money, you will know what to do if it slips or eats.
Belt tension on 8-valve VAZ engines
Before tensioning the timing belt on the VAZ, the following preparatory work should be performed:
After this, the drive marks should be checked. One of them, located on the crankshaft pulley, must coincide with the installation tab of the rear cover. At the same time, check the mark on the flywheel. It should be flush with the alignment mark on the block boss.
IMPORTANT! In reality, it is not always possible to achieve an exact match of marks. Therefore, the mechanism is adjusted with an error of +/- 1-2 mm. This does not have a noticeable effect on the driving performance of the car.
If the marks match, the question of how to tighten the timing belt can be considered resolved. Without removing the belt, it is necessary to move the weakened tension roller to the right so that the necessary tension occurs. After this, the roller is tightened tightly. To adjust the roller, a special “horned” key is used. If it is not available, you can use two Phillips screwdrivers, which are inserted into special holes on the roller.
If the marks do not match, the timing belt on the VAZ-2109 must be removed from the pulleys. After this, the pulleys themselves are individually set according to the marks. It is better to start reinstalling the belt from the rear branch. After installing it, the roller is tightened.
IMPORTANT! When installing the timing belt on a VAZ-2114 and other front-wheel drive models, the pulleys located according to the marks can shift by 1-2 teeth. If this happens, the marks should be set with an error to the left, which allows you to compensate for the offset. After installing the belt, the pulleys themselves will move into the required position.
It is necessary to finish tensioning and fixing the belt, and then manually turn the engine 2-3 turns by the crankshaft pulley. To do this, it is convenient to use a “19” head with an extension. The gearbox must be in neutral. If after turning the marks have not moved relative to each other, the procedure can be considered completed. Assembly is carried out in reverse order. » alt=»»> The question of how to check the consistency of the tension should be answered. To do this, hold the strap between your thumb and index finger and turn it 90°. The technician must be able to do this, otherwise the belt is considered over-tensioned.
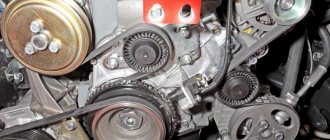
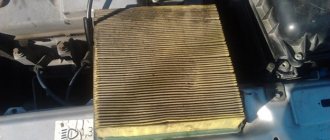
Timing roller location
Before you begin diagnosing or replacing the timing belt and rollers on a VAZ 2115 with 8 valves, you need to determine where the system itself is located. You can find it on the left side of the engine if you stand in front of the hood. It is located under a protective cover that prevents debris and dust from entering the system. For visual diagnostics, simply unscrew a couple of bolts and remove the upper part of the casing. However, if you are planning a more serious operation, such as replacing a belt or rollers, this will not be enough.
VAZ 2115 and VAZ 2114: differences in replacing timing rollers
The design of the timing system is identical on all cars of the Lada Samara family. This applies to both models of the first (VAZ 2108 - VAZ 21099) and second generation (VAZ 2113 - VAZ 2115). The only relevant difference is the width of the crankshaft pulley and the timing belt itself. On second generation models, they are much narrower than on older ones. Because of this, separated timing parts are not interchangeable for different generations of cars. Therefore, before purchasing parts, make sure that they will fit your specific car model.
Why change the belt?
In the list of routine maintenance for the VAZ 2114, the manufacturer provides for replacing the timing belt every 60-75 thousand kilometers. However, given the quality of our spare parts, experienced car enthusiasts recommend replacing it after no more than 30-40 thousand km.
The belt should be visually inspected for visible mechanical damage at least once a month. If the slightest problem is detected, it must be replaced immediately.
If this is not done, the tension pulley may fail, as well as the water pump. In addition, there are cases when parts of the belt wrap around the generator pulley, which leads to blocking of its shaft.
But there is also good news. In VAZ 2114 cars with 8-valve engines of 1.5 and 1.6 liters, a broken belt does not threaten bending of the valves and damage to the cylinder head, which cannot be said about sixteen-valve engines, where a similar problem occurs in 90% of cases.
Belt tension on 16-valve VAZ engines
Tensioning the timing belt on Priora and other cars equipped with 16-valve engines is generally done in the same way.
However, there are slight differences. Thus, the gas distribution mechanism cover of these engines is mounted on 6, and not on 3 bolts, as in the previous case.
In addition, the timing belt on VAZ-2112 power units (16 valves) is tensioned using two rollers. One of them is movable, used for tension. The second one is the support one. » alt=»»> When tensioning the belt of a “Prior” motor or motor 2112, special care must be taken. After putting it on and tightening it, you must definitely try to crank the engine by hand.
If the crankshaft cannot be turned, you should once again check that the marks are installed correctly. On these engines, an error almost always leads to damage to the valves and piston group.
After replacing the timing belt, it should be properly tensioned. Let's talk about this...
Removing the old timing belt
Work order
1. Place the machine on a horizontally level area and secure it with the parking brake.
2.In the engine compartment, it is necessary to remove the protective plastic timing cover. To do this, unscrew the 3 bolts securing it (10 wrench).
3.Using a wheel wrench, slightly unscrew the bolts securing the front right wheel disk.
4.Raise the car body near the right front wheel with a jack. Completely unscrew the bolts securing the disc and remove the wheel.
5. Unscrew the two bolts securing the protective casing (engine protection) in the area of the right front wheel.
6.Unfold the protective cover.
7. We loosen the tension of the generator belt by unscrewing the tensioner nuts (wrenches 10 and 13).
8.Move the generator towards the crankshaft pulley.
9. Dismantle the alternator belt.
10.Now you need to remove the crankshaft pulley. It is secured with a 19mm bolt. Very often, unscrewing it is quite problematic, since the pulley itself must be fixed. In carburetor engines it has holes located around the circumference. Here it is easier to insert a screwdriver or key into one of the holes and thus immobilize it. There are no such holes in injection engines, so you can fix the crankshaft either by immobilizing the flywheel, inserting a screwdriver between its teeth and the clutch housing, or by resting the key (curved end) on the right tie rod, as shown in the photo, and crank the crankshaft using the starter .
11.Unscrew the bolt, remove the generator drive pulley, screw the bolt back in.
12.Remove the timing belt.
13. Loosen the tensioner roller nut (key 13).
14. We dismantle the tensioner pulley and install a new one in its place without tightening the nut that secures it.
15.Now you need to align the camshaft and crankshaft to the marks. To do this, take a 17mm wrench, place it on the camshaft gear fixing bolt and rotate it until the mark on it coincides with the protrusion on the inner protective (metal) belt cover. Next, using the same key, placed over the crankshaft pulley mounting bolt, we rotate the crankshaft until the marks on the timing gear (drilled funnel) and on the engine housing (cast protrusion) match.
16. Additionally, it would not hurt to make sure that the position of the flywheel is consistent. The mark on it should coincide with the notch on the clutch housing.
17.If everything is in order, proceed to installation.
How to replace the tension roller on a VAZ 2113-VAZ 2115?
Removal: 1) At the beginning of the operation, install the entire timing mechanism according to the marks, detailed information in details and pictures on how to do this is explained in the article called “Setting the valve timing according to marks” so go to this article and do everything as described in it , by the way, just above we indicated in this article about the cover that will need to be removed in order to get to the timing mechanism, so read about how to remove this cover in the same article to which the link is given in this paragraph.
2) Go ahead and move on to point 2, now you will need to remove the tension roller itself from the car, but before removing it, remove the timing belt from the camshaft and from the tension roller itself, to do this, slightly loosen the nut that secures this roller (This nut in the photo above is indicated by a blue arrow, by the way, we’ll run straight ahead behind it, there will also be a washer located behind this nut, so don’t lose it when you completely unscrew the nut) and turn the roller by hand so that the belt loosens (the roller itself is made in the form of an oval, that’s why he regulates the belt tension, that is, at some point he strongly pulls the belt, and at some point he doesn’t pull it at all), after which remove the belt from the camshaft as shown in the photo below (Just do everything carefully), and well also remove it from the roller itself and let it hang (To completely remove the belt, you need to unscrew the bolt that secures the generator drive pulley, you also need to remove the belt itself from the generator, in general there are a lot of brands and so as not to completely remove it, just like we already indicated a little higher, remove it from the camshaft pulley, from the tension roller and let it hang from you).
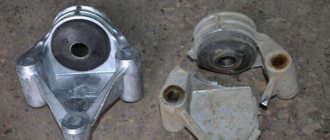
3) Well, at the end of the operation, when the belt is no longer in the way, completely unscrew the nut that secures the tension roller, remove the nut and the washer located behind it, and then remove the roller itself along the shaft as shown in the photo below, after the roller will be removed, check its bearing, to do this, grab the central part of the roller with your hand and rotate the outer part of the roller, it should not jam and should spin normally, there should be no play, and grease should not leak from the bearing (B In this case, the roller will be contaminated with grease).
Note! When the roller is removed, a spacer ring will be installed behind it, which we also recommend that you remove and check for defects. If it is in good condition, that is, not crimped or cracked, then you can not replace this ring with a new one and install it on your place again, by the way, due to this ring, as you already understood, the fact how the tension roller will stand depends, for example, if the ring is installed large, then the roller will come out a little and the belt will not stand straight, but at an angle, so if The belt doesn’t eat you up, and if it doesn’t fly off while driving, then you don’t even have to touch this roller, since it does its job, as they say, with a bang!
Installation: The new roller is installed in its place in the same way as it was removed, but only the entire operation is performed in the reverse order of removal, in addition, the roller must also be installed in such a way that the two holes that are on it (see photo below) are directed not inwards, but outwards, by the way, if you look closely at the tension roller which is shown in the photo below, you can even notice with the naked eye that it is covered in lubricant, such a roller needs to be replaced and cannot be reused, because there is a possibility that it will soon time, the bearing will jam, but a jammed tension roller will not lead to good things (Either the timing belt will fly off in this case, or it will break), after you install the new roller and secure it with a nut, be sure to put on the timing belt and adjust it, in more detail For information on how to do this, read the article: “Replacing the timing belt,” point 1.
Additional video clip: We have attached a very interesting and visual video clip for you just below, so that you can watch it and see in more detail how the process of replacing this tension roller is carried out, so watch this video clip and delve into it.
- Electrical equipment
- Engine
- Brake system
- Other
- Steering
- Transmission
- Suspension
- Tuning
- VAZ 2110 Other
- Engine
- Steering
- Electrical equipment
- Transmission
- Brake system
- Suspension
- Tuning
- Electrical equipment
- Steering
- Video publications
- VAZ tuning photo stream
- Operation and repair manuals