Purpose of the IAC regulator
The idle air regulator is used exclusively in electronic ignition systems:
- the proportions of the fuel mixture in the injector are determined by the on-board computer;
- the amount of gasoline or diesel fuel for each cylinder is measured by the ECU;
- the electronic ignition is equipped with sensors DPKV (crankshaft), TPS (throttle valve), MAF (air), DD (detonation), based on the signals of which the fuel pump is activated and the ignition is distributed to specific cylinders;
- when the gas pedal is released, the fuel damper is completely closed, the proportions of the fuel mixture are violated, combustion products are sucked back into the combustion chamber due to the difference in pressure in the intake and exhaust manifolds
Purpose of IAC
Based on the results of the air sensor signals, the controller makes a decision to further enrich the fuel mixture with air, ignoring the readings of the throttle sensor at this moment.
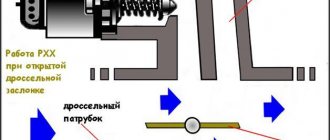
The chip on the IAC transmits a signal from the ECU; a bypass channel opens in the idle air regulator, through which air passes in the injector or additional fuel in the diesel engine. Engine speed is leveled, piston and crankshaft wear is reduced
Operating principle of IAC
The sensor installed on the engine (mass air flow sensor) determines the volume of incoming air and sends a signal to the ECU, which “gives a command” to “send” the required amount of fuel to the injectors. At the same time, the control unit takes readings from the crankshaft position sensor and controls the operation of the IAC. The last action is expressed in issuing a “command” to open an additional channel.
Another function of the IAC is to adjust the idle speed (700-900 per minute) depending on the engine warming up. If the temperature is insufficient, the ECU “orders” the sensor to increase the passage of the channel: as a result, more air enters the combustion chamber, and the control unit simultaneously supplies more fuel - as a result, the speed increases and the power unit warms up faster. In the same way, using IAC, the ECU takes into account changes in the load on the engine associated with the connection of additional consumers: for example, headlights, interior heater, heated rear window, mirrors, seats, etc. As a result, the engine operates stably at any load.
How does the regulator work?
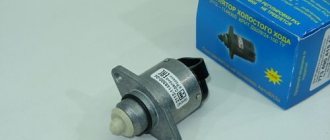
In everyday life, the IAC is often called a sensor, although in reality it is not one. The element is a stepper motor housed inside a non-separable housing. Only the spring-loaded rod with a cone-shaped tip protrudes outward. At the command of the ECU, the engine extends or retracts the rod to a certain distance.
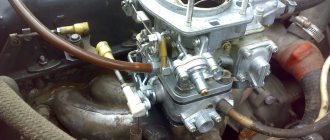
The idle speed sensor is located in the throttle valve block, the working cone is extended into a small cross-section bypass channel. Since the engine starts and idles without pressing the accelerator pedal, the mentioned channel supplies air to the cylinders when the throttle is closed. The task of the IAC is to regulate the amount of air flow, blocking part of the flow area with a cone.
Note. If a warm engine is started, the controller immediately sets the IAC (IAC) rod to the operating position corresponding to normal idle speed.
Types of IAC
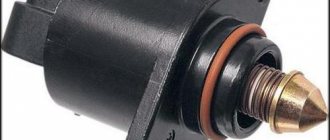
Externally, the regulator somewhat resembles an electric motor with a conical needle in its design.
There are 3 types of such controllers.
- Solenoid. The regulators are the simplest in design. When voltage is applied, the internal core on the winding is triggered and placed in a specially provided slot, which makes it possible to reduce the diameter of the passage channel. This reduces the volume of air or fuel supplied. The simple design helps reduce the cost of the product. Such a regulator can only operate in the fully open and closed position.
- Stepper. These IACs consist of a winding and a special ring magnet. There are four windings in total. Control signals from the computer are supplied to one of the windings, which contributes to the rotation of the rotor. Because of this, the cross-section of the passage channel smoothly changes from the state of complete opening to complete closure, and vice versa.
- Rotary. Their operating principle is similar to solenoid IACs. But here the tasks of the core are performed by the rotor. The latter is capable of rotating in different directions, thereby changing the dimensions of the channel cross-section.
Depending on the type of motor and its technical factory characteristics, different types of regulators are used.
We recommend: Do-it-yourself replacement of the Renault Fluence cabin filter: instructions with photos
Operating principle
In carburetor engines, the problem of enriching the mixture when starting the internal combustion engine was solved by a starting handle and shims. With the advent of electronic ignition, this is done by the idle air regulator in conjunction with other sensors and the computer. Its operating principle is as follows:
- IAC calibration is performed by the ECU controller automatically after detecting this sensor in the system;
- in fact, the IAC is a stepper motor with a conical needle in a special hole in the throttle valve bypass channel;
- The IAC contact does not transmit any signals to the “brain” of the machine, but receives them from the controller, therefore it is not a sensor, but an actuator - an electric valve;
- in turn, the on-board computer “sees” that there is not enough air in the fuel mixture based on the signals from the mass air flow sensor, compared with the signals from the air flow sensor;
- Voltage is applied to the XX regulator, the needle leaves the channel, and the missing amount of air enters the mixture for mixing.
Operating principle of IAC
In addition, the ECU receives signals about the temperature of the coolant and oil in the system. When starting in the cold season, it is necessary to warm up the engine to operating temperature in order to reduce wear on friction parts, so the IAC channel opens slightly to enrich the mixture for the injector, even without the driver pressing the gas pedal.
At the moment of start, the operating algorithm is as follows:
- the key turns, the ignition turns on;
- the rod extends all the way, the needle blocks the bypass channel;
- at the moment the rod rests against the calibration hole, the computer counts the steps backward;
- voltage is applied to the windings, the valve returns to the open position.
The number of reverse steps is programmed in the device firmware. For example, for Basch modifications on a warm internal combustion engine it is 50 steps, January – 120 steps, respectively. In total, the stroke of the rod is divided into 250 steps; the further it extends from the windings of the stepper motor, the greater the number of steps the ECU will count. When purchasing a new IAC, the distance from the mounting flange to the rod needle should be exactly 23 mm.
Operating principle and location of the IAC
Briefly, everything happens as follows. When the engine is idling, a certain amount of air enters it, which allows it to function smoothly.
DPKV takes into account the number of revolutions, this data is sent to the control unit, from which a command is given to the IAC to reduce or increase the air supply. Which he does, ignoring the closed throttle.
IAC device: 1) valve; 2) regulator body; 3) stator winding; 4) lead screw; 5) plug terminal of the stator winding; 6) ball bearing; 7) stator winding housing; rotor; 9) spring.
If the engine warms up to operating temperature, the controller automatically begins to maintain idle speed. If the engine has not heated up to the required degree, then the controller itself will increase the speed due to the IAC, thereby ensuring the engine warms up at higher speeds. This mode of engine operation allows the car to start moving immediately, without warming up.
Where is the idle air control valve located? Yes, in the throttle body - it is secured there with two screws. There are cars on which the heads of the mounting screws can be drilled out or the screws themselves are set on the varnish, which, of course, can significantly complicate the replacement or cleaning of the IAC air duct. In such cases, it is extremely difficult to do without dismantling the throttle body.
Currently, automakers use the following types of idle air regulators:
- solenoid;
- stepper;
- rotary.
Let's look at each of the listed types in more detail.
The idle speed control solenoid operates using electromagnetic force. So, when voltage is applied to its coil, the core is retracted, and the damper mechanically connected to it rises, thereby opening the air channel. When the voltage is lost (that is, the solenoid is turned off), the damper returns to its place, closing the channel.
Adjustment of the operation of the solenoid IAC is carried out by changing the frequency of command signals to the actuator. In order to pass a precisely measured amount of air through itself, high-frequency signals are sent to the working element. This allows air to be supplied in small portions.
The stepper idle speed controller has a ring magnet in its design, as well as four electromagnetic windings. Voltage is applied to them alternately, thereby creating a rotating magnetic field that causes the control rotor to rotate. It is connected to an actuator, which locks or unlocks the air channel.
As for rotary idle speed controllers , they are controlled using frequency pulses. The operating algorithm is similar to the solenoid type, however, instead of a solenoid, in this case a rotor is used.
Types of idle speed sensors
The simplest version of the device is made on the basis of a solenoid - a coil. When voltage is applied to its windings, the core inside jumps out and fits into a special socket, reducing the diameter of the passage channel. As a result, the air supply volume decreases. The simplicity of the design of this type of idle air control guarantees its low cost. But there is also a serious disadvantage: the impossibility of fine-tuning the throughput of the additional channel. This is due to the fact that the idle air control valve only functions in the open or closed position.
There is another type of IAC - rotary. The operating principle of this device is similar to the previous one. But there is an important difference: the opening and closing of the bypass channel is carried out by a rotor, which ensures smooth operation of the regulator. However, today the stepper device has gained popularity. Its design includes a ring magnet, a rotor and 4 windings. Each of them receives voltage from the ECU. As a result, the rotor rod begins to rotate, which is screwed into the channel, blocking it to the desired value.
IAC design
At its core, it is a stepper-type electric motor equipped with a cone-shaped needle pressed by a spring. The device is placed on a choke with a pair of windings. When one of them receives an impulse from the on-board control unit, the needle takes a step forward. The presence of voltage on the second winding causes the needle to move backward. There is a flange at the end of the IAC housing for easy fastening using screws or special varnish. The seal is carried out using a rubberized ring.
Design features
The valve structurally consists of:
- electric stepper motor;
- four-position rod;
- spring element;
- needles.
When IACs first appeared, they were rotary or solenoid mechanisms. Such devices had two positions - open and closed. This contributed to a decrease in the efficiency of engine speed control. Today, cars use four-step sensors, characterized by the possibility of stepwise feed through the bypass.
The idle air control itself is classified as a consumable item and is therefore considered non-repairable. It can be repaired if it malfunctions, but it will be cheaper to replace it completely.
Location
Externally, the IAC looks quite simple. It looks like a small electric motor. Its design includes three parts:
- Stepper motor;
- Spring;
- A rod with a needle at the end.
And the desired regulator is located near the mechanism that is responsible for changing the position of the throttle valve. There is no complex fastening system. To dismantle you just need to remove the mounting bolts.
Where is RXX located?
The device should be located next to the throttle valve and TPS. In some cars, the sensor can be fixed directly to the damper body using varnish. Sometimes the device is mounted using two bolts equipped with special mounting holes. The main thing is that the distance from the needle to the mounting flange on the installed device is 2.3 cm.
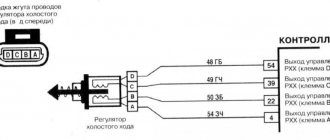
Connection diagram
Idle air controller connection diagram
One harness consisting of four cables is connected to the idle speed sensor; it comes from the microprocessor module. As a result of this connection, diagnostics may cause certain difficulties. The car owner will not be able to simply apply voltage to the terminals of the device, since the microprocessor module does this pulsed.
Where is RHH located?
If you have a carburetor engine, then the regulator (in this case it is usually called the idle air solenoid valve) is located on the side of the device itself that prepares the fuel-air mixture. A single wire approaches the device (the second contact of the solenoid coil is connected to the vehicle ground through the carburetor body). Determining the location of the sensor on an injection engine is not so difficult: usually the regulator is installed next to the throttle valve and the TPS sensor, which determines its position. The IAC terminal block has four wires. In most cases, the idle air control is attached with a pair of screws, sometimes it is fixed to the throttle body using varnish.
If the latter method is used on your machine, then be careful when dismantling the device: it is best to first remove the throttle assembly.
Symptoms and causes of IAC (IAC) malfunction
Signs of a malfunctioning idle speed sensor appear as follows:
Important point! There is a misconception that a regulator failure is necessarily accompanied by the inclusion of the Check Engine indicator on the dashboard. Since the element is an actuator, the light warning option is not provided in all cars.
If the car shows signs of IAC malfunction in the form of floating engine speed at idle, advanced diagnostics may be needed. A spontaneous change in the crankshaft rotation speed occurs for many reasons - failure of a sensor, air leaks, gas distribution malfunctions, and so on. It is better to start troubleshooting by checking the regulator.
IAC failure occurs for three main reasons:
There is a fourth reason - problems with the electronic control unit. The problem is quite rare and is accompanied by additional symptoms - increased gas mileage, unstable operation in all modes, difficult starting, and the like.
Oil deposits reach the rod thanks to secondary gases sent by the crankcase ventilation system for re-combustion. The more worn out the engine, the more deposits accumulate on the working cone. As a result, moving the rod becomes difficult; in advanced cases, the mechanism simply jams.
Signs of a malfunctioning carburetor solenoid valve
A malfunction of the carburetor solenoid valve can be determined by several characteristic signs:
- the engine regularly stalls at idle;
- the engine stalls when coasting;
- Fuel detonation occurs after the ignition is turned off.
The instability of the solenoid valve can also be determined by a drop in engine speed when an additional load is turned on (car radio, headlights, etc.). Thus, the main sign of a valve malfunction is unstable engine operation in idle mode.
Sensor diagnostic methods
The easiest way to check that the idle speed sensor is working is to start the engine and remove the power connector from the block. When the element is in good condition, the speed will drop sharply and the engine will stop - when the power supply is turned off, the spring will push the cone forward and the cross-section of the bypass channel will completely close. If the engine operation remains the same or changes slightly, move on to other testing methods.
The next stage of diagnostics is measuring the supply voltage, performed in this order:
Basically, on cars, you can check the performance of the stepper motor without removing it from the car. Using a multimeter, measure the resistance between the following pairs of contacts: A - B, C - D (it should be approximately 53 ohms). Then measure other pairs - A - C, B - D, on a working regulator the device will show infinity.
Further checking of the idle speed sensor is carried out as follows:
Advice. If a strong oil deposit is detected on the working part of the IAC, it is highly advisable to perform the procedure for cleaning the throttle and bypass channel - a similar picture is likely to be observed there.
To install a new regulator, be sure to remove the negative terminal of the battery. After assembly and connection, the IAC controller is calibrated - you need to turn on the ignition and wait 15 seconds. If the battery is not disconnected, the ECU will skip the calibration step, which may cause the engine to run unstably.
Valve check
Checking the solenoid valve for correct operation can be done in three different modes:
- when the engine is idling;
- when braking the engine;
- after turning off the ignition.
We recommend: 6 tips on how to deal with icing on car windows
The general serviceability of the valve can be checked after turning on the ignition. To do this, you need to increase the engine idle speed to 2100 RPM. After crossing this mark, a characteristic click should be heard, which means that the valve has closed. After this, you can lower the speed, as soon as its number reaches 1900 RPM, a click should be heard again, meaning that the valve has opened.
When braking with the engine while the gear remains engaged, the valve should not open, even if the engine speed has dropped below 1900 RPM. If a click is heard at this moment, the valve is not working properly.
If detonation and vibration occur after the engine ignition is turned off, this means that the valve does not close the idle jet and the fuel mixture enters the engine, which also indicates a malfunction of the solenoid valve.
You can also simply check the valve by disconnecting the power cable with the engine running. The motor should stop immediately after disconnecting.
You can check the valve by completely disconnecting the device from the carburetor. After dismantling the valve, you can connect it to the battery, after which you should hear a click and the valve needle should retract into the device. After turning off the power, you should hear a click again and the needle should move out.
The problem with the solenoid valve may lie not only in its malfunction, but also in the electronic control unit and in the wires. You can check the functionality of the wire using a multimeter (12 V ± 10%).
Checking the functionality of the control unit will require connecting the valve to the battery using an additional wire. A standard voltage control light is also required. First you need to disconnect the supply wire from the valve and connect it to the positive terminal of the battery. An additional wire is also connected to the battery positive. After this, you need to start the engine, at the cut-off of 900 RPM the warning lamp should light up, after reaching 2100 RPM it should go out. When it drops to 1900 RPM, it lights up again. If these indicators are met, but the engine stalls at idle, then the fault is probably in the valve control unit.
Sensor diagnostics
You can check the idle air valve yourself. Its faults can be divided into two parts: mechanical and electrical. There are several verification methods.
Visual inspection
First you need to conduct a visual inspection. In this way, you can detect body defects, needle wear, and carbon deposits. If deposits form, you can clean them with carburetor cleaner. It is also recommended to clean the entire throttle body as it is in a similar condition.
Using diagnostic programs
The operation of the IAC can be checked using a diagnostic adapter and special programs. For example, you can use the simplest ELM327 adapter and the OpenDiagMobile program. In the program menu you need to select the desired position of the XX regulator and watch the operation of the valve. It is better to set it at least 20 steps more than the current position.
Wiring check
For this we need a multimeter. With the engine off, remove the connector from the sensor. We set the measurement limit on the measuring device to 0-20 V DC voltage. We measure the voltage at the connector. Normally it should be 12V.
Checking the regulator resistance
To do this, we will need to measure the resistance between terminals A, B, and C and D after disconnecting the sensor terminal. We move the multimeter to the position of measuring resistance at the limit of 0-200 Ohms (Ω).
The normal value is within 50-55 Ohms. The resistance between A and C, B and D must be infinity.
Checking with throttle assembly
There is another way to diagnose IAC. To do this, you will need to remove the throttle assembly from the studs along with the sensor.
By connecting the valve connector and turning the ignition on/off, you can observe the operation of the IAC live. See how the needle works, if it is rubbing somewhere, check the evenness of the stroke, hear suspicious sounds.
Diagnostics of IAC on a carburetor engine
Locate the solenoid valve that is screwed into the side of the carburetor. Turn on the ignition and disconnect the wire from the valve, then connect again. Characteristic clicks should be heard. Their absence (provided there is a voltage of 12 volts on the wire approaching the valve) indicates a malfunction of the device.
Manual diagnosis
This is the simplest method and requires a helper to implement it. Algorithm of actions:
- remove the IAC plug from the socket;
- remove the regulator;
- reconnect the connector while holding the IAC in your hands;
- ask an assistant to start the engine: the rod of a working device will completely enter the solenoid at the moment of starting, and then extend back to a certain distance.
Using this method, you can check the functionality of the needle and the integrity of the coil windings. However, it is impossible to determine the consistency of the firmware: the needle must extend to a strictly defined distance. If we follow the principle “from simple to complex,” then the initial stage of testing is discussed above. What's next?
How to check the idle speed sensor using a multimeter
You will need a tester that measures resistance and voltage. To determine possible malfunctions of the idle air regulator, touch contacts C, D and A, B with probes: the tester should show 40-80 Ohms. Next, measure the resistance between pins A, D and C, D: it will be infinitely large. Now turn on the ignition and set the multimeter to voltage measurement mode. Between contacts A, B and C, D, the voltage should be between 12-20 volts.
IAC diagnostics on a homemade stand
If you have minimal experience in soldering radio components, then you can assemble the simplest circuit yourself. For this you will need:
- solder with flux;
- soldering iron;
- mobile phone charger;
- non-polar capacitor 10 µF for a voltage of at least 10 volts;
- plug block from IAC;
- 6 V light bulb;
- any switch with two positions.
This “stand” will help you check the device using impulses. Connect one of the “charging” terminals through the connector to contacts A and C of the idle speed sensor. Connect a light bulb in series to the second wire of the power supply - connect a toggle switch to its other contact. Solder a capacitor parallel to its terminals, which must be simultaneously connected to contacts B and D. Connect the unit to a 220 V network and click the toggle switch: a bright glow of the lamp indicates a malfunction of the regulator, but if it is lit at full intensity, the IAC is normal.
Folk method
Implementation of this method is only possible with an assistant:
- The sensor is being dismantled. To do this, it is usually enough to unscrew the fixing bolts.
- A four-pin connector is connected.
- A finger is applied to the end of the sensor needle; no serious effort is needed.
- The assistant gets behind the wheel and the ignition is activated. When turned on, the controller should extend the needle. If this happens, then the regulator is operational. Malfunctions should be looked for in the functioning of the throttle position controller.
Diagnosis of IAC
Ideally, diagnostics of the regulator should be carried out on a stand that can reproduce the pulses of the on-board computer. In practice, this is expensive; low-cost verification methods are used. In any case, the algorithm of actions at the initial stage is the same:
- the handbrake is applied, anti-recoil devices - shoes - are installed under the wheels;
- disconnect the “-” terminal from the battery;
- knowing where the TPS and MAF sensors are located, the location of the IAC is determined;
- the valve is disconnected from the on-board computer (the plug is pulled out of the connector).
Valve removal
Further steps differ for different verification methods.
Manual check
The simplest method for checking IAC in an electronic intake distribution system is manual diagnostics (an assistant will be required):
- the IAC plug is disconnected from the connector;
- two screws are unscrewed and the device is dismantled;
- the regulator is reconnected to the ECU, but remains in the hands of the master;
- The assistant starts the engine, at this time the rod should be completely retracted into the coils, then, having received an impulse from the computer, extend a certain distance.
Manual IAC check
In other words, the functionality of the stem is checked, the owner makes sure that this part is not bent or jammed inside the valve. However, this does not provide a 100% guarantee that this IAC modification fully complies with the controller ECU firmware. The needle extends, but by an unknown amount. In the first case, the connector is checked, in the second - the plug; the markings are only on the plug.
In the classic version of checking “from simple to complex,” this stage is the initial stage; then you should check the integrity of the wires and coils, the condition of the bypass channel, and needle wear. Only after these steps can you assemble a homemade stand with a pulsed voltage supply for comprehensive diagnostics of IAC.
Diagnostics with a multimeter
At this stage, you will need an IAC tester, which is checked with this device in two modes:
- ohmmeter - when connecting contacts C – D and A – B with the multimeter probes, the resistance should have a value of 40 – 80 Ohms, D – C and A – D should be equal to infinity;
- with a voltmeter - when the ignition is turned on, the voltage reaches 12 - 20 V.
proverka-testerom
Attention: the IAC adjustment is performed automatically by the on-board computer after each connection of the device plug to the connector. After dismantling, it is recommended to lubricate the bypass channel with WD-40 spray to clean it. This measure is preventive, even in the absence of contamination of the bypass channel, in the gap of which the regulator is located.
Pulse testing on a homemade stand
Since the stand costs 1,500 - 1,800 rubles, and the regulator 300 - 500 rubles, purchasing the device is not economically profitable for the average user. A simple circuit without microchips is shown below:
- it uses 6 V charging from any mobile device;
- plug blocks are commercially available;
- First you need to disconnect the IAC from the on-board controller, then check the stroke of the rod;
- a bright glow of the lamp in the diagram indicates a malfunction of the rod itself;
- If the lamp burns at the incandescent level, the unit is considered to be in good condition.
Diagram of the device for checking IAC
Using a cleaning agent will restore the functionality of the rod, but only if it is clogged. If this part is bent, the entire regulator will need to be replaced.
How to clean the idle air control?
Cleaning a proven IAC is considered using the example of a Chevrolet Niva:
- The engine compartment is opened and the battery is disconnected. To do this, you need to dismantle the cover of the air filter device, which is removed and put aside.
- The block is disconnected from the air controller. The connector is located on a thick rubberized corrugation connecting the intake manifold and the air filter cover. This block is attached using a special U-shaped bracket. During dismantling, it may jump out, so you need to be careful.
- Then the corrugation is disconnected from the intake manifold, it is fixed with a clamp. The same must be done with the rubberized pipe; it connects the corrugation to the valve cover of the power unit. The hose is fixed with an iron bracket.
- The thin pipe connected to the intake manifold is disconnected and removed along with it. This hose is pulled onto the fitting.
- Inside the pipes you can notice contamination in the form of carbon deposits and traces of engine fluid. All hoses must be cleaned and washed, after which they must be blown out. To complete the task, it is recommended to use a special cleaning agent or WD-40 liquid. The main thing is that there is a tube included with the cylinder.
- The idle speed sensor itself is made in a black plastic case and is installed in the intake manifold. The plug is disconnected from it and the two bolts that secure the device are unscrewed. The procedure is performed using a short screwdriver with a Phillips head; first, traces of sealant must be removed from the bolts. When dismantling the device, you must also remove the O-ring.
- The IAC is being cleaned, and fuel can also be used for this. The procedure is carried out using rags and cotton swabs. You cannot pour a lot of liquid into the mechanism so as not to damage it. After each cleaning, the sensor should oxidize and dry.
- It is recommended to remove dirt from the intake manifold; dirt is removed using rags. The idle speed sensor seat is cleaned throughout its entire depth. Contaminants are also removed from the device fitting.
- After cleaning, the entire structure is reassembled in the reverse order. A new rubber ring is installed on the idle speed sensor, after which the controller is mounted in place and fixed. The connector is connected to it, and the air filter device is installed back.
Dismantled corrugation with hoses
Removing the IAC from the mounting location Cleaning the sensor with WD-40 liquid
Types of malfunctions of the XX regulator on Priora
As mentioned above, such a part rarely fails, unless the car has a cheap fake. However, breakdowns of this device occur and, as a rule, this happens with the following defects:
- Slippage occurs when the worm gear of a stepper motor wears out. Slipping leads to the fact that the ECU is not able to set the required number of steps to open the channel to the required distance.
- Jamming - most often, the valve is blocked in the closed position. This happens when the driver turns on the ignition and the regulator is set to zero (in this case an electrical circuit malfunction or rod damage occurs). If the rod is jammed in the closed position, the car engine can only be started by pressing the accelerator pedal. If it is possible to start the engine in this way, then the cause is clearly a malfunction of the XX regulator.
- A stepper drive malfunction occurs due to a break in the stator winding circuit (one of the windings).
- Air leakage - there is a sealing gasket on the IAC housing that prevents the possibility of air leakage through the product body. If the gasket is damaged, this will lead to excess air entering, and as a result, there will be unstable speed.
- Rod play in axial and radial directions. If you have removed the IAC, and by manually moving the rod, it is found to be freely moving, then this is considered a serious malfunction. This malfunction usually appears while driving, when the gas is released and the engine is idling. Due to the presence of play, the rod is delayed in opening the XX channel, so the engine stalls. There should be no play either when it moves in the axial direction or in the radial direction. The presence of play indicates the need to replace the product, but cannot be repaired in any way.
- Damage to the IAC housing - this often happens when a non-original Chinese element is installed on a car. Engine vibrations cause damage to the rivets, and as a result, the regulator simply falls apart. Even if the product can be repaired by installing new rivets, it is not recommended to use it further.
- Clogged cone valve - often during the operation of the car, carbon deposits consisting of dust and oily substances form on the valve. Dust comes from the air duct when the air filter is not changed for a long time. Oily substances enter the throttle assembly along with crankcase gases. The likelihood that the IAC valve is dirty can be determined by the clogged damper. A valve with a large amount of contamination cannot be set to zero and ensure complete closure of the channel. In addition, contamination causes the rod to become distorted.
Most of the above faults can be identified visually. Failures in the electrical circuit can be determined using a multimeter. And we’ll find out further how to identify all kinds of regulator malfunctions on a Priora.
Cleaning the needle and bypass channel
To provide access to valve parts, removal of the IAC is required using the following technology:
- disconnecting the block from the connector;
- cleaning the connector contacts and plug with a cotton swab soaked in WD-40;
- unscrewing screws with a curved screwdriver;
- removing the regulator to check the condition.
IAC cleaning
Attention: There is no need to disassemble the regulator, just spray the spring and rod with needle with WD-40 spray, wait for it to dry, and at the same time clean the throttle bypass channel.
The adjustment is made by the on-board network controller itself. However, for stable operation of the engine, you should check the distance from the mounting flange to the protruding needle cone. By default it should be 23 mm.
Inspection and repair
As mentioned above, if your car's throttle body is protected by a casing, getting to the regulator may not be easy. Before starting the test, we advise you to study this unit and also check the integrity of the wiring. An important point: further checking of the regulator cannot be carried out correctly with a discharged battery. If there are no problems with all this, then you can start checking. There are several methods:
- Check the resistance between the windings. Between C and B , as well as A and D, there must be an open circuit (infinite resistance). But between A and B , C and D, the resistance should be from 30 to 100 Ohms;
- Checking with a homemade tester. 6V AC transformer . Armed with such a tester, you will need to check whether the regulator rod moves normally. Some car enthusiasts simply lightly press their finger against the end of the rod and try to understand whether the rod moves.
Let us immediately note that if the elements of the sensor “filling” fail, the entire device will have to be replaced - it is not repairable. However, some manipulations can solve the problem at least temporarily. So, for example, if you checked the regulator using the second method and made sure that the rod stopped moving, do the following:
- Wedge the regulator with silicone grease. If it gets inside the device, there will be no consequences;
- If lubrication does not help, soak the stem in alcohol and wipe with a cotton swab. Alcohol can also replace carburetor cleaner;
- If the above cleaning products are ineffective, use WD-40. This is an extremely aggressive product that should be used last.
If cleaning the regulator does not produce results, you will have to buy a new device . A car enthusiast can disassemble it and try to identify the cause of the breakdown. In most cases, the regulator stops working properly if the guide cone needle is unusable (wedge, abrasion, deformation).
Nuances of choosing an idle speed sensor
The original idle speed sensor is marked as XX-XXXXXXXX-XX. The last two digits indicate the compatibility label:
- odd (01 and 03) are interchangeable, even (02 and 04) are also interchangeable;
- These groups are not interchangeable with each other, that is, instead of the “native” 02, valve 01 or 03 cannot be used.
Even with original regulators, it wouldn’t hurt to additionally lubricate the IAC with a mixture of lithol and WD-40 (spring and rod). Since replacing IACs with your own hands is in demand among car enthusiasts, there are counterfeit regulators that can be identified by the following characteristics:
- there are no distinctive marks on the packaging;
- yellow sticker on the body without frame;
- dark needle tip;
- thin black o-ring instead of thick red seal;
- body rivets do not have heads with a diameter of 3 mm;
- a white spring instead of a black product with frequent winding;
- the body is 1 mm shorter.
An example of a counterfeit IAC
Since installation is always done on your own, additionally lubricate the rod and spring to increase the service life of the IAC and the entire engine.
Thus, it is better to have an IAC solenoid valve costing 300 - 500 rubles in stock in order to replace it in the field to normalize the idle speed of the internal combustion engine. These diagnostic methods will allow you to determine a malfunction of the regulator and a clogged bypass channel of the throttle valve.
Is it possible to save money by replacing this part?
Toyota idle air valve 22270-21011 If cleaning the idle air sensor does not bring any results, and all diagnostic operations show that the problem lies there, then you should think about purchasing a new device. You can buy a Toyota idle speed sensor either from the manufacturer or at many car flea markets. In addition, there are many websites of spare parts suppliers, equipped with a convenient search for the required part or device. Just enter the code in the search: for example, 22270-21011 (for engines 1NZ-FE, 2NZ-FE) and the site will not only give you the required original idle speed sensor, but also offer replacement options. But you should remember that branded models of spare parts for foreign car engines are quite expensive
Prevention Tips
Recommendations that will increase the service life of the IAC:
- Do not allow liquid to enter the throttle valve. This will cause moisture and dirt to accumulate inside the device.
- It is necessary to monitor the condition of the air filters. The IAC is a flow regulator, so this is important for the sensor.
- If the car is rarely used during the cold season, then you need to find a garage for it. In this case, it is necessary to periodically start and warm up the engine and perform gas changes. This will allow the idle speed controller to develop and not freeze. After a long period of parking in low temperatures, the sensor may jam.
Have you changed the idle speed sensor on your car?
Design and principle of operation of the solenoid valve
The solenoid valve, also called the forced idle economizer (IAF), is an integral component of any carburetor in modern cars.
The active use of this unit began in the 80s of the last century, when the “battle” between injection and carburetor units intensified. This is largely due to the fact that the former had noticeably lower fuel consumption, and this already captivated a larger number of motorists. In order to minimize the consumption of carburetor engines, automotive engineers began to actively electronize them. In a few words, the essence of the latter was to reduce fuel consumption through the use of electronic devices. As a result, electronization resulted in the appearance of a carburetor solenoid valve, as well as a number of other electrical devices in the design of this unit. But why was this necessary and how did it help the competition between carburetor engines and injection engines? In order to answer this question, it is worth paying attention to the operating principle of the EPH.
Features of choosing IAC manufactured in the Russian Federation
The original product has its own marking, in which the last couple of digits indicate device compatibility. Even and odd numbers are interchangeable. For example, instead of a sensor with 01 at the end of the marking, you can install a device with the last digits 03. The same applies to even numbers: IACs marked 02 and 04 are interchangeable. That is, instead of 01 you cannot put 04.
Recently, a lot of counterfeit products have appeared on the auto parts market, including idle air regulators. Sometimes it is possible to identify them by their characteristic features:
- the packaging is not branded - there are no special marks, barcodes, or holographic stickers;
- the sticker on the sensor body is yellow and without an outer frame;
- the needle has a dark shade;
- the rivets on the regulator body do not have heads, the diameter of which should be 3 mm;
- the sealing ring is very thin and is black instead of red;
- spring – white with sparse winding (should be black);
- the body is 1 mm shorter than the original one.
Instructions for cleaning and lubricating IACs on Priora: detailed description of the process
In what case can a faulty idle air control regulator be repaired? Then, when this element is fully operational, and there is only contamination of the device rod. The cleaning procedure is not complicated and takes little time. To perform the cleaning procedure, you need to perform a number of the following manipulations:
- Remove the device from the car.
- Inspect his condition. The presence of play is unacceptable, and if such signs are detected, we immediately replace the product.
- If the rod needs cleaning, then it must be removed and the appropriate manipulations performed. The easiest way to remove the rod is to connect the power supply to it and turn on the ignition of the car. The rod will come out and simply separate from the rotor.
- Next, we evaluate the condition of the worm gear. If everything is in order, then clean the stem.
- Having cleaned the rod, we proceed to washing the inside of the rotor. To do this, we use kerosene, diesel fuel or WD-40, which needs to be used to treat the inside of the rotor. Carry out the procedure carefully so that liquid does not get on the stator winding, thereby damaging the insulation.
- After completing the above steps to clean the rod and seat in the rotor, you can lubricate it. Lubrication is needed to ensure smooth movement of the rod. To do this, we use regular Vaseline or technical lubricant for electrical devices. It is strictly contraindicated to use solid oil, litol, etc. Carefully lubricate the surface of the rod where there is a worm gear.
- It will not be superfluous to lubricate the bearing. To do this, we use a syringe with a needle and regular motor oil. Carefully lubricate the inside, and then proceed to the assembly stage.
- In order to install the rod in its place, it is recommended to additionally use a clamp. We screw in the rod, and after its threaded part is completely immersed in the rotor, it should be clamped in a clamp. We preliminarily control the position of the guides. After this, turn on the ignition. The rod will begin to move out and will automatically be pressed onto the rotor. Repeat the procedure several times until the rod in the extended position reaches a distance of 28 mm from the seat.
This completes the procedure for cleaning, lubricating and assembling the idle air regulator. It is suggested to watch a video where the author shows in detail how these manipulations are performed.
It is important to note that such manipulations with the IAC are recommended to be performed only in exceptional cases when the part can actually still serve. Otherwise, it is recommended to replace it immediately.
How to replace the idle speed sensor
Before starting work, remove the negative terminal from the battery. Disconnect the four-pin connector from the sensor to be replaced by first pressing the plastic latch (if available). Remove the pair of screws securing the regulator. Take a new device, lubricate the o-ring, spring and rod with engine oil: this will increase the life of the regulator.
Now you need to calibrate the newly installed product. To do this, put the negative battery terminal in place and turn on the ignition for 15 seconds without starting the engine. During this time, the control unit will calibrate automatically. Next, start the engine and check how the sensor functions on a running power unit. If the idle speed is higher than normal, then the procedure must be repeated (possibly more than once). With the idle speed control operating normally on a cold engine, the tachometer will show approximately 1000 rpm. After reaching operating temperature, they will drop to around 800 rpm. It is worth noting that discrepancies with these indicators may be caused by the use of low-quality fuel.
Video about the sensor
Recommended viewing:
- Idle speed floats: Causes and solution
- Lowering the car
- Heated rear window of Priora: Causes of failure
- Idle air control Lada Kalina
- Description of the idle speed regulator for VAZ cars
- Preparing your car for winter
Category: Sensors
← All injector sensors Mitsubishi Lancer 9
Lambda probe Lada Kalina: Purpose, Location, Error →
What do you need to know when replacing the IAC?
To change and install a controller that allows you to regulate idle speed, you need to pay attention to the position of the rod. It must not be allowed to be pushed forward too much. This can happen if the device is connected to the block and the ignition is activated before installation. It is not allowed to push the rod in by hand.
If the valve is installed with the needle extended and the retaining screws are tightened, damage to the unit may occur due to shearing of the worm gear. It is impossible to repair such a sensor. Depending on the vehicle model, after installing a new regulator, it may need to be calibrated. In some cars, this procedure is carried out using special equipment or a stand.
On VAZ cars, calibration is performed as follows:
- A terminal is connected to the negative output of the battery.
- The key is turned in the lock to turn on the ignition for ten seconds. There is no need to start the power unit.
- The ignition is turned off.
User Ovsyuk talked about replacing the idle air valve on his own using the example of a Lada Samara car.
Regulator replacement and calibration
IAC for most models is inexpensive. Therefore, it is advisable to purchase original spare parts. Usually it is not difficult to buy such a part. For almost any car it can be found in physical or online auto supply stores.
The replacement is done like this:
- Check the distance from the seat to the needle on the new part. It is normally 23 mm;
- Remove the negative from the battery;
- Remove the old regulator and replace it with a new one;
- Connect the battery;
- Insert the key into the ignition and turn one turn. There is no need to start the car. In about 5 seconds the sensor should calibrate;
- Turn off the ignition;
- Start the power unit and test the functionality of the DHW. To do this, you need to monitor the speed at XX. If they are normal and all previous problems have disappeared, then the work was done correctly. If the procedure does not help, it is advisable to contact a service station for a professional check and restoration of the car.
You can drive with a broken sensor. This is not prohibited by traffic rules. But operating a machine with such a problem is not very comfortable. Therefore, it is recommended to eliminate it within a reasonable time.
Tips for extending the service life of IACs
To increase the service life of the sensor, you need to follow simple rules:
- The air filter device must be replaced on time.
- You cannot park your vehicle for long periods of time in winter. At low negative temperatures, the car owner must periodically start the power unit, warm it up and perform gas changes. This will allow the valve to be designed to prevent it from sticking.
- Do not allow foreign liquids to enter the throttle mechanism area. Sprays for quick starting of the engine usually do not pose a danger to the sensor, but it is better not to overdo it.
How to identify a malfunction
Malfunction of the IAC is expressed in the following problems:
- The turnover is unstable.
- There were problems starting the engine: it does not start immediately, it stalls.
- Idle speed decreases with additional load (headlights, heater).
- The engine automatically stops working when the gearshift lever is moved to the neutral position.
Special diagnostic equipment will help determine the exact cause of engine malfunctions and determine the malfunction of the IAC. Depending on the complexity of the problem, adjustment, repair, or replacement of a spare part may be necessary.
How much does an idle air control valve cost?
The cost of a new valve depends on the manufacturer, as well as the make of the vehicle.
| Name | Price, rub |
| IAC for Nissan cars | 3000-3500 |
| For Mercedes | 1600-2800 |
| For VAZ cars | 400-600 |
| Prices are relevant for three regions: Moscow, Chelyabinsk, Krasnodar | |
Sources
- https://seite1.ru/zapchasti/datchik-xolostogo-xoda-princip-dejstviyaustrojstvovidyfotonaznachenie/.html
- https://vospari23.ru/datchik-holostogo-hoda-kakie-simptomy-polomki/
- https://2775040.ru/datchik-holostogo-hoda-proverka-zamena-gde-stoit.html
- https://autodvig.com/toplivnaja-sistema/datchik-holostogo-hoda-66182/
- https://elm3.ru/diagnostika/regulyator-holostogo-hoda-rhh
- https://djago.ru/sistema-zazhiganiya/datchik-holostogo-hoda-zachem-nuzhen-i-kak-rabotaet/
- https://avtozam.com/elektronika/sensor/kak-proverit-datchik-holostogo-hoda/
Instructions for replacing IAC on a Priora: choosing the optimal regulator option
There is nothing complicated in the procedure for replacing the IAC on a Priora. Knowing where this element is located, all that remains is to disconnect the power supply and unscrew the two screws that secure the product to the throttle body.
After this, the procedure for cleaning, lubrication or other types of repair work is carried out. It is important to note that if the part has a faulty bearing or winding of one of the circuits. Then do not attempt to repair the product. In this case, repairs can cost you a lot if the ECU fails.
This is interesting! When replacing the IAC, it is not at all necessary to disconnect the negative terminal from the battery. After replacing or removing a standard product, you will still need to perform the procedure for setting the regulator parameters.
The idle speed control on the Priora is installed in a similar sequence to the dismantling process. Initially, take the time to clean the valve seat on the damper body. In this case, the mounting screws are screwed in by hand without the need to control their tightening torque. Below is a video that describes and shows the detailed process of replacing the IAC on a Priora with your own hands.
After replacement, you will need to perform the procedure for setting the valve parameters. How to do this correctly is described in the next section.
One of the important and open questions is: which IAC is better to install on the Priora. Indeed, such devices are produced by different manufacturers, and it can be confusing to find a suitable option. The best option is to buy inexpensive products produced underground. To do this, choose products from the following manufacturers:
- Elkar;
- Regulators from the Kaluga plant are famous for their reliability (it is precisely these products that are installed on Priora). The photo below shows what the packaging looks like. Their cost is approximately 600-800 rubles;
- Pekar - good products, the cost of which is around 700 rubles;
- Omega group (yellow packaging) - keep in mind that the products of this company are inferior in quality to previous options, and they usually last no more than 30 thousand kilometers.
There are other options for regulators, for example, as in the photo below.
It also fits the Priora, but when buying such products from unknown manufacturers with Chinese designations, you risk that the part will not last even a month, and may not work correctly at all. That is why it is recommended, if necessary, to spend money once on the purchase of an IAC, which will last at least 100 thousand kilometers and will not cause your headaches.
This is interesting! Chinese manufacturers or unscrupulous people produce an analogue of IAC from the Kaluga plant. A fake is very similar to the original, but its cost is lower and the quality of the product is much worse. To distinguish the original from the fake, see the photo below.
It is also important to pay attention to the regulator itself, which also has characteristic features of differences.
Choose only original products to ensure not only stable engine operation, but also not to damage the integrity of your car’s ECU.
It is important to note that when purchasing a regulator, you need to pay attention not only to the shape of the valve (cap), but also to the code that is indicated on the body. For front-wheel drive vehicles, this code begins with the numbers 2112.
Be careful, as there are also devices that begin with the numbers 21203. They are designed for all-wheel drive vehicles, in particular for the Chevrolet Niva.
Now also about encoding. The Priora may have a regulator with the number 2112-1148300-01 or 2112-1148300-02 from the factory.
The products differ in the shape of the tip (valve). Pay attention to this and buy exactly the type that is on your car. The analogue for IAC with number 2112-1148300-01 is the device with code 2112-1148300-03 and vice versa. For regulator 2112-11483-02 it is equivalent to 2112-1148300-04 and vice versa. You cannot install a device with number 2112-1148300-01 or 03 instead of 2112-1148300-02, as the product will not work correctly.
After replacing the IAC, we move on to the process of setting it up. How to do this correctly, read on.