Typically, the fuel pump is changed extremely rarely, since this module is quite reliable and requires a minimum of attention. The main reasons why you generally have to remove or change the fuel pump on a Priora:
- Reduced pressure in the fuel rail
- Replacing the FLS
- Replacing the mesh (mesh filter)
In order to remove the fuel pump from the Priora tank, you will need the following tool:
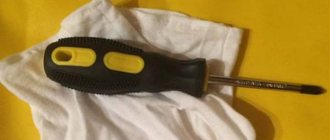
- Phillips screwdriver
- Head 10 (preferably deep)
- Ratchet handle or crank
- Extension
The procedure for dismantling and installing a fuel pump on a Priora with your own hands
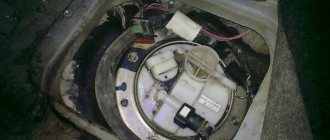
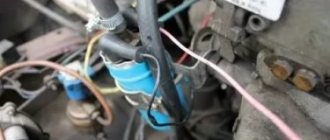
Using a Phillips screwdriver, unscrew the two screws securing the cover, and the pump will be located under it. Next, we need to disconnect the two fuel hoses by first pressing the clamps that secure them to the fittings of the top cover. One hose is secured with one metal clamp, which you need to press on and pull the hose to the side.
The second hose fits more tightly and in order to remove it, you need to press the “buttons” on both sides, which are shown in green in the photo below.
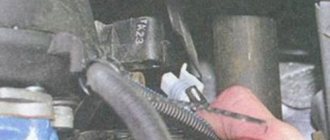
After this, disconnect the power plug with wires from the module by lifting the latch slightly upward.
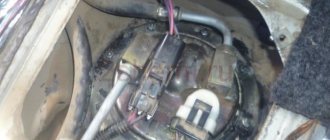
Next, unscrew all the pump mounting nuts using a 10 mm socket.
Remove the ring as shown in the photo below.
And the second plastic ring also needs to be removed from the studs.
After this, it will be possible to remove the entire fuel pump module from the tank assembly, since nothing else holds it.
To pull it out completely, you need to tilt it slightly to the side so that the fuel level sensor does not interfere with removal.
Please note that when removed, there may be a lot of gasoline in the container, so it must be drained immediately. Then you can take further actions, either replacing the pump, or the grid, or the fuel level sensor.
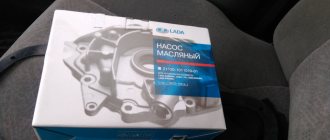
After completing all the necessary procedures, you can begin installing the pump in its original place and connecting all hoses and power wires. It is worth noting that the fuel pump on the Priora is from a new VAZ 2110 model, that is, for 1.6 liter engines. The price of such a pump assembly ranges from 2,200 rubles to 3,000 rubles.
Most of the units and components in cars of the Lada Samara model line can be changed with your own hands. To do this, just stock up on the necessary tools and purchase a new part. This material describes in detail how to replace a VAZ 2110 fuel pump and its filter element - a mesh. The work is quite simple, since installing a new product does not require an inspection hole or a lift. After studying this material, the reader will learn how to change the fuel pump, when it needs to be done and how to determine that the unit has failed. To make sure that the device has failed, you need to measure its pressure - the article contains several ways to perform this action.
Advice! Many Samara owners install a VAZ 2110 Bosch fuel pump. Despite the higher cost, the imported unit has a long service life, and it is easier to maintain when compared with a standard unit.
Manufacturers and prices of analogues
What car owners expect from analogues is maintaining normal pressure in the fuel supply system. If the electrical system is quite weak, there is no point in installing it. There is a list of proven devices for supplying fuel to the engine, which have been well rated by other owners and are suitable in their parameters for replacing the standard device:
- Soate 21101-1139-01, price – 1,600 rubles.
- Bosch 0580-453-453, cost – 4,500 rubles.
- Pekar 2110-11139009-00, price 3,100 rubles.
- Stellox 10-01202-SX, cost – 1,000 rubles.
- Stellox 10-01680-SX, cost – 3,000 rubles.
- STARNER 2112-11390-09, cost – 1000 rubles.
- Masuma MPU-103, cost – 2,800 rubles.
- Denso DFP-0105, priced at RUB 3,200.
Pump operation and malfunctions
From the name you can understand that the fuel pump supplies fuel from the tank to the engine injectors. Accordingly, if the unit is faulty, then there will be no gasoline injection, and the power unit will not start working. There are options for injector and carburetor. The VAZ 2110 is equipped with an injector; therefore, the fuel pump must be suitable for this system. If the “ten” was modernized by installing a carburetor, then the unit will have to be taken out of stock. The unit is located in the fuel tank - under the left rear door, the electrics go under the rear row seats.
It is quite simple to understand that there are faults in the pump or its network:
- The car won't start. There are many reasons for this malfunction, but before performing a full diagnosis, you need to check whether the pump mesh is clogged or clogged.
- There are noticeable jerks in first gear. There are also many options here, but one of them is a non-working fuel pump.
Preventing fuel pump malfunctions
What should you pay attention to so that the fuel pump runs as long as possible? First of all, this is the quality of the fuel and, of course, timely replacement of the fuel filter. If the gasoline you fill contains various foreign inclusions, this will most likely negatively affect the condition and service life of the fuel pump, and not only it. Therefore, it is not worth saving on the quality of fuel, since such savings then result in very significant expenses for car repairs.
Monitor the fuel level in the tank. The fact is that the fuel pump is cooled by the same gasoline that it pumps. Accordingly, if there is little fuel, or the pump runs idle, it may overheat and therefore fail. Knowledgeable people also advise cleaning the gas tank at the appropriate time and not neglecting this procedure. This is, perhaps, all the prevention of problems with the fuel pump.
Replacing the pump and its filter
Required Tools
Buying a new unit is only worth checking its pressure and condition of the parts. Replace with a Bosch fuel pump. If a standard unit is selected, then its product number is 2112-1139009. To work you will need the following tools:
- Screwdriver Set.
- Rags.
- Set of wrenches.
- Set of socket heads.
Replacement process
Replacing the filter or the entire unit will take no more than an hour. The work proceeds according to the following scheme:
- First you need to disconnect the negative terminal from the battery;
- Next, you need to dismantle the plastic cover, which is located under the rear row seats;
- Using the key “17”, you should loosen or completely unscrew the hoses, and also turn off the power to the unit;
- The next step is to unscrew the nut. The action must be performed in such a way as not to damage the float. Sometimes a plastic element remains in the tank, which is difficult to remove;
- After this, the filter (mesh) can be dismantled, cleaned and, if necessary, replaced;
- If replacing the “consumables” does not bring the expected results, then it is worth checking the operation of the unit itself and its pressure - a separate paragraph is devoted to this issue;
- The fuel pump is attached to the housing with eight bolts. After this, you can remove the O-ring;
- Now the unit can be removed along with the float and the rubber seal can be removed;
- When installing a new device, you need to make sure that the arrow is directed to the rear of the car;
- Having connected all the lines, the lid can be closed - the replacement is completed.
see also
Comments 29
I took a fuel measurement of 3 kg and it shows that the mechanic said to change the fuel pump, so for some reason I thought about the fuel pressure sensor, I replaced it, no wonder I’ll probably have to change the fuel pump, the reason is that it starts the second time and jerks during acceleration.
Do you know what pressure should be on the Priora when you turn the ignition key without starting the engine?
3.8 minimum, generally from the factory 3.8-4.0
Do you know what pressure should be on the Priora when you turn the ignition key without starting the engine?
I took a fuel measurement of 3 kg and it shows that the mechanic said to change the fuel pump, so for some reason I thought about the fuel pressure sensor, I replaced it, no wonder I’ll probably have to change the fuel pump, the reason is that it starts the second time and jerks during acceleration.
Well, as described here in the topic, if the pressure builds up and does not hold, then the RTD. And if it is 3 atm then yes it is not enough. Yes, and the symptoms are appropriate. If you don’t take the pump assembled, but only the module, then I wouldn’t save money. Well, Bosch now probably costs around 2500 per module.
the beam is very expensive, I’ll put it aside for capital and buy it for 1000 rubles, a cap of 10k is replacing the caps and rings and cleaning the valve injectors, it’s a problem that eats oil, I’ve driven 100k in the past 8 years
Well, the owner here is a gentleman) I do all the repairs myself.
Dan, did you measure the pressure with the engine running or just by turning the ignition key? Otherwise they measured it by simply turning the key, the pump pumped up to about 3-3.1 they said the pump should be replaced. Is this correct?
There are 4 tests with different measurements
I was lucky with the O-ring that I changed it like that. For me it changed size and burst during operation and gasoline just flowed in a stream. How I later figured out for myself there are two types of these rings. white rubber ones and black ones like yours. they don't change size. but the silicone white ones, yes. stretch only on the way. and quite quickly.
It stretched out for me, I bought a new one, installed it... It seems to be normal for now
Yes, I understood you.
In general, of course, the quality of the rings, and spare parts in general, is like a pig in a poke... I changed this last ring half a year ago
I completely agree. Mine that burst was made to order along with a Tolyat flange. And a couple of months passed at most.
We need to change the car to a better one
Yes, for example, German or Japanese production)))
I didn’t have time to change it before the new year, but now foreign cars have become more expensive, the ones I chose now cost 100-150 thousand more, but I don’t want to drive a Priora anymore, I’m tired of the basin.
To be honest, I didn’t want to take the Priora initially. But somehow there was no money for a new foreign car. But I didn’t want the old one. In the end I took the Priora. Yes, there were times when I had to tinker, but on average I’m still happy with the car. 3 years and slowly crumbling. It's sad, of course.
I was lucky with the O-ring that I changed it like that. For me it changed size and burst during operation and gasoline just flowed in a stream. How I later figured out for myself there are two types of these rings. white rubber ones and black ones like yours. they don't change size. but the silicone white ones, yes. stretch only on the way. and quite quickly.
I took a fuel measurement of 3 kg and it shows that the mechanic said to change the fuel pump, so for some reason I thought about the fuel pressure sensor, I replaced it, no wonder I’ll probably have to change the fuel pump, the reason is that it starts the second time and jerks during acceleration.
Welcome! Fuel pump - this unit, as you already understood, has a second name, but it sounds very simple: “Fuel pump”, over time this unit becomes unusable, and since it is the main part that supplies fuel from the tank to the car engine, then after the failure of this pump, the car begins to stall, but if it becomes unusable at all, or if it is simply not in the system, then the car most likely will not even start, and if it does start, it will work for 3 seconds and after that for now If you don’t install a working fuel pump, the car simply won’t start, so when you start to feel that gasoline is starting to flow poorly into the engine, there is a possibility that the car’s fuel pump is to blame!
Note! In order to replace the fuel pump on a car, you will need to take with you some tools, namely: A screwdriver, an extension cord with a socket head, as well as a set of regular wrenches, and you will also need to stock up on a pressure gauge, which is needed to check the pressure in the system engine power! (The pressure in the power system is checked only to make 100% sure that it is the fuel pump that has become unusable, but if you already know that it is the fuel pump that has become unusable, then accordingly you do not need any pressure gauge)
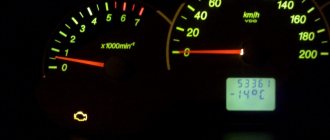
How to measure the pressure in the fuel system?
The easiest way to measure pressure is with a special device - a pressure gauge. The kit also includes an adapter and drain. Pressure can be determined using an air pressure gauge. This device is present in almost every motorist, as it is used to measure tire pressure. A normally functioning pump in a VAZ 2110 should have a reading of 2.8-3.2 atm. You need to connect the pressure gauge and check what the indicator is with the engine not running, but with the fuel pump on. It must be no lower than 2.8 atm.
Product selection
AvtoVAZ offers an original fuel pump for 4,000 rubles. The original catalog number is 2112-1139009. But many car enthusiasts buy and install cheaper analogues instead of the original.
Analogs
Bosch fuel pump.
A non-original part is often no different in quality from the original. So, if the vehicle owner wants to save money, then you can install a non-original part. Let's consider the main offers of analogue companies:
- Fenox EFM33006O7 - the cost of such a part will be about 3,000 rubles.
- Bosch 0 560 454 035 - as they say, I took BOSCH, and ... (go ahead).
- Ween 192-0262 – the price on the spare parts market will be approximately 3,000 rubles.
- Pekar 2112-1139009 - will cost a little more than the previous two, the average price is 3,500 rubles.
- ATS 53453 - praised, but the price tag is good. We know they put one like this as a replacement for expensive originals on Peugeot.
ATS fuel pump.
Replacing the fuel pump mesh on a Chevrolet Lacetti.
Step 1: Before starting work, relieve the pressure in the fuel rail. . To do this, you need to pull out fuse Ef18 (fuel pump) in the engine compartment. After which you need to start the car and let it stall.
After the seat is removed, you will see the fuel pump plug. This plug sits on bitumen mastic - similar to the one presented in professional vibration isolation. The plug is removed by picking it up with a flat screwdriver - carefully, around the perimeter.
And, pressing the tab of the chip itself, we pull it off the connector.
And we move it to the side, avoiding contact with metal parts of the body.
Step 4: . Disconnect the fuel lines. To do this, you need to squeeze the clip-petal at the bottom of the plastic end of the fuel line with your fingers and pull it up.
Step 5: Remove the fuel pump retaining ring. To do this, you can use a pair of flat screwdrivers (longer and thicker) - rest against the windows of the lock and turn the locking ring counterclockwise. The ring fits very tightly and is difficult to turn.
Step 6: Pull up the fuel pump module, allowing the remaining gasoline to drain into the tank (remember the float when pulling out). At the same time, make sure that not a drop of gasoline gets on the chip with the wires: there is a sensitive rubber seal there, which, upon contact with gasoline, will swell greatly and become unusable!
Step 7: Now we begin to disassemble the fuel pump itself on the Chevrolet Lacetti.
Remove the connector by pulling the latch down.
Step 8: Bend the fasteners (4 of them) around the circumference of the body and carefully pull out the top cover with the terminal and the fuel pump itself from the glass.
Step 9: We pry off the nozzle with a screwdriver, after which it is pulled out well and remove the glass.
Access to the Chevrolet Lacetti fuel pump grid is provided.
Step 10: . After this, inspect the mesh and replace it. Most likely, it won’t even give any light because of the dirt. Even metal contamination is possible. Compare what the new and old meshes look like.
Step 11: Inspect the pump module bowl. Often, it is full of dirt.
Step 12: When installing the new screen on the fuel pump, make sure that it sits completely on the neck of the fuel pump.
Step 13: Assemble everything in reverse order.
Fuel pump fuse functions
The Priora fuel pump fuse almost completely determines the performance of the fuel supply system.
He is responsible for the fuel injection system using the injection type of gasoline supply. Fuel is supplied using a 12V fuel pump. If the Priora fuse for the fuel pump fails, the car cannot be started. The function of the Priora fuel pump is to suck gasoline from the tank and supply it through the system to the injector intake manifold. If the fuel supply does not work, then, obviously, there is simply no way to start the engine. If you have problems with the engine, the first thing you need to do is check the fuse for the Priora fuel pump.
If the key is not turned to the start position, the fuel pump turns off after 2 seconds. Obviously, on a Priora, the fuse for the fuel pump is a buffer that takes on the full power of an unauthorized electrical discharge during abnormal operation.
Let's look at the principle of operation of the fuel pump fuse. The design of this element consists of two aluminum contacts and a fire-resistant plastic cover. If it fails at high voltage, the shell melts, which is considered a definite marker for fuse replacement.
Between the aluminum contacts there is a contact thread, which can only conduct a normalized current. For example, when marked “15A”, the current with constant amplitude cannot be higher than 15A. When large currents pass, the filament breaks and the body melts.
If we are talking about the failure of some element of the electrical equipment of the system, the inspection and repair of the car begins with diagnosing the relay and fuse box. This block in Priora is divided into three functional parts, which can be found in the following places of the car:
- The main mounting block is located on the left side near the driver's foot. The drawer opens by turning three locks 90 degrees;
- another fuse box is located near the expansion tank under the hood;
- the additional unit is located on the passenger side near his left foot.
The Priora fuel pump fuse is located in the additional mounting block on the passenger side; on the diagrams of the fuse and relay box it can be found under the designation F3 (15 A). K2 marks the location where the fuel pump relay is located. So, we figured out where the Priora fuel pump fuse is located. Now let's look at its functions.
- on-board computer;
- the relay is designed to adapt high currents at the moment of starting the fuel pump, protecting against combustion, thus, a malfunction of the relay leads to a malfunction of the fuel supply;
- fuse located next to the relay.
So, on the Priora we found out where the fuel pump fuse is located - in the additional compartment near the fuel pump relay. The main function of a fuse is to protect an electrical circuit. When high currents occur, the fuse trips and the circuit opens.
Thus, the functionality of all other elements of the system is maintained. Protection can work at any time. The reason is usually current surges or overheating. In general, if the fuel pump fuse fails on a Priora, it protects the on-board computer from power surges.
They are a small connector that can be installed without additional fastening. Replacing it, if you have experience, takes no more than 5 minutes with the opening of the edema of the additional power supply unit.
If problems arise with the ignition, it is better to immediately inspect the relay and fuse box; with prolonged exposure to high currents, you may encounter the problem of “socket melting,” which may require more complex repairs.
Price
Below are the prices and part numbers for the fuel pump, depending on the manufacturer.
| Manufacturer | vendor code | Price, (rubles) |
| Bosch | 2112-1139009 | 2000 |
| SOATE | 60.1139-01 | 1100 |
| RES | 0588455055 | 900 |
The table below shows the elements of the fuel cup and their prices, taking into account the manufacturer.
| Detail | vendor code | Price, (rubles) |
| RTD | 11180-1160010-00 | 480 |
| Hose | 21083-113902200 | 30 |
| Mesh | 21101-113920000 | 30 |
| The cost of a complete fuel pump glass starts from 2,400 rubles. Article: 21101-1139009 |
Symptoms of unit malfunction
Malfunctions of the Priora fuel supply pump can manifest themselves in different ways.
Sometimes it fails completely, in other cases it maintains too low pressure in the system. Symptoms of problems are:
- after turning the key in the ignition switch, the characteristic sound of the fuel pump is absent, and the engine does not start;
- when the ignition is turned on, the pump pumps, the power unit starts, but when you try to move away, the engine stalls and starts with difficulty;
- The car jerks while driving, stalls and does not want to start.
The first symptom indicates a malfunction in the electrical circuit that supplies power to the unit. Also, a complete failure may be the result of a breakdown of the pumping device itself, and it has to be replaced. Fortunately, such breakdowns are quite rare. Electric fuel pumps installed on VAZ cars are considered quite reliable devices and operate without problems for 150-200 thousand km.
The remaining 2 symptoms indicate that the amount of fuel supplied to the injectors is not enough for normal driving. If the car somehow starts and idles, then there is no longer enough fuel to move. Since the characteristic symptoms of low pressure in the line are similar to the symptoms of problems with other units and systems, it is necessary to carry out diagnostics and more accurately determine the cause.
Operating principle of RTD
The valve design and operating principle depend on the type of fuel system of a particular vehicle. There are 3 ways to supply gasoline from the tank to the injectors:
- The pump together with the regulator is installed inside the tank; fuel is supplied to the engine through one line.
- Gasoline is supplied through one tube and returned through another. The fuel system check valve is located on the distribution rail.
- The circuit without a mechanical regulator provides for electronic control of the fuel pump directly. The system contains a special sensor that registers pressure; the pump performance is regulated by the controller.