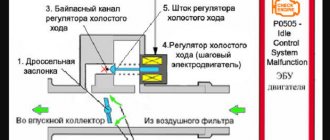
Principle of operation
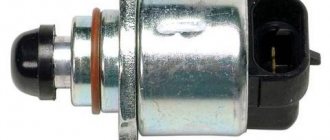
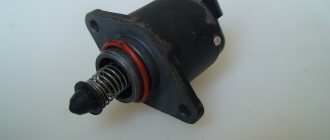
The Grant idle speed sensor with 8 valves is located at the very bottom of the throttle assembly. This part is a rod that regulates the amount of air supplied to the fuel system. The IAC works according to the following principle:
- When the engine starts, the throttle valve is in the closed position.
- Information about this is sent to the engine ECU.
- The ECU sends a signal to the IAC.
- The IAC opens, sending air bypassing the throttle valve through the outlet channel.
- The ECU, receiving signals from the temperature sensor, adjusts the clearance of the IAC rod, thereby maintaining the required idle speed.
The sensor operates until the engine warms up to 80 degrees. After reaching the required temperature, or after pressing the gas pedal, the IAC switches off. After shutdown, the throttle assembly comes into operation, opening the throttle valve. The IAC is switched on again when the car is idle with the engine running, in neutral gear.
Malfunctions of the electronic gas pedal
Moving contacts and conductive paths are subject to wear, which makes their signals incorrect. As a result, the engine will operate unstably, “dips” will appear, and at idle the speed will “float”. If a malfunction occurs in the operation of E-gas, the Check Engine warning lamp on the instrument panel will light up, and the ECU will switch the system to a reserve mode of operation, in which the speed will increase slowly, even when the gas pedal is pressed sharply. Fuel consumption may also increase.
If both sensors fail, the ECU will switch the engine management system to emergency operation mode, the engine will only operate at speeds slightly above idle (1500 min-1). In this case, it is recommended to contact a service station to replace the failed parts under warranty.
Symptoms of a problem
The IAC on Grant is called a sensor or IAC. But it is not one, because it does not provide information about calculating air pressure or speed. This part is a regulator. For this reason, the ECU does not receive a fault signal and does not send a “CHECK” signal to the instrument panel. The malfunction can be identified by the following signs:
- The engine starts with difficulty.
- It stalls after starting.
- Speed is unstable, especially in cold weather.
- Poor speed maintenance in neutral gear.
- High idle speed.
- Unstable engine operation when shifting the gearbox to speed.
All of these symptoms may be the result of a malfunction of other sensors and regulators that are part of the throttle body and fuel system. The main reason for this engine behavior is a lean fuel mixture or excessive air consumption in the system. The ECU clearly regulates the amount of air and gasoline, mixing them. Any discrepancy directly affects the stability of the engine.
Important! Checking the throttle assembly for operability must begin with the idle speed regulator.
There are several ways to check the IAC for performance. This will require dismantling the part. Without dismantling, you can only check the resistance and electrical conductivity of the IAC.
Important! It is prohibited to knock on the regulator body. This method will not improve performance. But it can render the part unusable if other components of the throttle system malfunction.
So why is this happening
Root causes of problems
The most common situations in which floating speeds occur:
- Cars with a built-in electronic fuel injection system suffer from such problems much more often than others. And this happens due to the constant suction of excess air, the volume of which still increases, which leads to the formation of a malfunction. The sensor responsible for gasoline injection simultaneously calculates the volume of air entering the cylinders. Based on these and some other indicators of the sensors, the electronic unit opens the electromagnetic injection valves for some time. It follows from this that when there is an excessive amount of air in them, the sensor, which is responsible for the position of the throttle valve, shows the driver that the task assigned to the system is impossible - the check light is on. During this, the temperature sensor indicates that the engine is exiting the warm-up mode. This indicates that it needs less fuel. Just at such a moment, floating speed appears in the car at idle, because the electronic unit does not understand what to do with the accumulated excess air in the system.
- This reason also partially relates to air suction and occurs mainly on 16-valve engines. The main place where air leaks still occur is the gluing contour of the receiver elements. Even minor damage to this area will lead to unstable operation of the motor.
- Constant jamming also easily becomes a reason for the occurrence of floating speed. It occurs in the crankcase ventilation valve. Therefore, if the reason is precisely this phenomenon, the systematic operation of the automatic power regulation sensor is disrupted. As a result, the same sensor signals instability of the engine. In a faulty state, the speed ranges from 1,300 to 900 per minute.
- In models with a carburetor engine, floating speed occurs due to a violation of the control of the servomotor. To correct this problem, simply unscrew the adjustment bolts in the area of the servomotor where the sensor points to the loose drive.
- Low pressure in the fuel system causes the same problems.
- Breakdowns in the ignition system are sometimes also classified as causes of floating speed. The problem is primarily related to high-voltage wires and spark plugs. But only with a visual inspection will it be possible to understand whether they are really the problem.
- A breakdown of the IAC (idle air regulator) causes floating speeds, because it is responsible for their initial stability. The element is inexpensive and can be replaced, so there may not be any significant problems with this.
- The electronic gas pedal has a lot of disadvantages, especially if tuning the car is only in the process, but the car is actively used. Floating speed is a fairly common occurrence in such a situation.
Resistance check
To do this, you need to disconnect the terminal supplying the IAC. Next, using a tester set to resistance testing mode, remove data from terminals A-B and CD. The operating resistance should be in the range from 0.4 to 0.8 Ohm.
Electrical conductivity
If the resistance is within normal limits, it is necessary to check the electrical conductivity. To do this, you need to disconnect the connector. Next, you need to connect “+” to terminal A. Then measure the output voltage from the remaining contacts. It should be equal to 12 volts. In this case, the operating resistance should increase to 50 Ohms.
Frame
Checking the short circuit between the housing is very important. The IAC may show operating resistance within normal limits, but be closed to the housing. To check, you need to set the tester to the “dial-in” mode. Next, connect one tester probe to the body, and connect the other one in turn to the conductive contacts in the regulator socket. If one or more contacts are shorted to the housing, the part is faulty.
Addresses of companies providing installation/replacement services (Moscow, St. Petersburg, Kyiv region)
| № | Name | Address |
| 1. | "Oiler" | https://oiler.ua/ Kyiv, V. Lobanovsky Ave., 119D, Goloseevsky district |
| 2. | "AUTOKLONDAYK" | https://auto-vaz.com.ua/ TO AUTOKLONDAYK, Kyrylivska street, 60P, of. 1, Kyiv, 04080 |
| 3. | "Star - D" | https://star-d.ru/ st. Savushkina, 89, not far from the Staraya Derevnya metro station, 200 meters from the St. Petersburg - Finland highway (from Primorsky Prospekt). |
| 4. | "OSA" - Society for Assistance to Motorists" | Address: 190013, St. Petersburg, st. Vvedensky Canal, 7, BC “Farvater”, office 210 |
| 5. | "Auto Mechanic" | Address: Rostokinsky pr-d, 3с61 |
| 6. | "PaAlex" | Address: st. Ozernaya, 46k2s2 |
Dismantling check
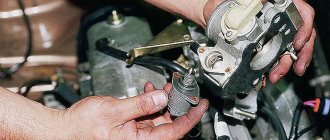
In order to dismantle the IAC, it is necessary to remove the air duct. Next, you need to unscrew the 2 mounting bolts, disconnect the power terminal, and remove the IAC from the mounting seat.
On Lada Granta with 8 valves, an electronic gas pedal can be installed. Its power connector may be located next to the IAC connector; it will also have to be disconnected. Before checking, the part must be cleaned of grease and dirt. It is not recommended to press or twist the rod. The rod is adjusted to 800–1500 rpm. Any impact may disrupt this setting. You also need to wash and clean the contact socket from oxidation. Check the integrity of contacts and wires.
1 way
You can check the functionality by simply connecting the power connector to the dismantled IAC. Next you need to start the engine. In this case, the rod should move slightly outside the housing. If this does not happen, the node is not working. There is no need to help the needle with this. Pressing or trying to influence movement is prohibited.
Method 2
This method is based on measuring the distance from the end of the needle to the IAC body. The measurement can be carried out using a ruler or caliper. For the working mechanism, the distance should be 2.3 cm. If this limit is higher, it means the rod is constantly open and the idle speed is higher than normal. If the distance is below 2.3 cm, then the end of the needle has worn out or has dried up in its saddle.
If a discrepancy with the required parameters is detected, this means that the IAC is inoperative and requires replacement.
Replacement
Replacing the idle air control valve on a Lada Granta is very simple. To do this you need to do the following:
- Stop the engine and wait for it to cool completely.
- Disconnects the negative terminal from the battery.
- Remove the air duct.
- Disconnect the electrical connector from the IAC socket.
- Using a key set to “13”, unscrew the 2 mounting bolts.
- Remove the regulator from its seat. It is also worth removing the rubber sealing ring.
- Clean the IAC seat from dirt and oil.
- Place the new O-ring into the seat.
- Reinstall the idle speed control.
Next, in reverse order, secure the IAC, install, and connect all elements of the system. After installation, you must turn on the ignition and give the computer time to recognize the new part. After 5–7 minutes, you can start the engine to check the functionality of the IAC.
Absolute pressure and air temperature sensors Lada Granta
These sensors are combined into one housing and installed on the receivers of the intake module; the most modern AvtoVAZ engines are equipped with them.
DBP on Grant differs in the output signal voltage within the range of 0.15..4.6 V, this voltage depends on the pressure level inside the intake pipe. The information it sends helps the ECU calculate the amount of air received by the intake pipe during one cycle.
A breakdown of the device circuit leads to an error code being entered into the system memory, and then the alarm turns on. After this, the control system calculates the air received based on the crankshaft speed, as well as based on the throttle valve opening angle.
The sensitive component of the DTV is the inlet pipe thermistor. The output signal voltage of the device connected to the computer will be approximately 0.3..4.9 V, it depends on the temperature of the air passing through the specified element. When a DTV failure is detected, the control system performs actions similar to its actions in the event of a DBP failure on a Lada Granta, replacing the readings of the described device with fixed temperature values.
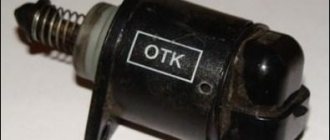
Original IAC
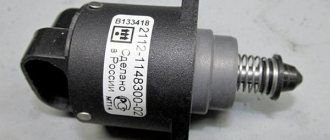
The working life of the original idle speed sensors is 90 thousand km. During this “time”, it is worth diagnosing this node. If there are any signs of malfunction, it is better to replace the IAC than to carry out independent repairs. Independent disassembly and assembly of this mechanism can lead to unbalance of the level of position and distance of needle movement. It is better to replace the IAC with original components. Russian manufacturers mark idle speed regulators with article numbers 2190 KZTA1148300-02 or KZTA 2112114830004. Non-original components of poor quality will not allow this part to operate for the required 90,000 km.
How to distinguish counterfeit pxx from the original?
You should not buy a regulator from the “first person you come across”
Buy in official VAZ showrooms, in specialized stores, where you will be offered a guarantee and a sales receipt. Pay close attention to the appearance of the product and original packaging. The absence of the latter is 100% counterfeit. Examine the body of the product; there should be no signs of “clumsiness” on it, the rivets on the surface should have heads, the original spring is always black and has fewer turns than on the fake. The body of a counterfeit product is most often 1 - 1.5 mm shorter than the original. Pay attention to the little things, and you are very likely to purchase an original and high-quality regulator.
Diagnostics of the idle speed sensor
Let's look at the operating principle of the idle air control (IAC) using the example of the IAC (idle air sensor) of the ECM of VAZ 21083, 21093, 21099, 21102, 2111.
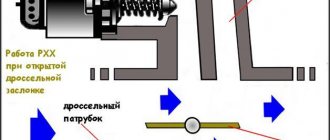
The operating principle of the idle air control and the order of its operation in different modes
Based on a signal from the controller (ECU), at different engine operating modes, the idle speed regulator, by moving the rod tip, changes the size of the flow area of the bypass channel through which air is supplied to the throttle valve. The maximum extended position of the rod is the initial position (zero step). It can be observed with the engine not running and the ignition off. In this position, the cross-section of the bypass channel is completely blocked by the tip, and air does not flow under the throttle valve. A fully retracted rod corresponds to 255 steps of travel and a fully open bypass passage.
IAC operation when starting the engine
When starting and warming up the engine, when the throttle valve is completely closed, the controller, based on the readings of the temperature sensor, using the IAC, slightly opens the access of the required amount of air to maintain increased idle speed. As the engine warms up, it reduces the amount of incoming air - the speed drops to normal.
Repair
Diagnostics
The VAZ 2110 lambda probe has four outputs:
Pads for VAZ 21102
Checking the oxygen sensor heater comes down to a basic check of the heater circuit:
the presence of voltage at the power contact of the vehicle’s on-board network (if there is no voltage, check the entire circuit); presence of continuity of the negative contact circuit.
In the future, we are exclusively interested in the signal wire, or rather, the change in voltage passing along it from the sensor to the ECU during various engine operating modes. You can check the operation of the sensor in two ways:
- Using a voltmeter;
- Using an oscilloscope (motor tester).
Since this instruction is intended for the common man who simply cannot have professional equipment in principle, we will diagnose the sensor using a voltmeter.
Method one: reading trouble codes
In order to read the fault codes located in the controller’s memory, it is necessary to either connect special diagnostic equipment to the diagnostic block (located on the left side under the instrument panel console) (too simple - not for us), or close contact “B” to ground, which is so The same can be done by connecting contacts “A” and “B”.
Diagnostic block VAZ 2110
- “A” - contact connected to the vehicle ground;
- “B”—controller signal contact;
- “G” — control of the VAZ fuel pump;
- “M” is a contact for issuing information (serial data).
After these contacts are closed, turn the ignition key to position “III” (do not start the engine), observe the “CHECK” indicator, which should flash the number 12:
- Flash;
- 1-2 second pause;
- Flash;
- Flash;
- Long pause of 2-3 seconds;
- Double repetition of the above cycle.
Reading fault code number “12”
Attention! This code indicates that the self-diagnosis program is running, otherwise this program does not work. After this, the program displays codes of existing faults in a triple cycle (each code three times), in the absence of these, code “12” continues to be displayed constantly. After this, the program displays codes of existing faults in a triple cycle (each code three times), in the absence of these, code “12” continues to be displayed constantly
After this, the program displays codes of existing faults in a triple cycle (each code three times), in the absence of these, code “12” continues to be displayed constantly.
Attention! When the diagnosis is completed, these contacts are allowed to be opened only after the ignition is turned off, after ten seconds. Erasing fault codes from the ECU memory in order to make sure that the fault has been eliminated occurs by turning off the controller's power for at least ten seconds. The power is turned off either by disconnecting the negative terminal from the battery or by removing the controller fuse
The power is turned off either by disconnecting the negative terminal from the battery or by removing the controller fuse
Erasing fault codes from the ECU memory in order to make sure that the fault has been eliminated occurs by turning off the controller's power for at least ten seconds. The power is turned off either by disconnecting the negative terminal from the battery or by removing the controller fuse.
Checking the idle air control
| If the engine runs rough at idle, then the cause may be a faulty idle speed control sensor. Before replacing it, you can check the IAC with your own hands. |
The IAC is an actuator and its self-diagnosis is not provided for in the system. Therefore, if the idle speed control malfunctions, the “CHECK ENGINE” lamp does not light up. Symptoms of IAC malfunctions are in many ways similar to TPS (throttle position sensor) malfunctions, but in the second case, most often the “CHECK ENGINE” lamp clearly indicates a TPS malfunction.
Testing IAC using a multimeter
- Turn off the ignition.
- Disconnect the harness connector from the regulator.
- Using a multimeter, check the resistance of the IAC windings (the resistance between contacts A and B, and C and D should be 40-80 Ohms). Check the resistance between contacts B and C, A and D. (the device should show infinity (open circuit)).
Checking the IAC with a homemade tester
| It is almost pointless to check the idle speed control on injection VAZs with a conventional multimeter. Measuring winding resistance, etc. is not informative, because the main problem with these devices is coking of the screw pair, which is why the regulator gets stuck in some positions and it is not able to maintain the correct operating mode of the engine. Not everyone can afford to buy a special tester for checking IAC, and most circuits are complex. |
However, you can make a simple device for checking IAC yourself. You only need a 6V AC transformer from your mobile phone charger. Using the switches alternately, we check the forward and reverse strokes of the IAC rod. If the unit is working properly, the lamp (6V/0.6A) barely shines. A bright light indicates that the rod is jammed and needs to be cleaned and lubricated or replaced. Detailed diagrams and seals from the author. If the IAC turns out to be faulty, then choose a new one.
Photo source: Key words:
Add a comment
How to set up a carburetor
Before you start adjusting the penny carburetor, you need to make sure that all components that affect the normal functioning of the internal combustion engine are in good condition. Check the spark plugs, the gap between the electrodes, the distributor, the coil, and the high-voltage wires. You can adjust the carburetor on a VAZ 2101 car only at engine operating temperature (85..90 degrees).
But before you start making adjustments, be sure to purchase a repair kit for the VAZ 2101
Moreover, pay attention to the fact that this repair kit matches your carburetor. If Solex is installed, then you do not need to buy a repair kit for DAAZ. Of course, the price of this set is not very high, but if you buy the wrong one, you will have to run around a little, exchanging for the right one
Disconnect the cable that connects the accelerator pedal to the throttle valve drive. The pipe connecting the air filter housing to the breather must also be disconnected.
Of course, the price of this set is not very high, but if you buy the wrong one, you will have to run around a little, exchanging for the right one. Disconnect the cable that connects the accelerator pedal to the throttle valve drive. The pipe connecting the air filter housing to the breather must also be disconnected.
Make sure that there is no vacuum in the hose connecting the carburetor to the advance angle adjuster on the distributor. Now you need to adjust the quality of the mixture. Screw in the screws one at a time until the engine begins to shake slightly. Now we need to achieve normal and most stable operation. To do this, unscrew the quality screws one by one. Do not make more than one turn. This adjustment is purely by ear, but it is quite possible to normally adjust the carburetor of a penny in this way.
To determine how well the adjustment has been made, open the throttle sharply and then close it immediately. If the speed increases sharply, there are no delays, then the carburetor is adjusted correctly. But the further operation of the VAZ 2101 will show more accurately. Carefully monitor how much gasoline is consumed per hundred kilometers. From time to time, check the condition of the spark plugs; if there is carbon deposits on them, adjust the air supply to the carburetor of the VAZ 2101.
Welcome! Idle speed - Over time, a person who uses a car with a broken idle speed decides to adjust it, because as we all know, if the idle speed is too low, the engine will stall from time to time, and if it is too high, then the fuel consumption of this engine increases and here you have to look for, as they say, a golden mean.
But in order to find this middle ground, you must first learn how to adjust the idle speed of a car, and not all people know how to adjust the idle speed. Therefore, today we will look at the issue regarding idle speed adjustment on cars of the “Classic” family.
Note! To make adjustments, you only need one single screwdriver!
- Adjusting the idle speed using a gas analyzer
- Adjusting the idle speed without a gas analyzer
Tips for adjusting idle speed: Firstly, adjustment must be performed at engine operating temperature (90-95 ° C), and also when adjusting, the air filter must be installed on the car.
Secondly, when adjusting the idle speed, the fuel level in the carburetor float chamber must be adjusted.
Thirdly, the valve clearances must also be adjusted and the car’s ignition timing must be adjusted.
Fourthly, when adjusting the idle speed, the air damper must be completely open; you can check this by removing the roof from the air filter housing and then looking at the damper.
Fifthly, adjusting the idle speed of a car is not always easy for a beginner, because adjusting the crankshaft rotation and adjusting the carbon monoxide (CO) content must be done together.
Note! To more accurately adjust the idle speed, you need to use a “Gas Analyzer”, which most owners do not have at all. But the adjustment can also be made without this device, but it will be more complicated! (How to make adjustments without this device, see the section: “Adjusting the idle speed without a Gas Analyzer”)
How to check the idle speed sensor VAZ-2114: signs of malfunction
If the idle speed of the car begins to “float”, and its operation as a whole has become unstable, then first of all you should check the idle speed sensor. In this article we will tell you in detail about this, and also tell you how to approach the issue of choosing this sensor.
Video with an overview of the main malfunctions of the idle speed sensor (+ replacement)
Main symptoms of a malfunction
Among all engine problems, “floating” idle speed is especially noticeable, and they manifest themselves in the following:
- The engine stalls when changing gears.
- The engine speed either rises sharply or drops to a minimum.
- The revolutions drop sharply at the moment of stopping with the engine running (at the moment of stopping at a traffic light - approx.).
If such symptoms are present, the idle speed sensor is usually faulty. However, before you start repairing it, you need to understand what it looks like and where it is located.
Sensor location on the engine
The sensor that regulates idle speed on a VAZ-2114 is usually fixed with two bolts next to the throttle assembly. It is easy to recognize by the presence of a power supply and its specific shape.
Idle speed sensor location
Now that we have figured out its location, we can begin diagnostics and, if necessary, repairs.
Troubleshooting
The difficulty in diagnosing the idle speed sensor lies in the fact that its problems will not be shown by the on-board computer, and its functionality can only be checked manually. The same cannot be said about the throttle position sensor, because they have the same symptoms of malfunctions, and the most ordinary on-board computer can identify the latter.
Checking the sensor circuit
- Before you start checking the sensor, make sure that the multimeter is working and ready for use.
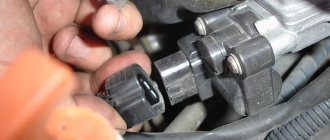
The idle speed sensor and its “wires” are below the throttle sensor. The throttle sensor is marked with an arrow. The block has been removed from the idle speed sensor.
Next, open the hood and disconnect the power supply from the sensor.
Please note that on cars equipped with a 1.6-liter engine, it is necessary to remove the throttle assembly mount and move it away from the receiver itself by about a couple of centimeters.
Take a multimeter
- Then, on the multimeter, set the “voltmeter” test mode.
- We connect the black probe to ground, and fix the red one to the terminals of block A - D.
This is what the pin layout looks like on the IAC power supply block.
With the help of an assistant, turn on the ignition and look at the parameters given by the multimeter. The reading should be at least 12 volts. If the voltage is lower, then there are problems in the battery, and when there are no values at all, then the problem should be looked for in the wires or the motor control unit.
If after checking it is determined that the circuit is working properly, then you can proceed directly to the sensor.
Checking the idle speed sensor
When testing the sensor itself, you must connect the sensor to resistance test mode as follows:
- Regardless of the polarity, we connect the probes first to terminals A and B, and then C and D. If the sensor is working properly, then the values should be about 53 Ohms.
Next, we connect them in the same way, only to outputs A and C, B and D, here the values should show “infinity”.
If the test readings were abnormal, you can try to clean it with carburetor cleaner, or purchase a new one.
Which sensor should you choose?
In order to correctly approach the selection of an idle speed sensor for a VAZ-2114, you should know that the last two digits on the sensor article number have a special meaning. Because if the article number of the old one ended with “01”, and a replacement sensor with the numbers “04” will be installed, then there will be no sense in this, because it simply will not work properly.
Sensors numbered “01” to “02” and “03” to “04” are considered interchangeable, respectively.
When choosing this device, also pay attention to counterfeit goods, because there are plenty of them on the modern market.
Elimination of floating speeds
- heads with a ratchet, and their size should be 6 and 8;
- neutral sealant, when purchasing, pay special attention to ensure that it is odorless;
- Silicone Grease;
You need to disconnect and remove the throttle cable stopper from the lever. This work must be done specifically on the throttle assembly. Next you will need to remove the resonator and air pipe. Using TORX T-25 heads and bits that were previously purchased, you need to unscrew the air filter shell. To be able to carry out this work with maximum convenience, you need to remove the wire from the exhaust receiver and all associated fasteners going to the throttle assembly.
Now, having removed the obstacle from the throttle assembly, unscrew all the bolt heads using a ratchet head to do this job. Only after this will it be possible to remove the remote control and remove the rubber rings that serve as a seal at the two ends of the throttle valve. All grooves need to be cleaned as much as possible and the FUM tape should be wound around them in a circle, about 15 times, and on the small pipe - about 10 times.
Only after completing this work can you begin to fully assemble the elements into a single whole. It would also be useful to use a clamp when securing the channel hose and the tube leading to the vacuum booster. This is necessary to further prevent air leaks in the connections.
Instructions for checking, cleaning and dismantling the idle speed sensor yourself
On any vehicle, the idle air speed sensor or control is an actuator that needs to be checked periodically. None of the components of the car can work forever, so sooner or later car owners are faced with the problem of a malfunction of the DHW. You can learn more about diagnosing and cleaning the device from this article.
Signs of sensor malfunction
Before you repair the device, you need to find out where the idle speed sensor is located. It all depends on the specifics of the vehicle, but as a rule, this controller is located on the throttle assembly, under the throttle position control. If the location of the DXX is clear, then you can find it without any problems.
Before checking the idle air control, familiarize yourself with the main faults specific to the part:
- the power unit has become less stable at idle;
- when switching to neutral speed, the engine may simply stall;
- if the power unit starts cold, there will be no increased speed;
- when an additional load in the form of a stove, air conditioner or optics is turned on, the engine speed drops significantly.
engine speed may increase or decrease for no reason;
Idle speed sensor device
Cleaning Rules
It often happens that cleaning the idle speed sensor can solve the problem of device inoperability. In general, this procedure is quite simple. Therefore, almost anyone can cope with it.
So, how to clean the idle air regulator:
Controller connection diagram
Main aspects of checking IAC
We figured out how to clean the idle speed sensor, now we’ll take the time to diagnose it. Like cleaning, testing can be done at home.
How to check the idle speed sensor:
- Find the IAC and remove it along with the wires. Unscrew several clamps that secure the throttle assembly with the receiver, then move these elements apart by about 1 cm.
- Using a diagnostic tester, check the IAC circuit - now you should make sure whether there is voltage in the network or not. Connect the tester probes to contacts A and D - as a rule, they are marked on the body. Having connected the probes, you need to activate the ignition and look at the results. The best option is 12 volts. If this parameter is lower, then most likely the problem lies in a poor battery charge, and if it is completely absent, then it is quite possible that the problem lies in the control unit.
- Make sure that the circuit is on the IAC itself. To do this, the tester's probes must be connected to pins A and B, and then to C and D, and you need to set the tester to ohmmeter mode. When checked, the diagnostic parameters should be about 53 ohms. Then the same actions should be repeated with other pairs of contacts, for example A and C, and the resistance should tend to infinity (the author of the video is Ivan Vasilyevich).
There is another option; for this, checking the idle speed sensor must be carried out with the IAC removed. Connect the power cable, then touch the end of the needle with your finger (no force required). During shutdown, the regulator should begin to extend the needle fully, so when you turn, there should be a slight push of the finger.
As you can see, in general, diagnosing a device is not that difficult, but for a quality test you need to understand how to use the tester. If you have no idea how to do this, it is better to seek help from an electrician, but in practice, after studying the instructions for the multimeter, there should be no problems with its use. Of course, the tester itself must be working, otherwise the readings will not correspond to reality and you will only get confused.
Features of dismantling
As for dismantling the controller, there is nothing difficult about it. Of course, some points may vary depending on the design features of your vehicle.
But in general the withdrawal procedure looks like this:
- First, the ignition is completely turned off. Just in case, to prevent a short circuit, you can disconnect the negative terminal from the battery.
- The next step is to disconnect the regulator's power wiring. Typically this connector is a four-pin output and can simply be disconnected. On some cars, the wiring block can be fixed using an additional fastener - there is nothing complicated here, you just need to disconnect the fastener.
- After this, the regulator mounting bolts are unscrewed and the controller itself is removed.
Video “Replacing the sensor at home”
The procedure for replacing the regulator is described in more detail in the video below (author - Ovsiuk channel).
Conclusion
Replacing the idle speed control is not a panacea in the fight against floating speed or a throbbing engine. Most automotive electricians have a tester in their arsenal to check the operation of the regulator. To do this, remove yours and give it for inspection. The regulator glitch may be intermittent, but the tester will show the correct picture.
Sometimes I have the same problem, the speed jumps, but the engine does not stall. Now I understand, most likely it is the idle speed sensor. I watched the video, in principle, now I can change it myself.
If the revolutions on 16 valves “float”, then the first thing you should check is the idle speed sensor. The only thing is that not all novice car enthusiasts know where it is and how to change it. It’s good that there are videos with which you can easily figure out what’s what.
A meaningful article that will be useful to every Lada Grant owner who does not want to spend their money on a hundred.
Comments from the same laymen as the author of the article... Do you even understand what you are writing about?
The idle speed sensor in the injection system of the Lada Kalina model is a special electronic device. Such a component can be found in any other car that runs on gasoline and has distributed injection. The design of the sensor is represented by an electric motor, paired with a conical needle by the manufacturer. Note that the device is controlled by an ECU.
The idle speed sensor rarely experiences malfunctions, but if such a fact occurs, it causes a malfunction in the idle speed of the engine. They begin to “float”, and the engine, in turn, ceases to function normally. As a result, achieving a timely return to operating temperature after a cold start becomes problematic.
How to check and replace the idle speed regulator of a VAZ-21114 engine
To check and remove the idle air control (IAC), you need to remove the throttle assembly completely (see “Removing the throttle assembly”) or partially. During partial dismantling, we disconnect the throttle valve drive cable, crankcase ventilation hoses and the canister purge solenoid valve from the throttle assembly. Having unscrewed the two nuts securing the throttle assembly to the receiver, remove the assembly from the studs without disconnecting the coolant hoses from it.
1. With the ignition off, release the latch and disconnect the engine control system wiring harness block from the IAC.
2. The regulator connector terminals are marked with the letters “A”, “B”, “C” and “D” on the block body.
To check the regulator supply voltage, turn on the ignition.
3. Using a tester, measure the voltage between terminal “A” of the wiring harness block and ground. We carry out the same measurements for other terminals of the wire block. In each case, when continuously measuring voltage, the tester readings should vary in the range from 0.5 V to 12.0 V.
4. To check the serviceability of the regulator itself, use a tester (in ohmmeter mode) to measure the resistance between the terminals of the regulator connector. For a working regulator, the resistance between terminals “A” and “B”, as well as “C” and “D” should be 40 - 80 Ohms.
5. To remove the idle speed regulator, use a Phillips screwdriver to unscrew the two screws securing the regulator to the throttle assembly (for clarity, shown on the removed throttle assembly).
6. Remove the idle speed control
The connection between the regulator and the throttle assembly is sealed with a rubber ring.
8. Install the idle speed control in the reverse order. Before installing a new regulator, use a caliper to check the distance between the end of the valve needle and the supporting surface of the regulator flange.
The distance should be no more than 23 mm. This is necessary in order not to damage the regulator during installation. The regulator needle should not rest against the throttle assembly seat. If the distance is more than 23 mm, then you need to use a special regulator tester to pull the shut-off needle inside the regulator. Before installing the regulator, clean the valve seat, air channel and the surface under the regulator's sealing ring in the throttle assembly.
Apply engine oil to the regulator sealing ring. The tightening torque of the regulator mounting screws is 3 – 4 Nm.
What is the difference between a fuel injection engine and a carburetor engine from a user's point of view? There is no need to pull the choke or play with the gas pedal when starting the engine. The car itself raises the speed for reliable operation of a cold engine, lowers it to normal and does not react in any way to turning on the headlights or air conditioning, despite the increase in load. Before the transition to electronic throttles, these functions were performed by a separate unit - the idle air regulator (IAC). What is RXX? This is an electronically controlled valve that allows the injection system to increase or decrease the amount of air entering the engine, regardless of throttle position. As soon as the injection systems “learned” to control the throttle directly, the need for a separate IAC disappeared.
The often used term “idle speed sensor” is completely incorrect. The sensor is a unit that transmits some information to the injection ECU, the XX regulator is an actuator mechanism with which the ECU influences the operation of the engine. They stand at different ends of the injection system operation algorithm, and cannot have anything in common. The appearance of the term “idle chord sensor” is associated with low technical literacy: any incomprehensible node connected to the “brains” can be considered a sensor. The idle speed sensor actually existed on primitive injection systems - it was a simple limit switch that closed when the gas pedal was released. And so he informed the ECU that the car had gone to idle. Later, this was determined by the throttle position sensor, and a separate “idle speed sensor” was not needed.
Self-diagnosis of the regulator
Signs of a malfunctioning idle air control regulator are a reason to carry out at least a basic check. Remove the regulator and check the condition: heavy carbon deposits will be a direct reason to clean it to eliminate their effect on the IAC.
In this regard, valves with PWM control are more convenient: you can fill them with carburetor cleaner and leave the idle speed control to “soak”, while stepper IACs are washed under pressure from jets from a cylinder, and the consumption of the product is higher.
When the IAC is removed, immediately check its seal (gasket or rubber ring) if the IAC is installed on a pipe or throttle body on the vehicle. External IACs are connected to the intake manifold by rubber pipes - carefully inspect them for cracks or breaks. A defective gasket or pipe will need to be replaced.
It is much easier to check the IAC if you have at least the simplest diagnostic equipment, for example, the ELM327 adapter with the appropriate software. Let's look at checking the idle air control using the example of the OpenDiag program (which is available in both free and paid versions, including for smartphones).
How to check IAC with a running engine? Run the program and pay attention to two lines: the desired and current position of the regulator. The numbers change synchronously with the change in speed (decrease as it warms up). When you turn on the headlights or air conditioning, you will see a change in the degree of opening of the IAC, but the engine speed should not drop. Moreover, the first line that changes is the “desired position” (this parameter is calculated by the injection ECU every cycle), followed by the “current position” (for stepper IACs - after each series of pulses is transmitted to the regulator, the displacement will be one step, until the “current” and "desired") If the data changes, but the speed does not, then we either have a serious air leak, which closing the IAC cannot compensate for, or the regulator itself does not move.
You can check the IAC even faster. Let's go to the actuator control menu, called up from the upper left corner. Here we are interested in the parameters “Desired position of the XX regulator” and “Desired XX speed”: by pressing the “right-left” buttons while the engine is running, you can either change the current position of the IAC valve, or set the speed at will, controlling the valve in the same way. Any intervention should immediately affect the operation of the engine. If in some part of the stroke the command to change it does not cause a reaction, then it becomes clear that in this place the idle speed regulator is jammed.
Idle air control designs
Where is RHH located? The answer depends on the specific regulator design. There are two common options:
- with stepper motor
- pulse width control.
The former are traditionally installed on the throttle body, the latter, due to their large dimensions, are installed as a separate unit. The exception is a number of Japanese cars, where PWM controllers are compact for installation on the throttle.
The stepper idle speed control is a valve mounted on the threaded shaft of a low power stepper motor. Since the stepper motor can, purely by design, rotate only through a certain angle, each control pulse turns into moving the valve stem over a strictly defined distance. This type of IAC is widespread, and thanks to VAZ cars it is known to everyone.
The main disadvantage of such regulators is the need to set zero. The ECU does not have the ability to know exactly how open the regulator valve is, therefore, when the ignition is turned on, it is forced to try to completely close the IAC and consider this position to be zero, calculating the valve movements from it.
Something else useful for you:
The second type of regulators with pulse-width control from domestic cars is familiar from Gazelles and Volgas (it is usually called RDV - additional air regulator). Here, as long as no voltage is applied to its windings, the sector damper opens automatically, allowing full air flow to pass through. When the IAC is operating, pulses arrive at its windings with a constant frequency, but with varying duration - the higher it is, the smaller the opening angle of the IAC damper and the smaller the volume of air passing through the regulator. But it can also be the other way around (impulses will try to open a normally closed damper).
The advantage of such idle speed controllers is the guaranteed self-zero setting: at the moment the ignition is turned on, the IAC valve is precisely open or closed. In addition, it is less covered with soot due to high-frequency vibration of the rotor (during the interval between pulses, the return spring manages to move the damper back), even if the motor is operating at a steady state. At the same time, stepper IACs are stationary at constant engine operation and collect carbon deposits more actively.
Functional features
The main purpose of the sensor discussed here in Lada Kalina is to measure the main parameters in the intake system and adjust the speed. This is done by sending pulses to the engine control module, which, based on the data received, adjusts the volume of injected fuel.
Due to the fact that the specified idle speed regulator acts as an actuator, determining its failure is a very difficult task. This is due to the lack of a useful self-diagnosis function in the Lada Kalina.
The device is designed to control the volumes of air that are directed through the intake tract into the combustion chambers of the engine. Here, the air mass (also measured by the mass air flow sensor) enters through a special channel, bypassing the throttle valve, which is closed in idle speed mode.
This idle speed regulator is involved in warming up the 8-valve engine, ensuring that the unit reaches its operating temperature in a timely manner.
When the ignition is turned on, a rod “crawls out” from the regulator and reaches a specially designed hole. This is called the initial position of the sensor.
Next, we outline the primary functions of this device:
- adjusting the optimal air mass;
- participation in warming up the engine 8 valves;
- determination and adjustment of the number of revolutions.
IAC malfunctions
Since the IAC, as the name suggests, operates primarily at idle, its malfunctions are noticeable in this mode. Like any electromechanical unit, the idle air regulator has a higher probability of mechanical failure. The moving parts are covered with deposits from crankcase gases, but if the engine is equipped with an EGR system (exhaust gas recirculation), then the IAC “smoke” even faster.
Since the injection ECU cannot monitor the actual change in the flow area of the idle air regulator, the slightest wedging of the damper rod or rotor will instantly give itself away. Swimming, freezing idle speed, inability to start without the gas pedal indicate that the idle speed control is sticking or not moving at all. Such IAC malfunctions do not cause any error codes to appear in the memory of the injection computer.
Problems with the electrical part are less common, and usually not in the regulator itself, but in the connector and wiring: breaks, short circuits, oxidation of contacts. An error with a standard OBD-II code will already be set here:
- P1513 – short circuit to ground.
- P1514 – open circuit.
General information
Any car owner sooner or later faces a problem when the idle speed of the car fluctuates. If the car has been in use for several years, then you will inevitably have to face this problem. In order to determine the reason for this breakdown, you need to carefully understand the design of the car.
If, when starting the engine of a Lada Granta, it is observed that as it warms up, instead of smoothly decreasing, the speed simply disappears for a few seconds, and then operates spasmodically, then the reason is 60% precisely because the idle speed fluctuates .
However, the problems disappear after the engine continues to function. All visible symptoms suddenly disappear and the engine continues to operate normally. However, the problem will repeat itself every time it is started and will not go away.
With each subsequent use of the car, this problem will only get worse. Therefore, you should not postpone its solution indefinitely, as in the future this will lead to very expensive repairs.