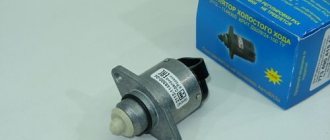
Types of idle speed sensors
Today, automobile manufacturers present several types of IACs:
- Solenoid sensor. It works based on electromagnetic force. After voltage is applied to the coil, the core is hidden. The valve flap allows air to flow freely inside. Once the solenoid is turned off, the peripheral channel is blocked.
The operation of the sensor is monitored due to the dynamics of the frequency of command signals. A certain amount of air has its own frequency equivalent, which allows you to clearly regulate the operation of the IAC.
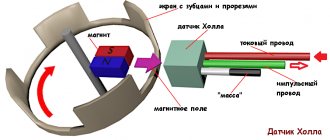
- Stepper. The technical structure of such a sensor includes a ring magnet and windings. Due to the stepwise supply of voltage to each element, under the influence of a magnetic field, the main rotor rotates. The executing mechanism, depending on the position of the rotor, controls the opening of the air duct.
- Rotary sensor. Control occurs through alternating frequency pulses. It is very similar in structure to the solenoid IAC, but the main place in the design is occupied by the rotor itself.
Cleaning Rules
It often happens that cleaning the idle speed sensor can solve the problem of device inoperability. In general, this procedure is quite simple. Therefore, almost anyone can cope with it.
So, how to clean the idle air regulator:
- First of all, the IAC must be disconnected from the wiring.
- Next, take the WD-40 liquid and apply it to a Q-tip. This stick is used to clean contacts.
- Next, take a small Phillips head screwdriver and unscrew the controller latches, there are two of them. If the fastenings are completely missing, this indicates that the IAC is mounted on varnish; if this is the case, then, most likely, the entire throttle will need to be dismantled.
- Dismantle the DXX and inspect it. If there is dirt or traces of motor fluid on the device, then in addition to the regulator itself, you will need to clean the entire throttle assembly.
- Now take a cleaning fluid (you can use carburetor cleaner instead of WD-40) and apply it to the cone needle and spring. Although carburetor cleaner is better for cleaning! Having done this, you need to dry the controller and put it in place. Before installation, make sure that the distance from the device body to the needle is 2.3 cm. If cleaning does not help fix the problem, then most likely you will have to change the DHC.
Controller connection diagram
Purpose of the IAC regulator
The idle air regulator is used exclusively in electronic ignition systems:
- the proportions of the fuel mixture in the injector are determined by the on-board computer;
- the amount of gasoline or diesel fuel for each cylinder is measured by the ECU;
- sensors are installed in the electronic ignition
DPKV(crankshaft),
TPDZ
(throttle valve),
Mass air flow sensor
(air), DD (detonation), based on the signals of which the fuel pump is activated and the ignition is distributed to specific cylinders;
- when the gas pedal is released, the fuel damper is completely closed, the proportions of the fuel mixture are violated, combustion products are sucked back into the combustion chamber due to the pressure difference between
intakeAnd
exhaust manifold
Purpose of the IAC
Based on the results of the air sensor signals, the controller makes a decision to further enrich the fuel mixture with air, ignoring the readings of the throttle sensor at this moment.
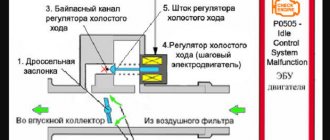
The chip on the IAC transmits a signal from the ECU; a bypass channel opens in the idle air regulator, through which air passes in the injector or additional fuel in the diesel engine. Engine speed is leveled, piston and crankshaft wear is reduced
How not to fall for a fake when choosing an IAC
If the check shows that the regulator is broken, you should be prepared to replace it, which was mentioned just above. If we talk about IAC on VAZ, then the idle speed controllers OMEGA and KZTA (Kaluga) stand out in terms of quality and reliability. Of course, we are talking about original parts, not fakes.
You can identify a fake IAC by the box in which it is packaged. Cheap packaging, strange font, bad, smudged printing - all this indicates a fake.
The fake part itself also has flaws. As a rule, this is play in the guide bushing and the cap itself. Over time, the backlash only increases, which negatively affects the operation of the IAC. In addition, there may be a gap on the regulator body, due to which air leaks will appear. Poor soldering of the contacts is also possible.
You can protect yourself from counterfeiting with the help of the manufacturer himself, who applies protective measures. This may be a unique spare part code, which can be verified via SMS or on the website.
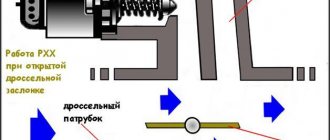
Operating principle
In carburetor engines, the problem of enriching the mixture when starting the internal combustion engine was solved by a starting handle and shims. With the advent of electronic ignition, this is done by the idle air regulator in conjunction with other sensors and the computer. Its operating principle is as follows:
- IAC calibration is performed by the ECU controller automatically after detecting this sensor in the system;
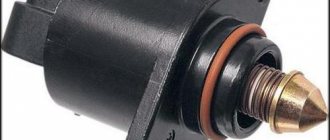
- in fact, the IAC is a stepper motor with a conical needle in a special hole in the throttle valve bypass channel;
- The IAC contact does not transmit any signals to the “brain” of the machine, but receives them from the controller, therefore it is not a sensor, but an actuator - an electric valve;
- in turn, the on-board computer “sees” that there is not enough air in the fuel mixture based on the signals from the mass air flow sensor, compared with the signals from the air flow sensor;
- Voltage is applied to the XX regulator, the needle leaves the channel, and the missing amount of air enters the mixture for mixing.
Operating principle of the IAC
In addition, the ECU receives signals about the temperature of the coolant and oil in the system. When starting in the cold season, it is necessary to warm up the engine to operating temperature in order to reduce wear on friction parts, so the IAC channel opens slightly to enrich the mixture for the injector, even without the driver pressing the gas pedal.
At the moment of start, the operating algorithm is as follows:
- the key turns, the ignition turns on;
- the rod extends all the way, the needle blocks the bypass channel;
- at the moment the rod rests against the calibration hole, the computer counts the steps backward;
- voltage is applied to the windings, the valve returns to the open position.
The number of reverse steps is programmed in the device firmware. For example, for Basch modifications on a warm internal combustion engine it is 50 steps, January – 120 steps, respectively. In total, the stroke of the rod is divided into 250 steps; the further it extends from the windings of the stepper motor, the greater the number of steps the ECU will count. When purchasing a new IAC, the distance from the mounting flange to the rod needle should be exactly 23 mm.
Calibrating a new IAC
What should I do if the test reveals that the sensor needs to be replaced? It needs to be calibrated.
- We check the distance from the end of the rod to the mounting plate, it should be no more than 23mm.
- We disconnect the minus from the battery, de-energizing the ECU.
- Install the regulator.
- We connect the battery back.
- Turn on the ignition for 5 seconds without starting the engine. At this time, the IAC calibration occurs.
- Turn off the ignition to complete the calibration.
- We start the engine and observe the idle speed.
Now you know how the idle air regulator works, how to check it and, if necessary, replace it. As you understand, there is nothing complicated about this and all operations are accessible even to a novice car enthusiast.
Finally, a video about diagnosing IAC:
Previous post How to check gasoline injectors
Next entry Misfires - causes, diagnosis, elimination
Signs of a malfunctioning idle speed sensor
The main problem will be that this part is not equipped with any type of self-diagnosis. On the control panel you will not see a flashing light or an inscription that will indicate a malfunction of the IAC. Everything will depend on your attentiveness and how you feel and hear your car. Signs that indicate that a part is worth checking include:
- the car began to stall at idle (uneven idle speed);
- a sharp drop or increase in speed during idle;
- when driving on a cold engine, the speed does not increase;
- When changing gear, the car stalls.
There are few reasons why the IAC failed. As they said earlier, this is a fairly reliable part, but it can still fail. There may be several reasons for the malfunction:
- The guide needle is worn.
- Broken contacts inside the part.
- The needle is clogged due to poor quality fuel.
As we all know, fuel is one of the most important components of the operation of both the engine and the car as a whole, and the idle speed sensor is no exception. Most of the reasons for part failure are the use of gasoline with impurities.
A malfunction and inadequate operation of the XX sensor is indicated by any changes in the engine speed. If the part fails completely, you will not be able to start the car without using the gas pedal. And such a procedure will negatively affect the operation of the vehicle as a whole. Manufacturers do not recommend this practice for nothing.
Signs of failure
The main symptoms that the idle speed sensor is not working correctly are:
- speed in parking mode is unstable;
- reduction in crankshaft rotation speed when any consumer is turned on (windshield wipers, headlights, air conditioning, radio, heater);
- no increase in shaft rotation speed when starting the internal combustion engine;
- stopping the engine when turning off a gear or changing gears.
Attention: These symptoms are not 100% the cause of IAC failure, as they are similar to the failure of the TPS damper sensor. However, in the latter version, the Check error lights up, and the idle speed controller is not connected to the engine control system and does not have self-diagnosis.
Preventive measures
In order not to encounter a complete malfunction of the regulator in the future, it is worth periodically carrying out the cleaning process described above.
How often to carry out the cleaning process depends on how actively you use your vehicle. If the car is a work vehicle, it is recommended to check and clean the sensor once a year; if you use it only for yourself, once every two years will be enough. But, of course, do not forget about the signs of a part malfunction; if they appear, do not delay. This will help you avoid complete failure of the part and enjoy a high-quality ride. Together with you, we come to the conclusion that the part is unpretentious, simple in its functionality and use. Don’t forget: timely detection of a malfunction is the key to overall vehicle productivity. The full operation of the engine depends on the serviceability of each of its components, and if you neglect any part, including the idle speed sensor, this can lead to more labor-intensive repair processes and failure of the entire car.
Checking the idle speed sensor
Diagnosing the part is quite easy, but pay attention to a few points. The first problem may be removing the part; most manufacturers attach the XX sensor to screws, and in extreme cases they can be drilled out, but in some variations the part is mounted on varnish. If your regulator is secured with varnish, be careful not to forcefully remove it, as this may damage the intake part of the car. In your case, it would be correct to completely dismantle the throttle assembly and only then disconnect the IAC.
The easiest way to check is, of course, visual inspection. During a visual inspection, the first thing you should pay attention to is whether the needle is dirty. Also pay attention to the condition of the contacts and the throttle valve itself.
If broken wires are found, they must be returned to their place. Solder them and, to avoid corrosion, treat them with varnish.
It would be appropriate, if possible, to check the IAC with a multimeter or a homemade tester. You can check the resistance with a multimeter, and use a homemade tester (you can make one from a mobile phone charger) to check the stroke of the regulator rod.
If you find that the motor is damaged, the rod is completely worn out, or the cone needle is worn out, the part will need to be replaced. Don’t be too upset about this, the cost of the part will only be about 1000 rubles.
Main aspects of checking IAC
We figured out how to clean the idle speed sensor, now we’ll take the time to diagnose it. Like cleaning, testing can be done at home.
How to check the idle speed sensor:
- Find the IAC and remove it along with the wires. Unscrew several clamps that secure the throttle assembly with the receiver, then move these elements apart by about 1 cm.
- Using a diagnostic tester, check the IAC circuit - now you should make sure whether there is voltage in the network or not. Connect the tester probes to contacts A and D - as a rule, they are marked on the body. Having connected the probes, you need to activate the ignition and look at the results. The best option is 12 volts. If this parameter is lower, then most likely the problem lies in a poor battery charge, and if it is completely absent, then it is quite possible that the problem lies in the control unit.
- Make sure that the circuit is on the IAC itself. To do this, the tester's probes must be connected to pins A and B, and then to C and D, and you need to set the tester to ohmmeter mode. When checked, the diagnostic parameters should be about 53 ohms. Then the same actions should be repeated with other pairs of contacts, for example A and C, and the resistance should tend to infinity (the author of the video is Ivan Vasilyevich).
There is another option; for this, checking the idle speed sensor must be carried out with the IAC removed. Connect the power cable, then touch the end of the needle with your finger (no force required). During shutdown, the regulator should begin to extend the needle fully, so when you turn, there should be a slight push of the finger.
As you can see, in general, diagnosing a device is not that difficult, but for a quality test you need to understand how to use the tester. If you have no idea how to do this, it is better to seek help from an electrician, but in practice, after studying the instructions for the multimeter, there should be no problems with its use. Of course, the tester itself must be working, otherwise the readings will not correspond to reality and you will only get confused.
Method for checking the sensor using a multimeter
The most reliable and common way to check the functionality of the sensor is to use a multimeter. But to do this, the regulator must first be removed. Typically, it is secured with several screws near the throttle sensor, but on some cars it can be secured with a special solution or varnish.
It is impossible to dismantle the IAC using force, since there is a high risk of damaging the intake system. In such a case, you will have to remove the entire throttle assembly.
To check the electric motor, it is necessary to measure the resistance of the windings. The multimeter contacts must be connected in turn to each of the windings A and B, C and D. If everything works properly, the data obtained will fall in the range of 40–80 Ohms.
As an additional check with a multimeter, the contacts can be swapped. The sensor, in this case, should indicate an open circuit.
IDLE SENSOR CONTAMINATION
Often the cause of improper operation of the idle air regulator is its contamination. In such a situation, you can replace the sensor (which is inexpensive) or clean it. Cleaning the idle speed sensor takes place in two stages: You need to moisten a cotton swab with a special product (for example, which is used to clean a carburetor) and use it to clean the contacts of the sensor. This must be done carefully so as not to damage them; The remaining parts of the regulator can be cleaned mechanically using the product indicated above. Moisten a toothbrush with it, for example, and carefully clean the needle, rod, spring, removing accumulated dirt.
Design features
At the stage of the emergence of DHC, solenoid and rotary idle speed sensors were used. They had two positions, similar to a valve - Open/Closed, which reduced the efficiency of engine speed adjustments. Currently, they have been replaced by a 4-step valve with stepwise bypass supply adjustments.
If you disassemble the IAC, you can see that it is assembled from four parts:
- stepper motor;
- four-position rod;
- spring;
- needle.
Stepper IAC design
When voltage is applied to one of the four windings, the coil is magnetized, interacts with a magnetic ring, and moves the rod to one of four positions. Accordingly, the number of breakdowns of this electrical appliance is as limited as possible:
- the bypass channel is clogged;
- windings burn out;
- the needle or spring breaks.
The sensor is positioned, that is, it is considered conditionally unrepairable. It is cheaper to replace the whole thing than to disassemble and repair individual parts. If they are not on sale, you need to grind them yourself.
However, the first reason can be eliminated on your own - with the connector disconnected, remove the regulator to clean the bypass channel with universal WD-40 spray.
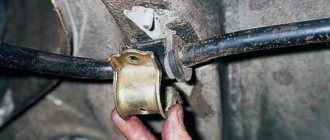
Installation location
Knowing the principle of operation of the IAC, it is very simple to determine where the valve is located - near the throttle valve and its spatial position sensor TPS.
It is extremely rare that the sensor is glued to the damper body with varnish; in other cases, the device is fixed with two screws for which there are mounting holes. The main task of how to adjust the IAC valve with your own hands when installing it is to ensure a distance of 23 mm from the needle to the landing flange.
Location of the XX regulator
Before removing the regulator for replacement, you should study the markings. IACs marked 01/03 or 02/04 are considered interchangeable. If you put 02 instead of 01 or 03, the device will not work correctly.
Connection diagram
The idle air control control receives a single harness of four wires from the ECU. Below is a diagram of the distribution of the electric motor windings.
Connection diagram
The main problem is diagnosing the sensor on your own. Simply applying voltage to its terminals to check functionality will not work, since the ECU does this pulsed. The windings burn very rarely; mechanical faults are more common, for example, a bent rod or a clogged bypass channel
At a service station, the sensor is checked on stands capable of reproducing an ECU pulse. Even with a multimeter, a car enthusiast can only verify the integrity of the windings and the absence of a short circuit between them, nothing more.
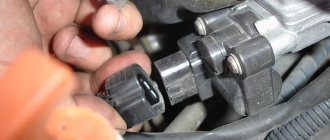
Cleaning the needle and bypass channel
To provide access to valve parts, removal of the IAC is required using the following technology:
- disconnecting the block from the connector;
- cleaning the connector contacts and plug with a cotton swab soaked in WD-40;
- unscrewing screws with a curved screwdriver;
- removing the regulator to check the condition.
IAC cleaning
Attention: There is no need to disassemble the regulator, just spray the spring and rod with needle with WD-40 spray, wait for it to dry, and at the same time clean the throttle bypass channel.
The adjustment is made by the on-board network controller itself. However, for stable operation of the engine, you should check the distance from the mounting flange to the protruding needle cone. By default it should be 23 mm.
Basic faults
The above symptoms of malfunction usually occur in the following cases:
- the throttle valve bypass channel is clogged with dirt;
- the integrity of the wires or coils is damaged;
- The ECU firmware does not match the IAC modification.
Regulator needle is dirty
Checking using the above methods reveals all the causes of the problem. Whenever disassembling the regulator or throttle assembly, it is recommended to clean the IAC with special liquids/sprays.
What do you need to know when replacing the IAC?
To change and install a controller that allows you to regulate idle speed, you need to pay attention to the position of the rod. It must not be allowed to be pushed forward too much. This can happen if the device is connected to the block and the ignition is activated before installation. It is not allowed to push the rod in by hand.
If the valve is installed with the needle extended and the retaining screws are tightened, damage to the unit may occur due to shearing of the worm gear. It is impossible to repair such a sensor. Depending on the vehicle model, after installing a new regulator, it may need to be calibrated. In some cars, this procedure is carried out using special equipment or a stand.
On VAZ cars, calibration is performed as follows:
- A terminal is connected to the negative output of the battery.
- The key is turned in the lock to turn on the ignition for ten seconds. There is no need to start the power unit.
- The ignition is turned off.
User Ovsyuk talked about replacing the idle air valve on his own using the example of a Lada Samara car.
Sensor diagnostics
You can check the idle air valve yourself. Its faults can be divided into two parts: mechanical and electrical. There are several verification methods.
Visual inspection
First you need to conduct a visual inspection. In this way, you can detect body defects, needle wear, and carbon deposits. If deposits form, you can clean them with carburetor cleaner. It is also recommended to clean the entire throttle body as it is in a similar condition.
Using diagnostic programs
The operation of the IAC can be checked using a diagnostic adapter and special programs. For example, you can use the simplest ELM327 adapter and the OpenDiagMobile program. In the program menu you need to select the desired position of the XX regulator and watch the operation of the valve. It is better to set it at least 20 steps more than the current position.
Wiring check
For this we need a multimeter. With the engine off, remove the connector from the sensor. We set the measurement limit on the measuring device to 0-20 V DC voltage. We measure the voltage at the connector. Normally it should be 12V.
Checking the regulator resistance
To do this, we will need to measure the resistance between terminals A, B, and C and D after disconnecting the sensor terminal. We move the multimeter to the position of measuring resistance at the limit of 0-200 Ohms (Ω).
The normal value is within 50-55 Ohms. The resistance between A and C, B and D must be infinity.
Checking with throttle assembly
There is another way to diagnose IAC. To do this, you will need to remove the throttle assembly from the studs along with the sensor.
By connecting the valve connector and turning the ignition on/off, you can observe the operation of the IAC live. See how the needle works, if it is rubbing somewhere, check the evenness of the stroke, hear suspicious sounds.
How does the regulator work?
In everyday life, the IAC is often called a sensor, although in reality it is not one. The element is a stepper motor housed inside a non-separable housing. Only the spring-loaded rod with a cone-shaped tip protrudes outward. At the command of the ECU, the engine extends or retracts the rod to a certain distance.
The idle speed sensor is located in the throttle valve block, the working cone is extended into a small cross-section bypass channel. Since the engine starts and idles without pressing the accelerator pedal, the mentioned channel supplies air to the cylinders when the throttle is closed. The task of the IAC is to regulate the amount of air flow, blocking part of the flow area with a cone.
To better understand the issue, it is worth presenting the operating principle of the idle speed sensor in the form of an algorithm:
- After the driver turns on the ignition, the controller activates the governor motor, forcing the idle air passage to open. The ECU calculates the opening amount using a temperature sensor - if the engine is cold, the rod will move back more.
- At the moment of startup, the injectors supply an enriched mixture to the cylinders. Then the amount of fuel is reduced so that the engine does not “suffocate” and stall. The speed is monitored by the control unit using a crankshaft position sensor.
- The volume of air entering through the IAC is taken into account by the mass air flow sensor located on the inlet pipe, while increased crankshaft speeds are maintained (1200–1500 rpm).
- Using the temperature sensor, the control unit “sees” that the engine is warming up and gradually reduces idle speed, giving the command to the IAC to cover the cross-section of the bypass channel. When the temperature reaches an acceptable value (60 °C or more), the regulator maintains the speed at 850 rpm.
Do-it-yourself IAC diagnostics
The causes of malfunction are conventionally divided into electrical and mechanical. First, you need to dismantle the regulator and conduct a visual inspection of it to eliminate contamination with waste carbon and its possible impact on the performance of the power unit. If repairs are necessary, the part must be cleaned, thoroughly dried and lubricated with silicone. The step option is washed with a spray can, which is not an economical method.
After removing the assembly, you should pay attention to the rubber ring or gasket, provided that it is installed on the throttle or pipe. When mounting the part externally, a connection is made to the intake manifold. It will be necessary to inspect its rubber elements for deformations and tears. Any part found to be defective must be replaced.
Alternative diagnostic methods
If you have a special device for detecting faults, for example, an adapter with suitable software, diagnostics are much easier. OpenDiag can even be used on a smartphone and is available in both paid and free versions. When starting the software, it is worth paying attention to the current and desired throttle valve positions. Their performance will change accordingly along with the revolutions. If you turn on the additional electrical unit, you can notice changes in the IAC data, but the motor power should not change. First of all, the values are updated on the line of the desired position, and then on the current one. When the values change, the RPM value should also change. Otherwise, there is a possibility that the idle speed control is inactive or there is an air flow leak.
For faster verification, you need to open the menu in the upper left corner. This is control over the operation of actuators. Using the parameters “current idle position” and “desired idle position”, you can enter your values, which should immediately be displayed on engine operation. If there is no response to intervention, a faulty section of the stroke with obvious dysfunction of the regulator can be immediately identified.
You can also use a multimeter to diagnose the wiring. With the engine turned off, the connector is removed from the regulator. DC voltage values of 0-20 V are entered into the measuring device. Then the voltage value of the connector is measured. The acceptable value is 12 units.
It is also worth checking the IAC resistance. To do this, you need to fix the values after removing the terminal from the sensor between terminals C and D, A and B. The limit on the multimeter is set to 200 Ohms. With an acceptable resistance, the norm will be 50 Ohms, and the resistance between the terminals will tend to infinity.
Diagnostics can be carried out using the throttle assembly. Having dismantled it together with the sensor, you need to monitor its operation when activating/deactivating the ignition system and connecting the valve connector. The work of the needle, the presence of extraneous sounds, and the uniformity of the work process are subject to close attention.