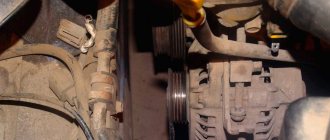
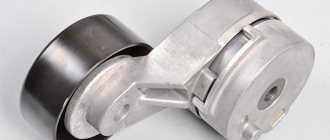
All engine belts are located under the hood. The air conditioning compressor belt runs from the crankshaft pulley to the compressor pulley. Its tension occurs due to the action of the tension roller (indicated in the photo).
1 — crankshaft pulley, 2 — tension roller, 3 — air conditioning compressor pulley, 4 — air conditioning compressor drive belt, 5 — alternator belt, 6 — power steering belt, 7 — power steering pump pulley, 8 — coolant pump pulley, 9 — generator pulley.
Compressor belt
All engine belts are located under the hood. The air conditioning compressor belt runs from the crankshaft pulley to the compressor pulley. Its tension occurs due to the action of the tension roller (indicated in the photo).
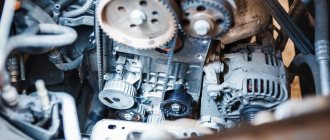
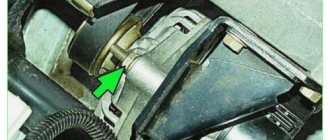
Generator belt
The alternator serpentine belt grips the alternator pulley, crankshaft and water pump. This part is tensioned using a special tension mechanism that moves the generator.
Power steering belt
This V-belt grips the pump pulley and the power steering pump shaft; its tension occurs due to the movement of the power steering pump housing, which is mounted on a bracket and attached to the power unit.
- We drive the car onto a viewing hole (overpass, lift). Open the hood and, using a Phillips screwdriver, unscrew the piston bolt that holds the mudguard fastening system. The piston must be pulled out.
- We climb under the bottom of the vehicle, find the screws holding the mudguard fastening from below, and use a 10mm wrench to unscrew them. After removing the mudguard, it is also recommended to remove the wheel - in this case, the replacement procedure will be more convenient and faster.
- To get to the A/C pulley, you must first remove the alternator belt. To do this, use a 12mm wrench to loosen the generator mounting nut. Using the same tool, unscrew the adjusting bolt to loosen the belt tension.
- After this, we move the entire drive of the auxiliary units towards the cylinder block, which will allow access to the air conditioner pulley. Remove the belt from the shafts.
- Since we previously loosened the Accent air conditioning belt tensioner, we can now completely unscrew the adjusting bolt without any problems. Now we remove the air conditioner belt - the first part of the task is completed.
- We install the new belt in its original place. To tension the air conditioner belt, use a 12mm wrench to loosen the screw that secures the generator to the oil pump. We begin to slowly rotate the adjusting screw until the pulley is sufficiently tensioned. Note that the tension should be moderate - when pressed from above, the belt should move vertically by 5 - 7 mm. If you clamp the Hyundai Accent air conditioner belt tensioner roller too tightly, the load on the bearings during rotation of the generator shaft will be constantly increased, which can cause their premature wear. The same trouble awaits the refrigerant pump bearings.
- After tightening the strap, you should tighten and tighten all the bolts and screws that were previously unscrewed or loosened.
- All subsequent operations should be performed in reverse order. The last thing to install is the mudguard.
The importance of tension level and checking it
How to tension the alternator belt
Let's consider what unpleasant consequences an incorrect level of tension will lead to. If it is weakened, then there is a high probability of slippage . That is, the generator drive will not operate at rated speed, which in turn will lead to the level of voltage generated by it being below normal. The result is an insufficient level of battery charging, insufficient electricity to power the vehicle systems, and operation of the electrical system under increased load. In addition, when slipping, the temperature of the belt itself increases significantly, that is, it overheats, which is why it loses its service life and may fail prematurely .
If the belt is too tight, this can also lead to excessive wear on the belt itself . And in the worst case, even to its breakage. Also, excessive tension has a detrimental effect on the bearings of the crankshaft and generator shaft, because they have to work under conditions of increased mechanical load. This leads to excessive wear and speeds up their failure.
Possible causes of malfunction
If the alternator belt creaks, then this sound hurts the ears not only of the driver and passengers, but even passers-by. When such sounds occur, the thought arises that the reason is in the strap and it needs to be replaced urgently, but this is not always the case. Therefore, before rushing to replace it, you should understand the cause of the squeak.
A generator is present in any car; its purpose is to provide electricity to all car systems. Continuity of rotation of the device rotor is ensured by a belt drive between the crankshaft and the generator. Due to friction with the pulley or slipping of the rubber product, a whistle occurs. Pulleys and belts may differ for different vehicle devices, but the principle of their interaction is the same. The cause of the squeak is the friction of parts from each other. Therefore, the whistle often occurs when the belt is loose and it slips along the pulley.
The cause of the squeaking of the alternator strap may be:
- insufficient tension;
- low quality product;
- traces of oil, coolant and various contaminants;
- distortion of the tensioner.
In the cold season, a squeak may occur when starting a cold car. The belt is a rubber product; in the cold it hardens and loses elasticity. As soon as the material warms up, the whistle disappears. The cause of the whistling may be increased humidity. In this case, nothing needs to be done, since the whistle disappears as the surface dries.
Tension check
Tension checking process
Now let's look at the issue of checking tension. It’s worth mentioning right away that the force values are unique and depend not only on the make and model of the machine, but also on the generators and belts used. Therefore, look for the relevant information in the manuals for your car or in the operating instructions for the alternator or belt. This will also be influenced by the presence of additional equipment installed in the car - power steering and air conditioning. In general terms, we can say that if you press the belt on the longest section between the pulleys with a force of about 10 kg, then it should deflect by approximately 1 cm (for example, for a VAZ 2115 car, when applying a force of 10 kg, the belt deflection limits are 10 .15 mm for generators 37.3701 and 6.10 mm for generators type 9402.3701).
If during the check you find that your alternator belt is too loose or too tight, you need to adjust the tension. This can be done in two ways depending on what kind of machine you have - using an adjustment bar or using an adjustment bolt. Let's look at them in order.
Replacement frequency
Servicing any car begins with studying the official manual. Renault has adapted its models well to Russian weather conditions and road quality. However, the recommendations presented somehow do not coincide with the actual interval between engine oil changes. The manual states that on all engines installed on the Renault Symbol model, it is necessary to change the engine oil at intervals of 15 thousand kilometers. This interval is only relevant if the machine is used in moderate conditions, is not subjected to heavy loads and does not experience sudden temperature changes. The following points influence the reduction of the actual interval between replacements of the working fluid in Renault Symbol engines:
- frequent traffic jams from traffic lights to traffic lights;
- hot summers and very cold winters;
- driving at high engine speeds;
- low quality of spilled fuel;
- using motor oil that does not meet the manufacturer’s requirements;
- poor quality roads, etc.
Therefore, in fact, it turns out that on Renault Symbol cars the oil and oil filter are changed not every 15, but every 8-10 thousand kilometers. Most owners adhere to these indicators. Motorists note that if such a maintenance interval is observed and high-quality lubricants are used, Renault Symbol engines work well, there are no problems and it is possible to maintain the functionality of the power plant. In more aggressive operating conditions and in the case of a high mileage of the vehicle, accompanied by severe engine wear, the frequency can be reduced to 5-8 thousand kilometers.
Tension with adjuster bar
Securing the generator using a strip
This method is used for older cars (for example, “classic” VAZs). It is based on the fact that the generator is attached to the engine using a special arc-shaped strip , as well as a bolt and nut. By loosening the fastening, you can move the bar with the generator relative to the engine to the required distance, thereby adjusting the tension level.
Actions are performed according to the following algorithm:
- unscrew the fastening nut on the arc-shaped bar;
- Using a pry bar, we adjust the position (move) of the generator relative to the engine;
- tighten the nut, fixing the new position of the generator.
The procedure is simple, it can be repeated if you were unable to achieve the required level of tension the first time.
Tension using adjusting bolt
Adjustment with a bolt on a VAZ-2110
This method is more progressive and is used in most modern machines. It is based on the use of a special adjusting bolt , by turning which you can adjust the position of the generator relative to the engine. The algorithm of actions in this case will be as follows:
- loosen the generator, its upper and lower fastenings;
- Using the adjusting bolt, we change the position of the generator;
- fix and tighten the generator mount.
The belt tension level in this case can be determined during the adjustment process.
Tension adjustment using a roller
Adjusting roller and key for it
Some modern machines use special adjustment rollers . They allow you to quickly and easily tension the belt. As an example of using this method, consider adjusting the belt on a Lada Priora car with air conditioning and power steering, as one of the most popular cars in our country.
How to tighten the alternator belt on a Priora
Work on tensioning the alternator belt on a Lada Priora car is carried out using a special tension roller, which is part of the structure. To work, you will need a 17 mm wrench to unscrew and lock the mentioned roller again, as well as a special key to turn the adjusting roller (it is a structure of two rods with a diameter of 4 mm, welded to the base, the distance between the rods is 18 mm). Such a key can be purchased at any auto store for a nominal price. Some car owners use curved pliers or “duckbills” in their work. However, we advise you to still buy an adjustment wrench, given its low price and ease of further work.
Voltage regulation process
To adjust with a 17 key, you need to slightly unscrew the fixing bolt that holds the adjusting roller, then use a special key to turn the roller a little in order to increase (most often) or decrease the belt tension. After this, use the 17 key to fix the adjusting roller again. The procedure is simple and even an inexperienced car owner can handle it. It is only important to choose the right force.
After you have completed the tension, you need to perform a check . To do this, start the engine and turn on the maximum consumers of electricity - high beams, heated rear window, air conditioning. If they work properly and the belt does not whistle, it means you have tensioned correctly.
Source
Let's get to work. Removing the belt
So, first you need to jack up the front left side and remove the wheel. Next, open the hood and loosen the pump pulley bolts. A total of four bolts need to be unscrewed. Next, remove the belt from the air conditioner (if one was installed on the car). To loosen the belt, slightly unscrew the tension roller. Next we need to remove the alternator belt. For this we need 12" heads. Additionally, unscrew the power steering shaft. The amplifier itself can also be removed.
We remove the pump pulley with the belt and disconnect the fasteners of the power steering reservoir. We move the last one a little to the side. Next, you should remove the side motor mount (the one that is attached to the right wing). As the work progresses, we inspect its condition. The engine mount should not have cracks or play. Otherwise, we replace it with a new one.
Next, unscrew the plastic casing under which the timing belt is hidden. Using a ratchet and a 22mm socket, unscrew the bolt located in the middle of the crankshaft. Be careful - it is twisted with great effort.
How to replace a belt on a Niva Chevrolet
In order to replace the air conditioning belt on a Chevrolet Niva, you need to use only one 12 key. There are no difficulties in carrying out repairs; it is enough to install the car on an inspection hole or overpass. This makes it much easier to make repairs, because the belt is located at the bottom. To remove it, you will need to loosen the roller mount.
After installing the new belt, simply tighten it using the bolt installed on the roller. Please note that when replacing all belts in a comprehensive manner, this should be installed last. First replace the timing belt, then the generator, and lastly the air conditioner.
It is recommended to buy belts from well-known brands, the quality of which has been tested by time. The layout of the drive mechanisms is shown in the photo.
To work you will need a tool:
- screwdriver;
- jack;
- set of socket wrenches;
- mounting blade.
The manufacturer of the Chevrolet Niva recommends changing the alternator belt every 50 thousand kilometers. Original drive belts can withstand increased loads up to 75 thousand kilometers. Consumables of Chinese origin have to be changed every 15-20 thousand kilometers. Additionally, a visual inspection should be carried out every 10-15 thousand kilometers.
Signs that the drive belt needs to be replaced:
- Visual wear: abrasions, unevenness, tears and cracks;
- Rubber peeling;
- Presence of oil stains.
Hyundai Accent Tagaz from 2001 to 2012
Buy drive belt and rollers 16 cl. DOHC
25212-26021 — generator drive belt
MOBIS original. Quality 100%!
1 987 947 895 — generator drive belt
BOSCH The supply of spare parts to automakers' conveyors and their sale to the secondary market accounts for 70% of the company's turnover. BOSCH spare parts are very popular in many countries, both among professionals and among car enthusiasts.
KDB006 - generator drive belt
KORTEX corresponds to the price-quality ratio. All products are manufactured in compliance with the requirements of the ISO International Quality Standard and European standards PIMOT, ECE R90, ATEST, as well as KBA/TUV/ISO technical standards. Auto parts sold on the Russian market are certified by NAMI.
57231-29100 — power steering belt
MOBIS original. Quality 100%!
1987948145 — drive belt
BOSCH The supply of spare parts to automakers' conveyors and their sale to the secondary market accounts for 70% of the company's turnover. BOSCH spare parts are very popular in many countries, both among professionals and among car enthusiasts.
AVX13X670 - drive belt
CONTITECH The German concern Continental AG is the third largest company in the world supplying units and components for primary equipment in the automotive industry.
97713-1E000 — air conditioning belt
MOBIS original. Quality 100%!
1987947894 — air conditioning belt
BOSCH The supply of spare parts to automakers' conveyors and their sale to the secondary market accounts for 70% of the company's turnover. BOSCH spare parts are very popular in many countries, both among professionals and among car enthusiasts.
KM53-01661 — air conditioning belt
KORTEX corresponds to the price-quality ratio. All products are manufactured in compliance with the requirements of the ISO International Quality Standard and European standards PIMOT, ECE R90, ATEST, as well as KBA/TUV/ISO technical standards. Auto parts sold on the Russian market are certified by NAMI.
97834-2D520 — air conditioner belt tension roller
MOBIS original. Quality 100%!
GTA0720 - air conditioner belt tension roller
GMB (Japan) is the world's largest manufacturer of water pumps, propeller shaft joints (crosspieces), and timing belt tensioner rollers.
PSA-C015 - air conditioner belt tension roller
PARTS MALL are exporters and manufacturers of high quality Korean auto parts for the entire range of Hyundai and Kia cars.
How to tighten the Niva Chevrolet alternator belt: photos and videos
There will be 2 wires on the back of the gene - one is plug-in, and the second is screwed with a nut and washer to the bolt.
To do this, we drive the car into a pit or overpass and remove the engine protection.
Check that the ignition is turned off. Having opened the hood, you need to remove the plastic trim, overcoming the resistance of the clamps (4 pcs.). Then, taking a screwdriver, loosen the clamp on the main air duct (photo 2).
A set of preliminary steps
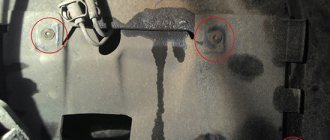
Use a 10mm wrench to unscrew the fastening screw (photo 3). The screw is removed, and then the air duct must be removed from the filter housing. Preparations are complete.
Reasons for failure
- Entry of a foreign body. This is most likely evidenced by traces of impacts on the body and marks on the flat side of the belt.
- Incorrect belt tension adjustment - too strong or too weak. In this case, the tension indicator, tensioner cover or tensioner limiter breaks. This can be caused by incorrect tightening of bolts or incorrect sizing.
- Work in high temperature.
- Part misalignment. Because of this, belt marks can be seen on its surface.
- Mechanical damage from tools during installation.
Checking and replacing drive belts for Niva Chevrolet auxiliary units
Depending on the vehicle configuration, various schemes and drive options for auxiliary units may be used.
Belts may vary in size, since auxiliary units such as a power steering pump, generator, and air conditioning compressor may be from different manufacturers.
Therefore, before checking and replacing belts, you need to decide which option is right for you.
The size of the belts is indicated on the outside of the belts. You need to buy belts according to their size.
When replacing belts, be sure to check the condition of the tension and auxiliary rollers.
You should definitely carry spare belts with you, especially on a long trip. Let's look at some options and technology for replacing belts.
Insufficient belt tension impairs fluid circulation in the cooling system, which leads to engine overheating. In addition, recharging the battery worsens and the belt itself wears out more. If the tension is too strong, the bearings of the water pump and generator may fail.
Check the tension of the drive belt of the water pump and generator from above in the engine compartment.
Tension is characterized by the amount of belt deflection between the pump and crankshaft pulleys (deflection “B”) (Fig. 1) or the generator and pump pulleys (deflection A) when a force of 98.1 N (10 kgf) is applied in the middle of the distance between the pulleys.
Deflection A should be 10 - 15 mm, deflection B - 12 - 17 mm.
It is more convenient to check the deflection “A”.
To check the tension, you can use a spring balance scale by hooking a belt branch with its hook and pulling it up.
Adjust the belt tension with the car mounted on a lift or inspection ditch.
The adjustment is carried out by moving the generator relative to the engine.
You will need: a 13" wrench, a mounting blade.
1. Remove the oil sump protection and engine splash guard.
2. Loosen the nut securing the generator to the tension bar by about one turn
3. Loosen the nut of the lower mounting of the generator.
4. To increase belt tension, move the generator away from the engine.
When moving the generator to increase belt tension, apply force only to the generator housing. placing the mounting blade between the housing and the engine.
5. To reduce belt tension, move the generator towards the engine by hand.
6. Without changing the position of the generator, tighten the nut securing the generator to the tension bar and the nut of the lower mounting of the generator.
nuts securing the generator to the tension bar 28.08-45.3 N m (2.9-4.6 kgcm);
nuts for the lower mounting of the generator 57.3-72 N m (5.95-7.35 kgcm).
7. Install the oil pan protection and engine splash guard in the reverse order of removal.
8. To replace the belt, unscrew the crankshaft position sensor screw and remove the sensor from the bracket socket without disconnecting the wires.
9. Remove the power steering pump drive belt.
10. Perform steps 2 and 3 for adjusting the belt tension and push the generator towards the engine until it stops.
11. Remove the belt first from the pump pulley, then from the generator and crankshaft pulleys.
12. Place the new belt first on the crankshaft pulley, then on the generator pulley, and then on the pump pulley.
If the new belt is tight on the pump pulley, and the generator is pushed all the way towards the engine, carefully turn the pump pulley by hand or slowly turn the crankshaft until the belt is completely seated on the pulley. Have an assistant turn the crankshaft.
13. Perform steps 2-6 for adjusting belt tension.
14. Reinstall the crankshaft position sensor.
As an option, one serpentine belt can be installed on the vehicle, which drives all auxiliary units (water pump, generator and power steering pump). In this case, the generator is installed to the left of the engine at the top.
In this case, the belt tension is checked by deflecting it between the generator and water pump pulleys. With normal belt tension, the deflection “h” under the action of a concentrated load “P” of 75 N (7.6 kgf) should be equal to (12 ± 1) mm.
Drive belt Mazda 3 BC
The tension of the drive belt of the Mazda 3 BC auxiliary mechanisms has a direct impact on their functioning. If the tension is insufficient, the following problems arise:
- the voltage at the generator terminals decreases - leads to excessive discharge of the battery, and if the generator belt slips, to complete discharge;
- the circulation of lubricant in the circuit of the hydraulic power steering wheel deteriorates - accompanied by a decrease in the service life of the power steering pump and steering rack due to increased force on the steering wheel;
- insufficient flow of antifreeze in the cooling system of the power unit - indicated by overheating of the internal combustion engine due to slipping of the belt on the Mazda 3 BK pump pulley.
- The Mazda 3 BK power unit uses an automatic tensioner.
Article on the topic: Why Sharp TV does not turn on
Examination
To check the tension of the bypass belt of the Mazda 3 BC auxiliary equipment, the following operations are performed:
- The fender liner is removed from the right front wheel.
- The alignment of the marks on the tensioner of the drive belt of the Mazda 3 BK attachments and the tensioner bracket is checked. If you observe a coincidence of the extreme marks, you will need to replace the Mazda 3 drive belt.
(Link to photo source)
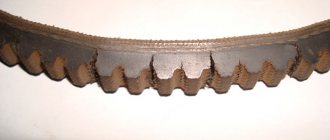
You can also evaluate the condition of the drive element after removal from the power unit. Replacement will be required if delaminations and cracks are detected. Another sign of wear is the triangular shape of the ribs in cross section on the working surface of the belt. A trapezoidal shape is considered normal.
Articles
To change the alternator belt for a Mazda 3 BC with a 1.6 engine, article numbers ZJ0115909A9F and ZJ0115909A are used as the original. Spare part manufactured by Mazda with the following characteristics:
- length – 2013 mm;
- number of ribs – 6 pcs.
Strap ZJ0115909A9F (Link to photo source)
You can also use analog options for the Mazda 3 BK from the following companies:
- PATRON – 6PK2013;
- DAYCO – 6PK2013;
- BLUE PRINT – AD06R2010;
- STELLOX – 06-02013-SX;
- JD – 6PK2010.
STELLOX strap – 06-02013-SX (Link to photo source)
Below are the article numbers of original spare parts for Mazda 3 with 2.0 engine:
- LF50-15-908A – air conditioner drive belt;
- LF50-15-909A – generator and pump belt;
- LF50-15-980B – tensioning device;
- Z601-15-940 – tensioner roller.
Strap LF50-15-908A (Link to photo source)
Article on the topic: Why the air conditioning compressor does not turn on
There is no point in replacing the assembled rollers with new ones, so here is the article number for the bearings for the rollers FAG 6203.2RSR. They are simply pressed out.
Replacing the Mazda 3 alternator belt
To replace the Mazda 3 BC alternator belt, you will need a wrench and a fourteen-socket socket. The work is performed in the following order:
- The key is placed on the fixing bolt and the tension roller is pressed out. Then the bypass belt is thrown off the roller.
- The Mazda 3 BK belt drive is removed from the accessory rotation pulleys and pulled out of the engine compartment.
- Reinstallation of the spare element is carried out in the reverse order;
If it becomes necessary to change the tensioner, unscrew the two fixing bolts and then remove it. At the time of reassembly, it is necessary to first apply an anaerobic fixative to the bolt threads.
In case of wear of the intermediate roller Mazda 3 you will need (installation is carried out in the reverse order):
- unscrew the fixing nut;
- remove the washer;
- remove the roller and, if necessary, the bearing bushing.
Installed a new Chinese generator on Shevik
When replacing the timing belt on a Chevrolet Niva, follow these steps.
- Remove the air conditioning and cooling radiators completely. Before this, of course, you will have to drain the liquid from the cooling system and bleed off the freon. There is no need to remove the fans from them.
- Remove the air purification filter housing.
- Remove the A/C compressor and alternator drive belts. Be sure to remove the tension mechanisms as well.
- Remove the upper part of the timing housing.
- Place marks on the shaft gears. They must definitely match. There is a notch on the engine crankcase that should match the mark on the pulley.
The first step is to prepare the generator for the repair and replacement process. To do this, old parts are removed. To do this, you will need wrenches of diameter 10 and 17.
1. First of all, you need to loosen the belt and remove it, otherwise you will not have access to the bearings themselves. To do this, you need to loosen the roller, which is held by a platform with nuts. There are three nuts, they require a 10mm wrench. Once they are all unscrewed, you need to unscrew the adjusting screw so that it moves up from the platform.
- Place the car in first gear to prevent the crankshaft from turning;
- Unscrew the nut that secures the part
- Remove the spring washer and remove the part.
The process of removing generator rollers on a Niva Chevrolet is identical to any other car.
5. The new ring is installed in its place;6. A new roller is installed in place of the old bearing. Before doing this, you should check the diameters of both parts to avoid the mechanism not working;7. Next, the bearing is fixed using a washer with a spring mechanism and a nut;
8. After this, the belt is put on the new roller.
1. You can put the car in 4th gear, put the belt on the roller and push in the direction of rotation of the crankshaft. When it starts to turn, you need to pull the belt onto the generator pulley, and it will fall into place on its own.
2. In the same way, you can not push the car, but lift the wheel and spin it, or spin the generator itself.
This makes it easy and quick to replace the Chevrolet Niva generator belt rollers. You should regularly diagnose the moving parts of the car in order to prevent possible breakdowns in time and replace faulty parts.
We recommend replacing the bearings and belt every 40 thousand kilometers.
As it turned out, the generator jammed and because of it the belt broke. Why did this happen? Most likely (my version) - when replacing the pump, the service center tightened the belt too much, because we couldn’t tighten the same one at all. As a result, during the hellish “tightening”, the old gene grunted; the bearings could not withstand such abuse. Therefore, it is better to do everything yourself or in a trusted service. Well, tighten it correctly, you could press the samples with your finger by 1 cm.
How did they even manage to tighten the 1885 belt? I can't imagine))
First I'll tell you about the generator
I took the old one, they completely disassembled it, looked at it and said that it had come to an end. The bearings were torn, and the rotor was worn out to such an extent that repairs would cost 2,500 rubles. And a new one costs 3100. It’s Chinese, but the warranty is 3 months, we checked it at the stand - everything works.
Therefore, it is better to take a native gene with the same width of the roller and with the correct number of rivulets (grooves). That’s why the belt is called a ripple belt, because the grooves must match, it turns out something like rails.
I wanted to buy a 100 Amp Pramo, but I couldn’t find it anywhere in the city; the original genes cost 4,000 rubles. So I decided to try Chinese))
How to remove a generator from a Chevrolet Niva
First you need to loosen the belt, which if tense, cannot be easily reset. So, our task is to loosen the tension roller; it is held in place by a platform with three nuts. You will need a 10mm wrench, it is very advisable to have a ratchet with the same head, preferably an elongated one, because the third nut is located directly under the belt and it is better to approach it from the side.
The first 2 nuts are easy to get out with a regular open-end wrench. But the third one is much easier with a ratchet.
We've loosened it - now we turn the adjusting screw (key 10) so that it moves as far up the platform as possible, so the entire platform with the roller will move freely up and down.
Renault Symbol oil change
Changing the oil in almost all Renault cars is carried out the same way. If the car is still under warranty that's one thing, but if the dealership's warranty period has long since expired, why pay for something you can do in your garage with minimal tools.
All you need is a tetrahedron, plenty of rags, hand gloves, new oil in the amount indicated in the filling volumes to operate the car, an oil filter and, if necessary, an O-ring on the drain plug.
Important! If you want to extend the life of the motor, replace it at the same time as flushing the deposits with flushing fluid. This will help clear the walls of sediment and metal debris.
Step-by-step instruction
- Warm up the engine to operating temperature and allow it to cool for 5-7 minutes. The oil awakens better and faster if it is not cold. However, the heat can burn you, so it's best to let the engine sit for a while.
- Open the filler neck of the cylinder block (we wake up there to fill the oil) and remove the dipstick. If oxygen is allowed to flow, the liquid will come out faster.
- We lift the car and put it on supports. A necessary step for easy access to the drain plug. You can also use a viewing hole or overpass.
- Unscrew the drain plug with a wrench. Remember that used oil will wake up hot, take precautions to avoid skin burns.
- We pour the waste into the prepared container. Do not pour extracts directly onto the ground!
- Unscrew the oil filter. If the filter is securely tightened, a special filter wrench may be required.
- We insert the new filter by lubricating its o-ring with oil and pouring some oil right into the middle to absorb it.
- We tighten the drain plug after checking the integrity of the washer located on its thread. If necessary, it must be replaced (sealing washer).
- We lower the car from the racks and use the dipstick to fill the empty engine with oil.
- After the full oil rises to the level of the center of the dipstick between the MIN and MAX marks, we wait 3-5 minutes. Then we warm up the engine for 5 minutes and measure the level again. As a rule, after the first heating the level drops and we add as much as we need.
Choosing engine oil
When it comes to large car manufacturers that have a good reputation and produce really good cars, try to fill only original oils and recommend it to your friends. Native lubricants are specially formulated for specific engines with specific characteristics. Although in some cases analogues may be superior to the original. In the case of Renault Symbol cars, follow the principle of using original compounds. The plant recommended the oils to Elf, which works closely with the French automaker and is the official supplier of motor oils for this company. Some car owners will say that official oils for Renault are too expensive, and the car itself belongs to the budget category. Therefore, there is no point in spending that kind of money. This is not entirely true. Elf oils have all the characteristics, additives and properties that optimize the performance of Renault engines. They passed all the necessary tests and laboratory tests.
The Renault Symbol model can have 4 types of engines:
- K4J;
- K7J;
- K4M;
- K7M.
They all work well with Elf synthetic motor oil. The oil is called Evolution 900 NF and has a viscosity index of 5W40. The car owner has the right to change the viscosity if he needs a special winter or summer oil or another all-season option. You should be careful with analogues. Alternative oils may have similar properties and characteristics, but will not ensure efficient operation of the French automaker's power units.
Several facts speak in favor of Elf brand oil:
- this oil is suitable for all drivers, regardless of their preferred driving style;
- these compositions have the necessary parameters, additives and characteristics that help increase engine life and increase the overhaul interval;
- Any alternative oils are considered experimental because there is no official guarantee that they will not damage the engine.
Renault Symbol owners say that the only limiting factor is the cost of the engine oil recommended by the manufacturer. Now such lubricant costs about 450 rubles per liter. Considering that for some engines you need to buy about 5 liters, the total cost is not that small. Some analogues are cheaper. But this does not mean that Renault puts its customers in strict limits by prohibiting the use of other motor oils. As analogues you can buy:
- Castrol;
- Lukoil;
- ZIC;
- Ravenol;
- Mobile 1;
- Liqui Moly and others
Buy strictly synthetic oils. Only in conditions of severe wear, when it is necessary to switch to more protective lubricants against engine wear, can high-quality semi-synthetic fluids be used. Without mineral oils. On it, Renault Symbol engines behave unpredictably, serious damage is possible, which will lead to a major overhaul of the engine. If you decide to replace the manufacturer's recommended oil with an alternative formulation, try to use the highest quality fluid that matches the engine specifications.
Original
Owners of Renault Symbol cars usually fill in Elf Evolution SXR 5W-40 or 5W-30 engine oil. The viscosity of the lubricant depends on the operating temperature. For example, 5W-40, 10W-40 or 10W-30 are recommended for all seasons (for year-round use), while in general in summer it is better to use SAE 20W-40 or 25W-50. If the car drives mainly in the cold season, then you should opt for winter oil 0W-40, 0W-30 or 5W-30.
Unoriginal
Owners of old Renault Symbol cars buy motor oils from well-known brands, for example, Mannol, Motul, Valvoline, Shell, Kixx, Lukoil, Castrol, etc. In addition, when choosing a suitable fluid, you should pay attention to important characteristics, including API approval.
This parameter is selected based on the engine type and year of manufacture of the car. For example, for the first generation Symbol gasoline, released in 1999, semi-synthetic all-season oil with API-SH and SAE 10W-30 parameters is suitable. For later model years - API-SL. For the second generation Symbol gasoline produced in 2008, semi-synthetic is also recommended for all seasons, but with parameters 10W-40 and API-SL. For 2012 cars, you can use semi-synthetic API-SM. Below are the best Renault Symbol motor oils.
Required volume
Once you have decided on the brand of motor oil for your Renault Symbol, you need to decide how much lubricant you need to change yourself. Some of the lubricant remains inside the system even after complete drainage. But this is the norm. There are no problems when mixed with new oil. However, if you are switching to a lubricant from another manufacturer, it is better to use a cleaning paste first. Here is the data on the average volume of engine oil, taking into account the filter, which also needs to be filled to about 50 before installation:
- The 16-valve 1.2-liter engine holds 4 liters of lubricant;
- a 1.4-liter 8-valve engine will require 3.1 liters of oil;
- if you have a 16V with a volume of 1.4 liters, then 4.8 liters of liquid will be useful;
- 4.8 liters are also needed in a 16-valve engine, but with a volume of 1.6 liters;
- when replaced, the only diesel power unit in the Renault Symbol engine line includes 4.6 liters, the engine itself has a volume of 1.5 liters.
The figure is approximate, but as close as possible to real indicators. It all depends on how well you follow the procedure and how much old mining can be drained.
First generation LB0C, 1999-2008
The Symbol compact sedan is a structural copy of the 1998 Clio sedan, so it had a controversial design with unimpressive proportions, especially in the rear with domed windows. During the 2001 restyling, the car received updated front and rear parts, due to which the appearance of the car radically changed. However, the interior has remained virtually unchanged. In 2004, another aesthetic restyling took place, and in 2006 the car received a solid look in the style of the new Clio. Thanks to the improvements made, the Symbol looked advantageous against the backdrop of the angular Renault Logan of the first generation. The car was equipped with 1.4 petrol engines (75-98 hp).
Gasoline engines 2002-2008
- 1.4 75 liters with. (K7J), oil volume - 3.3 liters, tolerance and viscosity: API-SH, SJ, SL; SAE 5W-40, 5W-30, 10W-30, 10W-40, 0W-30, 0W-40
- 1.4 98 liters together with. (K4J), oil volume - 4.8 liters, tolerance and viscosity: API-SH, SJ, SL; SAE 5W-40, 5W-30, 10W-30, 10W-40, 0W-30, 0W-40
Second generation LU01, 2008-2012
The second generation icon was built on the platform of its predecessor, but received a completely new design with correct proportions at the rear. At the same time, the developers managed to maintain the same body design, despite the dramatic changes in the front and rear. The interior also became tougher, and in terms of equipment the car was in no way inferior to the Renault Logan.
On the Russian market, the car was offered with 1.4-1.6 gasoline engines (98-102 hp), as well as a manual or automatic transmission. In other countries, economical versions were also offered with a 1.2-liter (75 hp) gasoline internal combustion engine, as well as a 1.5-liter diesel engine with 84 hp. The second symbol was produced in Argentina and Turkey until 2012.
Gasoline engines 2008-2012
- 1.4 98 liters together with. (K4J), oil volume - 4.8 liters, tolerance and viscosity: API-SL, SM; SAE 5W-40, 5W-30, 10W-30, 10W-40, 0W-30, 0W-40
- 1.6 102 liters together with. (K4M), oil volume - 4.8 liters, tolerance and viscosity: API-SL, SM; SAE 5W-40, 5W-30, 10W-30, 10W-40, 0W-30, 0W-40
How to remove the generator.
To remove the generator you need to use a ten key, loosening the nut that holds the base with the tension roller, removing all the nuts from their seats. Then unscrew the adjusting screw, having first found it. After making sure that the screw moves freely, unscrew it to the top of the platform. In the photo you can see where all these bolts are located.
We fold the belt off the pulley and unscrew the bolts that hold the device, this can be done with a thirteen key, and on the other hand with a seventeen key. We disconnect the two wires that are connected to the back of the generator, one is connected to the head of the bolt, the other is plugged in, and we disconnect them. Then we remove it from the seat.
What are the signs to recognize a malfunction?
A number of signs indicate the need to replace old rollers with new ones. They appear both directly while driving, in the form of extraneous noise, and during visual inspection.
- Mechanical damage on the surface of the rollers;
- Noticeable play;
- Grinding noises when turning. This is a clear sign that the car needs repairs;
- Damaged bracket or bearing;
- Leaking oil;
- High temperature during operation;
- Strong vibration during operation;
- Difficulty in turning the shaft.
Fixes
What to do if you hear a squeaking sound from the generator belt? You shouldn't change it right away. Sometimes there is a whistle, but the resource of the consumable has not yet been exhausted and it can be further used. Therefore, if extraneous sounds occur, you should inspect the belt drive and find out where the squeak comes from. To diagnose, open the hood and inspect the strap for:
- integrity of the part;
- degree of wear;
- presence of traces of working fluids on the surface;
- displacement of the pulley line, they must be strictly on the same line;
- degree of tension of the product.