When the timing belt breaks on a Chevrolet Lacetti 1.6 16v, it threatens bent valves and major repairs, so you always need to change it on time. You can replace the timing belt on a Lacetti either at a service center or with your own hands.
The belt also drives the coolant pump; it is recommended to replace it together with the timing belt. It is also recommended to replace the attachment belt at this mileage.
In the photo report you will see how to replace the timing belt and its components yourself. At the same time, the Lacetti thermostat was replaced.
Replacing the timing belt Chevrolet Lacetti detailed instructions with photos
Replacing the timing belt on a Chevrolet Lacetti . The timing belt is changed every 60,000 kilometers. Due to the fact that the pump pulley is also driven by the Chevrolet Lacetti timing belt, many people replace not only the tension (bypass) rollers along with the belt, but also the water pump. But another part of car owners prefers to exhaust the life of the pump to the fullest and change the water pump no more than once every 120 thousand kilometers. That is, if replacing the pump on a Lacetti is possible every other time, simultaneously with replacing the belt. Of course, the decision to replace must be made during a visual inspection. If there is play and traces of coolant leaks, then it is still better to change the pump.
Detailed timing diagram of the Chevrolet Lacetti in the photo below.
- 1 - mark on the rear timing cover
- 2 - mark on the crankshaft toothed pulley
- 3 - coolant pump pulley
- 4 — belt tensioner roller
- 5 - intake camshaft pulley
- 6 — marks on the camshaft pulleys
- 7 — exhaust camshaft pulley
- 8 — belt support roller
- 9 - timing belt
Below we offer complete instructions for replacing the Chevrolet Lacetti timing belt with photographs. First you need to remove the air filter. Now remove the right front wheel and securely fix the car on a factory-made stand. We remove the drive belt for auxiliary units (you can read how to remove the Lacetti drive belt here).
Using the “17” head, turn the crankshaft clockwise by the bolt securing the auxiliary drive pulley. We achieve alignment of the installation marks on the camshaft pulleys.
We unscrew the bolt securing the auxiliary drive pulley. To keep the crankshaft from turning, an assistant must engage fifth gear and press the brake pedal. We take out the bolt and washer and remove the auxiliary drive pulley.
Once again we check the alignment of the installation marks on the camshaft pulleys. When the valve timing is correctly set, the mark on the crankshaft pulley should be located opposite the slot on the rear timing cover.
Using a 10mm socket, unscrew the three bolts securing the lower front timing drive cover. Remove the cover.
Next, we have to remove the bracket for the right support of the power unit, since the timing belt seems to be put on it. We place an adjustable stop under the crankcase pan of the Chevrolet Lacetti engine.
Using a 14mm socket, unscrew two nuts and a bolt securing the support bracket to the cylinder block bracket, as well as the nut securing the support bracket to the support stud. Remove the support bracket.
To remove the belt from the pulleys, you need to reduce its tension. To do this, turn the coolant pump housing in the cylinder block socket counterclockwise while loosening the pump mounting screws.
Use a 5mm hex to loosen the three screws securing the coolant pump. In the next photo, three screws are marked with red arrows for clarity.
Attention! To avoid coolant leakage through the pump O-ring, loosen the screws only until the pump housing can be turned using a tool.
You can turn the pump using an open-end wrench “41” using the hexagon made on its body. If such a key is not available, turn the pump body using sliding pliers using the hexagon.
Having loosened the belt tension, remove it from the coolant pump pulleys, camshafts and crankshafts. Before installing a new belt, check the condition of the coolant pump, tensioner roller and belt support roller.
When rocking and rotating the pump pulley and rollers by hand, there should be no play, jamming, or noise in the bearings. If these faults are present, we replace the Chevrolet Lacetti pump with a new pump.
To replace the tensioner with the roller assembly, remove the cylinder block bracket to which the right-hand support of the power unit is attached. Using a 10mm socket, unscrew the four bolts securing the bracket for the right support of the power unit. Remove the bracket.
Using a 12mm socket, unscrew the three bolts securing the tensioner to the cylinder block. Remove the belt tensioner.
Using a 14mm socket, unscrew the bolt securing the support roller. Remove the support roller.
Install the tensioner and belt support roller in the reverse order. We tighten the tensioner mounting bolts with a torque of 25 Nm, and the support roller bolt with a torque of 50 Nm.
Before installing the belt, make sure that the alignment marks on the camshaft pulleys and the marks on the crankshaft pulley align with the slot on the rear timing cover. In this position, put the belt on the crankshaft pulley.
While tensioning both branches of the belt, we place the front branch behind the support roller, and the rear branch, putting it on the coolant pump pulley, behind the tensioner roller. We put the belt on the camshaft pulleys, eliminating the sagging of the belt branches.
We tighten the Chevrolet Lacetti timing belt by turning the coolant pump clockwise until the movable and stationary indicators of the tensioner align. With normal belt tension, the movable roller indicator should coincide with the fixed indicator on the tensioner bracket. See the photo below.
In this position, tighten the pump mounting screws. With the fifth gear engaged, turn the crankshaft two turns clockwise using the hub bearing nut using the 32nd head.
Sequence and recommendations
For proper operation of the engine, this work must be done with a warm engine. If you do this when it’s cold, you need to leave a gap, because after warming up the belt tightens. If you tighten the belt on a cold power unit, the latter will operate with quite noticeable noise. All operations related to belt replacement are performed according to the sequence below:
Do-it-yourself Chevrolet Lacetti timing belt replacement
Self-replacement of the timing belt on a Chevrolet Lacetti car.
Good afternoon, manufacturers recommend changing the timing belt on a Chevrolet Lacetti with a 1.6-liter engine every 60,000 km. Open the hood and remove the decorative trim from the engine; to do this, unscrew the four nuts with a 10mm wrench.
For convenience, we remove the air filter housing, first unscrew the four screws from the air filter housing cover and the air pipe clamp, remove it and the air filter. In order to remove the filter housing itself, it remains to unscrew two bolts 10 and 13 mm.
Now you need to remove the drive belt, use a 17mm wrench to pull back the drive roller and remove the belt from the pulleys. Unscrew the two 10mm bolts and remove the upper protective timing cover.
- We remove the front right wheel and the side engine boot, it is secured with two 10mm bolts and three pistons.
You need to unscrew the crankshaft pulley; in order to unscrew it, you need to fix the flywheel through the inspection window with a large slotted screwdriver (seen in the photo). Using a 17mm socket, use a wrench to unscrew and remove the crankshaft pulley.
- We also remove the lower timing belt protection cover; it is secured with three 10 mm screws.
The next step is to remove the engine mount; to do this, install an additional jack under the engine sump and tighten it. Now unscrew three nuts and one bolt with a 14 mm wrench and remove the engine support.
- It is also necessary to remove the support bracket by unscrewing the four bolts around its perimeter.
- Next, you need to install the timing marks on all the pulleys, on the crankshaft toothed pulley it will be at the bottom, it can be seen in the photo and on the camshaft pulleys, they are located horizontally and are also clearly visible in the photo.
- You can also turn the crankshaft one more revolution and the marks on the camshaft pulleys will be opposite each other, but there is no particular difference.
For better visibility, I marked them with a stroke. To make it easier to rotate the crankshaft, the pulley bolt needs to be screwed back in through some large old nut.
- That's it, you can start replacing the timing belt, unscrew the parasitic roller located on the right with a 14mm wrench, remove the belt and unscrew the tensioner roller, which is secured with three bolts.
- In general, when replacing the timing belt, it is recommended to change the water pump, since it is used as a belt tensioner; I will tell you how to change it in another article.
- (Independent replacement of the pump on a Chevrolet Lacetti)
But if you still had to change only one belt, then I recommend not tensioning it using a pump, because on an old pump the O-ring is dry and stiff and antifreeze may leak when turning the pump. First we install new rollers and the belt itself, we begin installing it from the crankshaft toothed pulley and then counterclockwise.
Before installing the belt, we check the marks, as they could get lost after removal. When all that remains is to put the belt on the pump only, you need to move the tensioner roller away using a wrench or something else suitable, as shown in the photo.
And put the belt on all the way, check that all the marks are installed correctly, then turn the crankshaft clockwise one or two turns and check the marks again.
It remains to check that the belt is tensioned correctly; to do this, turn the crankshaft clockwise two or three turns and look at the teeth of the tensioner roller, they should be opposite each other, plus or minus two or three mm.
If the readings on the roller are different, then the belt tension will have to be adjusted using a pump. Adjusting the timing belt tension using a pump involves unscrewing three hex bolts and using a large open-end wrench to rotate it.
After that, check everything again and you can reassemble in the reverse order.
Source: https://remont-avto.info/zamena-remnya-grm-na-chevrolet-lacetti-svoimi-rukami/
Part numbers
To buy a suitable part, you need to know its original catalog number or the part number of a replacement.
Belt
The Chevrolet Lacetti uses a belt with 6 longitudinal wedges on the inside. Its length is 1875 mm, width - 26 mm.
It is impossible to give an exact answer to the question of which belt is better, the original or a replacement. The fact is that the service life is significantly affected by 2 factors: operating conditions (sand and pebbles getting into the drive) and the absence of a plastic casing, like on the timing belt. Because of this, original parts can last 15,000 kilometers or, for example, 60,000.
Spare parts from Gates and Contitech are popular among owners due to their half the price and service life comparable to the service life of the original.
Original
Produced by General Motors under article number 96183108.
| Manufacturer | vendor code | average price |
| For 1.4-1.6 | ||
| General Motors | 96183108 | 1293 |
| For 1.8 | ||
| General Motors | 96309968 | 1338 |
1.4-1.6
| Manufacturer | vendor code | average price |
| FOR 1.4-1.6 | ||
| ACDELCO | 6K739 | 2127 |
| A.E. | MVB1875R6 | 1791 |
| AMD | AMDBL162 | 452 |
| AMIWA | 2905019 | 711 |
| AYWI | AW2130318 | 577 |
| BANDO | 6PK1875 | 1245 |
| BLUE PRINT | AD06R1870 | 730 |
| BOSCH | 1987946077 | 624 |
| BRAVE | BRTB19 | 369 |
| CONTITECH | 6PK1873 | 902 |
| DAYCO | 6PK1873 | 642 |
| DONGIL | 6PK1875 | 612 |
| FINWHALE | BP6PK1873 | 728 |
| FLENNOR | 6PK1873 | 800 |
| FRANCECAR | FCR6PK1875 | 600 |
| GATES | 6PK1873 | 845 |
| GLOBELT | 6PK1873 | 634 |
| GRAND PRIX | 6PK1873 | 380 |
| HUTCHINSON | 1870K6 | 691 |
| JAPANPARTS | DV6PK1875 | 1547 |
| KLAXCAR FRANCE | 6PK1875 | 614 |
| LYNX | 6PK1873 | 530 |
| MANDO | 6PK1875 | 721 |
| METZGER | 6PK1873 | 1068 |
| MEYLE | 500061870 | 571 |
| MILES | AD15003 | 465 |
| MITSUBOSHI | 6PK1875 | 954 |
| NEKO | 6PK1880 | 565 |
| OPTIBELT | 6PK1870 | 1237 |
| POSCO DAEWOO | 96183108 | 861 |
| QUINTON HAZELL | QBR61875 | 450 |
| RIB TOP | 6PK1870 | 665 |
| SCT | 6R435 | 429 |
| SKF | VKMV6PK1875 | 1003 |
| STELLOX | 601873SX | 418 |
| TRIXET | T9092 | 870 |
| TRUCKTEC AUTOMOTIVE | 819074 | 650 |
| TSN | 1014351873 | 426 |
| UNICORN | CEBC006 | 424 |
Replacing the timing belt Chevrolet Lacetti 1.4
The timing belt on the Chevrolet Lochetti 1.4, like other models, is located under the hood, and getting to it will not be difficult, but you will still have to put in some effort.
The timing belt is designed to synchronize the operation of the camshaft and crankshaft of an internal combustion engine. This unit is very important for the quality functioning of the car. From time to time the belt has to be changed; this is a mandatory procedure.
By diagnosing the condition of a given node, you can understand when it needs to be done.
When to change the belt
In general, replacement should be made in accordance with the manufacturer’s regulations - after 60,000 km. But it may well happen that the belt will have to be replaced ahead of schedule. If you neglect timely replacement, the belt may become unusable and even break.
But a break is very serious, since it can lead to bending of the valves, and such a malfunction requires major repairs, which are not cheap. Therefore, carrying out diagnostic procedures is very important, and from time to time it is simply necessary to look under the hood.
But here are some visual signs that indicate the need for a timing belt procedure:
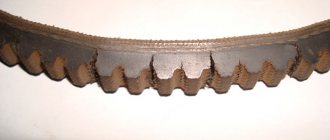
- oil stains are clearly visible;
- cracks;
- the teeth on the inner surface are worn;
- folds, bulges or depressions have appeared;
- the belt structure has delaminated;
- the belt became frayed and threads became visible.
Cost of work at the service center
If such defects are detected, it is necessary to immediately replace the old gear with a new one. Some signs of defects on the belt can be discerned by ear. For example, if a characteristic whistle is heard when the engine is running, then this is also a clear sign of belt wear. Sometimes in this case the engine may not even start.
Replacing the timing belt at service stations will cost 4,000 - 5,000 rubles - depending on the region. But you can save money and replace it yourself. To do this, you first need to purchase a timing kit. Don't forget to also buy a water pump, as this also needs to be replaced from time to time.
If this is not done in time, the pump may well jam, and this is also an expensive repair.
Premature belt wear can also be caused by improper installation. Sometimes foreign objects get into the timing mechanism, which also leads to early wear.
As already mentioned, replacing a belt is not such a difficult procedure, but it must be carried out with great care. This work requires precision. The main thing in it is the correct alignment of the marks. Failure to comply with this condition can lead to unstable operation of the propulsion system and even its breakdown.
Belt replacement
We park the car on level ground and open the hood. Disconnect the battery terminal. To avoid interference with the air filter housing, it must be removed. Remove the drive belt. Unscrew the crankshaft pulley bolt. To do this, you will need a 17mm head. To prevent the engine from falling, we place a support under it. The right engine mount will be in the way, so it’s better to remove it too.
Now remove the belt covers. To set the marks, you need to crank the engine to a certain level. We turn it by the camshaft bolt.
Now we pay special attention to the location of the marks. On the gears they must match.
And the mark on the crankshaft gear should face down.
Some people, for their convenience, also remove the front bracket located on the right, since it can also get in the way. The belt is tensioned by moving the water pump housing. To loosen the belt, the housing rotates. And if you decide to replace the water pump, unscrew its mounting bolts and remove it along with the parasitic roller, which is located on the right.
Part selection
The original timing belt can also be found under the following subcodes from the manufacturer Daewoo: 96814098, 96183352, 96183351. As a rule, they differ in price and marking color (not white, but red). Otherwise they are completely identical. Thus, GM simply changes the prices for its products when the same timing belt comes out, but with a new part number, and with a new price.
Timing belt characteristics for Chevrolet Lacetti 1.4 and 1.6
| Length | Width | Number of teeth |
| 1210 mm | 25.4 mm | 127 |
The factory timing belt is made of special rubber and reinforced with Kevlar for strength. There is also a special wear-resistant coating.
For Lacetti with a 1.8 liter F18D3 engine, a timing belt with GM article number 96413861 is installed off the assembly line. The price of the part is 1,700 rubles.
Chevrolet Lacetti: timing belt replacement
The compact passenger car Chevrolet Lacetti is produced by the South Korean concern GM Daewoo. On the territory of the Russian Federation, this vehicle is gaining significant popularity due to the combination of affordable price and unsurpassed quality. If you promptly take care of the components of the Chevrolet Lacetti, the car will last a long time. However, a car owner should know how to properly care for his own car. In particular, you should know the intricacies of such an important procedure as replacing the timing belt.
But when is it necessary to replace the tape in the gas distribution mechanism? What tools are needed for this purpose? Is it possible to replace the timing belt on a Chevrolet Lacetti yourself, or do you need to contact a service station? How is the replacement carried out according to the instructions? What is the frequency of replacing the timing belt in a Chevrolet Lacetti? You can find answers to each of the questions presented above in the current article.
When to change the timing belt?
In accordance with the regulations for replacing the timing belt in the Chevrolet Lacetti, this procedure is included in the list of mandatory measures to maintain the car in working condition. The official replacement frequency is once every 4 years. This corresponds to 60,000 - 75,000 km. However, due to the possibility of accelerated wear of the timing belt in the Chevrolet Lacetti, in practice replacement is carried out much more often. The reasons for the need for premature renewal of the unit are the following circumstances:
- Excessive use of the vehicle;
- Extreme driving;
- Additional load on the Chevrolet Lacetti (for example, a trailer);
- Unsatisfactory quality of road surface;
- Operation of Chevrolet Lacetti at extremely high temperatures;
- Increased hilliness of the area;
- Initially low-quality consumables.
Whatever the negative factor affecting the operation of the Chevrolet Lacetti systems, the car owner needs to pay attention to the following signs of the need to replace the timing belt:
- Strong vibrations in the power mechanism of the car when starting it; Noises while driving;
- Thick exhaust of black or dirty gray color;
- Complications when starting a Chevrolet Lacetti engine - decreased power, jerky movement, inability to start the engine, etc.;
- If you examine the timing belt itself, you can find cracks, chips, depressions and scratches on its surface. Particularly dangerous are abrasions on the gear part of the unit;
- Abrasion on the inside indicates a risk of collision between Chevrolet Lacetti pistons and engine valves;
- Problems with the pump (water pump) of the vehicle.
The listed dysfunctions may be a consequence of timing belt wear. If this breakdown is not noticed in a timely manner, the most important mechanisms of the Chevrolet Lacetti, including the engine itself, may fail. To avoid this, it is recommended to check the condition of the timing belt at least once every 45 kilometers.
Tools
To successfully replace the timing belt on a Chevrolet Lacetti, thorough preparatory measures will be required. First of all, it is important to prepare the necessary tools and spare parts, namely:
- New timing belt;
- Sets of wrenches and screwdrivers;
- Jack;
- Gaskets, seals and rollers (if it is necessary to replace these parts);
- Clean rags or household synthetic wipes for wiping the elements of the Chevrolet Lacetti system from dust or dirt contamination;
- Latch.
It is recommended to place the Chevrolet Lacetti car itself on an overpass or other flat horizontal surface. For work on replacing the timing belt, a garage inspection pit is also suitable, provided there is a lift.
Important to consider! The procedure for replacing a timing belt is one of the most complex processes from the point of view of auto mechanics, so in most cases it is carried out at accredited Technical Service Stations. However, in cases where the car owner is sufficiently experienced or has a technical education, he can replace the unit in the gas distribution mechanism himself.
Self-replacement of the timing belt on a Chevrolet Lacetti 1.6
In accordance with the step-by-step instructions for replacing the timing belt on a Chevrolet Lacetti 1.6, the sequence of actions of the car owner should be as follows:
- The terminal is removed from the Chevrolet Lacetti battery. This is necessary in order to de-energize the vehicle;
- The housing of the air filter element is dismantled;
- Using a 10mm wrench, unscrew the filter mounting box;
- The next step is to remove the Chevrolet Lacetti timing belt;
- The antifreeze supply hose is unscrewed. This element is located on the top plate of the timing mechanism holder;
- The bolts holding the plate are unscrewed using a 17 key. After this, the clamps are removed and the plate itself is dismantled;
- The pulley is dismantled. To avoid rotation of the Chevrolet Lacetti crankshaft, it is recommended to start fifth gear and depress the brake pedal;
- The alignment of the marks on the camshafts is checked;
- Using a 10mm wrench, unscrew the bolts of the protective timing cover and remove it;
- The bracket holding the engine cushion is removed. To do this you will need a 14 key;
- The tension of the timing belt is released and the timing belt is removed. Important! To avoid antifreeze leakage, the fastening bolts are not completely unscrewed, but only slightly loosened;
- Using a 41 key, turn the pump counterclockwise. If you don't have a suitable wrench, you can use pliers. Only after this can the timing belt be finally removed;
- If necessary, the rollers, tension mechanism and other additional units of the Chevrolet Lacetti system are replaced;
- A new timing belt is installed, after which the pulley and belt tension in the Chevrolet Lacetti are checked;
- The above procedure is repeated in reverse order.
This is how you can replace the timing belt on a Chevrolet Lacetti 1.6 yourself. After it is carried out, it is necessary to check the condition of the Chevrolet Lacetti engine. To do this, the engine starts for 5-10 minutes. If during the run no extraneous noises are heard, no tremor is felt and no problems arise when starting the mechanism, then the event has been completed successfully.
Replacing the timing belt on Chevrolet Lacetti 1.4 and 1.8
The basic principles of the procedure for replacing a gas distribution mechanism unit in a passenger car of a certain brand do not depend on the engine modification. Thus, on the Chevrolet Lacetti 1.4, the timing belt is replaced accordingly. The same can be said about the modification of the 1.8 engine. Additional information is indicated in the operating manual attached to each individual vehicle.
Consequences of untimely replacement
The consequences of untimely replacement of the timing belt in a Chevrolet Lacetti may be as follows:
- Bent engine valves as a result of a broken drive belt;
- Breakdown of piston heads by valves;
- Damage to cylinder walls and valve seats.
The problem is that usually the timing belt, as a result of wear or mechanical damage, can fail at high speed. To avoid this dangerous situation, it is necessary to observe the periodicity of updating this unit.
Source: https://fix-my-car.ru/texnicheskoe-obsluzhivanie/zamena-remnya-grm-na-lacetti.html
Voltage setting
The voltage in the generator changes with the temperature inside the machine's operating systems and limits it to control the amount of current in the rotor. When driving at high speeds, high power can reach 10% of the operating time, and 90% is in the off state. When driving at low speeds with a high load, the device can be on 90% of the time and off the remaining 10%.
Recently, new regulators with three diodes have been used on Chevrolet cars. Stator from another manufacturer and rotor with slip rings. And the brushes still have a similar design to the previous generators.
Of the standard parts, the pulley and fan remain unchanged throughout the years from the date of production of the model. There is no hole for additional testing.
How to check tension roller marks correctly
This is also an important point. From time to time people come to us in panic. They had the timing belt changed at a service station, and then they discovered that the belt was too tight. And questions begin to pour in - How to loosen the belt? Is it possible to drive like this? So what's now? Never step foot on this HUNDRED again! Well, everything like that.
Someone, in general, immediately climbs to loosen the belt tension.
In fact, you just need to check the tension correctly!
You cannot judge the tension simply by removing the timing case and looking at the marks on the tensioner. The fact is that the engine stops in different positions and the load on the belt at this moment is also different. Here are the marks after stopping the engine
The engine just stopped. And you can’t judge the tension in such a situation.
It is necessary to set the timing marks on the crankshaft and camshafts. And only then check/adjust the tension!
This is what we get in the same video after installing the timing marks
Therefore, do not panic and, especially, do not rush to loosen the belt tension.
How to unscrew the crankshaft pulley on an automatic transmission
There are many options, but I won’t list them all so as not to lengthen this text. I will give only the simplest method.
The pulley has grooves at the back
It is enough to insert a key or a wrench into one of the grooves and rest it, for example, on an air conditioning compressor. This will lock the pulley and can be unscrewed.
Using the same thin head or socket wrench, unscrew the bolts securing the lower timing case
Using a 14 mm socket, unscrew three nuts and one bolt securing the engine mount bracket
Using a 10 mm socket, unscrew the four bolts securing the bracket to the engine
There are two long bolts on top and two short ones on the bottom.
How to unscrew the pump
Now we need to loosen the belt tension. To do this, you need to loosen the pump mounting bolts.
This is done with a strong 5 mm hexagon
Please note that car owners often replace these bolts with regular 10 mm wrench bolts. Therefore, if you are not the first owner, then the bolts can be a regular 10 mm wrench.
In general, slightly unscrew the three pump mounting bolts. They are located here
Here's a little advice before you remove the belt
Now we need to turn the pump a little counterclockwise. This will relieve the belt tension.
But before this, you need to place a container under the engine so that the remaining coolant that still remains in the engine can drain there. There are not many of these remains, but still...
One more thing. If last time you poorly prepared the seat for the pump or used low-quality antifreeze, or, in general, water, then the pump may stick. And sometimes it gets so stuck that without a hammer nothing will work.
In my case, the pump sat on the car for more than 10 years and turned over without problems.
Pump key
To turn the pump you need a 41 mm wrench. You can purchase a special key. He looks like this
Or cut a regular open-end wrench to 41
And weld a head or something similar to it.
But personally, I am for the first option. The cost of a key ranges from 70 to 200 UAH, depending on the manufacturer and the thickness of the metal.
In general, turn the pump counterclockwise and remove the belt
Pay attention to the photo above. Only the left side of the belt is loosened, while the right side remains taut. This point will be useful to us when installing a new belt.
Unscrew the bolts of the camshaft pulleys. If you forgot to remove them in advance while the belt was still installed, then you need to fix the pulleys.
Important! Do not use nuts or bolts placed between pulleys for fixation. This will inevitably leave marks on the working surfaces of the pulleys. This damage will then destroy the belt, possibly causing it to break!
Important! It is not allowed to rotate the camshafts with the timing belt removed!
To hold the pulley, you can use special devices. I use shock absorber strut spring clamps.
Note. The pulleys are different. The left is different from the right. The left one simply does the job of turning the camshaft. And the right one still works with the camshaft position sensor. And there is a special ebb on it that acts as a mark for the sensor.
It is impossible to confuse the position of the pulley on the camshaft, since there is a hole on the pulley
And there is a special pin on the camshaft
Unscrew the two bolts securing the DPRV with a 10 mm socket and remove it
Use a 14 or 15 mm socket to unscrew the deflection roller
Using a 12 mm socket, unscrew the three bolts securing the tension roller and remove it
We unscrew the rear timing case mounting bolts in these places
We unscrew the pump mounting bolts and dismantle it
To dismantle the crankshaft pulley, simply unscrew the crankshaft bolt and remove the pulley
We inspect the pulley and, if there is the slightest defect, replace it with a new one.
We clean the pump seat very carefully. And we treat it with fine sandpaper so that there are no sagging or traces of corrosion.
Note. If you do not prepare this area perfectly, then the pump may become slightly misaligned. And this will lead to the fact that the belt may begin to slip off the pulleys while the engine is running!
