Diagnosing the operation of a vehicle is an important process, because it is with its help that you can find out which parts of the car have problems. One of the devices for car diagnostics is an adapter. For what reasons does the ELM327 Bluetooth not connect to the ECU and what to do in such cases? We will talk about this below.
Connecting the ELM 327 adapter to the VAZ 2110 diagnostic connector with your own hands (with photo)
Modern VAZ 2110 cars have a fault diagnostic system, which can tell a lot not only to a service station specialist, but also to an ordinary driver, if he knows how to correctly read and decipher error codes.
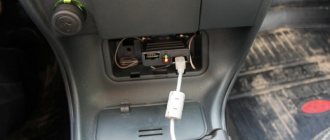
In order to read codes, or in case of replacing diagnostic equipment, you need to know that the diagnostic connector on the VAZ 2110 is located under the dashboard console on the left, and here is the pinout for each cable.
Diagnostic connector VAZ 2110
How can you tell if your car is faulty?
There is a special lamp on the instrument panel with the inscription CHECK ENGINE. When you turn on the ignition, it lights up, and until you start the engine, a special program reads data from all systems and components of the car, thus transmitting data to the on-board computer to identify faults.
After you start the engine, the lamp should go out, but if it stays on for another 10 seconds, it means that some problems have been identified and error codes have been entered into the on-board computer programs.
Communication with the controller is carried out using the diagnostic block.
CHECK ENGINE control signal on the instrument panel of a VAZ 2110
Calculation of codes
Most often, diagnostic program codes are “deciphered” using a special device. However, on VAZs it is not so difficult to do it yourself.
ECU January 4 for VAZ 2110
The diagnosis itself goes like this:
- Connect contact “B”, which has the diagnostic block and “ground”;
- Turn the ignition key to the third position, do not start the car;
- First, the aforementioned “CHECK ENGINE” lamp flashes code 12 three times in a row. It, in fact, does not signal any malfunction, but simply shows that the diagnostic programs are working. On the VAZ 2110 this happens in this order: the lamp blinks briefly once (which should be considered the designation of number 1). After a pause of at least two seconds, it flashes twice in a row (two). So we got the number two. And this is repeated three times so that the driver can understand these signs;
- Now you need to be careful not to miss any faults. After the diagnostic program has declared its serviceability, it will begin to display error codes, if any. In the same way - flashes and pauses.
You can read about the design and operating principle of wiring here: https://vazweb.ru/desyatka/elektrooborudovanie/provodka.html
Installing a new adapter
Modern adapters elm 327 with the OBD-II program (puncture) are suitable for the VAZ 2110 . You can also install them yourself. First you need to purchase an elm 327 and a cable for it. You already know the location of the diagnostic connector. Be sure to study the instructions, which indicate the pinout of the block and the location of each connector.
The pad can be removed quite easily. Insert your own cable into each connector of the block, making sure that the pinout of the elm 327 complies with the manufacturer’s instructions. Check that each connector is connected correctly and each cable is in the correct place. After this, the block is installed in its place.
Connecting the diagnostic connector to the block
Fault detection programs for elm 327 can be downloaded on the Internet, many of them in a free version. Now your VAZ is ready to detect errors in various car systems, and you can always download error codes from us.
Why is diagnostics needed?
Let's first figure out why we need to diagnose faults and whether this is required specifically for your car.
The main advantage of diagnostics is the ability to save money, time and modern nerves. If the car begins to behave inappropriately, some extraneous sounds appear, the stable operation of the engine is disrupted, then there are two options:
- To study all systems manually by dismantling and testing would waste a lot of time and nerves. The probability of finding the cause of the breakdown is far from 100%.
- Conduct computer diagnostics yourself by connecting a special adapter or cable to the computer. The program will scan the car and be able to issue the appropriate error codes. After studying our material with error codes, you can easily find the reason why the car began to behave abnormally.
Is it worth going to a service station?
The quality of diagnostics at a service station is often not much different from an independent check. Having an adapter and cable to connect the device allows you to deal with the problems of your own car without outside interference.
By contacting a service station, they can diagnose you with the same equipment, but they will only ask you for a decent amount of money. If you do not control the progress of the check yourself, technicians may claim to have found other errors that in reality do not exist.
The result of visiting a dubious service station for diagnostic purposes can be serious financial costs and a long absence of the car at your disposal.
Example of an adapter with cable
The only option when it is worth contacting a car service center is the lack of diagnostic equipment and the presence of good friends among car mechanics.
How to connect the ELM 327 auto scanner to a VAZ?
It started with the fact that the speed of my little engine was floating and it could stall out of nowhere, and after some time, and this time was half an hour or an hour, it would start up without the same apparent reasons. The problem is floating, even if it stalled, and taking it to a service station would not solve the problem, as I already said, it starts up without any solution to the problem. That is, if it wanted to, it stalled and would not start; if it wanted to, it would start. Many sensors and other spare parts were changed, but the situation has not changed.
Since I have an understanding of electronics, I decided to order equipment for diagnostics; before that, they told me at the service station that this equipment would cost twenty thousand. I thought that I didn’t need it for the campaign. But then I came across the ELM 327 adapter, I read a lot of information on the forums that many people do not connect to vases. And I also have a 2004 car, there is a port for GM12 diagnostics, and the diagnostic adapter comes with the OBDII standard, they needed an adapter that costs 450 rubles in China, but then I read that all this can be connected with three wires, at your own peril and risk I finally decided to take a risk and ordered it for myself from AliExpress.
A month later I received it (by the way, a video with my review and connection will be below), it comes with a disk with drivers that was broken, well now, the package still came from China, and not from a neighboring village, I wasn’t too upset, fortunately there is such a thing as the Internet. I opened the browser, found the drivers, downloaded, installed - the problem was solved, then I downloaded the OpenDiagFree 1.4 program, which is what works with the ELM327.
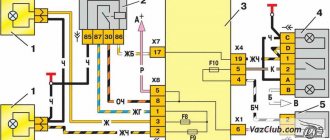
I connected everything with three wires according to this diagram:
Adapter diagram from OBDII to GM12 block
If you have a car made after 2005, then you can connect the adapter directly, my car is just a little old, I had to shamanize.
Then I turned on the ignition and there it was, all the sensor readings on the screen, engine speed, temperature, and other readings of the sensors that are installed in the car. The main feature of this adapter is that it can erase ECU errors. But in general, you can look at the capabilities of the adapter on the Internet, today we are talking about connecting it, by the way, here is a video with my review, as I said.
The adapter works, it helps a lot when the “check engine” lights up, you just connect it to the computer, see what the error is, which sensor notifies about this error, then you erase everything and then figure out how to fix it, what needs to be replaced where. If you don’t have a laptop, or you have one but the battery doesn’t hold it, there is the same ELM327, but not with USB, but with Bluetooth or WiFi, which makes the connection easier and you can view errors from a mobile device or tablet.
By the way, I solved the issue with floating speed using an adapter. The problem was that the 3rd injector was sucking air, and I turned off the injectors one by one and caught the moment when I turn off the 3rd injector nothing happens, but on the rest the car starts to work like a tractor. I couldn’t look right away because the check would light up and then go out. That’s basically the whole connection, if you have any questions, I’ll be happy to answer. Good luck to everyone, like)
If you find an error, please select a piece of text and press Ctrl+Enter.
ELM327 for VAZ - compatibility, diagnostics and programs
ELM no April 04, 2022 Rating:
Reading time
Difficulty of the material:
The ELM327 diagnostic adapter is widely popular among motorists. It allows you to carry out a quick computer service of electronic modules and track the values of important parameters of the internal combustion engine in real time. The adapter is easy to use and does not require special skills from the owner. The device is actively used for diagnosing not only foreign brands, but also domestic cars.
The ease of working with ELM327 is obvious - just connect the device to the service connector and synchronize it with your computer. The information will be displayed on the display of your PC or smartphone.
Important:
Older models may be equipped with an OBD2 connector, but do not support available ISOs. Such blocks are diagnosed using separate tools.
Location of the diagnostic connector on the VAZ-2110 and features of its use
Computer diagnostics of a VAZ-2110 car can be performed independently, without contacting a specialized car service center and large financial costs.
But for this you will need to have at least minimal knowledge and skills, as well as appropriate equipment. After all, without a simple understanding of where the diagnostic connector of a VAZ-2110 car is located, you will not even be able to connect the adapter to the electronic control unit. In this article we will talk in detail about how to read and decipher error codes, and also answer the most common questions related to the ODB connector. All you have to do is follow our recommendations.
Compatibility of VAZ cars with ELM327
The OBD 2 standard, according to which the adapter operates, supports the service of all cars with an electronic injection control system. There are some differences in diagnosing certain types of ECUs, but the general maintenance methods remain the same.
In this section, the user can find accurate information about the compatibility of the ELM327 with the desired vehicle. The table lists the years of production, as well as models. Just select your VAZ type in the list and the system will automatically provide all the information on computer servicing.
Finding the diagnostic connector on a VAZ-2110 car
Regardless of the modification of the “ten”, the diagnostic connector will be located on the right side of the driver’s seat at the bottom of the steering column. That is, right under the steering wheel. This location can be called quite convenient, since when using a laptop computer (both a laptop and any modern tablet can be equally successfully used), all necessary operations are performed directly in the driver’s seat, without the need to dismantle any components and mechanisms.
For comparison, in older UAZ cars the connector is located under the hood, which somewhat complicates diagnostic work.
In the new version of the UAZ Patriot, the manufacturer has eliminated this drawback. Now the block is installed under the steering column, as in the VAZ-2110.
How to use
Before purchasing an adapter, make sure it is compatible with your car. After purchasing the adapter, it is important to correctly connect the scanner to the connector. As a rule, the OBD 2 connector is located in the passenger compartment under the dashboard. Models before 2006 usually have a 12 pin connector (GM), and to connect the scanner you will need a 16 pin adapter.
Information on the location of the connectors is presented in the table and photo below.
Location of diagnostic connectors and recommended auto scanners:
| No. | Brand VAZ | Connector location | Suitable and recommended scanners + program |
| 1 | 2105, 2107 (with injector) | On the left side of the steering column | VAG-Adapter + Adapter 12 pin + OpenDiag Mobile |
| 2 | 2108, 2109 | Below the storage shelf, in the center. | |
| 3 | 2113, 2114, 2115 | In the cigarette lighter area, approximately 10-12 cm lower. | Scan Tool Pro + 12 pin adapter + OpenDiag Mobile |
| 4 | 2110, 2111, 2112 | On the right side in relation to the steering column, under the dashboard. | |
| 5 | Lada Priora, Kalina, | In the opening located behind the glove compartment. | Scan Tool Pro 2022 + OpenDiag Mobile |
| 6 | Lada Vesta | Located under the steering column on the left, on the left near the handle for opening the hood, under the mounting block | |
| 7 | Lada Largus | Inside the glove compartment on the back wall and closed with a protective cap | |
| 8 | Lada Granta | Right above the cigarette lighter. |
Location of connectors on some vehicles:
ODB connector pinout: convenient pin layout
In order to personally diagnose a VAZ-2110 car through the connector located under the steering column, you need to know where to connect this or that equipment. This task is greatly facilitated by pinout, which is a diagram of the placement of contacts. It identifies the following main outputs:
- A – ground from the car battery is connected to this output;
- B – output is intended for connecting L-Line type equipment. It is not used on all modifications of the VAZ-2110, so be sure to pay attention to this when choosing a computer scanner or adapter;
- M – K-Line type devices are connected to this output. They are rightfully considered the optimal choice for self-diagnosis of the VAZ-2110, as they provide excellent interaction with any computer equipment;
- H – output to which power is supplied during diagnostic operations;
- G is a very important pinout element, since it is it that ensures safety control of all procedures performed and eliminates any short circuits or other emergency situations.
This designation of contacts will allow you to avoid mistakes when connecting diagnostic equipment, as well as perform all the necessary work efficiently. Now that you know the location of the ODB connector, as well as its main components, you can begin to assess the technical condition of the car.
Computer diagnostics of cars: basic steps
To perform diagnostics, first start your tablet or laptop, and then connect the adapter or extended cable connecting the tester to the connector. It is necessary if the operation is carried out using a desktop computer to the appropriate output. After this, you just need to take a few simple steps:
- turn the key in the ignition to turn on the power. This is necessary, since otherwise the software will not be able to receive a signal from the controller and display error codes on the computer display;
- we launch the software on a tablet or laptop. If you made no mistakes when connecting and use only working equipment, a diagram of the entire electronic part of the car will appear on the display;
- We select the type of diagnostics we need from the menu (checking the engine, suspension, electrical equipment, gearbox, etc.) and start the process.
During diagnostics, the software will display only error codes detected by the on-board computer. To identify certain faults, you will need to decipher them. It’s not difficult to do, since you can easily find the meaning of all codes on any specialized website.
How to choose the right type of diagnostic work? We suggest focusing on the symptoms of a car malfunction. For example, if fuel consumption suddenly increases, you should check the engine, and if extraneous noise appears while driving, evaluate the serviceability of the vehicle’s chassis.
Where is the diagnostic connector on the VAZ 2110
Monitoring the condition of the car by ear, smell, touch, and visually allows you to focus the driver’s attention on emerging problems. The VAZ 2110 car is equipped with electronic devices for monitoring the operation of the engine, components, and mechanisms. An external diagnostic device will help you understand the situation.
The article will answer the questions:
- where is the diagnostic connector located?
- what diagnostic connectors are installed on the VAZ 2110,
- which scanner to choose,
- how the adapter is connected,
- which allows you to find out the testing of the vehicle.
Vehicle manufacturers, when releasing new models, strive to adhere to international standards. Making a car is half the battle. Ensuring service operation of the car and unifying maintenance is a more important task. The developers of the VAZ 2110, trying to keep up, equipped the car with nine sensors, eight actuators (the number of sensors and devices depends on the configuration option and version of the car), an electronic speedometer, tachometer, controllers, and an anti-theft system.
Diagnostic modes, OBD protocols for VAZ cars
The OBD standard has five types of information exchange protocols:
- CAN type;
- KWP2000;
- ISO 9141 version 2;
- J1850 VPW and PWM.
The purpose of OBD is to harmonize the various electronic systems of the car and ensure the exchange of information between devices. The standard establishes a number of rules for the transmission of data packets. The exchange speed is individual for each protocol. The ELM327 adapter coordinates the ECU and external devices for reading information. The data is displayed to the user in an accessible form.
The fastest is the CAN bus. The latest Zhiguli models provide for the use of this standard. Other protocols on this family:
- ISO 9141;
- K, L lines;
- K, L lines (extended block 55 pins).
Note: the number of supported diagnostic and interrogation modes of on-board systems depends on the installed protocol. The owner needs to check the year of manufacture and model of the standard control unit before servicing. The more recent the ECU and its firmware, the wider the list of available scanning parameters.
Important:
Some ECUs do not support the full set of functions without the use of a dealer scanner.
Select the car model and year of manufacture to determine which diagnostic modes your car supports through the ELM327 adapter, as well as what protocol the OBD2 port is based on. The data is presented for the following VAZ models and their modifications: 2114, 2107, 2110, 2112, 2109, 2115, 2106, 2108 and others.
Note:
(1) — The numbers between brackets (x3) correspond to the number of vehicles of the same type
(2) - DIN horsepower (multiplied by 0.736 for kW power)
(3) - PID is only supported for the primary oxygen sensor (#1)
- Mode X Column: A vehicle showing 00000000 in a mode means that the corresponding PID is not active and that as a result the mode is maintained but does not respond to any requests. None of the vehicles described below support Mode 8.
- Energy column: fuel type, Die for diesel, Pet for gasoline, Hyb for hybrid
- The vehicles on this list are classified alphabetically by make, model, then in order of increasing horsepower.
This mode returns common values for some sensors, such as:
- engine speed;
- vehicle speed;
- engine temperature (air, coolant);
- information about oxygen sensors and air-fuel mixture.
This mode provides a freeze frame (or instantaneous) failure data. When the ECM detects a malfunction, it records sensor data at the specific point in time when the malfunction occurs.
This mode displays stored diagnostic trouble codes. These fault codes are standard for all car brands and are divided into 4 categories:
P0xxx: for standard transmission related faults (engine and transmission) C0xxx: for standard chassis faults B0xxx: for standard body faults U0xxx: for standard communication network faults
More detailed information and definitions of common trouble codes are available on the OBD Common Trouble Codes page.
This mode is used to clear stored trouble codes and turn off the engine malfunction indicator.
Note: There is generally no need to repair a problem that has not been diagnosed or corrected. The MIL will illuminate again during the next driving cycle.
This mode provides the results of self-diagnosis performed on the oxygen/lamda sensors. This mainly applies only to gasoline vehicles. For new ECUs using CAN, this mode is no longer used. Mode 6 replaces features that were available in Mode 5.
Operating principle of the diagnostic connector
Information is collected, processed and stored. External test equipment connected to the diagnostic connector located inside the cabin will help you interrogate the electronic control unit, view error messages, find and eliminate faults. The European standard, launched in 2000, specifies that the test connection be located directly next to the driver's seat at an outstretched distance (up to 1 meter). The exact location is not specified. Access must be free, excluding additional manipulations with wrenches.
The creators of European passenger cars place diagnostic blocks under:
- dashboard,
- handbrake lever,
- steering column,
- ashtray.
Important. On the VAZ 2110, the diagnostic connector is mounted in a niche under the steering wheel on the driver's side.
The information provided by the car's electronic unit uses a special data exchange algorithm. The OBD2 (On-Board Diagnostics Version 2) protocol, developed by the USA, is recognized as a mandatory standard for checking cars with internal combustion engines. The command system, electrical signals, and exchange order are discussed. The shape of the connector has not been clearly established. Historically, since 2000, a two-row 16-pin trapezoidal connector has been used. At the same time, the VAZ 2110 continues to use the old-style 12-pin GM-12 connector. Manufacturers equip trucks and commercial vehicles with connectors of other types.
Selection of diagnostic equipment
Demand creates supply. Online stores are full of advertisements for diagnostic devices that check all kinds of car brands of different years of production. Adapters that satisfy a wide range of untrained users are considered. The buyer makes the choice. Some car enthusiasts want to perform periodic monitoring, maintain the operating condition of the vehicle, and use a laptop or tablet. Others like to be an airline pilot, constantly monitoring changes in dozens of parameters on a smartphone by connecting a test device permanently. The diagnostic devices produced will satisfy various wishes.
VAZ car owners should pay attention to devices designed to test VAG Group vehicles (48 automobile manufacturing enterprises producing branded cars in 21 countries around the world). In an effort to enter the world market, VAZ developers focused on electronic units with the logic for constructing tires from the VAG concern. The scanner must support the required protocol. Vehicles manufactured before 2007 are checked using the K-Line bus. New cars operate via a CAN bus; the K-Line bus is not provided on the connector.
Types of equipment used to check LADA
A list of diagnostic devices used not only in specialized car services, but independently, for example, in a garage. • Odometer correctors, with setting mileage values; • Models that support protocols, by reading information, erasing errors, codes are deciphered: ELM327 USB / Bluetooth / Wi-Fi running on the elm327 chip; • Vag adapter (cable) for later versions of the ECU and 12 pin pads; • Testers whose work is organized on the basis of oscilloscopes.
Diagnostic devices that support combination with ABS and SRS units, as well as using a CAN bus, are in demand.
Modern popular models
The best diagnostic scanners compatible with the VAZ have been selected for review. We pay attention to the following samples:

