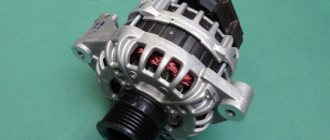
The generator belt tensioner roller (hereinafter referred to as NR) on the Lada Grant is installed exclusively in the “Lux” configuration with a 16-valve engine. Budget 8-valve versions of Lada Granta: “Norma” and “Standard” do not have a roller in the standard design.
Violation of the belt tension moment leads to its breakage. Many car owners determine the tension “by eye,” which in most cases is incorrect.
In service stations, special devices are used for these purposes, for example, a multimeter. Which allows you to adjust the tension using the voltage indication at the “output” from the battery.
In order to prevent belt breaks and deformation, many motorists install a tension roller. The same one that is built into the “Lux” package by default.
Let’s look at how to do this on budget Lada Granta models and what is needed for this in detail using the example of the Lada Granta “Norma” and “Standard”.
New video
How to replace the timing belt tensioner pulley of Lada Granta
If, when the engine is running, a strong noise of a rotating bearing is heard in the area under the front timing belt covers, you should check the condition of the tension roller and, if necessary, replace
it. This can be done without removing the belt.
Also, the roller should be replaced during routine replacement of the timing belt (article - “How to check and replace the Lada Granta timing belt”).
Replacing the timing pulley with tension roller
Remove the front timing belt cover
When replacing the tension roller without removing the timing belt, there is a risk of the belt jumping over the pulley teeth, which will lead to a shift in valve timing.
Therefore, before releasing the belt tension, align the mark on the camshaft pulley with the protrusion of the rear belt cover.
After installing the roller, the mark should not move.
Loosen the nut securing the tension roller and unscrew it completely.
Remove the roller from the stud, keeping the belt taut.
We install a new roller on the stud and secure it with a nut and washer, preventing the belt tension from weakening.
We adjust the tension of the timing belt.
Install the front timing belt cover.
Replacing a timing drive roller with an automatic tensioner
We prepare the car for work.
Remove the upper front timing belt cover.
After loosening the timing belt tension, there is a risk of the belt jumping over the pulley teeth, which will lead to a shift in valve timing.
Therefore, before releasing the belt tension, by turning the crankshaft, align the mark on the camshaft pulley with the protrusion of the rear belt cover.
After installing the roller, the marks should not move.
Using a 15 mm wrench, unscrewing the automatic tensioner mounting bolt half a turn, loosen the tension on the timing belt.
Unscrew the tensioner mounting bolt and remove it together with the bolt
We install the automatic tensioner without tightening the fastening bolt.
We put the timing belt on the tensioner roller, make sure that the marks match and adjust the tension (article, “How to check and replace the Lada Granta timing belt”).
We install the removed parts in the reverse order of removal.
Source
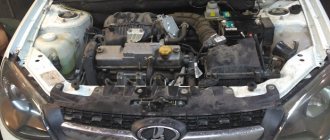
The easiest way to replace the timing belt, pulley and pump on a Lada Granta with an 87 hp 8-valve engine
Today our old client came to us in his white Lada Granta to replace the timing belt, roller and pump in the place with antifreeze. From the factory, this engine is equipped with a Gates timing belt with a declared service life of 75 thousand kilometers, but we change it to 60 just in case.
Important! When the timing belt breaks on this engine, all the valves bend. This is true for all engines produced until 2022.
I recently read that starting from 2022, this engine will be equipped with plug-in pistons; when the new Granta arrives, we’ll be sure to see if this is true with an endoscope.
Review of Manufacturer Prices
Technical parameters of the roller:
- hole diameter for nut - 10 mm;
- width - 27 mm;
- height - 55 mm.
Related link:
Features of replacing the thermostat on the Lada Grant 8-valve
| Manufacturer | Price, rub.) | Resource (thousand km) |
| 1118-104102013 original Lada Granta | From 520 | 25 – 30 |
| GATES T42042 | From 450 | —/— |
| GATES T43228 | —/— | —/— |
| GATES T43147 | —/— | —/— |
| LYNXauto PB-1027 | From 480 | —/— |
| LYNXauto PB-1029 | —/— | —/— |
*prices are current as of October 26, 2018.
Cost of purchasing components separately:
- video: 450 – 500 rub.;
- belt: from 300 rub.;
- bracket: 430 RUR;
- axle: 85 RUR;
- tensioner: 380 – 400 rub.;
- studs, bushings: 300;
- bracket - adapter for generator: 2200 rub.
Total: 3800 - 4000 rubles.
Preparatory operations
This procedure can be carried out even in the field; we don’t need a pit, much less a lift. Replacement time is 30 minutes, excluding engine cooling time.
If you are changing the belt and pump, then you need to drain the antifreeze from the cylinder block. Plug for the head at 13. Place stops under the rear wheel and tighten the handbrake. Remove the front right wheel and plastic mudguard.
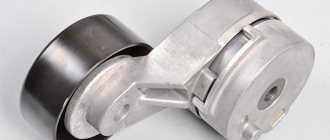
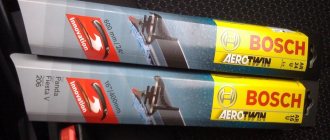
Loosen the tension on the alternator belt and remove the belt. The locking nut is 21, the tension roller rod is 10. Turn the tension roller, if it makes extraneous noise, replace it.
Alternator belt tensioner.
Unscrew the four bolts of the upper timing cover and remove it (hexagon 5).
Upper timing cover.
Set the top dead center
Using the crankshaft pulley bolt, be sure to turn it clockwise until the marks on the camshaft sprocket and the casing match (17mm head with extension). This will be top dead center (TDC).
Crankshaft pulley.
Marks on the camshaft.
We lock the crankshaft, engage fifth gear and insert a screwdriver into the ventilation duct of the brake disc below the caliper. Unscrew the crankshaft pulley bolt and remove the pulley. Unscrew the fastening of the lower timing belt cover (hexagon 5).
Bottom cover.
The mark on the crankshaft sprocket should be against the ebb on the oil pump.
Marks on the crankshaft.
Unscrew the tension roller fastening and remove it along with the timing belt.
If you are not replacing the pump, then proceed directly to installing a new belt. But we recommend changing the pump together with the belt.
Replacing the pump
We dismantle the camshaft sprocket (head 17).
Fastening the camshaft sprocket.
Next is the timing belt casing (nut and bolts 10).
Casing.
The pump is secured with three bolts (hexagon 5).
Pump mount.
Before installing the new pump, lubricate the gasket with a thin layer of sealant. Reinstall the camshaft housing and sprocket.
Reviews
| № | Positive |
| 1. | Victor: I’ve been using the car for the second year, I’ve driven more than 31,000 km. The build quality is good, no complaints. I fix minor defects on my own; I don’t use service station assistance. |
| 2. | Ivan: after 35,000 km, I heard a creak in the engine compartment, took it to the service center, and they said that the roller had fallen off. I'm on friendly terms with technology, I replaced it myself. I think that a resource of 35,000 km for domestic parts is very good. |
| 3. | Vladlen: I’ve been driving the car for a year and a half, no complaints. The build is not bad, for a model in the budget segment. After the purchase, I immediately re-tightened all the components and connections. |
| 4. | Ignat: my roller flew along with the belt at 32 - 33 thousand km. This is good for Lada. I didn’t change traditions and bought the original ones. |
| 5. | Gennady: At the first maintenance, the mechanic tightened my belt, but hasn’t changed anything yet. The car is almost one year old, I bought it at a dealership. |
| 6. | Vasily: The car is in its second year, no complaints. I strictly follow the manufacturer’s recommendations, I don’t race, my driving style is moderate. |
| 7. | Georgy: my positive review about the quality of the original rollers, replaced them at 34,000 km. Special thanks to the store manager for recommending spare parts. |
| Negative | |
| 1. | Kirill: despite following the manufacturer’s recommendations, the moderate driving style of the roller flew for 20,000 km. For Granta this is very little. For example, Renault Logan lasts for at least 40,000 km. |
| 2. | Ivan: in a year and a half of using the car, I contacted the car service for the second time. As for a car under warranty, this is often the case. I plan to sell, I have my eye on Renault Logan. |
| 3. | Slavik: I rented the car from a dealership, drove it for a year without any problems, then it started falling apart. The build quality is very poor. |
Installing a new timing belt
We take out a freshly purchased set.
Timing kit.
Important! The tensioning direction is indicated on the timing belt tension roller, do not confuse it.
We check that all marks match and install the tension roller; do not tighten the bolt. We install the new timing belt first on the crankshaft sprocket, then on the camshaft, tension roller and pump. The belt section between the camshaft and crankshaft sprockets must be tensioned. Pull the tension roller until the marks match and tighten the bolt.
Snapshot
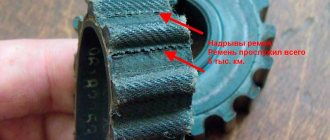
The surface of the toothed part of the belt should not have folds, cracks, undercuts of teeth and separation of fabric from rubber. The reverse side of the belt should not have wear, exposing the cord threads, or signs of burning. There should be no delamination or fraying on the end surfaces of the belt. If defects are found on the belt or there is a significant discrepancy between the belt tension control elements (see photo above), the belt must be replaced. You should also replace the belt with a new one if traces of engine oil are found on it (before installing a new belt, the cause of oil getting on the belt must be eliminated) or when replacing the coolant pump.
Attention! Failure of the timing belt (breakage and cutting of teeth) can lead to valves sticking into the pistons due to mismatch of the rotation angles of the crankshaft and camshaft and, as a result, to expensive engine repairs.
We replace the timing belt in accordance with the maintenance regulations every 75 thousand km or if defects are detected on the belt.
To avoid damaging the crankshaft position sensor, it must be removed.
Source
Removing the timing belt
You will need : remove the generator belt, the right wheel and the plastic shield of the engine compartment, prepare a “10”, “17” key, a “19” socket, and a screwdriver.
Procedure:
- Remove the plastic engine cover.
- Remove the timing drive protective cover by unscrewing the three fastening bolts.
- Timing diagram.
Set the piston of the first cylinder to the top dead center position:
- Turn the crankshaft clockwise by the bolt until the mark on the toothed pulley aligns with the antennae on the rear timing cover.
- Remove the window plug at the top of the clutch housing and make sure that the mark is not located opposite the scale slot.
- Secure the crankshaft from turning by inserting a screwdriver through the window between the flywheel teeth.
- Remove the bolt securing the generator drive pulley while holding the screwdriver. Remove the generator drive pulley.
- Loosen the tension roller nut. Remove the timing belt by turning the pulley so that the belt is loosened as much as possible.
- Remove the tension roller by unscrewing the nut securing it.
Have you noticed that the timing belt is eating or slipping? The reason may be a defective belt, rollers, or a pin that is overtightened.
Parts from the VAZ catalog
Let’s immediately look at the list of VAZ components and special tools:
- Tensioner roller for internal combustion engine 11183 – 2108-1006120, nut for it – 00001-0021647-21;
- Timing belt (11183) – 2108-1006040-10;
- Automatic tension roller – 21116-1006226;
- Timing belt (11186/21116) – 21116-1006040;
- Key for automatic roller – 67.7812.9573-01;
- Key for roller VAZ-11183 – 67.7834.9525.
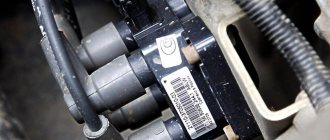
The tension roller of the "2108" family has two slots on one side. These slots should look “up”, that is, away from the engine.
Tensioner roller for motor 11183
The slots were made for special tools. It is designated by the numbers “67.7834.9525” (see list). And for automatic rollers, the key is designated differently - “67.7812.9573”. What it looks like is shown below.
The automatic roller can also be adjusted
It remains to list how the mounting bolts, washers, etc. are designated:
- Three bolts for the VAZ-11183 cover – 00001-0009024-11, washers – 00001-0026406-01;
- Timing drive cover (11183) – 21080-1006146-10;
- Bolts for VAZ-21116 covers – 2108-1003286-00, spring washers – 00001-0011977-73;
- Top cover – 21116-1006226-00, bottom cover – 21116-1006218-00.
We hope no questions arise here.
How to install and tension the timing belt
- Place the timing belt on the crankshaft pulley.
- By tensioning both branches of the belt, we put the rear branch on the pump pulley and wind it behind the tension roller.
- We put the front branch on the camshaft pulley.
- Tension the timing belt by turning the tension roller counterclockwise and inserting a screwdriver (as in the photo).
- Tighten the bolt securing the generator drive pulley and turn the crankshaft by the bolt 2 turns clockwise.
- We check the coincidence of the crankshaft and camshaft marks. If the marks do not match, repeat the operation to install the belt.
The entire process of replacing the timing belt of an 8 valve engine is also shown in the video:
Imported analogues
Various components are suitable for replacing belts “2108-1006040-10”:
- GATES – 5521 or 5521XS;
- BOSCH – 1 987 949 095;
- DAYCO – 94089;
- CONTITECH – CT527;
- Finwhale - 2108-1006040.
The timing belt “21116-1006040” can be replaced with another part:
- GATES – 5670XS;
- CONTITECH – CT1164;
- QUARTZ (Germany) – QZ-5670XS.
Usually the choice is made in favor of GATES products. The letters "XS" in its catalog mean "reinforced". Grantovods have already told us in detail about the timing of replacing the timing belt, its selection, and signs of wear in the material:.
Original timing belt and fake
Attention! Components from GATES (England) are most often counterfeited! From the photo you can understand what the main difference is. Beware of fakes.