There are several signs that indicate that the fuel pump is clogged. Each of them individually may not indicate this one hundred percent, but taken together they are sufficient grounds to begin cleaning. These are the signs:
- the engine stalls when you press the accelerator;
- the acceleration dynamics of the car decreases;
- the engine responds poorly;
- starting with the starter is somewhat difficult;
- When the gas pedal is pressed sharply, jerking occurs.
Depending on how badly the fuel pump is clogged, these problems can vary greatly in scope. For example, if the pollution is very high, then when you press the gas pedal, the car may hardly accelerate.
Cleaning the fuel pump screen can solve these problems, but it is important to remember that there are other reasons that can cause them:
- The injector has failed.
- The fuel pump is not working correctly.
- The fuel filter is dirty.
If the filter and mesh are still easy to change on your own, then for the rest it would be better for a beginner to contact a car service center. This will allow you to avoid gross mistakes that an inexperienced car enthusiast may make during the repair process.
Car won't start after replacing fuel pump
A common occurrence after replacing a fuel pump is that the car will not start. Let's start with the fact that the car should not start right away, since the pump must first pump up the pressure in the system, which was previously released.
To create pressure in the fuel system, turn on the ignition for a few seconds (the lights on the dashboard are on, but the key does not turn to the “start” position). After this, you can turn the engine with the starter for 5-10 seconds. If the attempt is unsuccessful, you should wait about 30 seconds. and then repeat the procedure.
If the engine cannot be started after repeated cranking with the starter, then this indicates that:
- errors were made when assembling and connecting the fuel pump;
- the new fuel pump is faulty;
- there was a planned blockage or failure in the car’s security system;
During installation and connection of a new fuel pump, various failures can occur, ranging from sticking valves on the pump itself to breakage of contacts, connectors and terminals.
In such situations, you need to determine the nature of the breakdown: mechanical or electrical. It’s easiest to figure out the power supply to the pump, since it’s either there or it’s not. As for a car alarm or immobilizer, the anti-theft system can block the car from starting by cutting off the power to the fuel pump. We should also not forget that the fuel filter may simply become clogged. When the valves on the pump stick, the device may hum and work, but idle.
If such problems occur, gasoline does not flow into the fuel rail and the engine does not start. To accurately determine the cause, you must first make sure that there really is no gasoline in the fuel rail. Then you will need to re-remove and connect the fuel pump directly from the battery or dimensions. This method of connecting the fuel pump directly is optimal for quickly checking the fuel pump yourself if the fuel pump does not pump.
- Replacing the fuel pump motor
The causes of whistling and increased noise during operation of the fuel pump are overheating of the pump. How to diagnose and fix the problem yourself. Tips and tricks. Read more
- Malfunction of the fuel pump relay: checking and replacement
What functions does the fuel pump relay perform, signs of breakdown. Where is the fuel pump relay installed, how to properly check the fuel pump relay. Read more
- How to clean the fuel pump mesh yourself
Why is it necessary to clean the fuel pump mesh? When is it better to change and how to clean the fuel pump mesh? How to properly remove the fuel pump, subtleties and nuances. Read more
- The fuel pump does not pump when the ignition is turned on
How to determine why the fuel pump does not pump or works poorly. Fuel rail pressure, pump diagnostics. Wiring, relays, fuel pump fuses. Read more
- Mechanical and electric fuel pump design
Mechanical and electric fuel pump, design and principle of operation of the device, types of pumps and main malfunctions, operating features Read more
- Replacing the fuel pump mesh with your own hands
Why does the fuel pump grid need to be changed? How to remove the fuel pump yourself to replace the filter. Features of reassembly after replacing the fuel pump mesh. Read more
Frequency of procedures
There is no set time frame for cleaning this part. Some are forced to clean the mesh every 50,000 kilometers, while others have to do this no earlier than the car has traveled 150,000 kilometers. However, there are cases when the manual for using a particular car indicates a specific number of thousands of kilometers, after which it is worth changing this part. However, even before this point it may also be necessary to clean the fuel pump mesh. It is not difficult to make it yourself.
How to remove the fuel pump
To answer how to change the fuel pump, you need to study the procedure for removing the fuel pump. Removing the fuel pump and replacing it involves dismantling the device. To extract, you will need a special key for removing the fuel pump (puller), open-end wrenches, a tubular wrench, and a set of sockets.
We add that the fuel pump mount may differ on different cars, although the general principle remains almost the same.
You can do this as follows:
- turn off the negative voltage on the battery;
- on the fuel rail under the hood, press the valve through which a certain amount of gasoline will flow out;
You can also go the other way. First, remove the terminal from the battery, then turn off the power to the fuel pump by removing the electrical connector from it. Then the terminal is put back on the battery and the engine is briefly turned with the starter. After a short period of time, the remaining fuel will leave the system. On some cars, the engine may even start and then stall.
So, the fuel pressure has dropped, now we proceed to remove the fuel pump. Remember, the terminal on the battery must be disconnected during work! The first thing to remove from the pump is the chip (electrical connector), if this has not been done previously
Then you need to pay attention to the fuel lines (1 fuel supply pipe and 1 return line to return fuel to the gas tank). On the indicated tubes, loosen the tightening of the clamps and clamps (if any), which are usually used to secure the electrical wiring sections to the lines to supply power to the pump
How to remove the tube from the fuel pump
Now you need to remove the lines themselves from the fuel pump. To figure out how to remove the hose from the fuel pump or disconnect the line, you need to accurately determine the method of attachment to the pump terminals. Often, the standard fastening of the fuel supply line is implemented in the form of a nut (fitting), which must be unscrewed with an open-end wrench. The so-called return line can be secured with a clamp.
Removing the fuel pump and replacing
After unscrewing the fuel lines, you will need to either unscrew the pressure ring of the fuel pump with a special puller, or use a tubular wrench to unscrew the nuts (which depends on the method of mounting the fuel pump on a specific car model).
- Before starting removal, it is worth noting that there are special arrow indicators on the pump and other fixing elements. We recommend remembering their position, which will facilitate subsequent reassembly.
- Then you need to remove the special o-ring. After removing the ring, you can remove the fuel pump from the tank. During removal, care must be taken, since devices for determining the fuel level in the gas tank (float sensor) may be attached to the fuel pump body.
- After removing the pump, there may be a rubber seal on its seat. For example, on cars of the VAZ family this seal is fixed on studs. This seal also needs to be removed by simply pulling it up.
The completion of the fuel pump replacement procedure is the installation of a new fuel pump, as well as the replacement of all rubber seals, which must be included in the kit or purchased separately.
We would like to add that during installation you should:
- Make sure that the pump is positioned correctly. To do this, there are special arrow-shaped markers on the pump itself, covers and pressure rings (depending on the make and model of the car). On some cars the arrows should line up, on others the arrow on the fuel pump should point towards the rear of the car. It is for this reason that it was recommended above to remember the position of the indicated arrows before removal.
- Also, in the process of placing the pump, you should carefully handle the float and other solutions to determine the fuel level in the gas tank. Often, during unprofessional installation, such elements are bent or broken, after which there is a need to replace them.
If the fasteners are over-tightened, they may break. If the fuel pump fixing elements are not tightened enough, then the pump may dangle in the tank, which is unacceptable. After the pump is installed, all that remains is to attach the fuel lines back, connect the pump power connector and the terminal to the battery. This is what replacing a fuel pump with your own hands looks like.
Cleaning method
The procedure is carried out in several stages. First, the rear seat cushion is removed and half of the sofa is reclined. Then remove the plastic cover of the fuel pump. Then you need to relieve pressure in the fuel system.
Now you can remove the negative terminal from the battery. It is necessary to disconnect the tubes from the pump (gasoline may spill). A special clamping ring-cover is unscrewed. The remaining gasoline should be drained from the fuel pump housing and the sealing ring should be removed. The pump can now be removed.
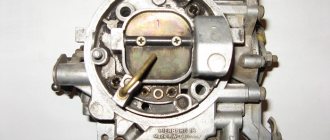
You will need to disassemble the pump to clean it. First, the lower part is removed, and only then the mesh. To dismantle the latter, you need to pick up the filter with a screwdriver at the place where the pump is attached to the housing. Usually the mesh is very dirty.
You can replace the part with a new one, but you can also clean it. As for cleaning the fuel pump mesh, it is better to choose one designed for cleaning the carburetor. If there is a need for mechanical action, it is better to clean the part with a soft brush. Then the mesh is dried and blown. At the end of the process, it is recommended to wash the mesh itself and the bottom of the fuel pump housing with gasoline. All that remains is to put everything back together.
It is not difficult to clean the fuel pump screen yourself. However, as with all repair work, all prescribed safety precautions must be followed. If you don’t want to do the replacement yourself, you can take the car to a service center, where they will do it for little money.
When and why you need to change/clean the fuel pump screen
Let's start with the fact that general problems with the fuel system (fuel pump in particular) should be divided into the most common groups:
- the fuel pump mesh and fuel filter are clogged;
- the fuel pump itself has failed;
- injector problems;
Let us add that we should also not exclude the possibility of air leaks, that is, airing of the power system. Another culprit of problems may be the pressure regulator in the fuel rail. In this case, engine malfunctions may be partially similar to some of the symptoms mentioned above. For example, a slight ingress of air into the fuel system results in the engine not starting for a long time after parking.
Article on the topic: Which type of tinting to choose?
Let's go back to the fuel pump. Its malfunction means that the performance of the fuel supply system is reduced. If the fuel pump breaks down, then the car becomes unsuitable for normal use. Signs of a fuel pump malfunction are as follows:
- It is impossible to start the engine, the fuel pump does not pump;
- the engine starts, but runs with serious interruptions;
In this case, the service often recommends diagnosing, repairing or replacing the fuel pump. It should also be taken into account that the fuel pump mesh filter may become clogged inside the device. Let us immediately note that it is impossible to accurately answer the question of when to clean the fuel pump stack. Some car enthusiasts clean/replace the fuel pump mesh as needed or as a preventative measure every 50-70 thousand km. mileage, while others are faced with the need to clean the fuel pump grid for the first time at mileages of 150 thousand km or more. and more. Let us add that the operating manual for some models specifically states that it is recommended to replace the fuel pump stack once every 120 thousand km.
It should be added that the loss of dynamics and the appearance of symptoms of a clogged mesh occurs gradually. For this reason, each driver decides to clean the fuel pump himself. On powerful naturally aspirated engines, the gradual deterioration in acceleration is not felt as strongly as compared to highly accelerated engines with a small displacement. For this reason, many owners of large-volume trucks begin to solve the problem after noticeable complications appear. Also, the condition of the pump grid is greatly influenced by the quality of the fuel being filled and a number of other factors and individual operating conditions, which we will talk about a little later.
Article on the topic: “Bus stop” sign - what to do if violated?
Frequency of procedures
There is no set time frame for cleaning this part.
Some are forced to clean the mesh every 50,000 kilometers, while others have to do this no earlier than the car has traveled 150,000 kilometers. However, there are cases when the manual for using a particular car indicates a specific number of thousands of kilometers, after which it is worth changing this part. However, even before this point it may also be necessary to clean the fuel pump mesh. It is not difficult to make it yourself.
How to remove the fuel pump on a Ford Focus 2 with your own hands
This is how I drank it.
Before changing the fuel pump, let's decide on the methodology, since there are two ways to remove the module - officially, the fuel module can only be changed with the fuel tank removed. There is an alternative way: you can cut an inspection hatch in the bottom of the car under the rear seat cushion and thus get to the fuel module. This method is quite popular, but has some disadvantages:
- we violate the integrity of the bottom;
- Interior sound insulation suffers;
- additional pockets of corrosion may appear;
- There is direct contact between the fuel tank and the passenger compartment, and safety suffers, especially during work related to dismantling the fuel module.
Correct method (official)
Let's start with the official method of replacing the fuel pump by removing the fuel tank. In fact, there is not much work, the main thing is to have an inspection hole, a lift or an overpass.
Relieve pressure in the fuel system. To do this, with the ignition off, remove the fuel pump fuse F111, start the engine and, at idle speed, use up the fuel remaining in the pipes. Remove the terminal from the battery. Having placed the car on an overpass or lift, we go under the car. Remove the fuel filter.
Once the pressure has been released, you can remove the fuel filter.
Unscrew the 2 nuts securing the heat-protective casing of the tank with a 10mm head. Move the casing to the side. We remove the tubes from the adsorber, it is located behind the fuel tank. To do this, press the lock button with a screwdriver and simply pull off the hose. At the front of the tank, remove the fuel hose from the tube by prying the white plastic clamp with a flat screwdriver
The fuel is under pressure, so remove the tube carefully as it may spill or splash. Disconnect the filler neck hose. It is fixed to the tank with a clamp
Loosen the clamp by unscrewing the tightening screw and remove the hose. Attention! If the gasoline level is higher than the nozzle, it may overflow from the tank. We disconnect the air outlet thin tube near the filler pipe, freeing it from the clamp. Using a 13mm socket, unscrew the bolts securing the gas tank to the body, but not completely. We pass our hand between the bottom and the front of the tank, disconnect the contact connector on the hatch cover in the upper part. To do this, press the connector latch with a screwdriver and disconnect the contact blocks. We remove the tank by moving it forward and lowering it down.
Let's remove the tank Whoa, but without barbarity and sawing.
We thoroughly clean the surface of the tank from dust and dirt, especially in the area of the fuel module. Unscrew the plastic threaded washer. To do this, take a wooden spacer, rest it against the edge of the washer and, with light blows, unscrew the washer securing the module. Carefully remove the fuel module assembly, inspect the condition of the tank from the inside, look for the presence of suspended matter in the fuel, and, if necessary, rinse the tank.
New fuel pump installed.
We install the new fuel pump according to the marks, aligning the mark on the tank and the arrow on the pump.
Assembling the gas tank and installing it is carried out in the reverse order.
Replacing the fuel pump from the passenger compartment
Be prepared for the fact that when replacing the fuel pump on a Ford Focus, without removing the gas tank, you will have to cut metal.
This method involves replacing the pump without removing the tank from the car, but to do this it is necessary to cut a hatch in the bottom under the rear passenger seat using metal scissors. Work should be carried out either outdoors or in a well-ventilated area to avoid the accumulation of gasoline fumes. We cut out the hatch, focusing on the wiring harness passed into the bottom under the floor covering.
For aesthetics, you can also cut out a circle with a diameter of at least 250 mm.
Having cut out the hatch, we gain access to the fuel pump, but working with the pipes and the threaded locking washer will not be as convenient as with the tank removed. All operations for removing and installing the pump are carried out according to the same algorithm as described above, and the hatch can be closed with a new sheet plate with a diameter of about 300 mm, placing it on short self-tapping screws.
The length of the screws should be such as not to damage the plastic tank.
User Experience
My engine rarely stalls. A couple of times there were simply problems with the fuel, but once there was a problem with the pump. I figured out how to take it apart myself. I realized that there was no damage, it was just pollution. I had to change the grille - before I had no idea that they could be cleaned. Since then I have driven a hundred thousand kilometers and so far everything is fine. When another 20-30 thousand are added, then I’ll look under the hood. This time only for preventive purposes.
I'm new to driving, but have already encountered this procedure. When the car didn't want to start the first time, I thought the problem was with the battery. But then the engine began to behave strangely - it either would not start or suddenly increased speed. Friends suggested that we need to disassemble and clean the pump. As it turns out, it's not difficult at all.
I became a motorist five years ago. Since then, I have never needed to repair or change anything - my husband usually does this. He simply cleans the grille for himself, but always installs a new one for me. The answer to my questions is that it is safer.
I clean the grille every 150 thousand kilometers traveled. I have a sedan made by Nissan, and I almost never drive it outside the city. Although there are no particular problems, I should do this after about a hundred kilometers. Focus on the ignition - if everything is fine with the battery, then the pump is probably dirty.
I never do this myself and I don’t recommend it. Any car service center will do this procedure almost free of charge. In addition, mechanics spend less than half an hour on it, and when you do it yourself, you don’t know exactly how much more digging you’ll have to do. Aleksey Ivanov
Do-it-yourself fuel pump screen cleaning.
To carry out the work, you need to stock up on the following materials:
- Compressor.
- Fuel pump gasket.
- Nozzle seal.
In order to clean the hard filter, it is necessary to dismantle the fuel pump.
- Turn off the car's power source.
- Unscrew the holders and remove the cover.
- We remove the electric drive.
- We disconnect the fitting and the conductor through which the fuel circulates.
- We also remove the fitting and remove the fuel outlet hose.
- Remove the seal.
- Raise the gasoline compressor and remove the float. Next, together with the mixture level analyzer, we dismantle the fuel pump.
- At the bottom of the pump there is a mesh (coarse filter).
It is quite difficult to determine the contamination of the mesh by visual inspection. Small particles can interfere with the proper functioning of the fuel, while remaining almost unnoticeable. To successfully wash the mesh, you need to let it soak in a special solution. To do this, you need to dilute the detergent one to ten with water. Next, you need to place the mesh in a tank with the prepared composition and leave it there for one hour.
After this, you can proceed to the main cleaning stage.
- To do this, uses the same composition and a brush with fine bristles. Using the specified materials, thoroughly rinse the mesh.
- After this, you need to clean the filter with a stream of air. To do this, we use a compressor.
- Next, you need to wait until the filter is completely dry. After which, you can assemble the fuel pump.
After washing the element, it is necessary to carry out repeated visual diagnostics. The network must not have mechanical damage. Otherwise, further use of the element is impossible and the filter must be replaced.
After completing all stages of work, we assemble the fuel pump in the opposite order. Next, you need to check the correct operation of the fuel system and the success of the operation.
https://youtube.com/watch?v=xnKwDtCtM_0%3F
During the operation of the car, it is necessary to promptly pay attention to malfunctions in the fuel system and regularly replace used filters. Happy renovation!
Happy renovation!
How to clean the fuel filter of a gasoline engine
The average car owner spends thousands of money a year on maintenance and repairs. Without proper care, your car will fall into disrepair. While most of your car's maintenance will need to be done by professionals, there are some things you can do yourself. The fuel system is one of the most important parts of your vehicle. This system has a number of components such as a fuel filter. Over time, this filter will collect a lot of debris, so cleaning it is a good idea.
Learning how to clean your fuel filter will help you avoid problems in the future. Below are a few steps to follow when cleaning your fuel filter.
Replacing the fuel pump motor
The reason for replacing the fuel pump module motor is low gasoline pressure or sudden changes in pressure, which is recorded by a pressure gauge during the diagnostic process. Also, the imminent failure of the motor is indicated by the fact that the fuel pump is humming or whistling.
In this case, it is often possible not to change the pump assembly, which will save money. The device must be removed (similar to the situation with cleaning or replacing the mesh filter), after which it is disassembled. The motor itself is replaced and can be purchased separately. The housing and fuel level sensor can be left from the old fuel pump. At the same time, it is recommended to replace the gas pump gasket and other rubber seals, which are not designed for re-installation after removal, that is, they are disposable.
Assembly
The fuel pump must be installed so that its outlet fitting coincides with the recess in the top cover. Therefore, first, disconnect the insert with a coarse mesh from the flask (held on by several small latches).
Install the fuel pump into the flask, not forgetting about the sealing ring in the grooves of the lower and upper parts. A small ring is put on the body of the gas receiver. Snap the mesh onto the flask, aligning the fuel return drain fitting with the fitting on the mesh body.
Secure the plastic cover with 3 clips, put on the fuel pump hose, connect the power wires and screw on the part of the housing with the fuel level meter. The remaining components of the system are assembled in the reverse order of removal and do not cause any difficulties.
Pump operation and malfunctions
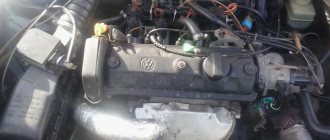
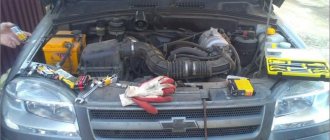
From the name you can understand that the fuel pump supplies fuel from the tank to the engine injectors. Accordingly, if the unit is faulty, then there will be no gasoline injection, and the power unit will not start working. There are options for injector and carburetor. The VAZ 2110 is equipped with an injector; therefore, the fuel pump must be suitable for this system. If the “ten” was modernized by installing a carburetor, then the unit will have to be taken out of stock. The unit is located in the fuel tank - under the left rear door, the electrics go under the rear row seats.
It is quite simple to understand that there are faults in the pump or its network:
- The car won't start. There are many reasons for this malfunction, but before performing a full diagnosis, you need to check whether the pump mesh is clogged or clogged.
- There are noticeable jerks in first gear. There are also many options here, but one of them is a non-working fuel pump.
User Experience
My engine rarely stalls. A couple of times there were simply problems with the fuel, but once there was a problem with the pump. I figured out how to take it apart myself. I realized that there was no damage, it was just pollution. I had to change the grille - before I had no idea that they could be cleaned. Since then I have driven a hundred thousand kilometers and so far everything is fine. When another 20-30 thousand are added, then I’ll look under the hood. This time only for preventive purposes.
I'm new to driving, but have already encountered this procedure. When the car didn't want to start the first time, I thought the problem was with the battery. But then the engine began to behave strangely - it either would not start or suddenly increased speed. Friends suggested that we need to disassemble and clean the pump. As it turns out, it's not difficult at all.
I became a motorist five years ago. Since then, I have never needed to repair or change anything - my husband usually does this. He simply cleans the grille for himself, but always installs a new one for me. The answer to my questions is that it is safer.
I clean the grille every 150 thousand kilometers traveled. I have a sedan made by Nissan, and I almost never drive it outside the city. Although there are no particular problems, I should do this after about a hundred kilometers. Focus on the ignition - if everything is fine with the battery, then the pump is probably dirty.
I never do this myself and I don’t recommend it. Any car service center will do this procedure almost free of charge. In addition, mechanics spend less than half an hour on it, and when you do it yourself, you don’t know exactly how much more digging you’ll have to do.
Source
snag
In the snag areas of reservoirs you can find pike almost throughout the year, both in open water and in winter (photo 7). This is due to the fact that snags of various shapes and sizes perfectly camouflage the toothy predator during its hunt for small fish from ambush. By the way, in those reservoirs where I have to catch pike with winter baits, in snags the best bait is perch.
In my opinion, this is due to the fact that the striped robber is the most numerous here - in contrast to roach, bream and other fish, which are quite rare here. But further I would like to note one pattern that I was able to derive from two (I will emphasize here) low-flow suburban reservoirs. In the first half and middle of winter, the toothy predator was always present in the snags, often delighting me with its confident bites.
In the second half of winter, there was practically no pike bite here. This did not happen every year, but only in frosty, severe winters with almost complete absence of thaws. I believe this is due to the fact that even with the minimum positive values of water temperature inherent in the winter period, processes of rotting and decomposition still occur in the aquatic environment. And under a thick layer of ice in the snags, numerous woody remains rot, and as a result, the amount of oxygen dissolved in the water is significantly reduced.
Of course, during this period, pike and other fish leave these places unsuitable for life to areas of the reservoir with a more acceptable oxygen regime.
Hunting for pike in snags is fraught with certain difficulties and requires making some changes to the equipment of the trap. When fishing for toothy fish in such places, I use exclusively tees of relatively small size (I like Kamasan Pike No. 6 and 8 according to the Japanese classification), while catching the bait on the back. This allows you to immediately make a hook after the pike bites, when the fishing line is just starting to come off the reel. This practically eliminates the possibility of the predator getting the entire rig into a pile of snags at the bottom and then breaking it off on a dead hook.
Also, when fishing in snags, I try to be in close proximity to the placed girders in order to make a timely hook when a bite occurs and begin timely fishing.
Safety Tips
- Fuel filters are one of the most important and most accessible parts of a vehicle that need to be replaced frequently. If you don't feel confident that you can properly clean your fuel filter, it is better to buy a new one, as they are not very expensive.
- When removing the fuel line filter, wear safety glasses and gloves to protect yourself from gasoline splashes. If gasoline comes into contact with eyes or mucous membranes, rinse affected areas immediately and seek medical attention.
- Do not over-tighten the pump cover screws during reinstallation, otherwise the cover may leak and damage the pump. Check that all hose clamps are sufficiently tightened to prevent fuel leakage.
Reasons for replacement
Characteristic signs of a fuel pump malfunction:
- power drop;
- failures when sharply pressing the gas pedal;
- difficulty starting the engine;
- when you sharply press the gas pedal to the floor at low speeds, the engine begins to “choke”;
- increased noise level when the motor is turned on;
- “dips” are observed, a loss of power some time after the start of movement, and if the engine is allowed to cool, interruptions in operation disappear for a short period.
Before you begin replacing the fuel pump, it is important to make sure that engine interruptions are related to the fuel supply and not to the ignition system, ECU, or power supply to the pump motor. It is necessary to measure the pressure in the fuel rail
If the value obtained at the time of interruptions in engine operation differs from the standard values, you can begin diagnosing the power system. https://www.youtube.com/watch?v=JX5cP994JTU The symptoms described above can be caused not only by a faulty fuel pump, but also by a clogged mesh or fine fuel filter.
Also, do not forget that the cause of interruptions in the fuel supply may be poor contact in the motor power supply circuit (torn wires, oxidation, etc.)
For your own diagnostics, it is important to know the structure and operating principle of the fuel pump.
Where is TN
On the vast majority of passenger cars, the fuel pump is located inside the tank. A fuel pump with a coarse mesh, a fuel pressure regulator, a fuel level sensor and a critical fuel level sensor, and in some cars also a fine filter, are held inside the tank by the fuel section.
Design features of some cars
After reading the guide on how to replace the fuel pump yourself using the example of a specific car, you can easily replace it on any other car. But do not forget that in some cases the power system design will make adjustments to the replacement method.
For example, on the Ford Focus I and Chevrolet Cruze, there is no technological hole under the rear seat cushion for access to the fuel section cover, so to replace the mesh and the fuel pump itself, the tank will have to be removed. For ease of further maintenance, owners often cut holes above the fuel module themselves.
On the same Chevrolet Cruze, the manufacturer does not suggest a separate replacement of the motor and even the fuel filter (they are simply not in the catalog of original spare parts), so if the fuel pump fails, the fuel module will have to be replaced entirely. If you want to save money, you can pick up the engine, for example, from the related Opel Astra, but it will have to be adjusted a little. You can learn about this kind of design features from the repair and operation manual or from publications on specialized forums of the owners of your car model.
Signs of a clogged car fuel system
- problems with starting the engine (you have to turn the starter several times, sometimes you can’t start it at all);
- engine malfunctions;
- floating idle speed or difficulties when switching engine operating modes;
- increased fuel consumption (increase may be 20-30%);
- decrease in power, its failures when pressing the gas (the car “stumbles”, engine speed increases slowly);
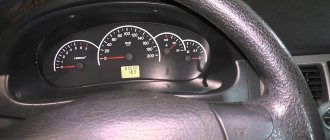
- Check Engine light comes on.
An illuminated Check Engine light may be a sign of a clogged fuel system.
These symptoms may be associated with breakdowns of other vehicle systems. Therefore, it is advisable to perform a comprehensive diagnosis, determining the exact cause.