Modifying the thermostat on the VAZ 2110 and 2112 is a simple job. But, after it is carried out, you will significantly increase the comfort of the cabin. Perhaps this is the main goal when carrying out such work. But, at the same time, having understood the principle of operation of the cooling system, you will be able to identify all possible malfunctions without any problems, as well as eliminate them.
Technical features
On “tens” and “dvenashki” there are 2 types of thermostats. They differ in the number of holes through which coolant is passed. The basic configuration uses a version with 5 holes, but such thermostats have one significant drawback: they limit the heating of the stove.
It is worth noting
that you can find old and new thermostats on sale.
The main difference between them is the ability to disassemble the part. Until 2003, cars were equipped only with collapsible thermostats, after which non-dismountable options began to be installed. Technically, they are practically indistinguishable and can be interchangeable. But, for some types of tuning, only old-style thermostats should be used. The thermostat's job is to regulate coolant flow. At low temperatures, only a small circle is used, so the thermostat is closed. As soon as it reaches a certain temperature, it is triggered and coolant is released through the radiator. All this allows you to quickly warm up the engine, but at the same time effectively fight against overheating. It is worth noting that some tuning methods slightly increase the engine warm-up time.
Installation of a modified vehicle
On a VAZ 2110 you can easily install a more advanced thermostat from Granta 2190. But you should still know a little about the design of the heating/cooling system in Granta. Its scheme can be easily implemented on the “ten”.
- Original TS Grants 2190 from BEHR;
- The lower radiator hose is from Granta, but the upper one 21214 will also work, or simply matched to size;
- Tee from VAZ 2110 for the cooling system;
- The studs are 8 mm in length - like from the camshaft bed;
- Straight long stove pipe from the “ten”;
- Gasket for thermostat.
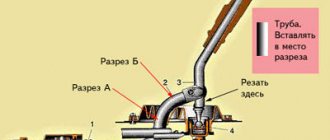
We act according to this plan:
- We change the lower radiator pipe to the one from Granta (or similar). You can leave the original one, but connect it to a suitable diameter at a right angle using a piece of pipe. However, remember - the more connections, the more opportunities for leaks;
- We connect the expansion tank pipe through a VAZ 2110 tee: one end goes to the drain from the heater radiator, the other end goes to the supply pipe;
- Drain the coolant;
- We change the studs to longer ones and install the Granta thermostat;
- We twist the temperature sensor.
Next comes a check to see if the modified heating system is working properly. Typically, the Grant vehicle is more stable, provides faster heating of the air in the cabin, and is not subject to temperature fluctuations.
Which thermostat should you choose?
So, it has already been mentioned that there are collapsible and non-dismountable thermostats. But this is not the only nuance by which you can choose these details. There is also a division according to the number of holes. All stock thermostats have 5 holes, and tuning ones have 6 holes. Before you start making your choice, you should understand the difference between them.
Thermostats with 5 holes in which the fittings are inserted provide a slower passage of coolant. From a technical point of view, during frosts this approach is justified, since coolant flows through the system more slowly and the engine cools less. But there are also disadvantages: in hot weather there is a risk of engine overheating, and the stove does not warm up the interior well.
Thermostats with 6 holes allow you to get better cooling, and the stove also works more efficiently with them. But in winter, the engine will take longer to warm up.
So which is better to choose? The manufacturer recommends using only standard thermostats, but they do not always satisfy drivers. If you want to increase the efficiency of the stove, you should choose a part with 6 holes. Also, by purchasing a dismountable thermostat, you will have the opportunity to modify it yourself.
VAZ 2110 /2001/: modification of the cooling system dozens
This review is not exactly what people are used to seeing here, but I think the information in it will help some of the "dozen" owners."
VAZ cars of the 10th family are very common in Russia and the CIS countries. Like all domestic cars, they suffer from a whole host of “congenital diseases”. Here is the usual “trouble”: “antifreeze always goes somewhere.” And “the expansion tank constantly breaks.” Yes, I heard, and the new “Kalin” “antifreeze goes somewhere.” To be honest, diagnosing this “disorder” was difficult, but educational.
First of all, any reasonable driver (and even a car mechanic) considers the expansion tank to be suitable pipes for this purpose. And already at the first inspection he makes a diagnosis: the expansion tank is leaking, it needs to be changed. In fact, it is very humid around the tank. We are changing. But the problem remains. On the other hand, tanks are bad.
I once noticed that the “tank leaks” only if the radiator fan was turned on while driving. Strange conclusion. But it's a fact! And what's even stranger: the tank doesn't leak if the stove is on. Even stranger. I decided to watch this process. I started the engine and opened the hood, leaving it idling even in hot weather. A few minutes later the tank began to “leak”, but so much! And then, after about three seconds, the radiator fan turned on. And the tank’s “leak” stopped.
The problem was that the engine simply boiled and the steam pushed the liquid into the expansion tank, where, under the pressure of this steam, the safety valve in the tank lid opened. And through this valve the pressure released the liquid. Then, when the radiator fan was turned on, the temperature in the system quickly dropped and the boiling stopped. Result: no glass of antifreeze.
Everything is obvious: the fan turns on too late, when the coolant has already reached the boiling point.
Of course, having experience in operating the Moskvich-2141, VAZ-21099, I naively thought that the thermocouple sensor on the radiator, which in these cars turns on the fan when the liquid in the radiator is heated, does not work well. But it took me about an hour to find this sensor on the “dozen” radiator. It turns out that this sensor is simply not in the top ten, and the decision on whether or not to turn on the radiator fan is made by the on-board computer, focusing primarily on the engine temperature indicator sensor. Like!
Well, maybe the temperature sensor of the thermometer is faulty, I'm changing it. And again the result is a complete “logical zero”.
Since the car was urgent and urgent from the owner, a relative of mine, I had to build a temporary circuit to manually turn on the fan. I instructed the owner, - As soon as there is more than 90° on the “arrow”, turn it on! And so you go, and when it drops below 90O, turn it off. The next day, the happy owner almost kissed me with joy that “the tank doesn’t break anymore” and “the antifreeze doesn’t go away.”
But practically the problem was not solved, and I had to return later. Apparently, the culprit is the idiotic computer firmware, which turns on the fan too late. As a result, the pressure in the system increases and the antifreeze escapes through the valve on the expansion tank cap or the tank bursts. Obviously, the best solution is to change the firmware. But changing the firmware can also affect other parameters of the machine. And everything except antifreeze was in order - good efficiency, sufficient maneuverability of the car, easy starting in winter. No, they decided not to change the firmware, but to try to deceive the computer by connecting a constant resistor in parallel with the temperature sensor so that the computer “thinks” that the temperature is 10 percent higher than it actually is. I started experimenting with the sensor and discovered that in order for the fan to turn on before the liquid boils, it is necessary to turn on a 9.1 kOhm resistor in parallel with it.
So he did. While it was hot, everything was fine, but in our northern latitudes in the summer it can be + 30 ° C during the day, and at night there can be frosts down to 0 ° C. On such a frosty summer night, the car did not start until the resistance was turned off.
As they say, I had to go back to the drawings. The resistance of the temperature sensor at room temperature is 2.5 kOhm; when placed in a refrigerator on ice, the resistance increases to 9-10 kOhm. In boiling water - 0.5 kOhm. It turns out that by connecting 9.1 kOhm in parallel, we lower the “hot” resistance by about 5%, and the cold one by as much as 60%. Therefore, on a cold engine, the computer “thinks” that the engine is warm enough and does not take measures to start the cold engine.
Of course, a radical measure could be replacing the VAZ-2110 radiator with a VAZ-2108 radiator with a thermocouple sensor installed on it to turn on the fan. But this is too expensive and time consuming.
In general, I had to leave the radiator alone and move to the other side. I disconnected the fan relay coil from the computer and asked it to control a simple homemade thermostat, the diagram of which is shown in the photo.
Thermistor R2 is the second temperature sensor that I bought in vain, thinking that the normal one was faulty. The working cylinder of the temperature sensor was coated with a thick layer of heat-conducting paste and secured with belts to the metal of the car radiator. Then I spread more heat transfer paste on it.
The ignition temperature is regulated by variable resistor R3. This should be a multi-turn variable resistor. Resistance R4 must be selected based on the required hysteresis value.
Relay K1 is a standard fan relay; it is completely disconnected from the computer. Or you can use an additional relay.
Instead of the KR140UD608 operational amplifier, you can use any general purpose operational amplifier.
I sent a more detailed version of this article to the Radioconstructor magazine, where they promised to publish it in Russian. 7 for 2010.
Reducing the bypass
One way to increase the efficiency of the thermostat is to reduce the bypass channel. This allows you to reduce the temperature of the liquid that passes through the thermostat, which means it will operate later. This approach allows you to speed up the heating of the stove radiator, which is actually the purpose of the modification.
In general, there are no particular difficulties when reducing the channel. This modification can be done in any garage with a minimum set of tools. The work is carried out in the following order:
- We take a sheet of aluminum, a thickness of 1.5-2 mm
. We cut out a plate of suitable size from it; - 5-6 mm
hole in the plate , this is less than the standard for these thermostats; - Place the plate inside the thermostat and secure it. This can be done by riveting or cold welding.
This completes the hole reduction process. But, if you have a 6-hole thermostat installed, you will need to additionally connect the return from the stove to the thermostat. In this case, everything will work most correctly. As a result, you will get a warmer interior, as intended.
Sealing the cracks in the front panel of the torpedo air ducts
The main problem with good blowing of the side windows is the presence of a large number of cracks in the torpedo air duct system, which should only be repaired, thereby reducing heat loss and significantly increasing the air pressure for blowing the side windows of the car.
Heater air duct installation
You will need silicone or anti-squeak (modelin). We seal all the cracks in the upper and lower parts of the torpedo panel along the perimeter. Also, don't forget to silicone all mounting holes. At this point, the first stage of work can be considered completed.
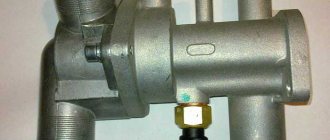
We install a thermostat from another model
There is another way to improve the operation of the thermostat; to achieve efficiency, you should use a part from a different model. If selected correctly, no additional modifications will be required, and at the same time, the system will work correctly and without failures. The most important thing here is not to make a mistake when choosing a part. The best option would be to install a thermostat from Lada Granta; it is almost identical in mounting, but is more efficient. Therefore, many drivers limit themselves to installing it.
There is no need to modify the thermostat itself. But, it is a little larger compared to the standard part. Therefore, the studs will need to be replaced. 20 mm longer are installed in their place.
. This will be quite enough. There are no special features to the replacement process. Simply remove the old thermostat and install a new one in its place. Be sure to replace the gaskets.
Setting the temperature corrector
Setting up the thermostat
I carried out the settings for accuracy of operation. Thermostat calibration. There are two ways: to measure the temperature of melting ice or snow, which is 0ºС, or to measure the temperature of boiling water, which is 100ºС. My sensor showed +2ºС in a jar of wet snow. I introduced a correction - 2ºС. The module began to show reasonable 0ºС.
After modification, the W1209 thermostat module was built into the fan heater. Which still works very successfully, performing the function of maintaining the temperature in the room.
The main advantages of the module: a complete installation kit, a wide range of settings and the ability to calibrate. And the most important advantage is its price (probably it doesn’t get cheaper with such functionality). Next, watch the video.
5 hole thermostat modification
In this case, they simply make another hole, resulting in a thermostat with 6 holes. Carefully drill a hole in the thermostat housing and install the pipe into it. A washer from the throttle is also installed together with the pipe. This entire structure is covered with cold welding. All that remains is to assemble the thermostat. As a result, you will receive a workable design that will be superior to the standard version.
The standard heating and cooling system on domestic cars leaves much to be desired. Therefore, modification of the thermostat on the VAZ 2110 and 2112 is simply necessary in most cases. This work is not difficult; it does not require a large number of tools or special skills. Everything can be done in the garage, and in the shortest possible time. As a result, you will get a significantly more comfortable car interior.
Owner reviews
| № | Positive |
| 1. | Vladimir: I’ve been actively using the car for two years now, and there are no comments about the heating system. I know about the problem of premature valve opening, but for me it is not significant. |
| 2. | Kirill: after 45,000 km I noticed that the regulator opens the valve already at 81°C. I visited a service station, after diagnostics the technician said that the defect was known, but had not yet been corrected by the manufacturer. Comrades recommended shortening the stock rod. |
| 3. | Vitaly: after buying the car, I shortened the regulator rod by 2.0 mm, and the valve activation threshold increased to 87°. This is enough for me, I don’t need to increase it any more. |
| 4. | Dmitry: I knew about the problem of underheating even before buying the car, I prepared in advance. Instead of the standard core, I installed 3091.92 V at 90° C. Now the system works properly. |
| 5. | Gennady: at 80,000 km I replaced the flow regulator for the first time, did not install the original core, bought a Wahler: 3017.87 D. I have been actively using it for two months, no comments. |
| 6. | Alexander: a year has passed since the purchase of the car, the valve opens at 80°C. I know that the threshold is low, but it doesn’t matter to me. I did not notice any increased fuel consumption. |
| 7. | Vasily: after purchasing the car, I replaced the antifreeze with imported one, installed a core from Wahler: 3017.87 D. |
| Negative | |
| 1. | Ivan: The car is a year and a half old, but I can’t fix the problem of early activation of the valve. On the advice of my comrades, I changed the cores, sharpened the stem, nothing helps. |
| 2. | Alexey: extremely dissatisfied with the car, the model is crude, there are many flaws and defects. You constantly need to dig around and fix breakdowns. |
| 3. | Vasily: the thermostat was replaced after a mileage of 50,000 km, after which faults were discovered in the ignition system and so on. |
Instruction No. 1
It often happens that the engine temperature does not rise to the optimal temperature during operation. For example, on the body of a thermostat device, 90 degrees is marked, and the temperature is not higher than 85. This problem can be solved with the help of a simple modification - modifying the rod. The fact is that in the process of opening the thermostat, the rod rests against the cover. If you expand the special recess in the lid, the thermostat will operate later. Therefore, it is easier to replace the rod with a bolt of the appropriate size.
- Pull the rod itself out of the cover.
- Drill a through hole at 4.5.
- Cut the internal thread to 5.
- Select the bolt length with a margin.
- Place a lock nut at 5 and a washer with an elastic band to seal.
- Reinstall the thermocouple.
- Fill with antifreeze.
- Check in practice, adjust the beginning of the opening of the large circle to 89 degrees.
Characteristics of DTOZH
First, let's look at the main characteristics of the regulator, which is often called a fan switch sensor. Let's start with the operating principle.
Principle of operation
The design of the part is based on a thermistor-resistor, which changes the resistance level depending on the temperature conditions. The thermistor itself is installed in a steel case with a thread applied to it. Directly connected to the body is the rear plastic part of the device, which contains the contacts necessary for connecting the power wires. One of these contacts is positive and it comes from the ECU, the second is negative, which is connected to the body.
In order for the engine temperature sensor to operate, it is powered by a voltage of 5 volts. The voltage is supplied from the ECU through a constant resistance resistor. Since the DTOZh thermistor itself has a negative temperature coefficient, as the temperature increases, the resistance parameter on it will begin to fall. In addition, the voltage supplied to it will also decrease. As a result of the decrease, the ECU calculates the temperature of the power unit, and the corresponding readings are transmitted to the instrument panel. The regulator should turn on when the ignition is turned on.
Where is?
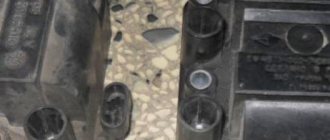
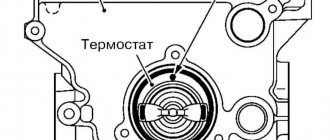
If you are the owner of a VAZ 21124, you will probably be interested in knowing where the coolant temperature regulator is located on a VAZ. On Ladas of the 12th family, the location of this device is quite simple - as can be seen from the photo, it is installed in the metal exhaust line of the cooling system on the cylinder head. The VAZ fan switch located here allows you to accurately determine the temperature of the consumable, since antifreeze passes through this line.
Where to buy?
What kind of thermostat is on the UAZ Patriot
? There are several options for where to buy a car radiator:
It's better to buy a new spare part. It can be purchased at a specialty store. A used part is cheaper, but its quality is lower and its service life is shorter. An old radiator for a VAZ 2112 is sold at the car market, at a disassembly point.
The VAZ-2112 entered mass production in 1999. This five-door hatchback continued the line of cars based on the base “tenth” model of the Volzhsky Automobile Plant.
Along with the positive innovations inherent in the entire range of these models, the VAZ-2112 received from its progenitor “family” disadvantages, which left their mark on the range of spare parts that are in demand among drivers of this car. In early versions of the 16-valve 1.5-liter engine installed in the early years of production, problems with valve bending were observed. This design defect was corrected on a 1.6-liter engine, but early car models often require a rebuild and major engine overhaul.
The VAZ-2112, like all models in this series, is equipped with an on-board computer that works as an advanced diagnostician. A significant number of sensors cover the main vehicle systems and provide operational information about their performance, however, the reliability of such sensors is quite low, which also requires their frequent replacement.
16-valve 2008
16-valve 2008
The cylinder head gasket for engine 21124 (pictured above) is non-shrinkable, made of non-asbestos material with metal cylinder seal edgings produced by Fritex, Yaroslavl, or VATI, Volzhsky. The 21126 engine has a Federal Mogul gasket - metal, two-layer with spring ridges to seal the gas joints and the lubrication system channel. Not interchangeable with 21124. Engine 11194 has a similar metal gasket, only with smaller cylinder hole diameters - 76.5 mm.
Thanks to the new gasket, the deformation of the cylinder walls is significantly reduced. Together with piston rings of a new design (less height and tangential force), a reduction in the mass of the connecting rod and piston set and an increase in the length of the connecting rod, this significantly reduced friction losses, oil consumption due to waste and the breakthrough of gases from the combustion chamber into the engine crankcase. Technology for tightening cylinder head bolts: 20 N.m + 90° + 90°.
The timing drive on the 21124 engine consists (excluding the coolant pump pulley) of the crankshaft drive toothed pulley, two driven pulleys of the intake and exhaust camshafts, tension and support rollers and, of course, a toothed belt. Its tension is controlled with a frequency meter. Axial fixation of the belt - flanges on rollers. The belt life is not too long - 45 thousand km, but if it breaks, the valves do not meet the pistons. The belt tooth profile is parabolic.
On the 21124 engine, the belt is 25.4 mm wide with 136 teeth. Its designation is 136–25.4. The tooth profile is parabolic. Modern models 11194 and 21126 received an imported Gates belt with 137 semicircular teeth. Width 22 mm, designation 76137 x 22 mm.
11194 and 21126 have the same timing drive, but different from 21124. The tension roller with a spring mechanism is semi-automatic (arrow). To tension the belt, you need to turn the roller with a wrench, align the mark on the inner race of the roller with the middle of the pointer on its outer race and tighten the roller with a bolt to the cylinder head. The service life of the toothed belt is 200 thousand km, but its replacement along with the tension and support rollers is provided at a mileage of 180 thousand km, when the coolant pump also needs to be replaced. This belt life was achieved thanks to a new tension mechanism that smoothes out pulsating loads, and also because its manufacturer, Gates (Germany), used a rubber compound designed for a wide temperature range.
Symptoms and diagnostics
- The first sign of thermostat failure is engine overheating. This situation occurs if the heat-sensitive plate does not open when it reaches 87 degrees, then the coolant turns into heating fluid. The motor does not cool properly and overheats.
- When the bimetallic plate hangs in an intermediate position, the cooling system does not work properly: when the engine warms up, the temperature rises slowly, and when the vehicle is operated in difficult conditions, the engine boils.
- If the valve is constantly open and the coolant constantly circulates in a large circle, then the engine runs cold. This translates into increased fuel consumption.
Primary diagnostics of the thermostat on the VAZ 2110 is carried out without removing it. The check is done with the engine just started. Lift the hood and touch the upper pipe leading to the radiator. It should be cold and stay that way until the 60-70 degree mark on the instrument panel. After the needle has exceeded 70 degrees, the pipe begins to warm up. If everything happens as described, then the thermostat is normal. In other cases, replacement is necessary.
More accurate and complete testing of the temperature-sensitive element is done using special equipment at a service station. If you have doubts about the correctness of self-diagnosis of the work, use the services of a service station.
It is not difficult to replace the temperature-sensitive element on the 2110 with your own hands, following the step-by-step instructions. To perform repairs, you need to prepare the following tools and materials:
- new thermostat. Check which one is installed on the car (collapsible or solid body);
- silicone sealant;
- new pipes if the old ones are worn out or microcracks appear on them;
- new metal clamps;
- paronite gasket for a new type body;
- container for draining antifreeze;
- open-end wrench 13;
- Phillips and straight screwdrivers;
- antifreeze;
- rags.
Toolkit in the photo
Rags Wrench for 13 Screwdrivers Sealant Clamps Cooling system pipes
Important! Replace the temperature-sensitive element on a completely cooled engine. Antifreeze heats up to 120 degrees and can cause burns
Step-by-step instruction
- Place a container under the drain hole on the radiator. Open the tap and drain the antifreeze. There is no need for a complete drain; it is enough to reduce the level to the height of the temperature-sensitive element.
- Move the coolant container under the engine in the area where the thermostat is located.
- Remove the thermostat housing. If the car has an old-style heat-sensitive element, then to remove it, just loosen the clamps and disconnect the pipes. On the VAZ 2110 since 2003, the thermostat is attached to the engine with two nuts. To dismantle use a 13 key.
The housing is secured using pipes and metal clamps
Replace the temperature sensing element if a six-hole housing is used. Change the gasket between the housing and the motor. Wipe with a rag and degrease the body terminals and pipes from the inside. Apply silicone sealant to the inside of the pipes and to the thermostat terminals. Place the pipes and tighten the metal clamps.
Before installation, lubricate the terminals and the inside of the cooling system pipes with silicone sealant.
Add antifreeze to the cooling system through the neck of the expansion tank.
Installation video tutorial
To assess your strengths and understand the process of replacing the thermostat on the “ten”, watch the video:
Remember that replacing a faulty temperature-sensitive element on a VAZ 2110 cannot be postponed. If repairs are not carried out in a timely manner, a problem with the thermostat will lead to serious problems with the power unit and expensive repairs.
Instruction No. 4
If your VAZ-2110 car has a 5-hole thermostat, then it can be modified so that there is one more hole in the body, that is, you need to make a six-hole thermostat from a five-hole thermostat.
Another pipe will be attached to this additional hole to drain spent antifreeze from the heater into the thermostat cavity. Thanks to this modification, the car engine will not become overcooled. There are also instructions for this:
- An additional hole of a standard size of 8 millimeters is drilled in the thermostat housing for another pipe.
- An additional pipe is installed (this must be done parallel to the same “original” pipe, which goes directly to the stove).
- A throttle washer is installed for a hole with a diameter of 8 millimeters (it can be used to increase the flow of antifreeze through the heater when the small circulation circle is open).
Also, we must not forget about the adjusting bolt, which rests on the thermostat housing cover. It serves to regulate the temperature when the thermostat device is opened externally.
If you do not have the time and desire to modify the “original” five-hole thermostat of your car, then you can purchase a new six-hole one, install it and enjoy all the advantages of this device.