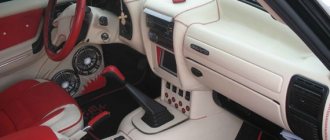
Installation of the dashboard on a VAZ 2110
The dashboard of the VAZ 2110 car is designed to display information about the current condition of the car. Made from regular quality plastic. Having a large number of light bulbs means that sometimes you need to replace them. Many drivers want to replace the nondescript factory panel of the VAZ 2110 with a more modern one. The article suggests learning how to replace the dashboard bulbs of a VAZ 2110 and how to make it more aesthetically pleasing.
Location of lamps on the dashboard of the VAZ 2110
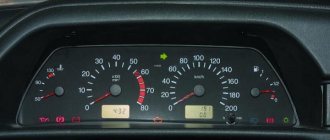
In order to replace a specific light bulb, you need to clearly know its location. Let's look at the dashboard of a VAZ 2110 car and find out which light bulb is responsible for what.
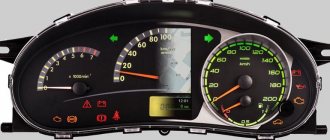
The purpose and location of the dashboard lights of a VAZ 2110 car, where:
- 1, 5, 7, 8, 12, 15 and 20 – illumination of the pointer instrument system;
- 3 – control of the right direction indicator;
- 4 – control of the left turn signal;
- 9 – emergency low oil pressure;
- 10 – parking brake;
- 11 – the generator is faulty (the battery does not charge);
- 13 – activation of the alarm;
- 14 – malfunction of engine systems;
- 16 – control of turning on the high beam;
- 17 – critically low brake fluid level;
- 18 – control of turning on external lighting (side lights and low beam);
- 19 – critical fuel level sensor (reserve 6-7 l).
Additional panel
The additional front panel of the new-style BSK control has indicators:
- An oil can is shown. If the light works, check the oil level;
- An icon lights up, which, with some imagination, can be “identified” as working wipers. This indicates that there is not enough windshield washer fluid in the tank;
- Conventional image of a thermometer over a container with liquid - high temperature of antifreeze;
- A crossed out light, which the arrow points to, is a sign that the brake light or parking lights are not working;
- If the light with the image of a wheel with brake pads lights up, it is quite possible that the pads are worn out and require replacement;
- The sign of a man with a seat belt indicates that the seat belt should be fastened.
Panel BSK VAZ 2110
What lamps are installed and how many of them?
The VAZ instrument panel is illuminated and the status of the vehicle’s components is indicated using 12 V 1.2 W incandescent lamps, which are installed in a 2W2 socket. The lamp is easily pulled out of the socket - you just need to pull it with your fingers; it can be purchased either separately or with a socket. In total, 20 lamps are used for lighting and indication in the instrument panel for the VAZ 2110, and they are inexpensive - 5-10 rubles. (at the time of writing) depending on brand (without cartridge).
VAZ car lamp installed in a socket and without it
If desired, instead of incandescent lamps, you can install LED ones in the VAZ instrument panel - they are produced for the same voltage with the same standard size and can be either with or without a socket. By the way, in the latest modifications of dozens of VAZs, LED light sources have already been installed.
LED bulbs without socket and with socket for VAZ 2110
Why are LEDs better?
First of all, they have a longer service life (up to 20-30,000 hours instead of 1,000 for incandescent lamps). They are not afraid of vibrations and are 8 times more economical. But you have to pay for all this in the literal sense of the word: LED light bulbs are many times more expensive than their conventional incandescent counterparts. If you consider that there are 20 of them in the VAZ panel, the amount will be considerable.
Be careful with the generator warning lamp; based on feedback from our readers, it is better to replace it only with the same one.
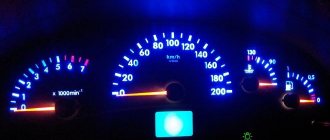
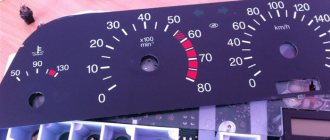
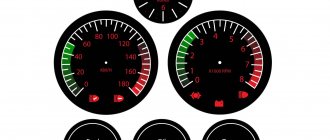
Designation of icons on the dashboard of Lada 2112
| Number in photo | Interpretation of lamps and indicators |
| 1 | Coolant temperature indicator; if the light comes on at the top of the scale, the engine has overheated. |
| 3/4 | The turn signal indicators light up simultaneously when the hazard lights are turned on. |
| 7 | Empty tank indicator; if the lamp lights up, stop at a gas station. |
| 8 | External lighting is turned on and operating normally. |
| 9 | The pressure in the brake system has dropped. It is necessary to immediately add fluid to the expansion tank of the system. |
| 10 | The high beam headlights are activated. |
| 12 | The odometer display shows non-resettable mileage. |
| 13 | The hazard warning lights are on. |
| 14 | The engine control system is damaged or not working correctly. |
| 15 | The battery is not receiving a charge. In this case, you should check the battery itself for wear and the generator set. |
| 16 | The handbrake is activated. |
| 17 | The oil pressure in the engine crankcase has dropped below normal. You should add fluid to the specified level and check the operation of the pump. |
| 18 | In a configuration with an airbag, it indicates that the squib drive is turned off. In other versions the light bulb is a backup one. |
How to remove the tidy
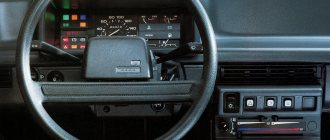
On a VAZ 2110, removing the dashboard from the dashboard is not difficult, and the only tools you need are a Phillips screwdriver and pliers or a wrench. With their help, we will remove the positive terminal from the battery before starting work. So, lower the steering wheel and unscrew the 4 screws that secure the decorative trim.
Releasing the decorative trim on the VAZ 2110
After this, we pull the cover towards ourselves, and it can be easily removed, hanging on the wires of the switches. To prevent the cover from getting in the way, the wires from the switches can be disconnected - they are on the connectors.
Disconnecting wires from switches and removing buttons located on the decorative trim
Before disconnecting the connectors, do not forget to label them so as not to mix them up during assembly!
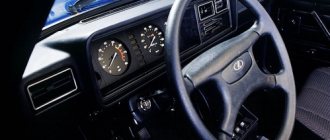
So, now we have a tidy in front of us, which is held in place by two screws located on the sides.
The instrument panel is secured with two screws
We unscrew them and carefully remove the panel, not forgetting that it is also on the wires. In principle, the wires supplying the instrument console in the VAZ do not need to be disconnected, since their length is sufficient to replace the lamps.
Errors on the dashboard 2112
VAZ cars have always stood out for their ease of operation and maintenance. Regardless of the type of engine, injector or carburetor, here the user can independently perform diagnostics and read errors without additional equipment. Symbols may appear on the instrument panel.
| Number | Meaning |
| 2 | Critical voltage drops have been detected in the on-board network. |
| 3 | The gasoline level sensor is damaged or does not work correctly. |
| 4 | Likewise for the antifreeze temperature sensor. |
| 5 | The outdoor thermometer is faulty. |
| 6 | There is critical engine overheating. You need to stop and let the engine cool. |
| 7 | The oil pressure in the engine is insufficient for normal operation. |
| 8 | The brake expansion tank is empty and needs to be topped up. |
| 9 | The battery is not charging properly. You will need to check the generator and its wiring. |
| E | BC firmware is damaged. |
Most two-digit codes are a combination of two errors.
Restoring the backlight and changing the warning lamps
We remove the light bulb that needs to be replaced (the purpose of the light bulbs is in the first photo of the article). To do this, turn the socket counterclockwise 90 degrees, and it will easily come out along with the light bulb.
Replacing a light bulb without disconnecting the power wires on a VAZ 2110
We remove the burnt device from the socket, insert a new one in its place and install the socket with the lamp in place, turning it 90 degrees, but clockwise. After this, we install the terminal on the battery, turn on the ignition and check the operation of the VAZ panel, performing the appropriate manipulations: turn on the hand parking brake, headlights, turn indicators, high beam headlights, etc. If everything is in order, then install the panel and decorative trim in place .
I replaced the lamps, but there is still no backlight - possible reasons
It may happen that the lighting or indication on the VAZ will not be restored even after replacing the lamps. What is the problem and how to find and fix it? Let's look at the main reasons for this situation, and the easiest way to search is in the order in which they are listed:
- The power and control cable connectors have oxidized.
- The contact pads of one or a group of lamps have oxidized.
- The fuse that powers the backlight bulbs has blown.
- The conductive paths have oxidized and become short-circuited or “burnt out.”
- The wires supplying certain lamps are short-circuited to the car body.
So, let's start the search. We check the quality of the contacts on the connectors through which the control cables are connected to the VAZ instrument panel. The contacts (they are in plastic blocks) should not be oxidized, and the connectors themselves should fit tightly in their sockets. Additionally, it makes sense to tug with a little force (without fanaticism!) each wire in the bundles: it can simply break inside from vibration and hang on the same insulation.
Checking the quality of contact pads is quite simple visually. It is necessary to remove the non-working lamps and examine these areas in bright light. If they are covered with plaque (usually white or greenish), it needs to be removed, for example, with a rubber band.
We open the fuse panel of the dozens and find the fuse responsible for powering the backlight. It should fit tightly in its socket, and the contacts should not be oxidized. At the same time, we check the serviceability of the fuse - it could have burned out from a power surge or simply been defective.
In order to check the conductive paths on the board, you will have to definitely remove the protective casing from the VAZ panel. We unscrew 10 screws and carefully inspect the tracks. They should not be oxidized or covered with a white coating. Remove plaque with the same eraser. If we find a burnt or rotted track, we restore contact using a soldering iron and a piece of tinned wire.
In this case, as a rule, the fuse burns out or the wire burns out at the point of the short circuit. We replace the fuse with a new one with the same rating. If it burns out again, then the problem is a short circuit: you will have to find it by walking along the harness. This can be quite a difficult task since the harness is located under the dashboard. But nevertheless, it must be performed in order to find and eliminate the short circuit.
Most often, short circuits occur in places where the wire insulation rubs against the body: these are various vias or ribs through which the harness passes.
If the fuse does not blow and the lamp still does not light, then in the same manner it makes sense to look for the burnt out wire.
In order not to waste fuses and not risk the wiring of your VAZ, before installing a new one, it makes sense to ring both terminals of the fuse socket on the car body, having first removed the positive terminal from the battery and turned on the ignition, handbrake, dimensions, headlights, and open the door. In general, everything that indicator lamps are responsible for. If the device shows 0 on at least one of the terminals, then the problem is a short circuit.
If you carefully read this article, you can easily replace the backlight and display lamps on the VAZ 2110 dashboard on your own, and, if necessary, find and fix the problem without the help of a specialist.
How to assemble and disassemble the panel
To reset the speedometer or fix the problem that the turn signal light on the dashboard is not blinking, it must be removed.
To this end, you should perform the following actions:
- You can remove the cover, but the board will still be locked.
- You need to take a Phillips screwdriver and use it to remove a few more bolts.
- Now you need to unlatch the latches on the panel. You should start from the bottom. If they were disconnected from the bottom side, then you can push them up. This way the fee will be removed quickly.
- The arrows will have to be removed anyway.
Note: some arrows are easy to remove, but the arrows for the gasoline quantity indicator are much more difficult to remove. To remove the arrows, you need to gently pull them.
The panel is disassembled, now we need to try to solve the problem.
Note: There are very small LEDs on the board that can also burn out. Because of them, the turn signal light may not blink, so they need to be replaced.
This requires working with a soldering iron.
But if the panel was disassembled in order to reset the speedometer readings, then:
Now it is advisable to somehow put the panel back together.
This is made even easier:
Place the board in a plastic case.
Note: It is advisable to have a clean cloth underneath to prevent the surface from being scratched.
- Now you need to screw in the bolts on the panel itself. They do not need to be completely screwed in yet, as the arrows must be put in place first.
- Before putting the hands back in place, they need to be wiped thoroughly, as fingerprints, dirt, etc. will be visible when exposed to light.
Note: the arrows need to be set approximately 3-4 mm below zero
It is also important that there is a small gap between the needles and the speedometer, otherwise they will stick
It is much easier to install, as well as remove, long arrows. To install short arrows, you need to act very carefully, as they are more delicate compared to long ones.
- Before installing the glass, it also needs to be wiped. Now snap onto the latches.
- Secure the board with bolts.
- Lastly, screw in the screws on the cover, and then put all the light bulbs in place.
Working with a panel in a car is probably the simplest thing it can be. Therefore, there is no point in going to a car service center, where the price even for such trivial work will be high.
It’s better to look through a bunch of photos and videos before you decide to do repairs and tuning of the car’s interior with your own hands, so as not to harm the car. Any instructions will help you get the job done quickly and efficiently.
Welcome! Instrument cluster - on many cars, instrument clusters differ from each other, in some not significantly, and in others it is radically changed, but the filling in almost all remains the same, they just differ in appearance and the lights and indicators are the same , but the combination is subject to deformation and can easily be damaged, and therefore, if you take some old cars, on every second car, the combination has already changed, despite this combination is a very important thing, because if something happens to the engine, then combinations You can only determine this, you can find out the speed at which the car is moving, and you can also find out how much fuel is left in the tank without looking into the tank just by looking at the instrument cluster.
Note! To remove and install the combination, you will need: A screwdriver and pliers, if you have a standard torpedo, then you will do the work quite quickly and most likely no difficulties will even arise!
When should you change the instrument cluster? If it stops working, there is no need to panic and go to the auto store for a new combination; first of all, check the fuse that goes to it and, if necessary, replace it with a new one; if it turns out that everything is fine with it, but the combination does not work at all, then we can assume that it has failed if some specific indicator in the combination has failed (Speedometer, for example, does not work), then in this case, perhaps the problem is not in the combination, but in the speed sensor, for example (Read the article: “Replacing the speed sensor with car"), if the fuel gauge does not work, then look at the fuel level sensor, in common parlance “FLS” (Read the article: “Replacing the FLS in a car”) or the wiring, and so on.
Location of lamps on the instrument panel of the VAZ 2107
Before we start replacing the light bulbs, let’s see where they are located on the PCB board and what the VAZ 2107 is responsible for illuminating or indicating.
Layout of dashboard lamps on a VAZ 2107, where:
- Fuel level.
- Instrument lighting.
- The direction indicators are on.
- Engine control controller malfunction.
- Exterior lighting is on.
- Emergency oil pressure.
- The parking (hand) brake is on.
- High beam headlights are on.
- Battery charge indicator lamp.
Reasons why the PP stopped working
It is its malfunction that often causes the shield to fail. The fact is that many car owners turn on various devices through the cigarette lighter, for example, a special vacuum cleaner, chargers, pumps and other devices. Due to the fact that these gadgets require high current, either the socket itself or fuse F19 often breaks, as a result of which the instrument panel on the VAZ-2110 does not work.
In addition, the cigarette lighter may become damaged if left on for too long. In this case, you can return the instrument panel to functionality by disconnecting the socket block. But it is worth saying that such manipulation will be successful only if fuse F19 is functioning. If it does burn out, it must be replaced.
In fact, there are not so many of them and the most common are:
- The easiest one is poor contact between the panel and the electronic control unit. The problem is solved by replacing the plug or simply cleaning the contacts.
- A breakdown in the instrument panel itself or malfunctions. To solve the problem, all connectors are reconnected, taking into account the correct connection diagram.
- Malfunctions of the tachometer, speedometer, fuel level controller. In this case, the cause is mechanical or electrical. To troubleshoot problems, replace regulators or check the operation of fuses.
- The illumination of the VAZ-1215 software stopped working. In this situation, it is necessary to find out the cause of the problem.
To check, you must turn on the hazard signal or turn signal. If they don't work, it means the fuse has blown. Therefore, we can conclude that a short circuit has occurred. To fix the problem, check the electrical circuit.
DETAILS: Alternator pulley VAZ 2114 - All about Lada VAZ cars
However, it also happens that the fuse is intact and in working condition, but the instrument panel on a VAZ-2115 car stops working. Here the reason is much more difficult to find out. The solution to the problem is to remove the instrument panel and check whether voltage is flowing from this fuse to the terminals of the white and red blocks. The white block supplies power to the speedometer, tachometer, and temperature gauge. And the red one is the fuel gauge.
If, as a result of checking, the terminals show a voltage of 12 V, then this indicates that the PCB does not work as a result of poor contact of the wire that goes to the ground of the car. If the voltage of 12 V is not reflected at the terminals, then it is necessary to disassemble the mounting block and look for the cause of the problem.
Removing the instrument panel and preparing for replacement
To change the lamps in the instrument panel, the latter will have to be removed. It cannot be said that the PP can be removed with one movement of the hand: the designers of the VAZ 2107 made dismantling a little more difficult than on other cars of the VAZ family. Nevertheless, dismantling the PP is quite feasible in a garage or even a parking lot. In this case, the operation does not require any special knowledge. The tools we will need are:
- small flat screwdriver or knife;
- crosshead screwdriver.
I think all this will be found in the trunk of any VAZ 2107, and we can get started. First of all, we remove the plastic handles from the heating control knobs by prying them off with a flat screwdriver.
Removing handles from the seven's interior heating system
We unscrew the nut securing the daily counter reset button (marked with a red arrow), and push the button itself inside the shield.
Removing the daily counter reset button
Now you need to unscrew the screw that is located under the plug and secures the decorative trim. Remove the plug using a flat-head screwdriver and unscrew the Phillips screw.
Removing the fixing screw of the PP decorative trim
After this operation, the right side of the panel will move away so that you can get to the flexible speedometer control shaft.
Releasing the right side of the control panel on a VAZ 2107
The shaft is removed with bare hands: simply unscrew the nut securing it.
Removing the speedometer drive
Now remove the instrument panel from the clamp that secures its left side and pull it out slightly to get to the vacuum hose connected to the econometer. It can also be removed with bare hands, but be careful not to tear it.
Removing the vacuum hose from the econometer to the PP
It remains to disconnect the three power connectors of the instrument panel and the three wires on the VAZ 2107 heater switch. Before disconnecting, it is advisable to mark them so as not to confuse them when assembling the panel.
Disconnecting the power wires from the heater switch
We remove the decorative trim along with the PP and unscrew the four self-tapping screws securing the shelves (two on each, I marked them with red arrows) to the decorative trim, and the instrument panel can be removed.
Removing PP from a decorative trim
The VAZ 2112 instrument panel does not work - reasons
If the panel suddenly stops working:
- When the engine does not start and the dash does not work, inspect the ignition switch. Here the contact often burns out or oxidizes.
- If the machine is working and the panel has failed, you will need to check the corresponding fuse, wiring and lines.
- If the manipulations do not help, you will need to remove the device and test its circuits.
Panel backlight does not light up
There may be damage to the light activation key. It is recommended to check the corresponding fuse.
The panel is blinking
Consequence of deterioration of electrical wiring contacts. The user should inspect the supply wires for cracking or damaged insulation. The contact groups should be disconnected and cleaned of oxides and dirt. Treat the terminals with special oil.
Tidy 2112 stuck
This kind of problem is unexpected, but it occurs everywhere. As a repair, users are suggested to reset the electronic equipment. Remove the terminals from the battery and wait 15 minutes.
Replacing warning lamps and backlight bulbs
We lay the VAZ 2103 dashboard on a smooth soft surface face down and see the backlight and indication lights (see the very first photo). I hope that before removing the dashboard, you found out which bulbs burned out and, using the recommendations above, purchased new ones of the right type. As I already indicated above, backlight lamps can be sold both with sockets, ready for installation, and without them.
We can easily remove the lamp together with the socket directly from the rear side of the instrument panel of the VAZ 2107 (in the photo is the PP of another VAZ model)
If you purchased lamps with sockets, then simply install a new one to replace the burnt one and fix it by turning it clockwise. If the light bulb was purchased without a socket, then you need to first remove the burnt one from the socket and install a new one in its place. The lamp is removed by lightly pressing it and turning it counterclockwise.
To remove the light bulb from the socket, you need to press it and turn it 90 degrees.
After this, we install the finished light bulb-socket set in its place. All that remains is to put the PP in place, not forgetting to connect 3 power connectors, 3 wires of the heater switch, the speedometer drive and the vacuum hose.
Simple and fast upgrade
In principle, with your own hands you can either completely replace instrument panel of a VAZ 2110 or tuning the existing one.
One of the quite popular options is replacing light bulbs with LEDs. Moreover, there is no difficulty in this - you need to remove the light bulbs and insert LEDs in their place.
However, there is one small trick: they work well only if the polarity is observed! If the LED does not light up immediately when connected, you need to remove it, turn it 180 degrees, then reinsert it into the socket.
Even such a simple replacement will increase the brightness of the dashboard , but this is not enough, it is hardly worth completing the tuning with your own hands.
READ How to clean the MAF sensor on a VAZ