When it gets cold in the car in winter, the interior is poorly heated, the flow of warm air is too weak, the first thing that comes to mind is to replace the motor or heating fan. Replacing the fan (motor) of a VAZ-2107 stove requires certain knowledge, however, if a breakdown occurs, there is no other way out.
Where to begin
If the fan of the VAZ-2107 stove does not work, it is most likely necessary to change the motor. Replacing the VAZ-2107 stove fan begins with preparing the necessary keys and screwdrivers. It is better to work with gloves.
The first step is to remove the trim from the windshield. To do this, open the hood and begin to remove the trim from the corners: unscrew the fastening nuts. After the nuts, unscrew the screws along the entire length of the windshield.
We remove the seal, being careful not to damage it, and put it aside. Carefully remove the cover. Disconnect the hose from the washer. We will also need to remove the trim and frill, for which we unscrew all the screws under the plastic plugs. We remove the remaining linings and insulation, getting to the heater housing. Next we need to get to the electric motor itself.
Other actions
Owners of VAZ-2107 cars are well aware of most of the intricacies of repairing their iron horse with their own hands.
Anyone who does not disdain such an activity understands perfectly well that replacing a part in a given car can be much easier than getting to it. Therefore, if you have disassembled almost half of the torpedo, you should take the opportunity and carefully inspect all those spare parts that are in your public domain. It is necessary to pay attention to possible malfunctions that are visible to the naked eye, a violation of the tightness of the same stove, as well as signs of a possible imminent failure of some other spare part.
By conducting such a simple study and discovering, and then eliminating all possible problems, you will save a decent amount of time that you would have to spend in the future on the next disassembly of the VAZ-2107 instrument panel.
At the same time, we should not forget that there are a huge number of service stations where highly qualified specialists can not only detect problems on their own, but also fix them in a matter of hours.
How to get to the heater
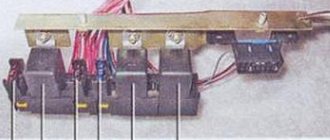
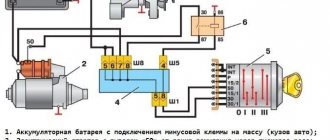
First of all, to make it more convenient to work, you need to think about additional lighting for the place where you will be replacing the VAZ-2107 heater motor. Unscrew the negative wire from the heater motor. It is screwed on with a nut and it will take some effort to unscrew it.
If the nut is rusty, it is better to first lubricate it with penetrating lubricant. We unscrew it first with a key, and then by hand, trying not to drop the consumables. If there is another nut, unscrew it with a deep head; if not, remove the wire. Remove the clamp from the self-tapping screw. We are looking for another positive wire and disconnect it from the plug.
Now it is most convenient to use a short screwdriver to unscrew the screws securing the heating system box and remove the 4 spring brackets. The bolts in the middle are the longest, so set them aside to screw them into place later.
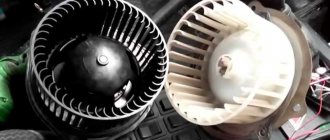
Let's figure out how to remove the fan of the VAZ-2107 stove. It is necessary to move the housing with the fan to the side. If it falls down, then all the bolts have been removed. If not, look for the remaining screws. The motor is inserted into the grooves and rotates freely. Next, the VAZ-2107 heater electric motor is directly replaced. Usually it is very dusty and dirty here, so we remove all the dust and what gets into this compartment.
Work order
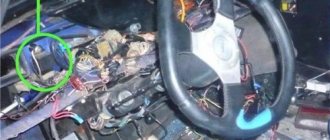
Before starting work, you need to fully read the instructions on how to repair the device. A complete understanding of the process will allow you to act more confidently. The technician must first understand how to remove the fan. First you need to prepare the car for work: remove the gear shift lever, remove the radio and all the blocks with wires. Now you can start working:
- To gain access to the device, carefully remove several parts. First you need to remove the shelf on the passenger side, it is secured with 4 bolts.
Now you need to remove the panel with the cigarette lighter, it is removed with a screwdriver, you need to pry the corners one by one until it clicks.
Then you need to dismantle the console with the buttons; it can be easily lifted with a screwdriver and moved upward. This makes the two fasteners located underneath accessible; they need to be removed. Now the part is completely free, it can be removed and put aside.
- Also, access to the motor cooler is blocked by air ducts; to dismantle them, you need to pry off the plastic latches with a screwdriver. But you need to understand that the fasteners are made of fragile plastic and must be bent carefully. Access to the bottom of the heater is now open. There are four latches on the stove - two on each side. You can bend them with your fingers or a screwdriver, but be careful - the latches spring strongly and fly off far away.
- Now access to the required unit is open, and you can begin to remove the VAZ 2107 heater fan. The electric motor and cooler are secured with two steel latches, one on top, the other on bottom.
You can bend them with a screwdriver with a thin and long tip. The dismantled unit is removed and a new device is installed in its place. - Now you can perform assembly in the reverse order of disassembly.
You can also see the procedure for replacing the stove fan on a VAZ 2107 in this video:
Replacing parts
How to change the heater fan on a VAZ-2107 becomes clear when you see this motor. With a slight force, the motor is pulled out of the grooves, and the wires are pulled out through the seal. The negative wire can usually be removed without problems, but the positive wire requires some effort.
When the wires are removed, the motor is disconnected from the body and can now be replaced with a new one, previously purchased at an auto parts store.
How to remove and replace the heater motor on VAZ-2107, 2105 and 2104
So, dear friends, today we will tell you in an accessible language how to get to the heater motor on a VAZ-2107 in order to replace it or repair it, depending on what forced you to take it out. Let us immediately note that if the heater motor on your seven began to squeal when cold, or squeal, then this will only get worse, the motors from the factory are bushed, lubrication will not lead to anything, it may return you silence for a short time, but not for long, so in this case only replacement. And ideally, replacing the heater with a bearing motor - it certainly won’t squeal. So, first we will need to remove the beard on our seven. First, we remove the gear shift knob, it will interfere with us, and we remove the radio from the shaft and disconnect the connectors. It’s different for everyone, some may not even have a radio.
First, let’s unscrew the shelf, everything is simple here, the action is in three photos:
Then, we disconnect the wires from the clock, the cigarette lighter (for ease of assembly, I would advise marking them), remove the socket to the side and gain access to two nuts, here it will be convenient to use a 10 mm socket wrench
We unscrew the nuts, do not lose the washers, look down where the buttons are. There is a decorative plug on the side that looks at the rear passengers; we pry it off with a screwdriver, and under it we see two screws screwed into the tunnel:
We unscrew them, disconnect the pads from the buttons, the panel no longer holds anything. We move it to the side and gain access to the stove body:
Now, we disconnect the side air ducts and carefully remove them from the latches with a flat screwdriver (the photo shows how they snap into place):
We are interested in the lower and middle parts of the body of the stove 2107, in order to remove them you need to get close to the metal latches, there are only four of them - two on each side, here they are:
It can be problematic to snap them off with your hands, we recommend using a screwdriver, like in this picture:
After the latches are removed (be careful when removing, they may “shoot” and fly away in an unknown direction), the lower part of the stove body can be easily pulled out by hand:
Here we see our motor. The motor itself is held in the lower part of the case, also on two metal latches; we snap them off and disconnect the terminals
and remove our motor from the stove body:
That's all, assembly is carried out in the reverse order, about 40 minutes are spent on everything. By analogy, the heater motor is replaced on the VAZ-2105 and VAZ-2104, the only difference is in the beard itself and its fastenings. A little later we will tell you about the nuances of replacing the heater motor in these and other VAZ models. Good luck on the roads and don’t let your car break down. We will be glad to see you in our VAZ classics club on the forum.
Installing a new part
Installing a new part is not difficult. Replacing the VAZ-2107 stove motor is completed within a few minutes, and the longest part of this work is to put all the bolts in place and connect all the contacts.
We try not to mix up the wires and thread them into the correct holes near the grooves on which the motor itself is supported. During installation, the fan must be level, without distortions, otherwise it will cling during movement and eventually break.
When the new motor is installed, we put it in place together with the system cover. We try on the body and make sure that it fits into place without any effort and stands straight.
We put the brackets and all the bolts in place, install the insulation, frill, wipers and check how the heating works.
If you have a helper, have him turn on the heating system while you hold the heater body. By the sound of the operating system, you will immediately understand whether all parts are installed correctly and whether the installation requires correction. If you are alarmed by any sound or knocking, take everything apart and put it back together.
Important points
When replacing a heating fan on a VAZ 2107, you should remember several important nuances, neglect of which can ruin all the work. Here they are:
- When bending the plastic latches on the central panel and on the cigarette lighter panel, there is no need to apply much effort, since these latches are made of the same fragile plastic as the heating fan. They break very easily, especially if repairs are made in the cold;
- You need to be very careful when removing the motor after opening the latches. Behind it are wires with terminal blocks. If you pull such a wire carelessly, its terminal block may crack, since it is very thin. It is not possible to find this spare part for sale. Therefore, cracked pieces of plastic will have to be glued together using universal glue. All this can be avoided if you act carefully and slowly.
So, it is quite possible to change the stove fan on the “seven” with your own hands. Even a novice driver who has some understanding of the operation of automobile heating systems can do this. All you need to do is be patient and follow the instructions above exactly.
Reasons for replacement
Replacing the VAZ-2107 stove motor occurs for several reasons. Let's look at the most common cases when a new VAZ-2107 heater fan is needed.
- A terrible sound with a characteristic screeching sound. If such a squeal appears when the car is warming up, it is better not to lubricate the engine, as many do, but to replace the VAZ-2107 heater fan.
- The air does not flow and the interior does not warm up - there is nothing left to do but remove and change the heater motor on the VAZ-2107.
- The air flow is very weak.
- The interior warms up extremely slowly.
Remember that a well-functioning system will be almost inaudible, since insulation and other materials ideally muffle sound very well. However, if something is broken, you can easily fix it.
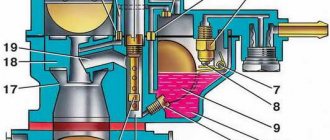
Purpose of the heating fan on the VAZ 2107
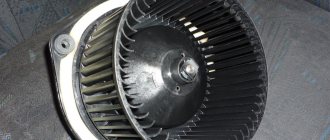
The main task of the heating fan is to blow on the hot stove radiator and through special air ducts to pump warm air into the interior of the VAZ 2107, heating it. The fan is made of ordinary plastic and is driven by a small electric motor.
The stove fan on the VAZ 2107 is made of plastic and is not very durable
Both plastic and the electric motor are not highly reliable, so car owners have to carefully monitor the condition of these parts so that they do not fail at the most inopportune moment.
Furnace Fan Location
The VAZ 2107 heating fan is located under the central panel, behind the heater casing.
The heating system of the VAZ 2107 is quite complex, so getting to the fan is not easy
That is, in order to get to it, the car owner will have to disassemble the central panel of the car, and then remove the stove casing. Without these preliminary operations, replacing the heating fan is impossible.
Replace without removing the panel
But no matter what method is used, you will first have to drain the coolant from the system. Therefore, you will have to stock up on antifreeze in the required quantity in advance.
First, let's look at the replacement method without removing the panel. As already mentioned, this will require making cuts in some places.
To complete the work you will need:
- Set of screwdrivers of different lengths;
- Hacksaw blade for metal;
- Flat container for draining residual coolant from the radiator;
- Rags.
Having prepared everything and drained the coolant from the cooling system, you can begin work:
- We remove the storage box (glove compartment) from the panel, for which it is necessary to unscrew 6 screws securing it;
- Remove the side trims on the center console;
- Using a metal blade, we make the necessary cuts: The first cut is vertical
, we make it on the inner wall of the panel near the center console (behind the metal strip of the glove compartment).
Moreover, here you will have to make two cuts. The second cut is horizontal
, running in the upper part along the rear wall of the opening under the glove compartment.
The third is also vertical
, but not end-to-end. It is done on the right on the rear wall of the lower storage shelf of the panel; - After all the cuts, part of the panel together with the wall can be bent down, which will provide access to the radiator. We bend this part and fix it;
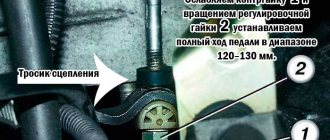
- Unscrew the near bracket for fastening the heating system flap control cable and move the cable to the side;
- Loosen the clamps of the coolant supply pipes to the radiator. In this case, you should place a prepared container under the connection points, since liquid will flow out of the heat exchanger. Remove the pipes;
- We unscrew the three screws securing the radiator, remove it and immediately inspect it.
Afterwards we replace the heat exchanger, fix it in the seat, connect the pipes to it and clamp it with clamps. To make the pipes fit easily, lubricate them with soap.
At this stage of work, you should fill the cooling system with liquid and run it to remove air pockets.
Next, it remains to make sure that the connections between the pipes and the radiator are not leaking, and that the damper and faucet are connected without errors.
After this, all that remains is to return the cut part of the panel to its place and fix it. To do this, you can use screws and plates.
The main thing is to fix it in several places so that in the future the cut off part does not rattle when moving. Use sealant or silicone.
This method is convenient because if you replace the radiator again (which is quite possible), all the work will be very simple - you just need to remove the storage box and unscrew a few screws.
In addition, all cuts are made in such places that after assembling the panel and installing the glove compartment they will not be noticeable.