- ➡️ Conclusions
The clutch is one of the most important components of a car's transmission. It must withstand enormous loads during movement. One of the main parts that ensure the operation of the clutch is the release bearing (VP or clutch release clutch).
Its purpose, types and characteristic faults, and how to replace the bearing are described in a detailed article.
Purpose of the clutch bearing
The clutch is designed to stop the supply of torque from the engine to the gearbox. While driving, when the driver presses the clutch pedal, the transmission between the engine and the gearbox is interrupted.
For this purpose, the system provides a release bearing. His tasks:
- Provide force on the petals of the basket;
- Smoothly remove the input shaft from contact with the flywheel;
- Isolate the clutch drive from torque loads when pressed.
The basket is rigidly connected to the flywheel, so it rotates at constant speed.
The function of the clutch release clutch is to press the housing petals without causing harm to the parts. At the moment of contact, the outer race begins to rotate at the same speed as the engine, while smoothly transferring force from the person’s leg.
Is noise a sign that replacement is needed?
Not really. If noise occurs, this does not mean that you should immediately replace the element. But it is strongly not recommended to delay repairs. Let's just say this is a signal for certain actions, which you will have some time to complete before the consequences become catastrophic.
In some cases, the noise occurs when the engine is started, and it persists until the car warms up, after which it disappears. In other cases, the noise returns every time you try to disengage the clutch.
The worst option is a grinding sound. This sound indicates that the element is rubbing against the leaf spring, and wear will form on the petals. If you are “lucky enough” to encounter such a situation, there is no time. Replacement needs to be done quickly.
By the way, there is no point in repairing it. Release bearings cannot be repaired, so the only solution is replacement.
Types of bearings
There are two main types of bearings used in clutch systems of manual transmissions.
Mechanical
Mechanical clutches are found on Soviet-made cars. Some modern models, such as Priora, are also equipped with a classic system. It is unpretentious and simple in design.
The mechanism consists of:
- pedals in the cabin;
- metal cable in a protective braid;
- forks;
- release clutch.
When the unit is turned on, the part does not participate in the operation of the box. When you press the pedal, a cable is pulled, which moves the fork. The clutch shifts towards the petals of the diaphragm spring. The disc comes out of contact with the flywheel.
Mechanical systems are gradually giving way to others and are becoming less common. The reason is low efficiency, which requires a lot of force on the pedal.
Hydraulic
The drive is designed according to the brake system diagram:
- master cylinder;
- pipeline;
- fluid reservoir;
- highway;
- working hydraulic cylinder.
When you press the pedal, the circuit pressure increases. The fluid passes from the master cylinder reservoir to the slave cylinder, which moves the clutch to the petals of the basket. The clutch disengages.
Hydraulics have greater efficiency than mechanics. The viscosity of the fluid contributes to the smooth shutdown of the gearbox. The pedal is light and does not cause discomfort.
The disadvantage of the system is the complexity of the design. With high mileage, air may enter the hydraulic system. Depressurization of the circuit causes the pedal to fail and the clutch stops working.
Combined
Combined units include mechanical and hydraulic drive elements. The system can be found in classic VAZ models. Combines the advantages of two types in one device.
When you press the clutch pedal, the hydraulic system is activated. Increased pressure is generated in the circuit, performing mechanical work. But the fluid does not push the release clutch. The working cylinder rod moves the yoke, which moves the part along the surface of the drive shaft.
Further, the operating principle is the same as the mechanical system. The cage presses the diaphragm blades, the driven disk comes out of contact, and the transmission is disconnected from the engine.
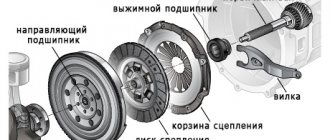
Clutch assembly design and bearing arrangement
Mechanical clutch has two main elements:
- Pressure disk. It is often called a basket. Leaf springs are built into the body. They are connected to a round plate that presses the driven disk. Pressing on the springs is carried out by the outer ring and causes the platform to shift along the axis.
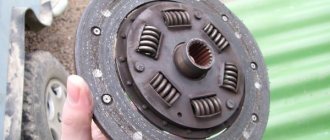
- Driven disk. It consists of friction sectors, a splined groove for connecting to the input shaft, and a radial disk. Damper springs are installed all around to absorb shocks.
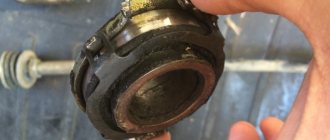
The release bearing disengages the driven disk. It is installed on the input shaft. The body of the part is fixed to a fork, which fits into the protective bell of the gearbox. Pressing the pedal moves the bearing towards the petals of the basket.
Squeezing devices are technologically similar and consist of:
- inner race (mounting hole for the shaft);
- rolling mechanism (roller or ball);
- external housing with a pressure pad.
Depending on the design, the rolling elements are made of hardened metal. The coupling body is cast from steel or cast iron.
Causes of bearing failure
The operation of the squeezing device is subject to constant dynamic loads. Engine power depends on speed, because of this the impact on the part is not constant.
Worth remembering:
Torque exerts load only when the pedal is pressed. Based on this, we highlight the most common symptoms of a faulty release bearing, described below.
- Holding the clutch in the disengaged state for a long time. Uneven transmission of force leads to increased wear of the part.
- Sharp throws and pedal presses. This style is typical for lovers of aggressive driving. Great force is immediately applied to the part, which can cause breakage.
- Incorrect setting of the cable stroke or rod of the working cylinder. The nickel ends up in constant contact with the forks.
All causes of malfunctions come down to the human factor. Improper handling of the pedal results in sudden loads on the part. There are frequent cases of complete destruction of the VP.
Consequences of untimely replacement
Ignoring any malfunctions will lead to more serious damage over time, and failure of the release bearing is no exception. The following may occur:
- due to severe overheating, the clutch disc lining is destroyed;
- the appearance of extraneous noise;
- plug damage;
- violation of the integrity of the spring petals;
- deformation of guide bushings.
If you don't change the release bearing
On a note! In order not to overpay for repairs, you need to react to the appearance of the first suspicious sounds in the clutch operation.
Possible malfunctions, their symptoms and diagnostics
No special equipment is required for diagnosis. The symptoms are eloquent and difficult to confuse with other elements. It is enough to listen to the car yourself while pressing the pedal.
Signs of a faulty release bearing:
- whistling, crunching, localized in the pedal area;
- characteristic knocking sound of the drive when the engine is running;
- shocks when pressed, pedal wedge;
- Difficult gear shifting, sometimes accompanied by extraneous sounds.
How to check the release bearing:
- start the engine, put the gear in neutral;
- press the clutch, listen to extraneous noises;
- engage the gear and slowly release the pedal.
The occurrence of at least one of the described symptoms indicates the need to replace the bearing. Delaying the procedure threatens its complete destruction.
How to check the clutch release on a car:
Signs of a faulty release bearing:
When diagnosing, remember the features of VP:
The sound of a pressed pedal does not always indicate a malfunction. This is normal in cold weather. Rollers (balls) are made of steel that does not have large linear expansion. The holder is cast from heat-treated metal. This difference can cause a gap to appear that is acceptable for operation.
How to replace a release bearing
Operations for replacing different types of squeezing devices have similar technological steps. Let's look at mechanical and hydraulic structures using specific examples.
Mechanical clutch type. Step-by-step instruction.
For clarity, let’s take a VAZ 2114 car. Before starting disassembly, ensure sufficient lighting of the gearbox. Prepare your workplace and tools.
Advice:
It is recommended to perform the gearbox removal operation in a pit. This ensures full access to the checkpoint. The help of a partner will not be superfluous.
Photo report of gearbox removal:
After removing the transmission from the vehicle, you can proceed to replacing the spare part:
- Carefully inspect the inside of the bell. Make sure the fork fastening is intact. If there are signs of damage, replace it.
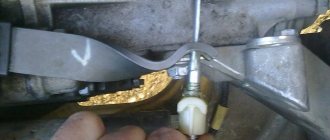
- Locate the edge of the spring that secures the clutch. Use a screwdriver to pry off the bearing.
- Clean the shaft splines of old grease and dirt.
- Let's start replacing the part. Lubricate the seating surfaces and gearbox shaft. Use CV joint lubricant.
- We put the new part on the shaft. Install the retaining spring.
- Check the axial travel of the coupling. It should be free of jams.
- We check the rotation of the rollers (balls). There should be no rolls, wedging or other defects in the process.
This completes the replacement. The gearbox can be installed in reverse order.
Advice:
Be sure to check the condition of the driving and driven clutch discs and basket.
Photo report of VP replacement
Hydraulic clutch type. Step-by-step instruction.
As an example, consider a Ford Focus 2. The preparatory stage consists of removing the gearbox from the engine.
Advice:
The box mounting bolts vary in length. Be sure to label them before unscrewing.
Photo report of gearbox removal:
Replacement of the release bearing is carried out according to the following plan:
- We inspect the inside of the protective casing. We remove oil, dirt, and wear products from friction linings and clean the space.
- Unscrew the bolts securing the spare part housing. Remove the element from the gearbox shaft.
- We clean the seating surface from traces of oil and dirt.
- We install the new part on the shaft. Tighten the bolts of the fluid coupling housing.
- We check that the pipe-to-fitting adapter is installed correctly.
- We install the transmission on the car according to the instructions.
Upon completion, it is necessary to bleed the hydraulic drive system to remove air. It is recommended to carry out the operation with a partner. After each deep pedal press, unscrew the outlet fitting and release the air. Repeat the procedure several times.
Advice:
Carefully inspect the fluid inside the clutch reservoir. It should not be cloudy or dirty. Otherwise, remove it with a syringe, fill in a new one and bleed the system.
Photo report of VP replacement
What do you need for work?
If you decide to replace the release bearing yourself, you should prepare in advance everything you need for repairs:
- new bearing, of course;
- flat screwdriver;
- wrenches;
- WD-40;
- lubricant "Shrus-4";
- work gloves.
Tools for replacing the release bearing
You can do without special lubricant, but with its help you can extend the life of the new bearing. Once everything is ready, you can start replacing.
Video - How to choose a release bearing
How to replace a clutch bearing without removing the transmission
An example of replacement without removing the gearbox on a Lada Kalina car. This car uses a mechanical release system. A special feature of the procedure is the ability to change the part without completely dismantling the box.
Before operation, inspect the slave and master disks. If there are no signs of malfunction, you can proceed to the main process.
Replacing the clutch bearing on a VAZ 2118 Kalina is carried out as follows:
- Unscrew the hub nuts of both wheels. Remove the drives from their seats.
- We support the gearbox from the bottom with a jack.
- Unscrew the bolts securing the engine. We leave the top two untouched.
- In place of the unscrewed ones, insert long bolts or studs that match the size of the holes.
- We unscrew the remaining “original” bolts.
- Move the box 20-30 cm until the coupling appears. The gap is chosen so that the hand can crawl under the shaft.
- We are replacing the clutch release bearing.
- We assemble the box in reverse order.
Don't move the knot too far. In this case, the load on the “ear” of the fastening will increase, which can break it.
Important Note:
Make sure the gearbox is securely supported. This will protect you from the box falling while doing work.
Photo report of replacing the VP without removing the gearbox
REPLACEMENT INSTRUCTIONS BY VEHICLE BRAND:
On our website you can see detailed instructions with photos and videos for all types of designs and techniques for the following car models:
- VAZ:
- 2114
- Kalina
- Logan
Note:
If your car is not on the list, choose by brand, in 90% of cases the instructions will be suitable for you!
Instructions for replacing the release bearing
Despite the apparent difficulty, there is nothing difficult in replacing the clutch element. In addition, this procedure will take a little time. You just need to strictly follow the step-by-step instructions. Below are instructions for replacing the release lever using the example of a VAZ 2110 car.
Replacing the release bearing
Step 1: Disconnect the battery terminals and then remove the battery.
Disconnecting the battery terminals
Step 2 : Also remove the air filter. He will get in the way.
Removing the air filter
Step 3: Remove the top starter nut.
Unscrewing the starter mounting nut
Step 4. Using two 17mm wrenches, loosen the nuts on the clutch cable.
Unlocking the nuts on the clutch cable
Step 5. Pull the clutch cable from the fork and move it to the side so it is out of the way.
Removing the clutch cable
Step 6. Unscrew the transmission mounting bolts in a circle.
Unscrewing the gearbox mounting bolts
Step 7. Remove the top decorative plastic protection.
Removing the plastic engine cover
Step 8. Install a special structure to hang the engine. Only after this can you continue working.
Installing a structure for hanging the engine
Step 9: Remove the two front wheels.
Removing the front wheels
Step 10. After removing the decorative cover, unscrew the nut securing the outer grenade.
Unscrewing the nuts securing the outer grenade
Step 11. After removing the protection, raise the car even higher. Then use a wire brush to clean the area around the drain nut.
Cleaning the drain plug from dirt
Step 12: Remove the drain plug. To do this you need a 17mm head.
Unscrewing the drain plug
Step 13. Drain the oil and screw the plug back on.
Draining the oil from the gearbox
Step 14: Remove the two bolts that hold the ball joint in place.
Ball joint fasteners
Step 15. Press the pry bar onto the post to free the ball from the studs. If possible, perform this activity with a partner.
Dismantling the rod
Step 16. Using a pry bar, carefully pull the CV joint out of the gearbox.
Removing the CV joint from the gearbox
Step 17. Remove the CV joint. Do this carefully so as not to damage the anthers. Then repeat the procedure on the other side.
Carefully removing the CV joint
Step 18. Remove all casing bolts.
Unscrewing the casing bolts
Step 19: Remove and stow the cover.
Removing the cover
Step 20. Remove the rod.
Dismantling the rod
Step 21. Using a 17 socket, unscrew the lower starter mounting bolt.
Unscrewing the starter mounting bolt
Step 22. Dismantle the starter, first disconnecting the chips from it.
Dismantling the starter and disconnecting chips from it
Step 23. Disconnect the speed and reverse sensor chip.
Disabling the speed and reverse sensor
Step 24: Unscrew the two rear cushion brackets. Hold the bolts with another wrench to prevent them from turning.
Unscrewing the rear airbag brackets
Step 25. Unscrew the bolts securing the pillow, and then remove it.
Removing the pillow
Step 26. Place the stop under the gearbox and unscrew the nut securing the second cushion. You will need a 17mm socket with an extended knob.
Unscrewing the nut securing the second pillow
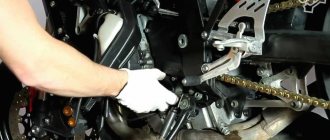
Step 27. Using a mounting tool, loosen the box a little and try to remove it.
Disconnecting the box from the engine
Step 28. Slowly lower the box down, being careful not to damage the input shaft petals.
Lowering the gearbox down
Step 29: Inspect all clutch components.
Visual inspection of clutch elements
Step 30. As you can see in the photo, the release bearing is jammed. Only replacement will save.
Clutch release bearing jammed
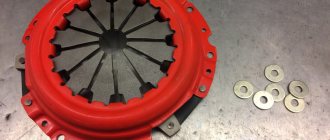
Step 31: Also inspect the clutch basket for damage.
Clutch basket inspection
Step 32. Lubricate the working surface of the new bearing with lithol.
Lubricating a new bearing with lithol
Step 33. After lubricating the splines with lithol, install a new bearing.
Installing the release bearing
Step 34. Install the clutch in reverse order, remembering to lubricate all fasteners.
Clutch and gearbox installation
Step 35. The box is in place and everything is almost ready, you just need to pour oil into the system.
All parts are installed
Step 36 As you can see, the clutch and brake pedals are now at the same level. This means that the replacement was successful. All that remains is to check how the gears shift and, in fact, conduct a test drive. That's all!
Checking clutch operation
Prevention of bearing failure. How to increase service life
Proper operation of the clutch pedal will not only preserve the release unit, but will also extend the service life of the entire device.
- Tip 1 : Do not practice unnecessary sudden starts of the car from a standstill. At this moment, huge dynamic loads arise, contributing to bearing failure.
- Tip 2 : No need to keep the clutch disengaged in traffic jams or at traffic lights. Place the car in neutral and release the pedal.
- Tip 3 : Don't "throw" the clutch. For this reason, not only the bearings wear out, but also the disc. Excessive force only increases the negative effect of torque.
- Tip 4 : Avoid situations where the car slips. To turn the wheels, enormous force is required, which is transmitted through the entire drive mechanism.
- Tip 5 : When replacing a bearing, rely on the choice of trusted manufacturers. A table with recommended companies is presented below.
Which release bearing to choose. TOP 5 manufacturing companies
Let's look at the list of the most popular companies producing clutch parts.
| Firm | A country | Official company logo | Applicability |
| LuK | Germany | VAG cars | |
| Valeo | France | Kia, Daewoo, ArvinMeritor, SsangYong and Hyundai | |
| SACHS | Germany | Mersedes, Audi, BMW, Opel, Porsche, Rover, Fiat, Jaguar, Ford, MAN, Peugeot, Toyota | |
| INA | Germany | Mercedes-Benz, Peugeot, Audi/VW, as well as Renault, Opel | |
| LPR | Italy | Renault, Mazda, GM, and PSA Group |
Note:
For the domestic auto industry there are options from Valeo. Parts from the Lada plant are popular and can be found in any spare parts store.