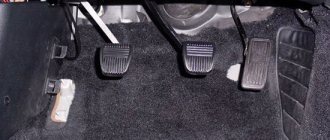
Some drivers joke that they can recognize from a crowd a person whose car has an old clutch - they clearly have a clubfoot on their left leg. But seriously, the problem of a tight clutch pedal and the associated double or even tripled load must be eliminated before problems with the knee joint of the leg appear.
Oddly enough, the problem of a hard clutch pedal exists on a variety of models and brands of cars with a manual transmission. An initially normal or slightly heavy clutch pedal can become stiff in both the cable and hydraulic clutch actuators. But in most cases, it is car models using a cable that suffer from this strange problem. In hydraulics, the percentage of such problems is lower. There are some peculiarities in the design of the basket, why the clutch pedal became tight without visible defects or breakdowns on the drive side.
In the overall picture, the main reasons for a tight drive pedal are the following:
- abnormal operation of the clutch basket diaphragm spring;
- the presence of local scuffing or local wedging of the release bearing, fork, friction disc on their supporting surfaces;
- a cable in a working braid that is partially torn and unraveled into wires.
The last point can be easily controlled independently, without the help or services of auto repairmen.
Design and adjustment of the VAZ 2109 clutch
VAZ 2109 is the legendary “nine”. The front-wheel drive five-door hatchback was serially produced at the Volzhsky Automobile Plant from 1987 to 2004. From 2004 to the end of 2011, the VAZ 21093 modification was assembled in Zaporozhye.
Many car owners try to maintain their personal car themselves and know how to do it correctly, since they carefully study the operation of the main components and leading modules. The list of routine maintenance includes periodic adjustment of the VAZ 2109 clutch. This task is quite simple if you familiarize yourself with the operation algorithm in advance.
Return
Nine clutch device
The clutch kit is one of the key components of the Nine transmission. This is a single-disc friction-type mechanism located between the engine and the gearbox (gearbox). The algorithm for its operation is as follows:
- Initially, the car is stationary, the engine is started, the pedal is released. The gearshift lever is in the neutral position, that is, the rotation of the input shaft is not transmitted to the secondary shaft.
- The driver is preparing to move forward. With his left foot he presses the pedal, and the mechanism disconnects the gearbox input shaft from the engine. The driver moves the lever to the first gear position, the mechanism ensures the engagement of the primary and secondary shafts of the gearbox. The car is stationary because the engine is disconnected from the transmission input shaft.
- The driver smoothly but decisively releases the pedal. The engine is connected to the input shaft, the task of which is to transmit power to the drive wheels through the secondary shaft, then the car will start moving.
- Switching from first gear to second, from second to third, and so on occurs in the same way.
The VAZ 2109 clutch design is such that when the pedal is released, the driven disk is clamped by springs between the flywheel and the pressure plate. In this case, power is transferred to both gearbox shafts and the drive wheels.
When you press the pedal, the VAZ 2109 clutch fork rotates through a special rod and presses on the levers that retract the pressure plate. The VAZ 2109 clutch driven disc is disconnected and power transmission stops. The mechanism casing is connected to the pressure plate by three pairs of elastic plates.
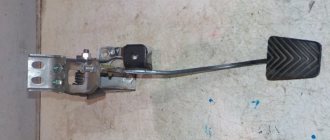
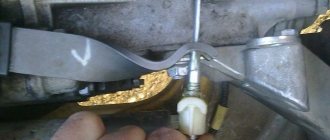
The unit is driven by a cable, its lower tip is fixed with nuts in a bracket on the engine crankcase.
The clutch cable is connected to the clutch release fork lever.
Return
Typical VAZ 2109 clutch malfunctions
The clutch is one of the relatively reliable units of the VAZ 2109. With normal operation and periodic adjustment, it lasts for years. The estimated resource of the unit exceeds 100 thousand km. And if the clutch pedal fails, this is a rare case. The list of typical faults includes:
| Type of problem. | What is expressed? | What is the reason. |
| The clutch drives. | Pressing the pedal all the way does not ensure complete disconnection of the shaft from the gearbox, and the engine is not disconnected from the gearbox. Pressing the pedal when the unit is faulty leads to the fact that the pressure bearing does not act strongly enough on the damper spring, and the engine flywheel continues to partially transmit torque to the gearbox shaft. | The reason for this is often poor adjustment of the VAZ 2109 clutch cable or failure of the drive disk. |
| The clutch is slipping. | When the pedal is fully released, the gearbox input shaft remains loosely pressed against the engine flywheel and slips, that is, slippage occurs. The torque is only partially transmitted to the drive wheels and sliding of the contact surfaces occurs. This effect is clearly manifested when a loaded car is moving uphill: the driver accelerates, the speed increases, but the car almost does not accelerate, the clutch of the VAZ 2109 slips. | In this case, the drive is most often poorly adjusted, the clutch cable gets stuck, the driven disc is worn out or oily, which is why the clutch slips. |
| Noise when switching off transmission. | When you press the pedal, a distinct rustling or rustling sound is heard. | This quiet sound may indicate a possible release bearing failure. Continuing to operate the car in this condition can lead to troubles: if it jams, the VAZ 2109 clutch basket will inevitably quickly fail. Change the bearing at the first sign of a malfunction, otherwise serious repairs to the clutch, including replacement of the basket, are inevitable. |
Clutch adjustment is not only included in the list of routine maintenance of the VAZ 2109, but is often a way to eliminate emerging malfunctions of this mechanism.
Return
Changing the release bearing
More information on how to remove and dismantle the bearing device from the coupling:
- Remove the gearbox. This will provide free access to all components and elements of the transmission and clutch system.
- Disengage the spring fastening from the coupling. To do this, use a screwdriver or other available tool.
- Dismantle the failed release bearing from the guide bushing. To do this, you will need to press out the 4 latches of the spring fastening and remove it. After removing the device from the coupling, carefully inspect the device for any defects or malfunctions. Make sure that the part has failed and needs to be replaced.
- Before changing and installing a new bearing, it must be checked. Delays during rotation of the device are not allowed, as are gaps. If the part is operational, then replace the coupling. When installing, make sure that the inner protruding part of the ring is directed to the side. After installation, the element must be secured with a fastener.
- Lubricant is applied to the guide, after which the bearing device is installed. The part is secured using a holder.
- The removed gearbox is installed and the functionality of the device is checked.
Removing the gearbox
The procedure for dismantling the gearbox can be performed differently depending on the design features of the machine. Removal of the unit should be carried out with an assistant. Before dismantling, the vehicle battery is disconnected and removed, as well as the transmission fluid is drained.
How to remove the gearbox:
Disconnect the clutch pedal cable. Remove it from the bracket. Disconnect the block with wires from the speed sensor installed on the box. Be careful not to damage the connector. To turn it off, press the latches. Using a wrench, unscrew the bolts that secure the ignition module bracket to the gearbox. Also unscrew the screws securing the transmission to the power unit. You will see connectors on the bottom of the gearbox; they need to be disconnected. Remove all screws that secure the torque rod bracket to the transmission housing. It is necessary to loosen the clamp of the rod clamp, which is designed to change gears. Disconnect this element from the hinge. Dismantle the wheel drives. Remove another nut that secures the transmission to the engine. Unscrew the three screws and remove the gearbox housing cover. It remains to unscrew one more bolt that secures the unit to the engine. Under the bottom of the car, find the nuts that secure the left and rear engine support of the car.
After this, the gearbox must be carefully moved along the guides. Dismantling the gearbox is carried out with the help of a partner
Replace the release bearing and reinstall the gearbox. Fill with new oil.
Cleaning a motorcycle chain with a silicone brush
Cleaning should be approached calmly, preferably in your free time, immediately after driving. The engine should be raised using a winch or center stand to allow easy access to the chain. Since the motorcycle is constantly exposed to dirt and you ride on different types of surfaces and in different weather conditions, the task will not be so easy. Don't forget to change into work clothes because it would be a shame to get your clothes dirty.
It's a good idea to purchase a motorcycle chain cleaning kit - for a small price you get the necessary prep, lube and a special brush that allows you to reach every corner of the chain. Of course, each of these elements can be ordered separately. It is also worth having a dry, clean cotton cloth on hand.
Signs indicating the need to adjust the clutch on a Lada Kalina
Among obvious symptoms such as: problems with gear shifting, extraneous sounds when depressing the clutch pedal, poor traction and the clutch not completely disengaging, there are other signs that indicate the need to adjust the Lada Kalina clutch. In order to identify them, carry out a simple check.
The engine must be completely stopped. Depress the clutch pedal several times and listen for any extraneous sounds while pressing, for example, friction, squeaking, clicking, etc.
d. Pay attention to whether there is any jamming while moving the pedal. If you cannot feel it with your foot, try pressing the pedal with your hand and check the stroke. If the pedal jerks or sticks while driving, the clutch most likely needs to be adjusted.
Other signs of the need to adjust the clutch of your Lada Kalina:
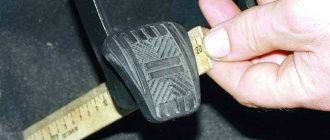
- Take a ruler and check the distance from the floor of the car to the outside of the pedal.
- Depress the pedal fully until it hits the floor.
- Release it and check the distance again; if it exceeds 14.6 cm, it is necessary to adjust the pedal travel.
- If: the full pedal stroke is 14.6 cm, the lower cable guide moves freely relative to the release fork lever by more than 2.7 cm, there is a runout of the driven disk linings of more than 0.5 mm, and the distance between the linings and rivets is less than 0, 2 mm - adjustment or complete replacement of the clutch is necessary.
What to pay attention to
There are certain signs that the clutch on the Lada Grant has failed and action needs to be taken. It is worth paying attention that if the car has just been purchased, the pedal will be pressed quite easily. If this requires great effort, then this is the first evidence that the clutch needs to be adjusted or replaced.
It is also worth paying attention to the appearance of extraneous squeaks at the moment when the driver presses the pedal. In addition, it should not twitch when the car owner does not touch it.
Most often, car enthusiasts are faced with the fact that the pedal travel becomes too tight. It is worth considering in more detail the reasons for this problem.
Causes of slipping and ways to eliminate them
Not in all cases you will necessarily have to buy a completely new clutch. Once, out of inexperience, I changed a unit, which turned out to be almost completely serviceable. In reality, it was just necessary to change one inexpensive component. But sometimes you have to learn from your mistakes.
From everything I have learned, I realized that determining the cause of clutch slipping plays a key role here. Your further actions directly depend on this.
- The clutches are worn out. Your actions depend on the degree of wear. When the distance between the working elements used is less than 0.2 mm, you can simply adjust the free play of the pedal. In case of severe wear, the driven disk and linings are replaced;
- Oil appeared on the linings. Oil on the friction linings may appear due to certain problems in the flywheel drainage or an excessive amount of lubricant in the box. The oil should be removed and the surface dried. Kerosene works well. After cleaning, go through with fine sandpaper;
- Damage to the integrity of the rubber components of the hydraulic drive. When they swell, the clutch very often begins to slip. Here you will have to remove both cylinders (worker and main), wash them with alcohol, replace the rubber elements and clean the expansion holes. Don't forget to bleed the clutch and the brakes themselves;
- Loss of elasticity of pressure springs. This problem occurs on old cars that have been in use for over 10 years. Elasticity decreases gradually, which causes the required level of pressure on the driven disk to drop. As a result, the clutch slips. The check is carried out by removing the clutch disc. If elasticity has decreased, they will have to be replaced.
There are cases when changing individual components or trying to restore their functionality is pointless. The wear or damage is so severe that repairs will only have a short-term effect. A better solution here would be to completely replace the clutch.
Subscribe, tell your friends about us and don’t forget to come to us again!
Watch this video on YouTube
Deaeration of hydraulics
After repairing the cylinders or eliminating the leak that caused the pedal to fail, it is necessary to bleed the system to remove air from it.
You should hire a partner for the job. The procedure is as follows:
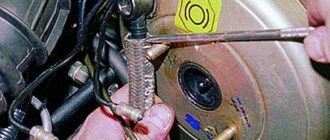
- the protective cap is removed from the fitting of the VAZ master cylinder;
- instead, a hose of a suitable cross-section is put on;
- the end of the latter is placed in a jar, into which a couple of glasses of brake fluid are first poured;
- then loosen the fitting a little and press the pedal a couple of times, and then leave it in the lower position;
- At the same time, monitor the liquid level in the tank;
- when the air stops coming out in the form of bubbles, the fitting is tightened and the pedal is released.
But what can we do?
Everything is very simple. For example, you arrived at an intersection where the traffic light was red. If the green light does not light up within 5-10 seconds, feel free to turn on neutral, and keep the car (if it is a slope) on the handbrake or brake pedal. Fortunately, many traffic lights have a timer, so you can predict the situation in advance. But this rule must be used not only at intersections, but also in any other traffic situation (for example, while standing in a traffic jam). You should not “play” with the clutch, sneaking behind an oncoming car in order to maintain a minimum distance.
The less time you keep the pedal depressed, the better for the bearing. Don’t be too lazy to once again move the gearbox selector to “neutral” - this way you can avoid, albeit not expensive, but quite time-consuming repairs. Since replacing the bearing involves removing the transmission and clutch basket. And if it is a rear-wheel drive car, then there is also a driveshaft.
Reviews from car owners
If you look at the opinions of car owners about this component of the car, many note that it quite often creates problems. For example, some have to deal with tight pedal movement or the appearance of unpleasant crunching and clicking noises.
However, few people have to buy a complete clutch kit. Often a specific detail is enough. Therefore, most often it is enough to install a new cable or lubricate the jacket. Accordingly, even if this unit fails, repairs will not be as expensive as it might seem.
In general, car owners are satisfied with this car. It is inexpensive and does not require special care. If you do not use it in extreme conditions, then there should be no problems. It also performs well on difficult roads. Many note that modern foreign cars at the same cost have much worse characteristics.
Purpose
To understand where the release bearing is located, you need to understand the purpose and design of the clutch. The clutch and all its parts belong to the vehicle's transmission. It ensures the transmission of torque from the engine to the drive axle and wheels, and must be located between these parts of the machine
But an important condition for the location is accessibility in its control by the driver. Most often this is the clutch pedal, less often the lever near the steering wheel
Using the clutch mechanism, the driver periodically disconnects the engine from the transmission. This allows you to stop the car, change the gearbox, and change the driving dynamics.
Reasoning about alternative regulation
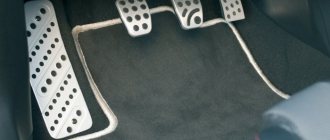
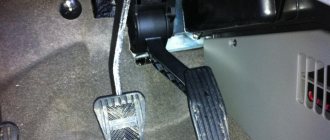
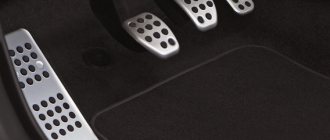
Before adjusting the clutch on a VAZ 2110 in the traditional way, let’s think about how justified it is, and whether there is any point in using an alternative option. According to reviews from many owners of “ten” cars, and not only them, the clutch control pedal is quite high from the floor. The inconvenience that most drivers get used to is actually quite significant.
The driver gets tired during the trip, he wants to change gears less and less, each time lifting a heavy boot. This affects not only the speed of movement, but also the condition of the transmission. Experienced drivers assure: when the clutch pedal is released, it should be positioned so that it can be depressed without lifting the heel from the floor. It’s not without reason that on UAZs and Gazelles, where adjustment is impossible, experienced drivers place a piece of board under the mat.
The classic adjustment order indicates data that ensures the clutch disengages with a large margin. As a result, by fully depressing the pedal, the driver forces the bearing to bend the diaphragm spring much more than is technically necessary. As a result, it loses its characteristic properties, and at critical moments it simply breaks
And it doesn’t matter that you chose a branded clutch kit to replace - everything is subject to the laws of physics
Method for alternative clutch drive tuning
Experienced car enthusiasts prefer to make adjustments individually for each set of coupling parts. The event does not require an assistant or special equipment:
- Start the engine, depress the clutch and engage reverse gear. On almost all VAZ models it does not have a synchronizer, so the disks are completely disconnected.
- Slowly release the pedal and simultaneously engage and disengage reverse gear.
- The moment the speed is switched on is manifested by vibration on the shift knob. If the setting was made according to the official factory instructions, then the start of activation will correspond to a distance of the pedal from the floor of 75-100 mm.
- Set the cable length so that the “grasping” moment corresponds to 20 mm from the floor to the top edge of the pedal.
After we adjusted the clutch on a VAZ 2110 in this way, the clutch pedal in the initial position is much lower than the brake pedal. This allows you to instantly switch the toe of the boot without raising your foot to the handlebars. Early activation greatly simplifies the process of driving a car; gears are engaged smoothly and without jerking.
Types of connection of polypropylene pipes
When polypropylene is heated, mutual diffusion occurs - mixing of particles. What’s characteristic is that when it cools, the reverse reaction does not occur; the part becomes monolithic. This quality is used when connecting two pipes. Let's consider how the result is achieved.
Socket welding
This principle is most popular due to its simplicity and accessibility. To connect pipes of the same diameter, a special part is used - a coupling. Its internal diameter is slightly smaller than the external diameter of the pipes being welded.
Welding occurs due to heating and melting of the outer surface of the pipe and the inner surface of the coupling. Then the pipe is inserted into the coupling, the operation is repeated with the other part, and the connection is complete.
Butt welding
This principle is applied in production. To connect pipes of the same diameter, their sides are melted and then joined into a joint. The method is complicated in that it is necessary to ensure perfect, precise alignment, which is impossible at home.
Cold welding
Cold welding (using glue) is another type of connection. A special glue containing a strong solvent is applied to the pipe. It softens the surfaces of the pipes and they can be inserted into each other.
The big disadvantage of this method is the low strength and tightness of the resulting connection. Another disadvantage is the drying time – a day or more. This is where cold welding loses to thermal welding.
At home, it is advisable to use connections using couplings. We will consider this method in more detail.
Clutch release bearing: principle of operation, symptoms of malfunction and testing
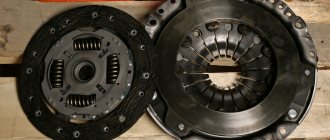
Today, the most common clutch systems have two discs - a leading one, rigidly coupled to the crankshaft, and a driven one, transmitting torque to the gearbox.
To change gears or put the car into idle speed, the clutch discs must be disconnected, which is done using a release bearing that pulls the driven disc away from the drive disc.
Release bearing location
This is an important element of the clutch system, and at the same time one of the most vulnerable parts.
The clutch release bearing is at rest while the vehicle is moving, and only comes into operation when changing gears.
The part costs from 300 to 1500 or more rubles, depending on the manufacturer and model of the car.
Replacing a bearing at a service station will cost 3,000-7,000 rubles, so if you have the desire, opportunity and a normal set of auto tools, it makes sense to do it yourself and save a lot of money.
Types of release bearings
There are two common types of release bearings now:
- roller or ball - mechanical units that transmit force to the bearing through a rigid bunch of rods;
- hydraulic - here the force is created by hydraulics, due to which the clutch pedal is depressed much easier.
Hydraulic release bearing
Roller release bearing
The mechanical clutch release bearing can be called a part from the past, because Moskvich, VAZ and other old cars were equipped with it. New machines, even budget ones, mainly use hydraulic systems. Although a number of domestic cars currently produced are still equipped with mechanics, in order to reduce the cost and simplify them.
Operating principle
The release bearing's job is to connect and disengage the clutch when you press the pedal inside the car. The operating principle of the part is quite simple:
- the driven disk is pressed against the flywheel by a pressure disk, due to which clutch is ensured;
- the pressure on the pressure plate is provided by a diaphragm spring, the inner petals of which are acted upon by the clutch release bearing;
- the movement of the bearing, which initiates the separation of the discs, is ensured by the clutch fork.
Release bearing in a car clutch system
Causes and symptoms of release bearing failure
The reason for the breakdown of this part is uneven loads on it at the moment when the clutch is depressed, and it goes back along with the driven disk.
For this reason, holding the clutch pedal for a long time while the gear is engaged is strictly not recommended.
In principle, this is a reliable and durable part, and it most often fails among novice motorists.
The most important symptom of bearing wear is the appearance of a slight knocking sound when the clutch pedal is depressed.
If the sound appeared in the summer, this is almost a guarantee of future problems, but if it came along with frost, there may be an elementary change in the linear dimensions of the bearing cup due to a drop in temperature outside. The release bearing in most cars has an undeniable advantage - high strength, so even if noise appears, you can afford to do nothing for a while and watch to see if it gets worse.
How to check a release bearing
The clutch release bearing is checked by ear when the pedal is depressed while it is in operation (rotating).
Depending on the stage and nature of wear (a small amount of lubrication or depletion has begun), the sound will be different; it can either simply hum or make noise or make other unpleasant sounds in the area of the box.
But you should not confuse these sounds with those that can occur when the clutch pedal is not even depressed, since such a sign will indicate the input shaft bearing.
Required Tools
Before starting work, it is important to prepare all the necessary tools. Here's what you'll need:. Welding machine - is a heating element with nozzles for different pipe diameters
Some models have a thermostat to maintain a set temperature; working with these devices is much easier
Welding machine is a heating element with nozzles for different pipe diameters. Some models have a thermostat to maintain a set temperature; working with these devices is much easier.
If you do not plan to use this device in the future, then there are many services where you can rent a welding machine for the duration of the repair. So you don't have to buy it.
Scissors. You can cut the pipe with a hacksaw, saw or even a grinder, but the quality of the resulting surface will be unsatisfactory. It is much more convenient and practical to purchase special scissors for these purposes.
Gloves to protect your hands - choose thick ones that do not conduct heat well. This will protect you from getting burned.
Shaver. The device removes the outer aluminum layer when working with reinforced pipes. The tool may not be useful, depending on the type of material
Trimmer. The device is designed to remove part of the internal reinforcement. This is necessary to avoid water getting between the layers of the pipe.
Degreasing agent. Necessary for cleaning the pipe from dirt and grease. You can use ethyl or isopropyl alcohol. It is not recommended to use acetone; it can soften polyvinyl chloride.
Troubleshooting the clutch drive
As a rule, when one of the signs of a clutch drive malfunction appears, it is necessary to accurately determine the malfunction. If the problem is in the clutch mechanism, it is better to change the entire clutch kit, and not limit yourself to just the part that has failed.
It is also necessary to take into account the high cost of repair work, since it is often necessary to remove not only the clutch itself, but also the gearbox.
Methods for eliminating some clutch faults:
If problems with operation and a tight clutch pedal remain after repair, we can identify a number of other reasons why the clutch is tight. Among them are:
- clutch cable wear;
- dirt, corrosion in the cable jacket;
- lack of lubrication on the clutch fork shaft.
If we are talking about a hydraulic clutch drive, then the reasons may be a malfunction of the clutch master or slave cylinders.
Let us also add that it is important to replace the clutch release fork as a complete set with the clutch assembly when it becomes deformed or worn out. If this is not done, the plug may burst or bend during operation.
Hydraulic failure
Some VAZ models have a hydraulically driven clutch. This system involves:
- line where the special liquid should be located;
- slave and master cylinders.
Here the base of the pedal is fixed to the piston rod of the latter. Pressing it squeezes out the liquid, and it goes into the working cylinder, which acts on the fork. Thus, the pedal on a VAZ can fail if the system loses its tightness. First of all, you need to see whether there is enough liquid left in the tank located in the engine compartment. Proceed like this:
- make up for its deficiency;
- monitor the stability of the level.
Why has the clutch pedal become stiff?
Since cable systems are the most prone to failure, let's first look at why the pedal might become stiff under these conditions:
- increased rigidity of the diaphragm spring petals - this leads to gradual wear of the part and its deformation;
- jamming of the release bearing, coupled with increased force to rotate the fork, subjects the clutch cable to increased loads;
- rupture of the cable wires - they adhere to the metal braid, increasing the resistance of the tight pedal.
The first reason is more common, and this is due to the arrangement of the petals of the basket. The central part, which has a release bearing, becomes higher than the plane of the spring; additional pressure is required to overcome this elevation.
To make the diaphragm spring more durable, manufacturers artificially increase the rigidity of the petals. This happens especially often with Chinese counterfeits of well-known companies. Despite expectations, the tight pedal will not change with the installation of such an element.
Diagnosis of clutch faults VAZ 2110 2111 2112
Cause of malfunction
Elimination method
The clutch slips (does not fully engage) When you sharply press the gas pedal, the engine gains speed, but the car hardly accelerates - this is especially noticeable when driving uphill; the smell of overheated friction linings may be felt; fuel consumption increases
Oiling of the flywheel, pressure plate, friction linings of the driven disk
Thoroughly wash oily surfaces with white spirit or gasoline and wipe them dry. Replace the heavily oiled driven disk. Eliminate the cause of oiling (oil leakage through the cuffs (oil seals) of the engine or gearbox)
Severe wear or burning of the friction linings of the driven disk
Replace the driven disk assembly
Damage or jamming of the clutch drive
Remove jam. Replace drive if necessary
The clutch moves (does not disengage completely) It is difficult to change forward gears, the reverse gear is engaged with noise. Gearbox is OK
Incorrect clutch drive adjustment (full pedal travel is too small)
Adjust the drive. Replace the deformed clutch fork
Clutch cable jamming
Lubricate the cable with engine oil. If this does not help (the cable wires are frayed, the sheath is damaged) - replace the cable
Loosening of rivets or breakage of friction linings, warping of the driven disk (end runout more than 0.5 mm)
Replace the drive
Severe and uneven wear, scoring on the working surfaces of the flywheel or pressure plate
Replace flywheel. If the surface of the pressure plate is damaged, replace the housing with the pressure plate assembly (“clutch basket”)
Jamming of the driven disk hub on the splines of the input shaft of the gearbox
Clean the splines from dirt, remove minor damage with a file. If there is significant wear or damage to the splines, replace the transmission disc and/or input shaft. Before assembly, apply CV joint grease to the splines
Distortion or warping of the pressure plate
Replace the housing with the pressure plate assembly (“clutch basket”)
Wear of the diaphragm spring blades at the point of contact with the release bearing
Replace the housing with the pressure plate assembly (“clutch basket”)
Jerks when starting off
Clutch cable jamming
Lubricate the cable with engine oil. If this does not help (the cable wires are frayed, the sheath is damaged) - replace the cable
Jamming of the driven disk hub on the splines of the input shaft of the gearbox
Clean the splines from dirt, remove minor damage with a file. If there is significant wear or damage to the splines, replace the transmission disc and/or input shaft. Before assembly, apply fresh CV joint grease to the splines
Driven disk deformation
Replace the driven disk
Loose fastening of the friction linings of the driven disk, severe wear or cracks on the linings
Replace the driven disk
Loss of elasticity of the spring plates of the driven disk
Replace the driven disk
Significant settlement or breakage of torsional vibration damper springs, wear of windows for springs
Replace the driven disk
Seizures on the working surfaces of the flywheel or pressure plate
Replace the flywheel or clutch housing with pressure plate assembly (clutch basket)
Oiling of the working surfaces of the friction linings of the driven disk
Thoroughly wash oily surfaces with white spirit or gasoline and wipe them dry. Replace the heavily oiled driven disk. Eliminate the cause of oiling (oil leakage through the cuffs (oil seals) of the engine or gearbox)
Rattling, knocking or noise when engaging the clutch
Significant settlement or breakage of torsional vibration damper springs, wear of windows for springs
Replace the driven disk
Driven disk deformation
Replace the driven disk
Loose fastening of the friction linings of the driven disk, severe wear or cracks on the linings
Replace the driven disk
Increased noise when disengaging the clutch
Worn, damaged or leaking clutch release bearing
Replace bearing