02/28/2022 23,821 VAZ 2109
Author: Ivan Baranov
For any vehicle to function properly, it is necessary to regularly monitor its technical condition. Sometimes you need to remove the gearbox, for example, when overhauling the gearbox itself, replacing the oil seals in it, or if it interferes with getting to any parts when repairing the car. The article describes how to remove the box on a VAZ 2109, and also attaches a video in which you can see all stages of the process.
[Hide]
Useful tips
It is extremely important to monitor the serviceability of the gearbox, and if signs of breakdown are detected, fix them immediately. Do it yourself or with the help of a car service - this is your personal decision.
When operating a car in city conditions, you have to change gears more often. Therefore, it is recommended to use motor oil here. This ensures that the synchronizers remain effective longer. Transmission oil is better suited for highways, increasing the life of bearings and gears, although the synchronizer lasts less.
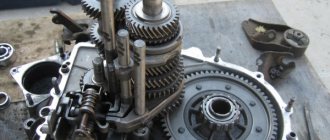
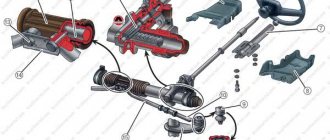
Internal structure of the box
Device
To understand the essence of repairing, disassembling and assembling a gearbox, first of all you need to get acquainted with its structure. In the case of the VAZ 2109, the box structure is as follows:
- On the input shaft there is a block of drive gears that are in constant mesh with the driven gears of the gears when moving forward;
- The second shaft has driven gears with needle bearings. There is also a pair of synchronizers located there;
- The secondary shaft is created together with the drive gear of the main transmission;
- The driven gear of the main gear is attached to the flange of the two-pinion differential box;
- Differential bearings are always mounted with interference, which is adjusted by selecting rings of different thicknesses.
Checkpoint diagram
Preparatory work
Before removing the box on the VAZ-2109, it is necessary to prepare the car for dismantling. For this:
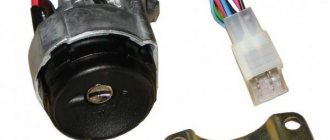
- Completely disconnect the battery and remove it.
- A jack is installed under the left side.
- Loosen the bolts that secure the wheels.
- Unlock the nut securing the outer CV joint and loosen it.
- Lift the left side and completely remove the wheel from the car.
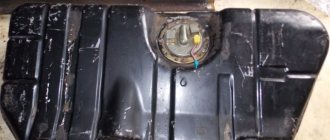
- Place a container of at least 5 liters under the gearbox housing.
- Drain the gearbox oil. Assess its condition and, if necessary, refill it with fresh water.
With this, the preparatory work is completed, you can begin to dismantle the elements that will interfere with the removal of the gearbox.
Malfunctions and their elimination
Gearbox repair largely depends on the nature and type of fault. There are several options for the breakdown of this unit, in each of which appropriate actions should be taken to eliminate them.
| Malfunction | Possible reasons | What do we have to do |
| There is noise in the gearbox |
|
|
| Gears are difficult to shift |
|
|
| Spontaneous gear disengagement occurs |
|
|
| Gears are switched on with noise and crackling |
|
|
| There is an oil leak from the gearbox |
|
|
In most cases, problems with the gearbox are eliminated by dismantling and disassembling it. Do not take on this type of work without the proper skills and experience.
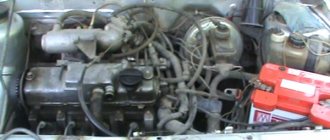
Replacing the VAZ 2109 box if necessary
Replacing the VAZ 2109 gearbox is carried out in case of emergency. There are several reasons for this, (overheating of parts), operation without lubrication or with a low oil level, destruction of its main parts due to overload. This happens extremely rarely, but I myself witnessed the consequences of careless maintenance - they simply forgot to fill in new oil, and the car came for repair with an overheated gearbox. All the parts inside turned blue from the heat, the teeth of all the gears became unusable, in just one day. There was only one solution - replacing the gearbox with a VAZ 2109. Replacing it completely is easier and faster than bothering with repairs, and more expedient.
What is a box and what is it for?
Let's figure out what it is and what it is intended for:
- A gearbox is needed to convert (change) the rotating (torque) moment that is transmitted to the drive wheels
- In addition, the gearbox makes it possible to disconnect the driveshaft from the crankshaft (and drive wheels)
- When the engine itself is idling (during starting, warming up and coasting)
- Manual transmission - as in our case (has an abbreviated name - manual transmission, as well as a common name - mechanics)
- The mechanics is a kind of multi-stage cylindrical gearbox, which provides for manual gear shifting
- According to the number of steps, four-speed, five-speed, six, seven and more speed gearboxes are distinguished (reverse gear is not taken into account)
- The main advantages (advantages) of a manual transmission are the simplicity of its design, operational reliability, the ability to be controlled manually in all driving modes and an affordable price.
- It is thanks to these qualities that the manual transmission is the most common type among gearboxes today.
And also change the direction of torsion (rotation) of the wheels (providing reverse motion of the car)
Tool
Replacing a VAZ 21093 gearbox will be easier if you have the following tool:
- Set of sockets with extensions and ratchet
- Set of spanner wrenches
- Hex key for draining oil
- Empty bucket (or other clean container larger than four liters in volume)
- Clean rags
- Flat mount
Replacing the box
Replacing the box on a VAZ 2109 is carried out in two stages: removing the old box and installing a new one in its place, let’s start in order, with removal:
- First, remove the mudguard, then the crankcase protection (if equipped)
- Drain the oil from the box (if it is there, it’s better to be safe)
- We tear off the nuts of the drives and wheels
- When removal is carried out in a pit, then it is necessary to lift the front part of the car with a jack and hang it on “traces” (or large wooden blocks).
- It is imperative to disconnect (remove) the battery terminals
- Next, remove the clutch cable
- And disconnect the speedometer cable
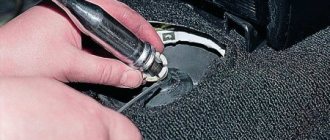
- Then, with the car raised, unscrew its ball joints (we recommend unscrewing the two bolts securing the ball joint to the “fist”; the bolts are marked with arrows in the photo)
Unscrew the bolts that attach the ball to the knuckle
- Then we tear off and remove the left longitudinal brace from the car
We tear off and remove the longitudinal brace, its fastenings are marked in red
- Now call an assistant to pull both drives out of the box, let the assistant tighten the inner grenade using a flat pry bar (so as not to bother with removing the drive), and you sharply pull the wheel to pull the drive out of the box
An assistant squeezes out a grenade with a flat pry bar.
Helpful advice: after you have removed one drive, in order to avoid turning or scattering of the differential, we need to insert a special chopper, stopper or old grenade in its place into the box
- Unscrew the central nuts of both drives and remove them
- Next, remove the starter
Unscrew the starter mounting bolts
- Disconnect the ground wire
- Remove the connector from the reverse sensor
- Unscrew the flywheel protective cover from the bottom of the box
- We disconnect the gear shift lever (it is important not to forget to mark its position first)
We unscrew and pull off the drawstring, making sure to mark its position
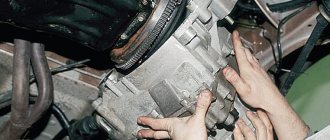
- Then you need to unscrew one by one all four points at which the gearbox is attached to the engine
- It is important to fix the engine, either support it with a hydraulic jack from below, or hang it over a board that rests on the spar cups in order to remove the box on a VAZ 2109
- Holding the box, unscrew and remove all the supports (and “cushions”) of the gearbox mounting with your own hands
- Then, together with an assistant, slightly shaking, we move the box away from the engine to the side; about 10 centimeters are needed for the input shaft to free up and come out of the clutch disc and basket
- When performing removal, you must be very careful not to damage the clutch basket petals with the input shaft.
- On the VAZ 2109, the removal of the gearbox is completed
Removing the box is a labor-intensive task, so to avoid repeated removal after a couple of days, at the same time:
- It is necessary to check the serviceability of all components and parts (such as the clutch disc, release bearing, basket, and so on)
- Also check the alignment of the entire clutch kit, and lubricate the splined connections of the input shaft, as well as the release bearing flange
Now the question for the VAZ 2109 is how to remove the box.
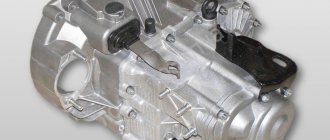
Putting a new box in place
Replacing the gearbox on a VAZ 21093 with a new one, after removing the old one. In this case, you can definitely do without the help of a partner and perform the following actions:
- The motor, fixed with a jack or stretcher, is lowered by 10-15 degrees
- We lift and insert the new box until it stops (in this case, tightening the box with the engine with bolts is not allowed, you need to manually fit the box tightly against the engine)
- Tighten the four fastening points
- Then we install the gearbox supports (pillows)
- We put on and adjust the length of the clutch cable (in this case, the clutch pedal is located 1 centimeter higher than the brake pedal)
- Install and connect the starter and reverse speed sensor
- We put the flywheel protection in place, then the speedometer cable and behind it the ground wire
- We connect and adjust the gear shift mechanisms (put the gear selection lever on the mark or “neutral”, focusing on the first speed)
- We assemble the chassis (insert drives, screw on ball joints, install braces)
- We lower the car onto the wheels, tighten the central nuts of the drives (with a force of 23 -25 kilograms per meter, the approximate length of the lever is about 1-1.5 meters)
- Fill the oil to the level (if you haven’t drained it, then it’s fresh)
Our replacement instructions are complete, the procedure is accessible and can be done without going to a service station, the video will clarify any unclear questions about the replacement.
Dismantling
To dismantle the box, we recommend that you rely on the instructions, strictly follow the sequence and reinforce your skills with visual videos.
- Disconnect the negative terminal from the battery and drain the oil from the gearbox system.
- Unscrew the bolts that hold the crankcase guard in place and remove it.
- Disconnect the ground (wire) from the clutch housing.
- At the end of the clutch cable, loosen the tension on the nuts slightly.
- Remove the cable end from the clutch lever.
- Disconnect the block from the traction relay.
- Disconnect the wire going to the starter traction relay.
- Dismantle the starter itself directly.
- Disconnect the drive rod from the joint tip. We are talking about traction, which switches gears.
- Disconnect the cable from the car's speedometer drive.
- Unscrew the tie rod ball joint.
- Remove and press the steering rod hinge pin out of the strut swing arm.
- The shank of the inner CV joint of the front wheel drive should be pressed out and moved to the side.
- Disconnect the second CV joint.
- Remove the clutch housing shield.
- Release the gearbox from the fasteners holding it to the engine.
- Remove the box.
Carefully remove the gearbox
Be sure to move it horizontally away from the motor before directly removing the box. Then disengage the input shaft. Be careful not to damage the clutch spring petals.
How to remove a VAZ 2109 box
Removing the VAZ 2109 box is quite problematic. However, in fairness, it is worth noting that the clutch can be replaced even with the box not completely removed, but only slightly moved to the side.
But in cases where it is necessary to completely overhaul the gearbox, it must be removed. To do this, it is not necessary to have an overpass or a hole; it will be enough to raise the front part of the car higher (20 centimeters above the ground so that there are wheels).
In this state, you can remove the box without much difficulty. But you will need a tool and a little knowledge before you remove the VAZ 2109 box with your own hands, without resorting to outside help.
The procedure for removing the VAZ 2109 box
To begin, place chocks under the rear wheels and remove the battery. This must be done before removing the box of the VAZ 2109. Raise the entire front part with a jack. First one side, then the other.
Remove the wheels one by one and install reliable supports. If the repair is carried out at home, then a thick stump will work as supports. It is advisable to use wood; do not even think about installing bricks.
If you doubt the reliability of the support, you can install a pair of wheels nearby. Now remove the engine protection, open the hood, and completely drain the gearbox oil. Removing the VAZ 2109 box is impossible without this.
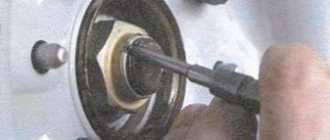
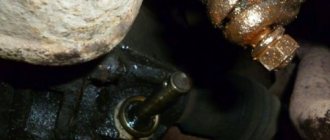
Now the most unpleasant thing is tedious and painstaking work, which is complicated by licked heads of bolts and nuts, and rust on them. After draining the oil, you need to remove the left grenade.
To do this, unscrew the two bolts that secure the ball joint of the left wheel to the hub and unscrew the nut, after removing the cotter pin, on the steering end. Now take a small chisel and a hammer. Place the chisel between the gearbox housing and the internal grenade. Apply short blows so that the CV joint comes out of the differential.
When it comes out, insert a plug in its place - a piece of pipe or a tightly rolled newspaper. That's it, now you can continue disassembling, since it is not yet possible to remove the box of the VAZ 2109, a lot of work still needs to be done.
Immediately unscrew the speedometer cable and loosen the bolt on the rocker, remove it from the axle. Unscrew the nuts and bolt securing the bracket on which the clutch cable is located. Remove the latter by pulling it towards the cooling radiator.
Disconnect the wire from the reverse sensor and remove the starter, first disconnecting two wires from it. Proceed to the most difficult stage - unscrewing the nuts and bolts on the two pillows. The rear may even rust to the body, so penetrating lubricant must be used.
When you have finished, you can begin removing the VAZ 2109 box, just first install a platform under it so that it does not fall from a height to the ground. You can put a cross member on the car and hang the box from it.
Now unscrew the remaining three bolts and one nut that secure the gearbox to the engine block. For convenience, remove the right inner CV joint. Using a crowbar, begin to pull out the gearbox; its input shaft should easily come out of the splines. Carefully, so as not to damage it, lower it to the ground. That's it, now the removal of the VAZ 2109 box is completed, you can repair or replace it.
Disassembly
Having removed the gearbox, you can proceed directly to the main thing - disassembly. This will allow you to change damaged elements as you work, identify existing faults and solve problems on your own.
- Clean and thoroughly wash all external surfaces of the gearbox.
- Place the box in a vertical position and remove the back cover.
- Remove the clutch cable bracket, then use a rubber hammer to knock the rear cover off the gearbox.
- Remove the old gasket. She will be replaced.
- Engage any of the two gears - 3 or 4.
- Unscrew the bolt that holds 5th gear, then turn it on.
- Simultaneously turning on the indicated speeds will allow you to fix the shaft and prevent it from turning.
- Unscrew the nut on the secondary shaft, and then on the primary one.
- Remove the 5th speed synchronizer along with the fork.
- Remove the fork from the coupling. Remove the synchronizer as carefully as possible. If you allow the clutch to move away from the hub, the spring-loaded balls that secure the synchronizer will simply fall apart.
- Remove the 5th speed synchronizer locking ring.
- Remove the 5th speed driven gear from the output shaft.
- Remove the thrust ring located on the needle bearing.
- Remove the needle bearing itself from the 5th speed gear.
- Remove the drive gear from the drive shaft and remove the bearing plate.
- Now the needle bearing bushings should be removed from the secondary shaft, and the thrust washer should also be removed.
Jewelry work
- Take out the ring that secures the input shaft bearing, and then a similar ring for the secondary shaft.
- Unscrew the locking plug and remove the ball and locking spring. Next you can get a couple more clamps.
- Remove the rear engine mount.
- Unscrew the reverse gear lock plug, tilt the box and thus remove the lock ball and spring.
- Remove the clutch housing and gearbox housing mounting bolts.
- Acting as carefully as possible, separate the two units. To do this, there are grooves in the crankcases into which the ends of a screwdriver are inserted. By shaking, you can disconnect the elements without any problems.
- Remove the gearbox housing.
- Unscrew the bolt securing the 1st and 2nd speed shift fork.
- Remove the fork and stem.
- Unscrew the bolt securing the 3rd and 4th speed forks.
- Separate the rod head from engagement with the lever, remove it along with the fork from your gearbox.
When disassembling the box into parts, be sure to pay attention to the condition of the elements. If you detect faults in time and replace gearbox components, you can get by with inexpensive but very effective DIY repairs.
Disassembled gearbox
Removing the gearbox from a VAZ 2113, VAZ 2114, VAZ 2115
How to remove the gearbox from a VAZ 2113, VAZ 2114, VAZ 2115? This question may arise in a number of cases, whether it is replacing a clutch disc , clutch basket , release bearing , or replacing a flywheel crown. And there are many other reasons for the need to remove the gearbox. In this regard, this procedure is included in a separate article. Removing the gearbox is a thorough process and you need to prepare for it properly. You will need: a lift or pit, a set of socket wrenches (sizes: 30, 19, 17, 13, 10), a flat-head screwdriver, a mount…………..
After preparing all of the above, you can proceed directly to removing the gearbox. First of all, remove the terminal from the battery. The air filter will interfere with us, so use a 10mm wrench to unscrew the air filter mount. We disconnect the mass air flow sensor and move the filter to the side, along with the pipe.
It would be enough. Using keys 13 and 17, disconnect the power supply to the starter and unscrew one bolt (indicated by the upper right arrow (the rest will be more convenient to turn from below) securing the starter itself.
Unscrew the two nuts securing the gearbox to the engine. Use a 17 key to disconnect the clutch cable.
Next, we hang up the car and take off the front wheels. Use a 30mm wrench to unscrew the hub nut, having previously loosened it.
At the same time, it is necessary to keep the brake pedal depressed. And not weakly, because as a rule the hub nuts are tightly tightened. Further actions will take place under the car. The next step is to remove all the protection available under the engine compartment.
If you need to remove the drive, in order to protect against possible leaks, you need to drain the oil, for which you unscrew the bolt-plug with a 17mm wrench. Here we will consider the option without removing the drives from the gearbox. After the engine protection is removed, you need to use a 17mm wrench to unscrew the three bolts securing the crabs.
Using the key again at 17, unscrew the stabilizer mounts.
Using the same key, unscrew the two bolts securing the ball joints.
After carrying out these procedures, you can pull out the drive. To do this, it is necessary to remove the drive from the hubs on each side by simply moving the hub to the side.
Disconnect the reverse switch. Disconnect the speedometer terminal.
Now we remove the starter by unscrewing the remaining two bolts (let me remind you that one bolt on top has already been unscrewed) securing it.
From the rear, on the interior side, a rod approaches the gearbox (the rod comes from the gear shift lever). This rod will be connected to the gearbox rod through a clamp tightened with a bolt and nut size 13. We loosen this clamp and pull the rod off the splines of the rod.
So, using a 10mm wrench, unscrew the three bolts securing the flywheel protection, the so-called crescent.
Unscrew the side airbag fastening. And the rear cushion is attached to two studs. And finally, we unscrew the remaining two bolts (the first bolts, let me remind you, we unscrewed them from the top) securing the gearbox to the engine. After the work has been done, the gearbox can be removed, first by hooking it with a pry bar.
The box must be removed carefully, especially without damaging the petals on the clutch basket with the input shaft. The box has been removed. Its installation is carried out in the reverse order of removal. When the process as a whole is clear, the sequence of some steps can be changed, depending on what is convenient for you. In addition, it should be noted that after installing the box in place, it will be necessary to adjust the travel of the clutch pedal by moving the clutch cable to a certain position using the corresponding nuts.