Knocks in the chassis are a frequent companion in life for VAZ 2114 owners. Many elements that can cause knocking, bad roads, and low-quality parts can cause extraneous noise in the suspension. A common source of the problem is the angular velocity distributor, or CV joint (grenade). The process of replacing a part is simple, so you can change it yourself. The question is often asked which CV joint for the VAZ 2114 is better: regular or tripoid. Among the most common arguments: tripoid is more reliable, but it hums and vibrates at high speeds. The regular one is less reliable, but the car handles better at high speed. However, you can find opposing opinions and arguments on this matter.
This article was written thanks to the help and support of the Interior Design website. This is an information portal about interior design: new products, photos, videos, the best styles, options for the perfect combination and recommendations from professionals
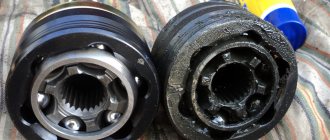
There is no clear answer which type is better. Operation in harsh conditions showed that there is no fundamental difference in driving sensations and reliability. The main thing is to buy a high-quality grenade made of well-hardened metal, install it correctly and monitor the safety of the anthers.
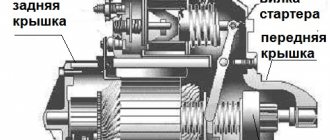
Scheme for disassembling the VAZ 2114 CV joint
In what cases is it necessary to replace the inner CV joint?
Replacing the internal CV joint on front-wheel drive VAZ vehicles is required if the following symptoms are present:
- Crunching and knocking noises when driving and accelerating in a straight line;
- Vibration and shock when changing gears;
- Significant play when testing by hand;
- If the “grenade” fails completely, the vehicle cannot move further.
» alt=»»> The main reason for the malfunction of the VAZ “grenade” is the entry of water and dirt through the hole in the torn boot. The second possible cause of failure is a sharp press on the gas with the wheels fully turned, although in this case you risk killing the external rather than the internal grenade.
In addition to the above, replacing the internal CV joint on VAZ-2110 and other models may be necessary if the quality of the previously installed joint is poor.
Drive diagnostics
But a crunch can also appear when other suspension elements - balls, rod ends, bearings - are destroyed. Therefore, before replacing the CV joint on a VAZ-2109 with your own hands, do a complete diagnosis of the suspension and chassis. It is quite possible that it is not only grenades that will need to be repaired. In general, the diagnosis looks like this:
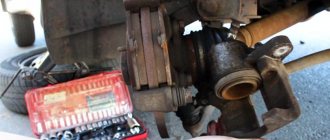
- Place the car on a viewing hole, overpass, or lift. It needs to be secured securely so that it does not roll off.
- Using a mounting spatula, check the drive play - if it is large, you can hear the balls knocking when moving, you will need to change the element.
- At the same time, check the condition of the ball joint - their reliability is not very high, and the roads leave much to be desired.
- Visually inspect the condition of the anthers on all grenades - they determine how long the drives will last.
Replacing the inner CV joint with your own hands
» alt=»»> The procedure for replacing a “grenade” is the same for the entire front-wheel drive VAZ line, starting with 2108 and ending with VAZ-2115, “Kalina”, “Priora”, “Grant”. Before removing the inner CV joint, the oil is drained from the gearbox. Then proceed according to the following algorithm:
- Unlock and unscrew the hub nut. To make the work easier, a piece of pipe about 1 meter long should be put on the key.
- The desired side of the car is hung on a jack or lift.
- Remove the wheel.
- Remove the washer located under the hub nut installation site.
- Disconnect the steering tip.
- The CV joint is removed from the hub.
- Using a pry bar, remove the drive and internal joint from the gearbox.
Note: when removing both drives at the same time, a suitable mandrel should be installed in their place.
How to change the “grenade” with the drive removed? To do this, clamp the shaft in a vice, loosen the clamps and remove the boot. After this, the hinge is knocked off the splines with hammer blows.
The new CV joint should be hammered by applying light blows to its end with a hammer. For this it is better to use a wooden mallet. The “grenade” is first filled with a special lubricant.
Before installing a new constant velocity joint, it is necessary to clean its seat from old grease and install a new boot. Assembly is carried out in reverse order.
The repair is considered complete after successful sea trials. In this case, there should be no extraneous sounds from the drive side in all modes of vehicle movement.
CV joint repair
As mentioned above, the hinge cannot be repaired. Conventionally, one of the repair measures includes washing the “grenade” after driving with a damaged boot.
Washing is carried out at the same time when the damaged boot on the pomegranate is replaced. The hinge is carefully knocked off the shaft, inspected for damage and thoroughly washed to remove any dirt and grease in gasoline or kerosene.
After washing, the assembly is filled with lubricant and mounted in place, having previously installed the boot. The procedure makes sense only if there are no obvious signs of a joint malfunction.
A crunchy or knocking part definitely needs to be replaced, since wear forms on the working surfaces of the inner race, and it is no longer possible to stop the destruction. Continued operation of the vehicle may be dangerous for the driver and other road users.
Place the car on a lift or inspection ditch and perform the following operations on both sides of the VAZ 2115:
- – remove the wheel cap and unscrew the hub nut on the outer joint housing;
- – loosen the front wheel mounting bolts, hang the front part and remove the front wheel;
- – disconnect the ball joint of the suspension arm from the steering knuckle by unscrewing the bolts securing it;
- – moving the telescopic strut of the front suspension to the side, remove the splined shank 18 of the outer joint from the hub, using tool 67.7823.9544;
- – drain the oil from the VAZ 2114 gearbox;
- – using a puller 67.7801.9524 or a hammer through a drift, knock out the inner joint housing from the hole of the side gear;
- – remove the wheel drive of the Lada Samara 2.
To avoid damaging the front wheel hub bearing, it is not allowed to apply a load (lean the car on the wheel, roll the car, etc.) to the hub when the front wheel drive is removed and the hub nut is not tightened.
Installation of the wheel drive is carried out in the reverse order of disassembly. In this case, be sure to replace the retaining ring of the inner joint housing to prevent spontaneous separation of the wheel drive and the side gear. To do this, center the retaining ring relative to the shank of the inner joint housing using grease. Then install the joint housing into the side gear by applying axial force to the wheel drive shaft. Then check again that the protective cover is intact.
If it is necessary to replace the inner joint housing oil seal (half shaft), use mandrel 67.7853.9562. After installing the wheel drive, fill the VAZ 2113 gearbox with oil.
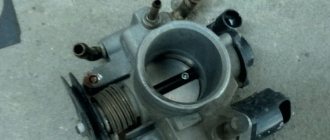
Signs of failure of the outer grenade (CV joint).
There are two options here:
- signs that your grenade has already broken
- signs that the grenade will soon come out and break .
How to understand that a grenade will soon break.
Of course, the first sign of a malfunction of the external grenade is a crackling sound . If you hear a crackling noise while driving with the steering wheel turned, it is definitely a CV joint. The greater the angle of rotation of the wheel and the harder you press on the gas, the louder the clicks. Another sign that does not always appear is vibration on the steering wheel at speeds greater than 80 km/h. The vibration is only slightly similar to the vibration from an unbalanced wheel. It usually manifests itself as a slight twitching of the steering wheel.
How to understand that the outer CV joint has broken.
If the CV joint breaks, the car will stop moving. In any gear engaged, press the gas, the speed increases, but the car does not move.
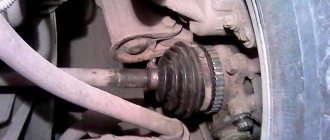
How to understand that it is the outer CV joint that has broken, and not the internal one or the clutch in general (the first signs of failure are similar to the signs of a clutch failure)? First of all, start the car and put it in any gear. Next, open the hood and look in turn at each of the shafts going from the box to the wheels (one short, the other long). If any shaft is spinning, it means that the CV joint has broken on this side.
I recommend not just visually looking at the shaft, but touching it with some long, hard object, such as a stick. The main thing is that there is nothing on it that could wrap around the shaft . When you touch the shaft with a stick, if it is spinning, you will feel a slight vibration. This is usually done in the dark, because it is difficult to understand whether a cylindrical object is spinning, especially in the dark.
What to choose?
How to replace a CV joint with your own hands and tips for prevention
To replace the inner or outer CV joint on a VAZ 2114, a new element will be required. To be fair, we note that the most suitable and high-quality CV joints for the VAZ 2114 model are produced by the manufacturer, that is, AvtoVAZ.
But here comes the most important disappointment - they are not for sale. The only option is to go to a specialized VAZ official car service center. But from the point of view of financial costs, it is not the most reasonable decision.
In addition, there is now a fairly wide range of analogues on the market.
Judging by the reviews of VAZ 2114 owners, special attention should be paid to CV joints produced by such companies as:
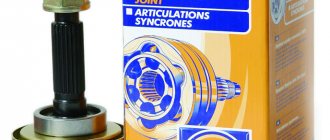
Photo of GKN CV joint for VAZ 2114
How to remove a vaz shruz
Having determined that it is the external grenade that is broken, we begin to remove it.
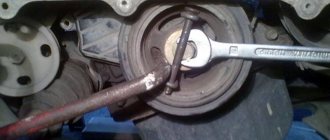
How to unscrew the hub nut on a VAZ?
First of all, unscrew the hub nut. To do this, take a 30mm head and a lever, the larger the better. We put bricks under the wheels to prevent the car from rolling (simply putting it in gear is not an option, the wheel will spin) and begin to unscrew the hub nut.
In this matter, the more you weigh, the better, since I very often lacked my weight and leverage of about one and a half meters. I got out of the situation in the following way: I stood completely on the lever, as close to the edge as possible, thereby giving maximum tension to the nut, and hit the lever with a hammer. Usually this method helped me unscrew even the most soured wheel nuts.
One more nuance: if the outer walls of the head come into contact with the walls of the hub, it is better to lubricate the head with mining or lithol, or, in extreme cases, with silicone grease. Thanks to this trick, the head will not bite in the hub.
How to install a new CV joint on a VAZ.
Be sure to follow this sequence for installing new parts:
- Small clamp.
- Grenade boot.
- Large clamp.
- Retaining ring.
- The CV joint itself.
First, we clean the drive shaft from dust, dirt and old grease. Most CV joints come with lubricant, a boot, two clamps and sometimes a new hub nut. If suddenly there is no lubricant in the kit, it is better to use graphite lubricant, and if it is not available, then simple lithol. First of all, we put on a small collar. Then the boot (it should go behind the limiting washer) and a large clamp. Then we put a retaining ring on the drive shaft. Now open the tube of lubricant and completely squeeze it into the grenade. Now it's time to put the CV joint on the drive. Because of the locking ring, it will be difficult to insert the drive into the grenade, so we take a hammer and lightly, trying not to damage the thread, press the grenade into place. Now you need to put the boot on the CV joint and tighten the clamps. Assembly occurs in reverse disassembly sequence, but there is one nuance! Do not overtighten the hub nut! This may cause the bearing to hum. The hub nut must be tightened with a force of 225.0–250.0 N*m. Of course, few people have a torque wrench. So, tighten the nut tightly, but not with all your might. In theory, a force of a maximum of 25 kg will need to be applied to a meter-long knob. But, the extension pipe will spring back under such force, so how can you describe it exactly? But obviously there is no need to jump with weight.
I hope I helped you. If you have any questions, ask them in the comments.
Which company is the most profitable to buy grenades from?
Since the VAZ-2114, our “four”, is considered more for young people, the companies that stand out most among them are:
- Lorbo
- Hola
- Kraft
Consequences of replacement
Careless handling of machine parts often results in consequences. Contamination of the boot, rapid wear of spare parts and two grenades. If you do not start replacing the boot and CV joints in time, the car can no longer be used for its true purpose. If the owner of the car constantly checks the condition of the anthers and hinges, then the likelihood of dirt getting in will be small.
If you notice rips and holes on the boot, you won’t be able to sew them up; you’ll have to buy new ones. When changing covers, you should also inspect the hinges to make sure they are working. This procedure will not take much of your time, but will preserve the integrity of the grenades and save your money.
After installation is completed, it is recommended to drive the car to check the serviceability of all parts. After making a couple of turns, if you don't hear any squeaking sounds, congratulations, you did it right!
Do not forget to monitor the parts from time to time and sometimes lubricate them, and then they will serve you for a very long time and with high quality.