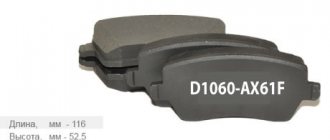
Brake pads are a working element of the brake system, which slows down the speed of rotation of the wheels by braking torque due to friction against the surface of the wheel or brake disc. Replacing brake pads is not a complicated procedure and can be done even by a novice car enthusiast, even without experience in such a procedure.
Each part of the car has its own working life, which decreases over time. The wear of brake pads depends on many factors and in each individual case the brake pads will have to be replaced after a different time.
Brake pad - what is it and what functions does it perform?
The brake pad is an element of the brake system, which is part of any car, as well as the main working “organ”. It is the pad that is responsible for creating acceleration, which slows down the movement of the vehicle due to contact with the surface of the wheel and disc. Thus, the pressing force is “transformed” into braking torque.
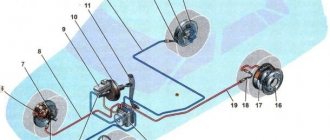
Brake systems of the shoe type operate by converting energy. The kinetic energy of the car’s movement is “converted” into heat due to the intense friction of the pad against the disc, wheelset or drum. When you press the corresponding pedal, air pressure, brake fluid, and cable tension are generated in the brake drive. The latter is transmitted to actuators such as cylinders and cam. They are responsible for ensuring that the pad interacts as strongly as possible with the surface of the disc or drum.
The harder it is pressed, the more effective the braking will be. During such interaction, the friction pair, that is, the pad and the disc, become very hot and “absorb” the kinetic energy of the moving vehicle. As a result, it stops.
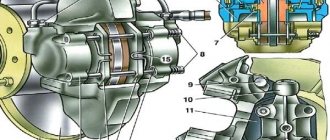
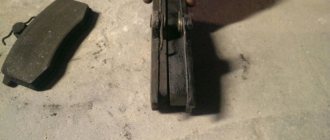
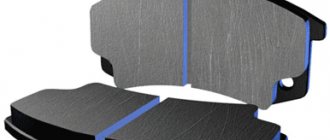
The brake pad design cannot be called complicated. It is a plate made of metal. It plays the role of a base on which a friction lining is installed. This design “repeats” the shape of the surface with which it interacts (disc, drum), and therefore has the shape of a semicircle or straight.
The pad is fixed to the block using special rivets and glue. On some models of modern cars, the pad is equipped with wear sensors. Modern pads include a specialized friction coating that is designed to protect and maintain structural integrity in extreme conditions (the temperature of the pads during operation of the braking system often reaches 1000 degrees).
Thanks to the presence of a friction coating, the pads are able to withstand operation at extreme temperatures for a long service life. The car owner must remember that if there is a desire to avoid premature wear, it is necessary to protect the brake pads from contact with water, engine oil, aggressive fluids such as antifreeze or brake fluid, as well as excessive overheating.
When braking efficiency drops, a squealing sound occurs when you press the pedal, the lining is completely worn out and the vehicle is slowed down only by the metal base - this is a sure sign of pad wear. Replacement required.
Recommendations for timing of brake pad replacement
Car enthusiasts should not forget that the safety of the car, driver, and passengers in the cabin largely depends on the condition of the brake pads. Every vehicle owner should know when a replacement is required. However, the service life of such consumables directly depends on the material used in their manufacture, the individual driving style of the car owner, as well as operating conditions.
To maintain the braking system in working condition, you need to carefully monitor its performance. Experienced auto mechanics who work in specialized auto repair shops know exactly when it is necessary to change pads of one type or another. The remaining resource can be approximately determined by paying attention to the mileage of a particular car. Moreover, you can obtain information about the timing of replacement if you read the documentation included with the car.
The type of brake also affects the rate of wear. On average, brake pads are recommended to be replaced after traveling from 50 to 80 thousand km. You can extend the service life of such consumables by adjusting your individual driving style (sharp acceleration and deceleration while driving increases the rate of destruction of the linings several times).
The absent-mindedness of the car enthusiast can bring the day of replacing the pads closer. The fact is that inexperienced drivers (most often those who “got behind the wheel” recently) forget to release the car’s parking brake and start driving with the handbrake on. Such a “misconduct” has a very negative impact on the condition of the consumable material, as well as the performance of the braking system as a whole.
To increase the service life of the pads and prevent unnecessary costs associated with frequent replacement of this consumable, it is not recommended to perform long braking, which involves holding the brake pedal down for a long time. Experienced drivers in such a situation prefer to slow down their car by frequently and briefly pressing the brake pedal. Such measures will not only help prevent rapid wear of the pads, but will also prevent the car from skidding (the danger of such a phenomenon occurs when driving on a too steep slope or slippery surface), which will significantly increase the safety of the car, as it will prevent skidding.
How to replace disc brake pads
Every driver should be able to determine the moment to replace brake pads. Some manufacturers claim that the safe thickness of the pads is 1.6 mm, others - 3.2 mm.
In any case, the sooner you replace the pads, the better, because... with a thickness of 2-3mm, the material will wear out very quickly.
When the pad wears down to the metal base, the brakes fail, the metal severely scratches the disc and can completely destroy it.
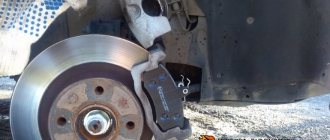
The edge of the brake pad can be seen through the hole in the wheel. Some cars also have a special inspection hole. If the viewing area is not enough, you will have to remove the wheel.
Worn pads can be indicated by a drop in the fluid level in the master cylinder. As the friction material wears, the brake caliper pistons move inward more, emptying the tank more. If the fluid level decreases, you should also check the system for leaks (see the article Finding leaks in the brake system).
Typically, small or medium-sized cars are equipped with disc brakes with calipers and pistons.
Checking the degree of wear
Look into the hole in the wheel rim to assess the thickness of the lining. If there is not enough viewing area, feel the pad, but be aware that the discs may be hot given the recent stoppage.
Disc brakes can vary greatly in design. Two identical cars may have different brakes installed if the manufacturer used different suppliers during assembly. When disassembling the pads, you must carefully remember (or sketch) the design features.
When purchasing replacement pads, contact trusted suppliers. Remember that the manufacturer's name must be written on the box clearly and without errors.
The pads are usually supplied in packaged pairs (for both wheels at the same time). Never try to save money by replacing just one pad.
In addition to the pads themselves, the package should contain pads, bolts, spacers, springs and clips necessary for installation.
Removing the pads
As a rule, when the pads are removed, the calipers remain in place. The pads are held in position by bolts that pass through the caliper body.
Use pliers to pull on the invisible bolt to release the lock that holds the pad in place.
Use pliers to pull on the latch that holds the block in place.
Reliability of fixation is ensured by small wire clamps (“invisible”). Remove all “invisible” elements and pull out the latches.
Remove the pads with a pair of pliers by grasping the top and bottom of the backing board and applying even pressure. If you don't have a second pair of pliers, pull the top and bottom pieces alternately.
If the block is stuck, try rocking it from side to side.
Pull both sides evenly (simultaneously or alternately).
In some cases, replacing the pads requires moving the caliper down or removing it completely.
Removing the clamp
Some pads have clamps that hold the noise pads in place. Pry them up using a small screwdriver.
Behind the pads there are sometimes anti-noise pads that are secured with clamps or clamps. When disassembling the structure, try to remember where they are and how they are attached.
It should be remembered that the pads on the right and left wheels can be of different shapes.
Cleaning the disc and caliper
To clean the outer edges of the disc, rub them with an emery cloth.
Carefully wipe the pad seat and the visible part of the piston. If dirt gets into the cylinder bore, the caliper may be damaged.
Try to gently remove the dirt with the blade of a screwdriver. Be careful not to scratch the parts or damage the dust seals.
Finish cleaning with a brush or toothbrush, dipping it in a special cleaner or methyl alcohol.
A rusty brake disc rim also needs cleaning. Slide the screwdriver through the caliper until the blade rests on the rim, and then turn the disc by hand. Sand the edges with sandpaper.
Wipe the disc with a lint-free cloth moistened with cleaner or methyl alcohol.
Replacing pads
New pads should be thicker than old, worn ones, so you will need to move the pistons back to make room for them.
For these purposes, a device for compressing valve springs or a carpenter's clamp is used.
A clamp is usually used to set the pistons. Secure the clamp to the outside of the caliper.
To reposition the piston, you must gently but firmly press on it.
In fixed calipers, a mounting blade can be used to guide the piston. Be careful not to damage the piston.
When the piston is reset, the fluid is pushed back into the master cylinder. If brake fluid spills on the paint, the finish will be damaged. To prevent this, wrap the tank neck with a cloth that can absorb liquid.
Wrap a rag around the filler neck to prevent brake fluid from leaking.
If liquid does spill, wipe it up as quickly as possible.
You may need to scrape paint off the edges of the new pad backing plates to allow them to move freely in their sockets. Remember that the pads should not get stuck while driving.
You should not remove paint unless absolutely necessary, because... it prevents rust and prevents the pads from sticking.
Opening the bleeder
There is another way to drain brake fluid. To do this, you need to open the drain fitting, having first connected the bypass tube to it.
Alternatively, you can open the bleeder nipple on the caliper. If fluid is still leaking from it, the fitting must be closed, otherwise air will enter the system and you will have to bleed it.
Preparing and installing new pads
Apply anti-noise lubricant to the back surface of the pads and the front surface of the gaskets. Be careful not to let the lubricant come into contact with the friction material.
Once you're sure your new pads fit perfectly, apply anti-noise lubricant or mixture to the back of the pads and the front of the spacers (if equipped).
Be careful not to get any grease or mixture on the front surface of the pads or friction material. When one piston is adjusted, the second one may move forward or even fall out.
To prevent this from happening, temporarily replace the old pads after cleaning them.
Install the anti-noise pads so that the arrow points in the straight direction of the pad movement.
Install pads, gaskets and clamps. If there are arrows on the shims, they should point in the straight direction of the pad's movement.
Align all parts so that the fastener fits into the mounting holes.
Use a thin indicator screwdriver to align the holes.
Install new fasteners and secure them with new “invisible” ones.
Assembly and testing
If necessary, add brake fluid to the tank.
Connect the electrical sensors (if any) and return the wheels to their place. Press the brake pedal several times to restore its function and check the position of the pads.
Check the fluid level in the master cylinder reservoir and replenish it if necessary.
When you get behind the wheel for the first time after replacing the pads, drive very carefully. Remember that the pad grinding process takes some time.
Girling system brakes A
Girling A brake systems have a movable mount with two pistons. Such systems are installed in many popular cars.
Most models have a two-prong mounting pin (see illustration). Models with two pins are designed in a similar way.
Girling A brake systems have a movable mount with two pistons. Such systems are installed in many popular cars.
Both pistons are located on the inside of the disc, in a cylinder rigidly attached to the hub. The disk itself is movably attached and can move from side to side.
Loosen the bolt on the mounting pin and remove the nut, bolt and pin. Use a screwdriver to pry up the retaining spring.
When you press the brake pedal, the pistons move in different directions. One of them presses the brake pad to the disc, and the second pushes the movable mount towards it so that the second pad approaches the disc from the reverse side.
Use a pair of pliers to ensure even tension on the pin.
The pads are held in position by one or two fastening pins that extend through the entire assembly and the pads themselves, as well as a retaining spring.
There are models with two separate pins connected by “invisible” pins or staples.
Pull the straight trim towards you with two pliers. To release the indirect pad, lift the fastener with a screwdriver.
If a wear sensor is installed on one of the linings, it is located on the reverse side.
Girling XD48 system brakes
Don't confuse caliper springs with flat guides.
The Girling XD48 brakes feature single-piston cylinders that move from side to side.
The piston presses one lining against the disk, and then moves to the other side and acts on the second lining.
Pull out the cotter pins and lower the housing to release the guides.
The body moves along guides held in place by cotter pins. Remove the cotter pins, lower the body and pull the guides in different directions. If necessary, pry them off with a punch. Lift the body to expose the pads.
To raise the case, press one edge and pull the other up. Support the body with your hand to avoid unnecessary tension on the flexible tube.
After disconnecting the body, tie it to a convenient point. Don't let it just hang on the end of the tube, as this may damage it.
It should be remembered that each lining has a spring, which is located next to the drain valve. When replacing pads, carefully move these springs from the desired side.
Girling Colette brakes
Girling Colette and ATE brakes are used in some British, European and Japanese (under licence) cars.
Like the Girling XD48 brakes, they feature a single piston and two-pin sliding body.
Unscrew the contact bolt of the fastening to release the pin
The pins are equipped with dust plugs that must not be twisted. Each pin has flat areas that are located under the head of the mounting bolt. They allow you to hold the pin with a wrench while turning the bolt.
The housing rotates on one pin, exposing the pads.
Some front wheel drive vehicles with Girling Colette brakes have socket head bolts that require a special wrench to operate.
Turn the housing and tie it to avoid excessive tension on the flexible tube.
Some pads have shock-absorbing springs located on top or inside them. If a wear sensor is installed on one of the linings, it is located on the reverse side.
Lockheed brakes
Lockheed Light Duty, Bendix and ATE brakes are used in a variety of European vehicles.
They are very similar to the Girling system brakes and operate in a similar way. Sometimes anti-noise pads are installed behind the pads.
To secure the cylinder body, large cotter pins are used, under which there are locking springs.
Remember that cotter pins cannot be reused. When assembling, it is necessary to select new cotter pins with a beveled end.
However, Bendix and ATE type brakes use solid cotter pins that will require a hammer and punch to remove.
Lockheed 4X36MB brakes have four pistons, each pair driven by a separate flexible tube. This system is considered particularly reliable.
When removing the pads, you must disconnect the wear sensor.
Freins Girling and Bendix brakes
Freins Girling and Bendix brakes are used primarily in French and Italian cars. They are in many ways reminiscent of the Girling XD48, but the body is held in place not by cotter pins, but by wedges with “invisible” bars on both ends.
Before removing the wedges, you need to remember the method of attaching the “invisible” ones. The wedges are removed using a punching punch. The case is removed in the same way as in the XD48.
Set the piston with a valve spring compressor or a wood clamp.
Japanese models
For the most part, Japanese brakes are designed according to one of the schemes described above.
The single or dual piston sliding brake calipers used on Datsun vehicles may differ slightly from the Girling XD48 or A. The pads are pinned (in some cases with "invisible" pads) and are fitted with anti-noise shims or springs.
In modern Japanese cars, the pins are often secured by coil springs.
How to determine wear?
Checking brake pad wear is an integral part of periodic maintenance. To understand how much this consumable has worn out during operation, you need to perform several operations in the following algorithm:
- Check for brake dust mixed with metal shavings on the wheel rims.
- Determine how effectively the braking system functions. Severe levels of wear can be indicated by the vehicle decelerating too quickly or ineffectively, as well as by the presence of a wobble when the pedal is pressed.
- Place the car on a viewing hole or jack. This will help facilitate the process of checking the functionality of the front brakes.
- Unscrew the front wheels using a telescopic spanner. If you are checking the pads on the left side, then you need to turn the steering wheel to the left (the same with the right side).
- Determine the thickness of the brake pad linings. This can be done by using the inspection hole, which is located in the movable caliper bracket. When carrying out this procedure, it is necessary to remember that if the thickness of the friction lining is less than 1.5 mm, then replacement is required.
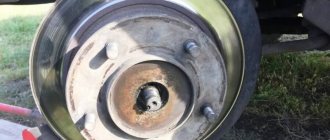
- Place a jack under the rear wheels, then dismantle them and remove the brake drum.
- Measure the thickness of the friction linings using a caliper or an ordinary ruler. In addition to the small thickness of the linings, replacement is required if they are poorly connected to the base or oil traces were found during the inspection.
To carry out the check correctly, you need to prepare the necessary tools, namely a jack, a telescopic wrench, a caliper, the functions of which can be performed by a regular ruler. This procedure does not require any special knowledge or extensive experience. To determine the need for replacement, a car enthusiast must have only basic skills and a general understanding of the work algorithm.
However, inexperienced car owners who have never had to check pad wear are not recommended to carry out such a check “alone”. The fact is that if the wear level of consumables is determined incorrectly, this may lead to a decrease in the effectiveness of the brakes or failure of the entire system at the most inopportune moment. The best solution in such a situation is to carry out diagnostics in a specialized car service center. Specialists will be able to quickly check and, if necessary, replace consumables.
Changing brake linings
Where to buy rivets? We sell brake rivets for clutch discs, brake bands, brake pads used in the repair of tractors, cars, buses and agricultural machinery.
In automobile fleets and auto repair enterprises, at service stations, in bus depots, riveting friction linings to brake pads is successfully used for car repairs. The use of this method reduces the consumption of scarce materials and the cost of working time for car repairs.
Rivets are sold at Avtodom-NN Nizhny Novgorod LLC (to purchase, call +7 831 4175724 ). The prices you are interested in are in the price list.
Available in warehouse in Nizhny Novgorod.
If the pads, which have at least a couple of rivets, begin to cling to the drum, immediately replace them. By the way, allowing the rivets to rub against the drum is extremely undesirable - this leads to grooves in the drum and deterioration in braking quality!
The correct way to rivet a brake lining onto a pad number 3
One way to install brake rivets for pads
You purchase rivets and also need two drills, one large for the diameter of the rivet head, the other natural for its shaft.
Using clamps, we press the lining to the block, mark and drill out holes with a thin drill, then use a thick drill to make a recess on the lining so that the rivet is recessed.
Then we clamp the bolt in a vice with the rod up (the thickness is about the diameter of the rivet, but a little less so as not to crumble the lining), rest the rivet head against the bolt and ivy on the back side. (One of the ways to rivet brake pads).
How to choose the right brake pads?
When purchasing brake pads for your car, you must pay attention to the type of material from which the friction linings are made. Today on the market you can find the following types of linings:
- Metal. They are often made from steel or cast iron. In addition to automobile braking systems, a similar type is used in railway transport due to the provision of highly effective braking. Such material does not warp, but sharply loses its properties at temperatures above 400 degrees.
- Non-metallic. Such linings are made on an asbestos base, and resin or rubber is used as connecting elements. This consumable provides a high coefficient of friction until the temperature rises above 220 degrees.
- Sintered. This variety is most often produced on a steel base, but other materials are “sintered” with it during the welding process. Their role is played by pre-made blanks, which consist of powder mixtures subjected to strong heating. The performance properties of such consumables include a high coefficient of friction, wear resistance, stability, and a good level of adhesion.
Each type of consumable has unique properties that must be taken into account when purchasing.
Brake pads must be selected taking into account factors that influence wear. These include:
- Brand of consumables. Each manufacturer's pads have their own characteristics, which must be carefully studied and taken into account when purchasing.
- Vehicle weight. The heavier the car, the more force the brake system will need to exert to slow down or bring the car to a complete stop.
- Driver experience and individual driving style. Even an inactive car enthusiast can quickly exhaust the life of the pads. This happens when the driver does not know how to “brake with the engine” if necessary, or while idling in a traffic jam, keeps his foot on the pedal all the time and brakes sharply, approaching close to the car in front.
If a car enthusiast is accustomed to “aggressive” driving, then it is worth giving preference to consumables with increased wear resistance when working under harsh operating conditions (when the temperature at the friction point rises to 1000 degrees). Such pads, as a rule, are made of expensive materials, which has a significant impact on the cost of the finished product. If there are not enough funds to purchase such pads, then all that remains is to adjust your driving style.
Preparing the car for replacing brake pads
Before replacing the pads, it is necessary to prepare two types of lubricants, namely for processing the studs and the hub pad, for lubricating the guide pins and brackets that serve as pad retainers. If it is necessary to process the studs and the hub pad, then most often a graphite type of lubricant is used. However, it is possible to use a high temperature type made on a copper base. The fact is that a copper dab can more effectively protect metal surfaces from wear, oxidation, and “sticking” under extreme temperatures (from -40 to +1100 degrees).
The second type of lubricant required for the guide pins and retaining brackets should be a general purpose lubricant (preferably). Such a lubricant can effectively perform its functions, moreover, it costs much less. Before you start lifting the car with a jack, you need to select as level a horizontal surface as possible, put the car in neutral gear, sharply press the brake pedal, and then immediately release it. The last action will allow you to “deepen” the brake piston, which will make further actions easier.
It is necessary to place special stops under the wheels to prevent accidental movement of the vehicle during maintenance. To make it easier to “recess” the piston, you need to open the hood and unscrew the cap of the reservoir that contains the brake fluid. To gain access to the pads, the wheel must be removed. You need to fix the guide pin using a 17mm wrench, then unscrew the lower and upper fixing bolts.
Some car enthusiasts, when replacing pads in a personal garage, prefer to completely unscrew only the lower fixing bolt, and simply loosen the upper one, so that in the future they can lift the caliper up and not completely dismantle it. Using this method of maintenance, you can significantly speed up the process, but it is impossible to check the stroke of the guide pin in such a situation.
In specialized car services, where the quality of service delivery is always put first, rather than the speed of completion of maintenance, the caliper is always completely dismantled. This approach allows for more efficient inspection and replacement, and, moreover, saves the car owner from “unpleasant surprises” on the road. To prevent the caliper from interfering with maintenance, specialists often hang it using a metal wire on the suspension spring.
How to carry out the work
When replacing disc brakes, the sequence of work must be followed. This must be done on a level surface, preferably in a garage, and prepare a set of tools for fastening in advance; different models use different options - from ordinary bolts to screws with an internal hexagon or star. Step-by-step instruction:
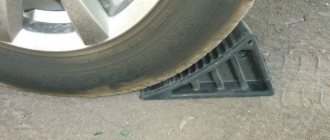
- Place chocks under those wheels that will not be removed to prevent the car from rolling.
- Remove the mounting bolts or nuts on the wheel rim. Raise the car with a jack and remove the wheel. It is dangerous to put a stop and leave the car on a jack.
- Unscrew the cap on the brake fluid reservoir. This will make it easier to press in the brake cylinder.
- When there are fixing brackets, carefully remove them with a screwdriver. Then unscrew the caliper mount. Take a flat-head screwdriver and carefully press in the piston on the brake cylinder.
- If you need to change the pads, the old ones are removed, the installation site is cleaned of dirt, and then new parts can be installed. Reassemble in reverse order.
- When removing the disc, move the caliper to the side and hang it so as not to damage the hose. The bolts must be removed carefully; to do this, first block the hub in a stationary position.
- Clean the installation site from debris and deposits. Replacing the brake disc is carried out in the reverse order. If there is a protective lubricant on it, remove it with a degreaser.
For your information! Carry out work no earlier than half an hour after the trip. All parts of the brake system must cool down.
When installing discs or replacing pads, inspect all elements and, if necessary, replace worn ones. Pay attention to the fasteners and brake hoses; if they are cracked, buy new ones. You can test the system ahead of time from the pit to ensure you have everything you need in advance.
What tools are needed to replace brake pads yourself?
Before you begin to “prepare” the car for the replacement procedure, you need to collect the necessary tools and other things. These include:
- Manual. If a car owner replaces the pads himself, then he needs to make sure that such a manual is available. If the “book” purchased with the car is not compiled in detail, then you need to purchase a higher quality edition with detailed step-by-step instructions. Such a guide will be useful to car enthusiasts who have little experience, as it will help to accurately determine the installation location of the jack, supports for holding the vehicle suspended, and obtain other information for the replacement procedure.
- Jack. As a rule, it comes with a new car. The jacks provided by the manufacturer are ideal for replacing a wheel, but “original” jacks are not always suitable for dismantling the pads. The fact is that they often cannot lift more than half the weight of the entire car, since the manufacturer believes that such a load capacity is quite enough to replace a wheel. But to replace the pads you need a device that can lift up to ¾ of the car’s weight. If we are talking about a passenger car, then the right decision is to purchase a jack designed for 3 tons. This will ensure safety and lift heavier machines if necessary.
- Lifting support. It is required to keep the car stable in the air after it has been lifted using a jack. Each such “stand” has individual load-carrying characteristics, so you need to purchase them based on the total weight of your personal vehicle. The best solution is to buy products with a reserve carrying capacity.
- Caliper adjustment tool. It makes it possible to independently calibrate the caliper if necessary. It can be done in other ways, but often all of them are less effective, especially if the car enthusiast lacks experience.
- New pads and brake discs (if necessary). An experienced car enthusiast will always prepare consumables in advance to replace worn ones before dismantling the wheel and removing old pads.
- Brake lube. It must be prepared, as it is needed for applying new pads and calipers to the surfaces during reassembly.
- Set of socket and wheel wrenches.
Important nuances of replacing brakes that you need to know
If you carry out the work yourself, you should understand all aspects in order to avoid mistakes. You should not skimp on the reliability of spare parts; not only their service life, but also traffic safety depends on this; cheap ones work worse and can lead to damage to other parts of the system. Please note the following:
- Front pads and brake discs should be replaced much more often than rear ones. They bear the main burden. On average, the resource is 2 times less.
- All data on the disks is printed on the end part. From the markings you can determine what the permissible minimum thickness should be. If it is less, it is impossible to restore their normal performance.
- Change discs in pairs, even when one of them is in good condition. This is due to the fact that due to uneven thickness and wear, the brake system will not work as well as it should. When buying used parts, you should only take those that were on the same car.
- Grind only cast iron products if the thickness is greater than the minimum permissible value. This can be done on both solid and ventilated parts, but composite versions are not subject to such processing. It is not possible to restore rims made of metal ceramics and carbon fiber. This work can only be done on a machine; it cannot be done in a garage. Usually the thickness reserve is only enough for one groove.
- Bleed the brakes even when the system has not been opened. New parts have different parameters from old ones, so it’s better to play it safe and rule out any problems.
- Change the brake fluid every 60,000 miles or every 2 years if the car has driven less during this period. The composition loses its properties, becomes contaminated and becomes saturated with water, which is unacceptable.
- In addition to discs and pads, it is necessary to change other parts of the system from time to time - brake cylinders, springs, brackets and other parts of the caliper. This is done as it wears out. When the rubber boot on the cylinder is damaged or the steel surface is corroded, it should be replaced immediately.
- After work, make sure that there are no leaks at the connections. Inspect the components from the pit, this makes it much easier to detect problems.
- Check the condition of the brake hoses. If they are cracked or swollen, replace them immediately.
Advice! It is advisable to use discs and pads from the same manufacturer.
In order for the brakes to work longer, you should not brake sharply or hold the pedal without releasing it; overheating will cause the metal to deform. Very often the discs will slip if you drive into a puddle when they are very hot. Temperature changes can ruin them in one go, especially when the spare part is of poor quality.
Step-by-step instructions for replacing brake pads yourself
Inexperienced car enthusiasts often wonder: how to understand brake pads . They should know that the replacement process in disk and drum systems has its own characteristics that need to be studied in detail before starting the procedure. If we are talking about replacing worn brake pads in a disc system, then you need to adhere to the following algorithm:
- Jack up the car, remove the wheel, and then install a special support on the bottom.
- Unscrew the caliper guides. If the design contains fixing brackets, they must be removed using a screwdriver.
- Disconnect the pad wear sensor connector, if equipped.
- Remove the pads from the disc using a screwdriver. This action is performed to press the brake piston.
- Remove old consumables.
- Install new pads.
- Reassemble the brake system in the reverse order, that is, put the wheel “in place” and remove the jack.
- Bleed the brakes. This is necessary for the new pads to “break in”.
Carrying out the above steps in the described sequence will help you carry out the replacement procedure as efficiently as possible and achieve a positive result without resorting to the help of specialists.
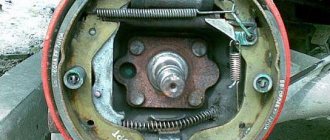
If the car is equipped with a drum brake system, the replacement procedure will have some differences. Actions are performed in the following algorithm:
- Jack up the car, install a support under the bottom and be sure to remove the car from the handbrake.
- Unscrew the bolts securing the brake drum, and then dismantle it.
- Release the handbrake cable. To do this, you will need to dismantle all the springs and remove the rear brake rods.
- Remove old pads.
- Install new brake pads, then reassemble the entire system in reverse order.
- Reinstall the removed wheel without removing the car from the jack.
- Check the operation of the rear brake mechanism. To do this, you need to put the car on the handbrake and try to spin the wheel.
- Pull the jack and supports out from under the car.
The described algorithms cannot be called complex - all actions can be performed in a personal garage by the car owner. However, a car enthusiast should have at least a general understanding of the design of the brake system (disc or drum). If you do not have the minimum experience and knowledge, then it is not recommended to “climb” to replace brake pads , “armed” with one instruction. An incorrectly assembled brake system may not work at the most inopportune moment.
Adhesive for brake linings: types, rules of use
The life of the vehicle owner and pedestrians depends on the health of the car. Therefore, the brake system must be in order. When replacement of the linings is required, special adhesive for brake linings is used for gluing. Otherwise, unpleasant situations will arise when braking.
Overview of brake lining adhesive characteristics
The adhesive for the pads must have the following characteristics:
- Guarantee 100% reliability when connecting brake plates to metal bases. This is especially important in circumstances of vibration and high loads.
- High temperature resistance.
- Resistant to structural changes when exposed to various liquids and oils.
Rating
Based on reviews from car enthusiasts, we have compiled a rating of the best products for repairing the brake system.
VS-10T
VS-10T glue has all the necessary data . Specially designed for the purpose of gluing the material to the pads and driven discs of the clutch, it can withstand high temperatures up to 300 degrees. Temperature drop can withstand up to -60 degrees.
The composition includes 2 resins, tetraethoxylane, methenamine, and quinoline are added. After the composition has completely dried, the connection is ensured with strength and is able to withstand the forces of vibration and heavy loads. When used, withstands contact with oils, gasoline and other liquids.
The adhesive consistency is viscous, transparent, tones range from light to dark brown.
Poxipol
Gluing can also be done using Poxipol . Available in two tubes. The first contains epoxy resin, marked with the letter A. The second contains a hardener, marked with the letter B.
The need for a hardener arises due to the long drying time of the resin, but it is this that has high flexibility and provides increased adhesion. The color of the composition is transparent, perhaps a metallic shade.
Epoxy resin (ED-20)
Epoxy resin , for example ED-20 , is also used to glue brake plates to pads . Provides high adhesion to metals.
It is not destroyed by various liquids, except powerful acids. Due to their different composition, resins are divided into cold and hot cure. Without additional components, the resin has a transparent yellow or orange color.
With components, the color changes from white to red, even black.
How to glue pads with your own hands
To glue the brake linings onto the pads yourself, you must adhere to the following points:
- The plane of the block is thoroughly cleaned of dirt and rust. If necessary, clean with sandpaper.
- Degreasing is carried out (acetone or gasoline).
- Wait until the surface is completely dry.
No more than 5-6 hours should pass between cleaning the surface and gluing.
- Apply glue to both surfaces to be glued. Application is carried out with a brush and in one direction.
The applied layer should evenly fill the plane. Glue-free areas are not allowed.
- Allow to dry for 1 hour. The room temperature should be close to 24 degrees.
- Apply another layer on top of the first one.
- Leave for 1 hour.
- Connect the planes, clamp them tightly (clean off any glue drips from the ends) and place them in a heating cabinet for 2 hours. The cabinet is preheated to 180 degrees.
- After cooling, the block is ready for use.
Finally
When choosing an adhesive composition, you need to focus on quality characteristics. Since we are talking about the serviceability of the braking system, which is very important for the safety of human life.
Did the article help you decide on the choice of adhesive composition? Leave your comment, share information on social networks.
Source: https://VseProKley.ru/avto/klej-dlya-tormoznyh-nakladok
Running in brake pads after replacement
Often, after replacing the pads on their own, car enthusiasts forget to break in the new consumables and immediately begin to operate the brake system in “aggressive” mode. Such an attitude can most likely lead to premature failure of the brake system elements (and we’re not just talking about the pads). Such use provokes the appearance of a “whistle” when braking in 80% of cases.
To increase the service life of the brakes, it is necessary to break in, adhering to the following algorithm:
- Warm up the brake system. To do this, without starting to move, press the brake pedal several times (2–3 times). This will help create the right pressure.
- Start driving using intermittent braking for the first 300 km. In this case, you must avoid pressing the pedal hard or for long periods of time. Such “procedures” make it possible to prevent the pads from overheating immediately after installation. During break-in, you need to pay attention to strong noises and vibrations that occur when the brake system is activated. The presence of such phenomena may indicate improper assembly or installation of brake system components. If such “symptoms” occur, you will need to check it yourself as quickly as possible or contact a car service center where the consumables were replaced.
- Perform final run-in. After passing the first 300 km, 3 to 5 intensive braking sessions are required. Such braking must begin at a speed of 90 to 110 km/h. The initial force when pressing the pedal should be average, then it needs to be increased until it comes to a complete stop (you don’t have to do this: just slow down as much as possible). Between intensive braking, you need to allow the system to cool for 1 minute.
- After the initial break-in and a series of intense braking, drive for several kilometers and try not to use the brake at all. This is necessary to cool the brake system as much as possible.
Running in is carried out in order to prepare the material from which the pads are made to the high temperatures that occur at the friction point during braking. Carrying out the described “procedures” allows you to avoid temperature shock (it provokes rapid wear) and effectively grind in the working surfaces of the pads and brake discs.
To perform break-in, you need to have a certain experience, in the absence of which, entrusting the described procedure to a more experienced specialist is the best solution. This will help avoid damage to the brake system when performing “rough” break-in.
What is needed for replacement
To do this, first of all you will need the pads themselves. It is advisable to buy original ones or a good quality analogue. You can’t save on this, unlike the costs of a master’s work. The parts should not be too soft or too hard. In the first case, they will wear out very quickly, and in the second, they will damage the brake discs.
You will also need a jack, a balloon and a set of keys.
Possible problems and their causes
As mentioned above, if the installation of new pads is carried out by an inexperienced car enthusiast, then problems may arise during future operation. These include:
- Overheating of brake discs. The main reason for this is the “wedging” of the caliper guides. In such a situation, the pad cannot fully interact with the working surface of the disc. Uneven pressure resulting from deformation of the pad leads to overheating. Its premature wear can also be a cause.
- Creaking and grinding of pads. The reason for the appearance of such sounds during operation of the brake system may be a violation of the integrity of the boot of the main piston, the use of low-quality consumables, the absence of cuts or bevels on the surface of the pad, excessive overheating of the disc or its wear. Extraneous noise can be eliminated in various ways, depending on the specific reasons.
- “Sinking” of the brake pedal. This phenomenon can be caused by damage to the cylinders, a lack of working fluid in the system, or poor-quality assembly. Most often, the pedal fails after replacing the pads due to the carelessness of the car enthusiast who installed them. Inexperienced intervention in the system will most likely cause air to enter or working fluid to leak out.
- Knock when braking. It can be caused by play in the caliper guides, wedging of the piston, bending of the brake disc, or loosening of the cable in the parking brake system. Another reason for the appearance of such extraneous noise can be the anti-lock braking system, if it is included in the design. To check this, you need to pull the fuse from it, which will “turn off” the ABS, but the brakes will continue to function.
- Vibration. It may be caused by deformation of the brake disc. It may be caused by excessive heat during operation. The fact is that during intense braking, the pads can be pressed too hard against the disc, creating enormous pressure and temperature. This can cause the disk to lose density and change its shape. It is worth noting that sudden cooling of the disk can also cause deformation in certain places.
Taking into account the above reasons, you can adjust your driving style in such a way that the service life of discs, pads and other elements of the brake system will increase several times. An inexperienced driver can protect the braking system from such problems to some extent by installing ABS.
The best disc manufacturers
When replacing, it is important to choose a reliable option; you should not use products from other models or skimp on quality. All disks can be divided into three types: inexpensive, medium and premium segment. It is best to select based on the characteristics of the car; the more powerful its engine, the higher the requirements for the brakes.
Inexpensive options
A low price does not mean the same quality, it’s just that manufacturers are focused on the used car market or on cheap models that use the simplest, small-sized wheels. The following brands performed best:
- Avantech. A South Korean manufacturer that supplies products to the assembly lines of some automakers. An alloy of cast iron and carbon provides special strength, and a special coating protects against corrosion. This option is an order of magnitude cheaper than most analogues with comparable quality.
- Nipparts. The Dutch company produces brake discs for Asian cars and sells them throughout Europe. They are distinguished by good quality, high safety standards, and low prices. During production, they are tested for braking efficiency for the best performance.
- Bosch. The brand is German, but all factories are located in Asia, and the quality meets all standards; the products are supplied to many automobile conveyors. The discs are cheap, but this option is only suitable for those who use the car in standard mode; if you often have to brake urgently or drive in the mountains, it is better to choose another manufacturer; under high loads, the efficiency is greatly reduced.
- NIBK. The Japanese company began producing parts for brake systems only at the end of the last century, but its quality and reliability made it popular all over the world. A wide range allows you to find discs and pads for most models, prices are at an average level.
- Ferodo. British concern producing brake discs. They are manufactured using a special nonlinear processing technology, which ensures quality and long service life.
For your information! Some automakers recommend certain manufacturers of spare parts. It is better to follow their recommendations as all the brands offered are tested and ensure safety and reliability.
It is worth buying discs from trustworthy stores. There are a lot of fakes on sale, which are much cheaper, but the quality is so low that the service life is reduced significantly. Contact an official representative of the brand, if there is one.
Medium and expensive price segment
They are used as a replacement for original products, which most often cost much more. Middle-class products are of good quality; all the brands presented have been in business for a long time and their production process is streamlined. Best options:
- Blue Print. British company with factories in Asia. Made from steel, the surface is perforated in a special way to ensure better adhesion to the pads and minimal braking distance.
- Masuma. The Japanese brand, which has the lowest number of manufacturing defects of all the companies represented, products are purchased by some Asian car manufacturers. There are often fakes on sale.
- Schneider. A German company focused on vehicles used in extreme conditions and heavy loads. Produces ventilated, cross-drilled discs that provide very effective braking in difficult conditions. But the pads will wear out much faster.
- Lucas (TRW). German manufacturer of brake system parts. The products are painted black, which protects them from corrosion and makes them recognizable. The price is low, but some models have a short service life, especially with aggressive driving.
- Brembo. An Italian company that produces high-quality wheels using special technology, which provides a warranty period of up to 80,000 kilometers. The model range is constantly updated, there are many options, so you can choose them for almost any model.
This group is distinguished by good quality, it is suitable for everyday driving, and there are options for those who use the car under high loads. It is worth selecting based on engine power and the nature of operation; sometimes it makes sense to install larger discs to increase braking efficiency.
As for expensive options, the quality is always high, but each has its own characteristics:
- Fremax. Suitable for extreme driving, packaged without air access, so there is no need to degrease the surface.
- DBA. They have perforations, which ensures good braking even when water gets in, are resistant to overheating, and have a long service life.
- AND THOSE. It supplies products to many manufacturers, there is a line for extreme driving, it can withstand high temperatures without breaking the geometry.
- Otto Zimmermann. They produce wheels for the VAG concern and other European manufacturers. The quality is high, it has good wear resistance.
- EBC. Expensive products for sports cars and premium cars. Defect rates are minimal, performance characteristics are among the best.
You should not buy expensive options for a small car, since there will be almost no difference compared to cheap models due to low loads. When choosing, you can read reviews, since different brands have their own optimal price solutions.