When and why an axle bearing fails on a Niva Chevrolet
Chevrolet Niva traces its history back to the regular Niva or VAZ 2121, which entered the assembly line more than 40 years ago. In turn, this VAZ SUV was developed on the components and assemblies of the VAZ 2106 and has many design solutions in common with it - both successful and dubious. The weak point was the ball bearings of the rear axle shaft.
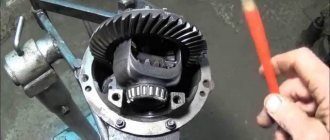
The bearing is located inside the rear axle housing closer to the hub and is pressed tightly onto the axle shaft. The second end of the axle shaft fits freely into the differential of the rear gearbox and is not fixed there by anything. On the wheel side, the axle shaft is secured with a plate with 4 bolts. Therefore, when driving off-road or installing wheels of larger diameter, both axial and radial forces act on the bearing itself. This load is enough to quickly finish off a relatively weak single row bearing. If this problem is not so acute on Lada cars, then on a more massive car, breakdowns are much more common.
Main reasons for failure:
- careless off-road driving, especially in combination with sudden impacts;
- overcoming fords and moisture getting inside the bridge;
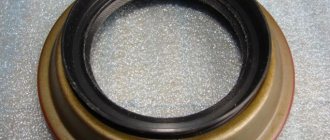
- oil seal wear and oil leakage from the rear gearbox;
- displacement of the locking ring due to its incorrect installation or defect;
- radial runout of the axle shaft (usually occurs due to deformation of the shaft itself);
- damage to the landing pads on the axle shaft or inside the axle stocking;
- installation of wheels with a larger diameter and offset than those recommended by the factory.
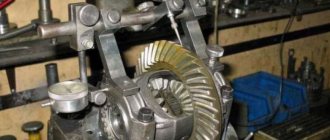
Disassembling the unit and removing the ball bearing
We place the car on a level surface or hang it on a lift. Be sure to install wheel chocks, and the raised side of the machine is additionally supported on a reliable base, for example, several thick bars or a special tripod. Great efforts are applied during dismantling, and there is a risk of dropping the car from an unstable support.
Procedure for removing the rear axle shaft:
- Remove the wheel from the faulty side.
- Unscrew the brake drum mounting bolts. If the drum cannot be removed by hand, these bolts can be used as a puller by screwing them into special holes. Or carefully knock it out with a hammer through a wooden spacer.
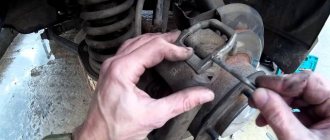
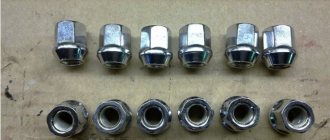
- The hub is held in place by 4 17mm mounting bolts, which can be accessed from the back of the brake mechanism protective casing. At this stage, you can visually assess the amount of axial clearance in the bearing.
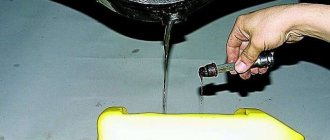
- After unscrewing the bolts, raise the rear axle so that the oil from the gearbox does not leak out through the stocking.
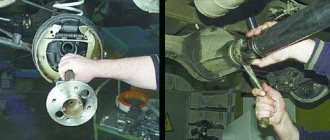
- We pull out the axle shaft with an impact puller or a reverse hammer. You can use the spare tire as an inertial puller. To do this, throw on the disk and lightly tighten the nuts. With energetic jerks we pull the axle shaft out of place.
- We take out the axle shaft along with the rubber seal. We hang the brake pads by wire to the suspension elements.
We inspect the axle shaft for mechanical damage, whether it is bent and the condition of the spline joints, then it is better to replace the axle shaft with a new one. In other cases, simply replace the bearing and seal.
Removing the right drive Niva Chevrolet
This is Tough! Removing the right drive Chevrolet Niva. Comparison of Chevrolet Niva and NIVA 21214 in Self-repair
Removing the internal grenade of a Chevrolet Niva
Replacement of the front left outer and inner CV joint at the Niva
Removing the left wheel drive shaft Niva Chevrolet
Replacing the seal of the internal CV joint of the front axle on the Niva. VAZ 21213.
Replacing the Niva front wheel bearing
How to change CV joint boots on Niva yourself
How to remove the front gearbox on a Chevrolet Niva
How to knock out an internal grenade. Do it yourself!
Replacing the gearbox seal yourself
Good day. Yesterday I spent more than half a day replacing the right drive, took everything apart according to the book, and put it back together. I couldn’t pull it out, the beam wouldn’t give, and the lid’s ear clings to it. How to get it out, I spit it in different ways and nothing. Give me some advice!
Comments 10
I've already removed the right drive twice. To avoid any confusion in the future, I unscrewed the studs from the RPM to which the side cover is attached, and screwed it onto the bolts.
Thank you, I’ll probably do that. I thought about that too when I pushed him back.
Is this operation performed by one person or by a team))? I suffered alone!
I repair them, so I make one. And it will be more convenient and faster for both of us. A friend and I installed an axle assembly with drives on a Chevy, it was a Kama Sutra, but they installed it.
2123-2303120 oil seal, right. Nivsky is the same, judging by the number, generally cheap 2101-3103038. Bet from Niva. The Chevrolet one has a rubberized body, that’s the difference.
Thanks, I'll look for it.
I unscrewed the ball joint to remove it
I unscrewed both the shock absorber and the ball joint, moved the fist to the side, unscrewed both bolts of the covers, the cardan, 4 nuts of the rear part of the axle. And nothing: (the cover does not help
I don’t know how to use the alphabet, but in practice the ear mounts are unscrewed, the cardan mount is unscrewed, and the mount to the stabilizer is unscrewed. A good idea would be to remove the left wheel, unscrew the lower ball joint, and hang the fist with the disk so that the drive can move freely back and forth. Move the entire structure of the RPM + drives to the maximum to the left, with the right side shifted towards the passenger. In this position, the right drive can be pulled out.
We remove the axle shaft, select tools, consumables and accessories
The tool has been selected and the axle shaft can now be removed. This is done in the following sequence:
- We place the car on a flat surface and install wheel chocks under the front wheels.
- We tear off the wheel mount, jack up the car, and install a stand under the rear axle.
- Remove the wheel and unscrew the brake drum mounting screws.
We unscrew the bolts securing the brake drum to the axle shaft. - We knock down the brake drum, but not directly with a hammer, but through a wooden spacer, otherwise there is a danger of damaging the brake drum.
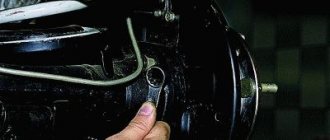
We knock down the brake drum using a wooden block. - Unscrew the four bearing spacer nuts from the back.
We unscrew the four nuts of the axle bearing mounting plate bolts. - Using a stand, we raise the rear axle, thereby freeing the shock absorber mounting bracket.
- Using an inertial puller, we pull the axle shaft out of the bridge.
If you don’t have a puller, you can try throwing the wheel onto the axle shaft and attaching three nuts so that there is a gap between the axle shaft and the wheel disk. We pull the wheel towards ourselves several times, trying to get the axle shaft. Sometimes a heavier wheel, for example from a UAZ, helps. We remove the axle shaft using an inertial puller.
When removing the axle shaft, you need to try not to damage the oil seal if there is no desire or need to change it. After this, the entire brake mechanism is suspended from the spring using a wire.
Read news about the new Niva
- The main causes of power steering leaks and repair methods
- AVTOVAZ increased prices for LADA Niva for the second time in 2022 » Lada.Online - all the most interesting and useful about LADA cars
- Sale of new VAZ (LADA) Niva cars 2022