string(10) “error stat”
If a rotating shaft comes out of the body of a mechanical device, it is necessary to ensure the tightness of the joint, because the moving parts “float” in the liquid lubricant that fills the body. A cuff is used to prevent leakage.
For the manufacture of modern O-rings, special types of rubber, rubber or silicone are used. The outer side of the diameter does not bear friction loads, is intended for fixation in the hole, and can be hermetically attached to a metal mounting ring (glass).
But there are special requirements for the internal side. The rear axle gear oil seal operates under difficult conditions. High temperature, continuous rotation, exposure to reagents from the road surface. All these factors accelerate rubber wear, so replacing the oil seal is a regular routine procedure.
How often is the gearbox seal replaced?
The frequency of standard replacement is indicated in the manual. Over time, rubber loses its elasticity, oil begins to leak, and the cuff cannot be restored. In addition, it makes sense to change the oil seal when repairing and servicing the gearbox itself. Even if it is in good condition, you will definitely damage the material when removing the shank.
If, when the season changes (from summer to winter), the bushing “snotty”, that is, the surface around the shaft axis becomes oily, it’s time to replace the gearbox seal. Soon he will lose weight completely.
And, of course, if there is a rupture and loss of tightness, it is necessary to stop using the vehicle and change the cuff. Otherwise, saving on matches will cost you expensive gearbox repairs.
List of required tools
You will need:
- Screwdriver Set
- Set of wrenches
- A socket wrench or a socket on “24” (a wrench will be useful for the head)
- Hammer
- Oil container
- Hex wrench (to unscrew the drain plug)
- Special two-jaw puller
- Torque wrench
- Syringe for filling grease
- Jack
- Supports (stands) for the body
Attention: Unskilled replacement of the oil seal in the rear axle gearbox can lead to disassembly and repair of the entire axle gearbox, which is only possible in a workshop; the cost of the issue increases many times over. If you don’t know how to do it yourself, use the advice and help of a familiar specialist, or go straight to a service station.
Why does the gearbox seal fail?
- The gearbox breather is clogged. When heated during movement, air pressure squeezes out the oil seal, it becomes deformed, and the internal stiffener wears out;
- Incorrect tightening torque of the propeller shaft flange nut on the gearbox leads to rapid wear of the oil seal;
- A low-quality cuff is installed, its service life is unpredictable;
- Contact with a hard object - a broken tooth from a gear, a piece of a broken retaining ring;
- Aggressive additives in gear oil;
- Chemical effects of reagents on road surfaces;
- Failure to change the oil in a timely manner leads to overheating of the gearbox; the oil seal cannot withstand too high a temperature.
Crankshaft structure
The crankshaft is installed in the lower part of the engine directly above the oil sump and consists of:
- main journal - the supporting part of the part on which the main bearing of the engine crankcase is installed;
- connecting rod journal - stops for connecting rods;
- cheeks - connect all the connecting rod journals with the main ones;
- toe – the output part of the crankshaft on which the timing gear drive pulley is fixed;
- shank - the opposite part of the shaft to which the flywheel is attached, driving the gears of the gearbox, and the starter is also connected to it;
- counterweights - serve to maintain balance during the reciprocating movements of the piston group and relieve the load of centrifugal force.
The axis of the crankshaft is the main journals, and the connecting rod journals are always alternately shifted in the opposite direction from each other. These elements have holes for supplying oil to the bearings.
The crankshaft crank is an assembly consisting of two crankpins and one crankpin.
Previously, prefabricated crank modifications were installed in cars. Today all engines are equipped with solid crankshafts. They are made from high-strength steel by forging and then turning on lathes. Less expensive options are made from cast iron using casting.
Here is an example of creating a steel crankshaft:
About the consequences of untimely “treatment”
And just as a runny nose can lead to serious problems in the body, even some kind of meningitis, oil leaking from the bridge can lead to serious “diseases” of the drive axle: overheating and jamming of bearings, scuffing on the surface of the gear teeth of the main pair, their rapid wear, increased noise and other troubles, including jamming of the main gear itself. Therefore, if you discover severe oiling in the area of the drive flange, or, even worse, an oil stain on the ground under the gearbox, you should not delay the “operation”. However, if “well, I can’t go on sick leave right now,” then by regularly monitoring and replenishing the oil level in the gearbox, the car can be operated for some time without any special consequences for the health of the bridge.
Repair of Pajero II transfer case shank
One fine day I drove into a small hole, the car shook, and clicks began to be heard in the body, as if the cardan cross had “arrived.” When the speed decreased, the symptoms disappeared and only appeared at speeds of 20-50 km/h. with a successfully found hole. Since the crosspieces were checked a couple of weeks ago, and the transfer case shank was already on the verge (the fork play in it reached 5 mm), I decided that on some unpleasant bump the crosspiece came out at abnormal operating angles and jammed, and the cardan at these moments rotates radially. A council gathered, we went to torment the car, ride in the pits, etc... then in the pit, with a smart look, we took turns shaking the shank and decided that it was his fault
Auto repair school - Do-it-yourself car repair
Jun 13, 2022 VAZ 2101, VAZ 2102, VAZ 2105, VAZ 2106, VAZ 2107, Zhiguli, Classics by admin
Are you looking for an answer to the question - How to change the elastic coupling on VAZ 2101-2107 cars ? Or are you interested in learning - How to replace the secondary shaft oil seal in the gearbox of your favorite Zhiguli ? If so, then you have come to the right place! It is in this article that you can get answers to your questions))). And I hope that after reading this, you will be able to replace both the oil seal and the elastic coupling yourself. After all, there is nothing complicated, you just need to be well prepared for work. But first, let’s define the reasons why you will have to take keys, hammers, screwdrivers and crawl under the car. With the seal, everything is clear. It is difficult not to notice an oil leak. But the elastic coupling requires attention. To do this, we climb under the car, take a large screwdriver in our hand and insert it between the flange and the rubber part of the coupling. We pull away from ourselves or toward ourselves (whichever is more convenient) and check the integrity of the rubber. If you see the same picture as in the first photo, then it’s time to get to work. No, of course, you can skip the above and not bother with technical inspection. Wait until the “elastic” breaks completely and then only change it, but believe me, when this happens (as a rule, this happens unexpectedly and at the most inopportune moment), you will not like further driving the car. There will be only one thought - Will I be able to get to the service station (or garage)? Well, tell me, who needs these thrills?? That’s why, carefully inspect the car yourself; if you don’t have the time and opportunity, trust the experts, and regularly carry out a technical inspection of the car.
From the introduction we move on to the main thing... First, on spare parts. You can even say it differently - “briefly for spare parts.” The secondary shaft oil seal (2101-1701210) and the elastic coupling of the driveshaft for VAZ-2101, VAZ-2105, VAZ-2106, VAZ-2107, Classic cars should be purchased from Balakovo production. High quality, accessible and inexpensive. Please note that the new elastic coupling has a tightening tape installed (photo 2). It should be removed only after installing the coupling on the car.
By instrument. The required arsenal should include: 13 mm spanners and socket wrenches, a large screwdriver, 30 mm socket wrench, hammer, 19 mm socket wrenches, expanding pliers for removing retaining rings. And, don’t forget in advance, prepare a mandrel for the “careful” installation of the gearbox oil seal. This can be a piece of pipe with an outer diameter of 55 mm (check the gland) and a height of 80-85 mm. You can hammer the seal in with a hammer, but it is not necessary. It’s better to try to do everything correctly and carefully, because you’re doing it for yourself))!!
After all the preparations, we drive the car onto an inspection hole or overpass and get to work - replacing the elastic coupling of the driveshaft and the gearbox seal on VAZ-2101, VAZ-2102, VAZ-2103, VAZ-2104, VAZ-2105, VAZ-2106. , VAZ-2107, Classic:
1) Unscrew and remove the propeller shaft. More details here. 2) Next, use a 13 key to unscrew the safety bracket (photo 3). 3) Unscrew and remove the gear cushion bracket along with the cushion (photo 4). This and the second point are not required, but for convenience, it is better to do just that.
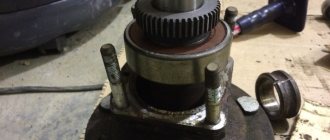
4) Using 19mm wrenches, unscrew the nuts on the bolts (3 pieces) that secure the elastic to the gearbox flange (photo 5). We knock out the bolts and remove the elastic coupling along with the flange. And in a more convenient position (for example, in a vice), unscrew the remaining bolts and remove the elastic coupling from the flange. We install a new one and climb under the car again to change the gearbox seal (well, of course, if there is a need for this).
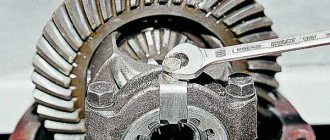
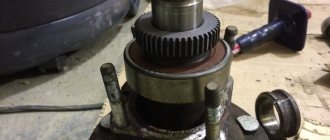
5) Remove the rubber O-ring. Using pliers, remove the retaining ring (photo 6). Next, bend the edge of the fixing washer (photo 7). And with a 30mm wrench we begin to unscrew the flange mounting nut (photo 8). By unscrewing it, we thereby move the metal centering ring to the edge of the secondary shaft. But it will not be possible to completely remove this ring in this way; we resort to using a screwdriver (two are possible), see photo 9.
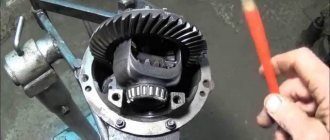
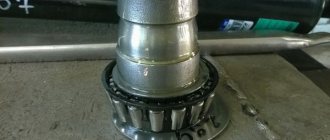
6) Remove the flange and see a beautiful picture (photos 10 and 11). We clean the gearbox shank from dirt and traces of oil. We press out the old oil seal (photo 12).
7) Using a mandrel, press in the new oil seal (photo 13). I had to “quietly” replace the defective reverse light switch (photo 14). Before installing the secondary shaft flange, make sure that there are no signs of wear, holes or burrs on it (photo 15). If there is, then it is better to replace it immediately, since if this is not done, very soon through his fault the oil seal will “leak” again.
We carry out assembly in reverse order. We tighten the flange nut with a force of 7-8 kg, that is, we tighten it well. To fix the flange, use a bolt or metal rod of suitable diameter (photo 16). After tightening, be sure to bend the edge of the washer (photo 17). And only after the elastic coupling is completely installed on the car , you can remove the tension tape (photo 18). You can, of course, remove it earlier, but be sure to write down how the installation of the elastic went))).
When using an article or photographs, an active direct hyperlink to the website www.avtorem.info is required!
Did you like the article? Share it on your page!
How to identify faults and repair the front axle of a UAZ
UAZ is a common car on Russian roads. Its design features allow you to move without problems on paved areas, as well as off-road. Repairing the front axle of a UAZ is impossible without knowing the diagram of the wheel gearbox, the design of which is similar to a similar part of the rear axle. The key difference is the peculiarity of fastening and installation of the main gear, the design parameters of the ball bearing located in a special compartment-cup.
Maintenance Recommendations
Carry out an inspection of the technical equipment strictly in accordance with the developed schedule, provided that the car is under warranty service. After the expiration of the period, you need to individually agree on a new schedule at the auto repair shop where you plan to get serviced. Eliminate wheel slipping from your driving style.
In order for the seal material to be elastic for a long time, it is necessary to fill the hydraulic base with the required marking. It can be either a synthetic or semi-synthetic base. It is better not to use mineral for a car of this class.
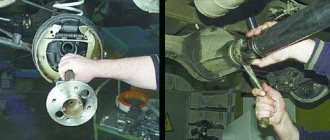
Replacement sequence
- The car is installed above the inspection hole. The plug on the rear axle is unscrewed, and the oil from the gearbox is drained into a previously prepared container. The cylindrical flange of the gearbox is wrapped with nylon thread, which is then attached to the dynamometer. The dynamometer is pulled down until the flange begins to rotate. The value observed on the dynamometer at the moment the rotation begins is stored or recorded.
This force is measured using a dynamometer
For this operation it is convenient to use a 27mm spanner.
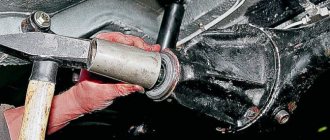
The flange has been removed from the shank
This operation requires a tube and a hammer.
The flange is tightened with a torque wrench
Video: How to carry out work on a VAZ 2107
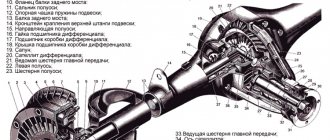
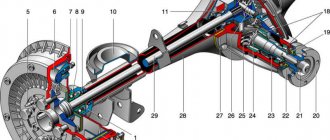
Purpose of the rear axle gearbox
Rear axle gearbox
It is impossible to directly apply torque from the engine to the drive wheels: they will rotate too quickly and it will be impossible to control the car. Some kind of intermediate link is needed between the engine and the wheels. Such an intermediate link is the rear axle gearbox. Its task is to receive torque from the engine and apply it to the drive wheels, having previously distributed it depending on the distance traveled by the wheels.
A little anatomy
In the last years of its life on the AvtoVAZ assembly line, the classic Zhiguli remained perhaps the only passenger car in the world with a rigid drive axle. This design is simple and technologically advanced in production, but has serious disadvantages in operation:
- large unsprung mass of the bridge, which negatively affects the smoothness of the vehicle;
- tendency to steer when one of the wheels hits an obstacle - at this time, due to the misalignment of the bridge, both wheels tilt from the vertical and tend to roll in the direction of the tilt;
- reduction in the useful volume of the trunk, because there must be free space between the axle and the car body for the axle to move during the compression of the suspension.
The advantage of a rigid axle, in addition to manufacturability, is its better adaptability to bad roads: the ground clearance under the axle practically does not change depending on the load, and the wheel drive is reliably protected from external influences by the axle housing.
The Zhiguli bridge consists of a stamped-welded bridge beam (such beams are called “Banjo” for their characteristic shape), a main gearbox with a differential, and axle shafts. The gearbox is made in a separate open housing, the flange of which is bolted to the crankcase. A drive gear with a driveshaft mounting flange and a differential with a driven wheel are mounted in the housing on bevel bearings. The main gears are hypoid, that is, their axes are located at an angle of 90 degrees to each other, but do not intersect (they are crossed). The amount by which the axis of the drive gear is offset relative to the axis of the driven gear is called hypoid offset. Such a transmission, if it is precisely manufactured and well adjusted, operates smoothly and with the least noise, but due to the intense sliding of the curved teeth, it is very sensitive to the quality and quantity of oil in the bridge.
The design of the bridge is relatively simple and technologically advanced, although it is not without its drawbacks
Surgery or therapy?
So, our “wounded” axle is leaking oil around the drive gear flange, and we are ready to save it. But first, as is usual with serious doctors, you need to figure out the cause of the “disease.” How does an appointment with a local therapist usually begin? Of course, from measuring temperature and pressure. You may be surprised, but when starting to repair a bridge, we should also remember these physical characteristics. And that's why. During operation, the drive axle gets quite hot - the temperature in the crankcase can reach 80 degrees Celsius. And since, ideally, the axle housing is a sealed container, along with heating in a confined space, the pressure also increases. This is the law of physics. The increased pressure additionally loads all the seals and gaskets of the bridge, breaking out where, for some reason, there is less resistance. This is often the drive gear seal, which is subject to the most intense friction. To reduce pressure, a valve (breather) is installed on the axle housing, which releases excess pressure. Therefore, the first thing you need to start diagnosing a leak is by checking the functionality and cleaning the breather from dirt. The valve cap should rotate freely. When you lightly press the cap from above, it should move freely and return to its original state when the load is removed.
If cleaning the breather does not help, and the leak continues, it’s time to prepare “surgical instruments”. In our case, a regular plumbing kit will be enough, although it would be nice to grab another skein of thread and a hand balance scale (dynamometer) with a good scale.