Driving at high speeds with broken universal joint crosspieces does not go without consequences. The rear axle gearbox on the classic and Niva is designed in such a way that when the car moves forward, the shank seems to be unscrewed from the engagement of the main pair. The drive gear of the main pair (also known as the shank) rotates on two bearings: front and rear. The distance between them is elastically fixed by the pretension created by the spacer sleeve when the shank nut is tightened. The vibration of the cardan, transmitted to the rear axle gearbox, gradually unscrews the shank nut. Radial play appears in the shank - especially on the front bearing, because When moving forward, the shank is unscrewed from the joint of the main pair and the front bearing is freed for play. Radial play wobbles the unfixed spacer sleeve and oil flinger washer, gnawing out metal fragments that fall into the tapered bearing. After the fragments cut “patterns” on the rollers and bearing race, noise begins, which continues even after the shank nut is tightened or the spacer is replaced. In theory, in such cases, repair of the rear axle gearbox is required. Repair with complete disassembly, troubleshooting and assembly. The last stage is not performed by anyone in a city of millions at a reasonable price. Everyone just replaces the gearbox with a new one and moves on.
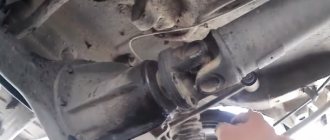
Replacing the front shank bearing.
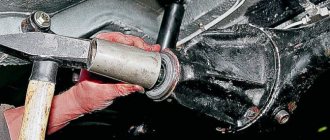
I decided to go a different route. Replace the front tapered shank bearing without disassembling the gearbox. I calculated the distance between the shank and the front bearing race, which was exactly 13 mm. It is necessary to select a puller into this distance, the clamping tab of which can squeeze through. We searched for a long time at the service station, but found a puller with a suitable jaw width size - 13 mm. Only the puller was external, but we managed to twist the legs for internal removal. We started working with this tool.
The flanges were uncoupled. We tightened the nut, took out the bearing, bushing and washer.
Now all that’s left to do is pull out the outer race of the front shank bearing.
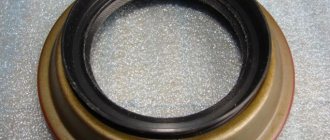
Rear axle gearbox bearings produced by the Volzhsky Bearing Plant (VPZ, 15 GPZ) for VAZ 2101-2107 and the Lada 4x4 family - VAZ 2121, 21213, 21214 (m), 21218, 2131 Niva and VAZ 2123 Chevrolet Niva .
Exactly what they put in at the factory.
№ 7705 - 1 PC.;
№ 7807 - 1 PC.;
№ 7707 - 2 pcs.
They are also installed in the front axle gearbox of VAZ 2121, 21213, 21214, 2131 Niva cars with 22 splines on the front wheel drives.
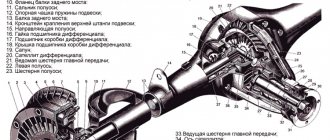
All VAZ classic cars are rear-wheel drive, the vehicle moves using the rear axle, which is the drive axle. The VAZ rear axle gearbox is the most important part in the transmission; it is where the main gear is located.
Differences in VAZ rear axle gearboxes
RZMs differ in the gear ratio of the main pair; in total, there are four types of gearboxes on the VAZ classic:
The slowest one is the RZM 2102, its drive gear has 9 teeth, and the driven gear has 40 teeth. To calculate the gear ratio, you need to divide the number of planetary gear teeth by the number of teeth on the drive shaft; for the VAZ 2102 the drive gear is equal to 4.44.
The “penny” gearbox (2101) accordingly has the number of teeth on the gears 10/43, so its IF is 4.3. The next, faster one is RZM 2103 - it has a ratio of 1041, which means the gear ratio is 4.1. And finally, the “fastest” will be the 2106 gearbox, with the number of teeth 11/43 and an inverter frequency of 3.9, respectively.
Many VAZ 2101-07 owners strive to install the fastest gearbox, but this is not always necessary. If the car often carries cargo, that is, the car is a “workhorse”, high speed is of no use, but high-torque power will be very useful. It should be noted that RZM 2102 was not supplied as spare parts; it was installed only on station wagons.
How to change a bearing yourself?
This unit is pressed tightly into the seat; it is difficult to remove it without a special tool. To replace the gearbox bearings, a special puller is used.
It allows you to distribute the force evenly, and the outer ring will not be distorted. To remove the bearing from the cardan gearbox, it is not necessary to remove the axle from under the car, but to repair the steering gearbox, it will have to be completely dismantled.
Replacing the rear axle gearbox of VAZ 2106, 2107
The main disease of REM is increased noise (hum), and the gearbox can hum for various reasons:
- there is insufficient oil in the bridge, or it is completely missing;
- the gap between the gears of the main pair is not adjusted;
- the gears are worn out, they have chips and other damage;
- the main pair has a manufacturing defect, the gears are not ground in from the factory;
- the shank nut has become unscrewed or loosened;
- bearings are worn out.
The main malfunction of the center differential is the wear of the gears of the axle shafts and satellites, when the surfaces of the parts are heavily worn, play forms between the differential gears, but the rear axle usually does not make noise due to wear of the differential gears.
ZM gearboxes on VAZ classics can be repaired, but only if there is no wear on the gears. If the mechanism can no longer be repaired, it needs to be replaced. We replace the rear axle gearbox of a VAZ 2106 on a “seven” as follows:
How to determine if a gearbox is humming
How to identify gearbox problems by sound and vibration: video
The source of extraneous sounds similar to the hum of a gearbox may be other transmission components, so first you need to accurately localize the sound .
Potential culprits include wheel and axle bearings, driveline components, and even warped or dirty brake guards.
Symptoms that appear in different modes will help you understand that it is the gearbox that is humming. Checking transmission components to find sources of noise can be done while moving , in a pit or on a lift.
Instructions for determining the cause of gearbox hum
During the diagnostic process, you should first pay attention to the wheels, hub bearings, and cardan transmission elements (the shaft itself, spline connection, crosspieces, outboard bearing). The technique presented below allows you to determine what is howling: an axle, a gearbox, a cardan drive or other components by the nature of the noise.
- The appearance of noise when you press the gas pedal and its disappearance after releasing it usually indicates wear of the teeth of the main gear pair.
- A loose shank nut manifests itself as an oil seal leak, as well as a “trolleybus” howl when braking the engine.
- Bearing problems manifest themselves as a constant monotonous and “buzzing” sound that is clearly audible at low speeds . As speed increases, the pitch and frequency of the sound also increase. When starting, a crunching or cracking sound .
- Wear of differential bearings and hubs manifests itself in similar symptoms: at low speeds you can hear squeaks and crunches, synchronous with the rotation of the wheels, which develop into a howl as you gain speed. You can find out what is humming, the gearbox or the axle shaft, in two ways: Rock the wheel in the vertical and horizontal plane: if there is play, then the problem is in the hub.
- Listen to the noise as the suspended wheels rotate and determine where they are coming from.
A hum in the gearbox after disassembling or repairing it may also indicate incorrect adjustment of the position of the shank relative to the driven gear.
How to determine the hum of a gearbox using the example of a VAZ: video
- Extraneous sound when the driveshaft outboard bearing wears also comes from the front of the car. The easiest way to locate it is on a lift or from a hole with the cardan rotating.
- The hum in the gearbox usually occurs only when driving in certain gears or in a certain speed range, but goes away when the engine braking. It is difficult to confuse it with the noise of the rear axle, since the sound comes closer to the front of the car. When the front axle gearbox hums, you can distinguish one problem from another by shifting gears: the gearbox howls the same at all speeds, but the gearbox howls differently.
How to determine if a gearbox or other component is humming using Mercedes as an example: video
Vibrations are a sign of the following problems:
- deformation of axle shafts or axle stockings;
- imbalance of wheels or cardan, or wear of crosspieces and suspension bearing.
The vibrations accompanying the hum indicate that the problem is not in the gearbox! This symptom occurs when there is axial or radial runout, and in the gearbox both the driven (shank) and driving (differential) parts have a two-point suspension at a short distance, which practically eliminates this possibility.
Defects in the gearbox
Increased play in the RZM can be formed due to wear of the differential pinion pin - if you grab the driveshaft and rotate it clockwise and counterclockwise, this play can be felt. Also, increased clearance can be formed due to wear of the splines inside the differential housing itself.
If the gaps in the main pair of gearboxes are not adjusted, a characteristic noise occurs when the car moves:
- when the load increases (sharp acceleration), a characteristic howl is heard in the bridge;
- When I let off the gas the noise goes away.
The engine can hum in a different way, but the characteristic feature described above can most often be heard on VAZ classic cars. Worn teeth of the main pair are clearly visible on the planetary gear - they become rounded, and they often show traces of rust.
How to make repairs
To begin, remove the gearbox from the machine, and then clamp it into a clamp. Unscrew both bolts for the locking plates and remove them.
Next, the bearing caps are marked for their future assembly. To do this, you will need a center punch and use a hammer to make marks. Use wrench No. 14 to unscrew the bolts and remove the covers.
It is important to immediately inspect the bearings for wear and serviceability. The outer races from each bearing are marked, since they are selected in pairs and cannot be disassembled
The radial play located on the axle gears is checked. If its size exceeds 0.5 mm, then the box is replaced. In normal condition, the bearing is removed and the planetary gear is unscrewed.
Next, you need to knock out the satellite axis using the adapter and pull them out.
You need to remove the drive shaft and gear from the gearbox housing. A soft metal punch is perfect for this. The inner wheel of the roller bearing is knocked out.
It is also necessary to replace the adjusting sleeve with a new one.
After knocking down the bearing, you need to remove the adjustment ring.
Next, use a drift to knock out the outer rings of the bearings.
Now you can wash all parts in kerosene or diesel fuel. After the washing is done, all parts are diagnosed. There should be no chips or cracks
If these defects are present, it is important to replace the parts. If there are small scratches, they can be polished with sandpaper.
Adjusting the VAZ rear axle gearbox
If the main pair in the gearbox is worn out, it must be replaced. But you can’t just put the gears back in place; the gaps in them must be adjusted. In total, two types of basic adjustments are made:
- The thickness of the adjusting sleeve (washer) is selected for the shank (drive gear). The washer can have a thickness from 2.6 mm to 3.5 mm;
- The gap between the gears of the main pair is adjusted using two adjusting nuts of the differential housing.
The washer for the shank is selected in such a way that the shaft with the drive bevel gear rotates in the gearbox housing without backlash with a force by hand (0.3-0.4 kg). In this case, the shank nut should be tightened with a force of 12 to 26 kg, usually 18-19 kg are tightened.
Is it possible to repair the gearbox if it hums?
In most cases, a hum in the gearbox is a harbinger of serious malfunctions. However, some problems can be corrected early, avoiding costly repairs. Neglected problems can ultimately lead to damage to the drive and driven gears, which, in addition to the need to replace the main pair, will lead to complete immobility of the car.
The first thing to do if the gearbox is humming is to make sure there are no leaks on the housing and check the transmission fluid level. By adding oil in time and replacing leaking oil seals, you can avoid replacing the main pair.
Special additives also help reduce noise in the gearbox, as they can improve the properties of cheap oil and extend the life of parts. But when the gearbox hums clearly, no means will help. Additives will not restore gears and bearings.
The method for eliminating gearbox noise is determined by the nature and degree of wear of parts. To do this, in most cases, you will need to disassemble and dismantle the unit. Further actions depend on the results of the troubleshooting:
Changing the oil in the Subaru rear gearbox
- Oil seal leakage
. If the oil level drops slightly and there are no metal shavings on the magnetic plug, the oil seal and transmission fluid should be replaced. The disappearance of noise after these procedures indicates that problems have been avoided. If the gearbox hums even after changing the oil, more detailed diagnostics are required to assess the condition of the main pair. - The nut has come loose
. Check the nut and tighten it to the torque specified in the repair manual for your car model. At the same time, check the cardan drive, because the nut often unscrews due to vibrations in it. If oil leaks are detected, the tightening is not enough, you need to change the shank oil seal. Also, at the same time, you should check the bearings by rocking the shank in different directions - there should be no play. In advanced cases, the bushing that holds the tension and the correct position of the “carrot” must also be replaced. - The main pair is worn out
. Gearbox wear without disassembly can only be determined indirectly, by noise under load. It may also be indicated by excessive (10 mm or more) free play of the shank when the wheels are locked. Direct diagnosis of the main gear is carried out by visual inspection of the condition of the teeth. - GP adjustment is broken
. Incorrect alignment of the drive and driven gears relative to each other after repair or disassembly of the gearbox can lead to noise and accelerated wear of the teeth. Correct adjustment is checked by checking the contact patch using paint.
Severe wear of the main pair elements
Diagnosing the main pair based on the contact patch and its subsequent adjustment is a complex operation that requires experience. Therefore, it is undesirable to do it yourself; it is better to trust the specialists.
The consequences of gearbox hum, which was not eliminated in the first 1–2 thousand km after occurrence, are most often irreversible. Most of the reasons due to which intense noise occurs indicate either an abnormal operating mode (without lubrication, with the adjustment of the GP) or already existing critical wear of parts.
Even if only one part of the main pair is worn out, the parts still need to be replaced together, since it will not be possible to eliminate the noise of the gearbox by replacing one element. The drive and driven gears are matched to each other in such a way that the contact patch is optimal, so the parts are replaced only as a set.
Repair or replacement, which is better?
Car owners of VAZ classics often cannot decide what is best to do - buy a complete ready-made REM assembled or purchase individual parts and repair the gearbox. It’s really difficult to decide here - the price of a new gearbox, of course, is higher, but the owner of the car is freed from the headache of adjustment. The thing is that it’s not so easy to find a good specialist in VAZ gearboxes, and there is no guarantee that the new main pair will not hum.
If a car owner buys a new gearbox, but it hums, the part can be exchanged under warranty, but the car owner loses money on removing and installing the gearbox. If you purchase a defective main pair, the repair itself will be more expensive - you will have to pay a technician for a secondary overhaul of the gearbox.
Can't you spoil the porridge with oil?
Oil is poured into the axle housing up to the lower edge of the filler hole, in the position when the axle is installed and secured to the vehicle. You should not fill oil above this level, since a larger volume significantly increases power loss when the gears rotate and provokes leaks.
Lubrication of gearbox parts occurs as follows. The lower part of the driven wheel and differential are constantly immersed in an oil bath. When the car moves, they rotate, alternately wetting with oil all the teeth of the main gear and differential gears. The differential bearings and the rear pinion bearing are lubricated in the same way. In addition, the teeth of the driven wheel spray oil abundantly, creating “oil mist” in the crankcase. The least amount of oil when splashed goes to the front, most distant, bearing of the drive gear. To lubricate it, a channel is made in the upper part of the crankcase, where, under the influence of centrifugal force, oil is thrown from the outer circumference of the driven wheel. The higher the rotation speed, the more oil enters the channel. This channel leads into the cavity between the bearings of the drive gear, passes through the bearings and returns to the bridge beam. To drain oil from the flange side of the drive gear, there is an oil drain channel in the crankcase. The bearings, due to the conical shape of the rollers, have a pronounced pumping effect, so the flow of oil that flows from the front bearing directly to the oil seal can be quite significant - more than one liter per minute. It is not easy to withstand such pressure, so an oil-removing washer is installed immediately behind the bearing, in front of the oil seal. It slows down the flow rate, but there is still a gap between it and the crankcase through which the oil flows to the oil seal. Therefore, the tightness of the drive gear oil seal is a constant concern for axle designers and manufacturers.
The amount of oil supplied to the oil seal depends on the speed of rotation of the driven wheel of the final drive
But the lack of oil supplied to the oil seal is no less, and perhaps even more harmful to its “health”, because with dry friction against the surface of the flange, no matter how smooth it may be in appearance, the working edge of the oil seal will wear out very quickly, and a gap will form between it and the shaft, through which not only oil can flow out, but also water can flow in if you need to cross a ford or just a deep puddle in a heavy downpour. And water in oil is a very quick “death” for gears and bearings.
VAZ rear axle gearbox locking
On VAZ 2101-07 vehicles, the factory does not provide locking of the center differential, but the industry already produces both differentials with locks and fully assembled 3M gearboxes. The most common today are REMs with screw locking; in them, the differential gears are locked depending on the load. In such rear axle gearboxes, a preload clutch is installed, it connects the wheel axle shafts with a certain force, and acts as a blocker.
Locking the VAZ rear axle gearbox provides the following advantages:
- increases cross-country ability, allows the vehicle to avoid slipping on difficult road sections;
- allows the car to accelerate faster at the start;
- The car corners more confidently.
But ZM gearboxes with screw locking also have their disadvantages:
- Fuel consumption increases slightly;
- when accelerating, the car handles worse;
- The differential and assembled gearbox with locking are much more expensive than standard parts (the price is approximately 2-2.5 times higher).
VAZ 2101-07 car owners should know that after installing the RZM with blocking, the car will not become an SUV, and it will not be able to move on severe off-road conditions.
Installation of the VAZ 2107 axle bearing and locking sleeve
1. Find a dense steel object in the garage that can act as an anvil. For such purposes, a piece of railway rails is often used (but this is only one of the options). You can use any available material.
2. Prepare a powerful hammer. If this is not the case, then you can use a small sledgehammer. In addition, take a second small hammer.
3. Place the axle shaft on the anvil so that the device flange does not touch it.
4. Place a thick rag on top of the axle bearing to protect your eyes from accidental flying splinters, or better yet, wear safety glasses. To protect your hands, wear gloves made of thick material.
5. Place any object under the second edge of the axle shaft. The main requirement is the absence of distortion.
6. Use one of the hammers (the smaller one) as a chisel - place it on the top of the holder and strike hard with the other (more powerful) hammer. If you fail to break the knot the first time, give it a few more blows.
7. After splitting the cage, remove the separator and knock down the intake sleeve with a chisel.
8. Remove the inner race. This whole process can be done much faster if you use a grinder, if you have one.
Universal wrench for flanges and hubs
If tightening the nut is a “one-time event” and there is no special wrench, you can get by with two M8 bolts and a wrench (metal rod). The bolts are inserted into the flange holes, and the knob is placed between the bolts in front of the flange. If the knob is placed behind the flange, you may accidentally press on the dirt deflector, after which it will need to be secured to the flange.
After unscrewing the nut, it is necessary to remove oil from the threads of the nut and the gear shank, which will significantly increase the coefficient of friction and, consequently, the moment of resistance to unscrewing the nut. It is better to install a new nut, since the thread of the gear shank is imprinted in the nylon of the insert, which reduces the resistance to self-loosening of the nut.
Causes and signs of failure
As a rule, the oil seal in the VAZ 2107 gearbox is replaced because it begins to leak. Over years of use, the sealing lip may dry out or tear. A leak can also be caused by improper installation of the oil seal.
You can definitely identify a malfunction by the following signs:
- After parking for a long time, an oil stain remained on the road.
- Droplets of oil appeared on the bridge body.
- Near the gearbox shank, characteristic traces of leaking oil are visible.
Important nuances in work
- When driving the oil seal using a mandrel, do not overdo it. Apply gentle blows and control the depth of the oil seal. If you hit it hard, you can easily damage the oil seal;
- Before installing the oil seal, lubricate the rim and sealing edge with fresh oil;
- Before installation, inspect the flange for wear in the area where the sealing lip of the oil seal meets. If there is a “groove,” the flange must be replaced.
As you can see, the process of replacing the VAZ 2107 gearbox seal is quite simple and does not take much time. The most important thing in this job is to properly tighten the rear axle flange nut.
Step-by-step replacement process
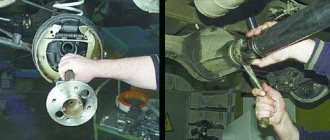
- We drive the car into the pit and unscrew the propeller shaft mounting bolts, having previously made a mark on the flank of the cardan and gearbox. After unscrewing the cardan, we tie it with a wire so that it does not interfere.
Using a special wrench, we secure the flange from turning and, using a wrench or a twenty-seven socket, unscrew the nut. The key for fixing the flange is shown in the photo below. You can also screw two universal joint mounting bolts into the flange and insert a powerful screwdriver between the bolts.
Unscrew the plug and drain the oil from the rear axle.
We remove the flange from the slots and take out the thin ring behind it using two screwdrivers.
- Using two screwdrivers, remove the inner race of the bearing.
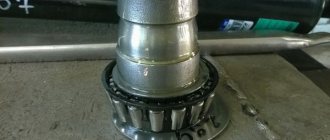
- We take out the spacer sleeve. This bushing is needed to create the correct tension in the bearings. Please note that the belt of the bushing you removed is barrel-shaped, but on the new bushing it is straight. At the moment of tightening, the belt is wrinkled and the correct tension is achieved. The photo below shows a new bushing and one that was already working.
- We install a new bushing, with the narrow side facing the trunk. We also install the ring.
- We hammer the oil seal into place using a mandrel. The mandrel can be made from a piece of pipe of suitable diameter or from an old oil seal. As a last resort, the oil seal can be carefully seated with a hammer.
Design and principle of operation
main gear
The main gear can be single or double. The single gear transmits torque to the wheels of the car using one gear pair, and the double gear – using two. Single gear, in turn, can be:
- cylindrical;
- conical;
- hypoid;
- worm
For a cylindrical main gear, the gears are located in the same plane, while for a bevel gear, they are perpendicular to each other. The advantages and disadvantages of the main modifications to single final drives are listed in the following table.
Modifications of single final drives:
| Modification | Efficiency | Noise level | Dimensions |
| Cylindrical | Maximum | Maximum | Large |
| Conical | High | High | Average |
| Hypoid | Average | Average | Average |
| Worm | Short | Short | Compact |
The double main gear can be central or spaced. The central one has a simpler design, a large gear ratio and a greater load on all elements of the system. The spaced one has a more complex design, it is more efficient in operation and compact.
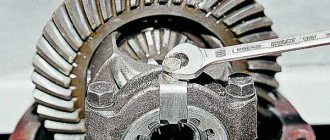
Differential
The cross-axle differential distributes torque between different axle shafts. If the car is slipping or slipping, the differential helps it cope with this problem by allowing the wheels to rotate at different speeds.
The cup (3) contains the satellite gears (4) and half gears (5). The cup is connected to the driven gear (2). The gear, in turn, receives torque from the main gear drive gear (1). The cup, with the help of satellites, transmits rotation to the axle shafts that drive the driving wheels of the car. The operation of the satellites provides different angular velocities. The amount of torque is unchanged.
A similar device is implemented in most rear-wheel drive cars, such as VAZ-2106, VAZ-2107, Gazelle. It has proven its reliability during operation in the most difficult conditions.