Replacing the drive gear oil seal of the VAZ 2106 gearbox
If an oil leak is detected, it is necessary to replace the gearbox drive gear oil seal with a new one, and for this, prepare the necessary tools for the job. To carry out repair work, you will need wrenches “13” “24”, a screwdriver, a mounting blade, a caliper, a set of torque wrenches and a dynamometer itself to control the tightening force of the bolts. If you have everything you need, then we will proceed directly to the repair work.
- It is necessary to drain all the oil from the rear axle housing into a previously prepared container; to do this, unscrew the plug, and after draining the oil, screw the plug back.
- Remove both rear wheels and take out the two axle shafts.
- Disconnect the propeller shaft from the drive gear flange; to do this, use a mounting spatula to secure the drive shaft from turning and unscrew the four bolts securing the cardan joint flange from the drive gear flange, remove the bolts.
- Using a screwdriver, disconnect the cardan drive.
At the next step of the repair work to replace the drive gear oil seal of the VAZ 2106 gearbox, you will need a dynamometer and a strong cord to check the moment of resistance.
- Wrap the cord around the flange of the drive gear, wind the cord and use a dynamometer to check the moment of resistance to turning the drive gear and remember the value.
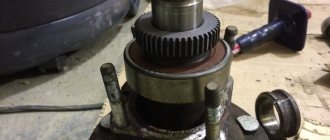
- Next, you need to unscrew the nut securing the drive gear flange, for this you will need a special key, which you need to hold the flange from turning and unscrew the nut, remove the flat washer and then remove the flange itself.
- After you have removed the flange, you will see the oil seal, which is why you are bothered with such repairs, you need to remove it, to do this, pry it off with a screwdriver and remove it from the neck of the gearbox housing.
After removing the inoperative oil seal, prepare a new one, lubricate its outer surfaces with Litol-24 grease and press it into place by lightly tapping it with a hammer through a special mandrel; seat the oil seal to a depth of about 1.7-2 mm from the end of the crankcase.
Reassemble in the reverse order, install the flange in place, to do this, secure it from turning with a special wrench, tighten the fastening nut, tighten with a torque wrench with a tightening torque of 12-26 kg.cm, depending on the moment of resistance to turning of the drive gear. Tighten until the required resistance torque is obtained.
After tightening the nut, install all parts back in place in the reverse order of removal. At this point, the repair of the VAZ 2106 can be considered complete.
PROCEDURE FOR DISASSEMBLYING THE UNIT AND REMOVING THE BEARING
Repair of the rear axle of a VAZ 2107 is carried out in the following sequence:
- The machine is installed on a level surface, secured with a parking brake and stops. The desired side is raised with a jack, the wheel is removed and the body is lowered onto a strong support.
- The screws securing the drum to the hub are unscrewed and the part is removed. The brake mechanism is cleaned of dirt and disassembled. Using a socket wrench, unscrew the bearing cap bolts through the windows in the hubs.
- If the brake pads are worn excessively, they will need to be replaced together with the pads.
- At the next stage, we try to remove the faulty axle shaft; this is easy to do using a special tool. If there is no such device, then pressing is done using a wheel disk. We fasten it to the hub with two bolts and knock the bearing out of its seat with sharp blows on the rim.
- If the axle shaft assembly is being replaced, then we put a new one in place of the faulty unit and reassemble it in the reverse order.
If you plan to repair the unit of a VAZ 2107 car, then it is necessary to disassemble it and then replace the bearing.
Malfunctions of VAZ 2107 axle shafts, their causes and symptoms
How to replace the rear axle gearbox shank oil seal
The main axle shaft failures include:
- shaft deformation;
- fracture;
- wear or cutting of splines;
- Damage to the wheel rim mounting threads.
Deformation
The axle shaft, although made of high-strength steel, can become deformed under high loads. Such a malfunction is often a consequence of gearbox jamming, bearing problems, or the corresponding wheel falling into a deep pothole. A sign of deformation of the axle shaft is strong vibration of the wheel rim, sometimes accompanied by a hum, knocking, or crackling noise.
Fracture
The result of a wheel hitting a pothole or a strong impact on a bump can be a fracture of the axle shaft. In this case, the car loses control because one of the drive wheels stops rotating. If the axle shaft is broken, the gears of the gearbox may also fail, so if such a malfunction occurs, it must be checked.
Worn or cut splines
Natural wear of the axle shaft splines may appear after 200–300 thousand kilometers. More often they are cut off, which occurs when one of the wheels jams and the gearbox malfunctions. Also, the splines are cut off due to wear of the axle gear teeth that mesh with them.
A sign of spline damage is a crunching noise from the gearbox.
A sign of wear or cutting of the splines is a crunch (crack) from the axle shaft, which usually occurs when starting or moving downhill. The crunching sound indicates that the gear teeth are slipping between the axle shaft splines.
Damage to wheel threads
It is quite difficult to damage the threads on the flange, but such troubles still happen. The reason for this may be non-compliance with the tightening torque of the wheel bolts, incorrectly set direction of the bolts when tightening, or violation of the thread pitch on the bolts. A sign of thread damage is vertical play in the wheel, or beating in the rear of the car while driving.
If the listed malfunctions are detected, the axle shaft (one or both) must be replaced. Continuing to drive a vehicle with faulty axle shafts is extremely dangerous.
How to Determine a Bearing Failure
The VAZ-2107 axle bearing wears out during operation, and sometimes the seat underneath it breaks. Malfunctions of this element can be determined by several signs:
- A humming noise appears from the rear axle. Sometimes it turns into crackling and squeaking. Moreover, the higher the speed, the louder these sounds. This should not be confused with a similar hum that can be heard when the rear axle gears wear out.
- The balls fall out and the separator is destroyed; the axle shaft jumps out of its seat when moving.
- Increased play of the rear wheels. Diagnostics is quite simple; you just need to place the car on a jack and rock the wheel several times. A knocking sound and free movement indicate that there is a malfunction.
- Sometimes the rear wheels jam, which can result in a serious accident.
The design of the VAZ-2107 axle bearing is simple and reliable; it can last for quite a long time. But if the car experiences very heavy loads, moves on bad roads, or the bearing is made of low-quality material, the service life is significantly reduced. The bearing cannot be repaired; it will only need to be replaced. In case of deformation and excessive wear, new mechanisms must be installed.
Sequence of actions when dismantling the axle shaft
Weight of the rear axle gearbox VAZ 2106
To dismantle the axle shaft and get to the bearing, you must perform the following steps in strict sequence:
- For convenience, the vehicle is placed on a flat surface.
- Secure all the wheels of the car with stops or other devices.
- The wheel bolts must be turned with a wheel wrench until they are slightly loosened before removal.
Removing wheels.
- Use a wheel wrench to completely unscrew all the bolts on the wheels.
- Use a jack to raise the car body and secure the lifting with supports.
Removing the brake drum.
- Remove the two drum guides using a 8 or 12 wrench.
- Remove the drum itself. If necessary, assist removal with hammer blows. To avoid deformation, place a wooden stand. An alternative way to remove the brake drum: start the car, put it in third gear, spin the engine to 3 thousand rpm and sharply press the brake. Repeat acceleration and deceleration several times, after which the drum can be easily removed
Unscrewing the axle shaft bolts.
Little by little, without using much effort, turn the axle shaft to get to the nuts. The axle shaft mounting bolts can be unscrewed using a 17mm socket wrench. They are used to loosen and remove 4 fastening nuts, which are closed with a special flange.
Removing the axle shaft.
We turn the removed brake drum over (with the inner side facing us), screw it to the axle shaft with a couple of bolts and sharply pull it towards ourselves, thus pulling out the axle shaft. (Instead of the brake drum, you can use a previously removed wheel)
But if you have a reverse hammer, you can remove the axle shaft with it. The hammer is attached to the axle shaft with wheel bolts. If you sharply place a load in the opposite direction, then due to the appearance of a shock load, the axle shaft begins to move towards the load. Thus, the axle shaft is removed. Then unscrew the hammer from the axle shaft and remove the rubber sealing ring.
Removing the lock bearing from the axle shaft.
The axle shaft is clamped in a vice and a small cut is made using a grinder on the outside of the locking ring.
The clamped locking ring is finally split by alternately striking the cut from the grinder with a hammer or chisel. Thus, the bearing is removed from the axle shaft. The axle shaft is checked after removing the bearing for surface deformations or chips or other damage. If there are any, then the axle shaft will have to be changed.
Installing a new bearing and lock ring on the axle shaft.
- The boot is pulled out of the new bearing.
- The bearing is then lubricated with grease or grease.
- Reinstall the boot.
- Lubricate the axle shaft with grease.
- Place the bearing on the axle shaft so that the boot is turned towards the oil deflector.
- Use a hammer to drive the bearing into the cell. To make it easier, you can use a piece of pipe. Place one end of it against the axle shaft with the bearing, and hit the other end with a hammer.
- The locking ring is heated with a blowtorch until a white coating appears on it.
- Using pliers, place the ring on the axle shaft of the VAZ 2107.
- Install the ring hermetically tightly to the bearing.
- Cool the lock ring by pouring engine oil onto it.
Replacing the axle shaft seal.
The oil seal to be replaced must be pulled out of its cell. To do this, lift its body with a screwdriver and remove the oil seal. The cell under the oil seal is wiped from the accumulation of dirt and dust, and grease is applied. The new oil seal is inserted into the seat with a spring to the beam. Use a special bushing and a hammer to drive the oil seal so that it is pressed tightly.
Installing the axle shaft.
Installation of the axle shaft is carried out in the reverse order from its removal. Put on the rubber sealing ring and bolt the axle shaft. Use small rotational movements to put it in place.
After installing the axle shaft, it is necessary to check it for the formation of gaps. They shouldn't exist. To do this, the wheels are rotated in all directions. If there are no gaps and no extraneous sounds appear during rotation, then the installation of the bearing and axle shaft was done correctly and correctly.
If necessary, replace the bearing on the second axle shaft in the same manner. Also, when carrying out these actions, you can immediately replace the brake pads and check the presence and level of lubricant in the axle housing.
Preparation and disassembly
To independently remove a leaking rear axle oil seal on a Niva Chevrolet, you will need the following tools:
- standard set of wrenches;
- slotted screwdriver and wheel wrench;
- jack;
- hammer;
- wooden stand;
- cloth gloves.
Never neglect gloves when repairing a car: they will protect your hands from damage due to accidental impacts. The height of the wooden stand should be enough to support the rear axle with the wheel removed and the shock absorber unscrewed, otherwise oil will leak from it.
Before removing the old seal, you will have to disassemble the rear hub assembly and remove the axle shaft. Disassembly is carried out in the following sequence:
- Place the car on a level surface and secure it with wheel chocks. Make sure the handbrake is turned off.
- Loosen the wheel nuts, jack up the car and remove the wheel.
- Clean the rear axle flange that protrudes beyond the brake drum from rust. Additionally, you can treat this area with WD-40 lubricant.
- Unscrew the 2 bolts securing the drum with a 12 mm wrench, then gently tap with a hammer to move it out of place.
- The drum is removed in 2 ways: by squeezing it out with the same bolts, screwed into other holes, or by knocking it with a hammer through a piece of wood. The methods can be combined, just be careful not to damage the edge of the drum with the blows.
- After dismantling, clean the seat on the axle shaft again to make the drum easier to remove.
The next step is unscrewing and removing the axle shaft. In the VAZ 2131 Niva Chevrolet, 4 bolts securing it are held on the other side by a bracket holding the shock absorber.
After unscrewing the bolts, the shock absorber will no longer hold the rear axle, and the spring will push it down, causing oil to flow.
To avoid this, you need to first adjust the stand by jacking the car higher. The rear axle “stocking” must rest with a slope in the other direction so that the oil does not leak out.
Since in a regular Niva VAZ 21214 and 21213 the shock absorber is attached to the spring cup, and not to the rear hub, there is no need to unscrew it. A stand is also not needed here; a jack is enough to lift it.
The 4 bolts holding the rear axle shaft are unscrewed with a 17 mm wrench
Pay attention to the growers: they should not get lost in the brake mechanism. If you ignore the loss of the groover and install a new one, then the old one will subsequently get between the block and the drum while driving and the wheel will jam. After unscrewing the bolts, remove the axle shaft with the bearing from the cage with a sharp movement
If this fails, attach the wheel to the studs with 3 nuts and try to pull it. The last option is to use a special inertial puller for removal. There is also a popular method: tie the axle shaft with a rope to an iron garage door and hit it with a hammer to knock it out of the cage. But for this you need to carefully park the car closer to the gate
After unscrewing the bolts, with a sharp movement, remove the axle shaft with the bearing from the cage. If this fails, attach the wheel to the studs with 3 nuts and try to pull it. The last option is to use a special inertial puller for removal. There is also a popular method: tie the axle shaft with a rope to an iron garage door and hit it with a hammer to knock it out of the cage. But for this you need to carefully park the car closer to the gate.
What will be required during the work
The design of the front and rear axles of the UAZ 469
As mentioned earlier, you can replace a failed bearing yourself, and you can do this work either in the garage or just on the street by placing the VAZ-2107 on a flat surface and placing a stop under the front wheels of the car. Before work, you need to prepare the most necessary tools and new components:
- a bearing of a suitable size, of course, it is best to install an element that has not previously been in use;
- oil seal for the axle shaft and locking sleeve;
- car keys size 10 and 17;
- jack for raising a car;
- hammer, chisel and grinder.
Experts recommend that you first make sure that it is the bearing that has failed, and only then buy all the necessary components. Since after dismantling is completed, it is discovered that the cause of the failure is not the wear of the bearing, but the rear axle shaft, which cannot be repaired, this means that you will have to buy the entire assembly and install it in place of the failed one.
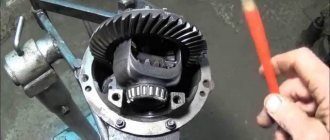
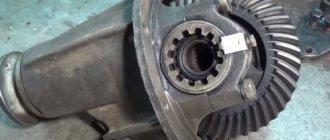
Bridge gearbox. Maintenance and repair
The reliability and service life of the central gearbox of the drive axle directly depends on the quality of its maintenance and repair.
Radial clearance adjustment
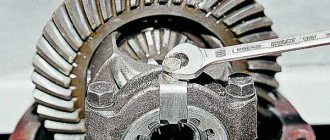
Periodic adjustment of the rear axle gearbox helps prevent increased wear of the teeth and promotes their uniform grinding. Increased radial clearance causes wear on the teeth and bearings of the drive gear shaft, and is adjusted using special washers placed under the front flange of the gearbox housing.
It is characteristic that adjusting the VAZ rear axle gearbox is no different from a similar operation for trucks. So, for example, the gearbox of the middle axle of a KAMAZ or MAZ is no different from the design of the rear axle gearbox and has interchangeable parts (except for the housing).
Lubricants
Adjustment, adjustment, but don’t forget about the working fluid, which is used to lubricate the working units of the axle gearbox.
The most widely used lubricants: domestic - TAD-17 or Nigrol, international classification - API (GL-1 - GL-5) or SAE (75 - 250). The increased viscosity that they retain at both low and high temperatures allows them to be used to compensate for fairly high loads that arise during torque conversion (up to 300 kg/mm2).
For optimal operation of the hypoid gear, it is necessary to maintain the recommended level of working fluid, since its decrease leads to premature wear of the teeth of the main pair. However, do not forget that exceeding it can cause harm; in a situation with a VAZ, squeeze out the rear axle gearbox oil seal.
Repair work or how to avoid mistakes
Repair of the VAZ rear axle gearbox is carried out in almost every garage cooperative, often without following the basic rules for its assembly and installation.
So, for example, the Niva rear axle gearbox and the Niva front axle gearbox must have the same gear ratio. Violation of this requirement will lead to uneven redistribution of torque, which can lead to the destruction of one of the main pairs. There are many known cases when, when repairing the front axle gearbox, unfortunate craftsmen contributed their own know-how.
The most common case is to replace the 21213 front axle gearbox with a faster VAZ 2107 rear axle gearbox. Take our word for it: doing this is more than unreasonable. Apart from the failure of the front and rear axle gearboxes, you will receive nothing, and the cost of spare parts is unlikely to be reimbursed to you.
But passenger cars and even VAZs are fine, but what will you do if the rear axle gearbox of a BMW or an equally expensive Toyota or Mercedes is damaged? In order not to tempt fate and not test the strength of your car, the best option is to turn to professionals.
Conceptual service is the key to success
Where is the best place to repair an axle gearbox? This question interests all owners of rear-wheel drive cars, and not only. A conceptual service center can provide high-quality maintenance, repair or replacement of the rear axle gearbox.
When repairing a Mercedes rear axle gearbox, professionals will not look at a book, since they know all the tolerances and radial clearances, as they say: “by heart.” Gazelle rear axle gearbox, KAMAZ rear axle gearbox, MAZ rear axle gearbox, UAZ rear axle gearbox, ZIL 130 rear axle gearbox, GAZ 53 rear axle gearbox, and more common: GAZ 3110 rear axle gearbox, as well as VAZ and Niva.
The schematic diagram of the rear axle gearbox is identical for most domestic and foreign cars. Therefore, if the workman knows perfectly what radial clearance, tolerance or contact patch is. And he also has at his disposal professional tools and technical equipment, as well as a drawing of the rear axle gearbox, then adjusting or repairing it will not be difficult for him.
By contacting the conceptual service center, you receive a full range of services, including the opportunity to buy a VAZ rear axle gearbox at a significant discount. Having weighed all the pros and cons, we come to the only correct conclusion: Conceptual service - no problems and high guarantees of the quality of the work performed.
How to correctly replace the rear axle bearing on a VAZ 2107 with your own hands with video
The problem that will be discussed today is quite common on VAZ 2107 cars. This is the failure of the axle bearing. Replacing it at a car service center is very expensive, but it is possible to carry out this procedure yourself. We will talk about how to do this correctly in this article.
Purpose of the rear axle bearing
The axle shaft is the most important part of the drive (in this case, rear) axle of the VAZ 2107. The axle shaft itself rarely fails, but the bearing in which it is attached is the weak point of this design.
The purpose of the part is simple: to ensure smooth and uniform rotation of the axle shaft in the rear axle while the car is moving. This part is located inside the bridge, immediately behind the brake drum. To see and change it, you will have to remove the axle shaft, remove the drum and brake pads from it.
It is impossible to get to the bearing in any other way.
VAZ 2107 axle shaft bearing with retaining ring
Signs of malfunction on the VAZ 2107
If the bearing itself fails or its seat breaks, the car owner will definitely notice this. We list a number of the main signs of failure of this part:
- While driving, a uniform low hum appears in the area of the rear axle, which over time can turn into a loud creaking or crackling sound. And the faster the car goes, the louder the noise becomes.
- A strong play appears on one of the rear wheels (to check this, just jack up the rear axle of the car and pull the wheel with your hands away from you and towards you).
- Balls fall out of the bearing (this means that the separator in which these balls are located has completely collapsed).
- Finally, the rear axle may simply jam. The drive wheels will stop rotating, and this can happen while driving (which may well cause an accident).
The reason for the destruction of a part can be both metal fatigue, which occurs due to very long cyclic loads on this part, and the quality of domestic roads, driving on which is often associated with impacts and other mechanical damage to the rear axle.
Tools required for replacement
- Set of socket wrenches with a crank.
- Hammer.
- Flat blade screwdriver (medium size).
- Chisel.
- Bulgarian.
- New VAZ 2107 axle bearing with a retaining ring for it.
Sequencing
- The car is jacked up, and the wheel is removed using socket wrenches, behind which there is a worn bearing.
- The brake disc and pads are removed.
- Now you need to unscrew the axle shaft itself with a 17 socket wrench.
The axle shaft is unscrewed with a 17 socket wrench - To remove it from its seat, you can use a crank.
It should be inserted between the brake cylinder and the rear of the axle and used as a lever to push the axle out. Pushing out the axle shaft using a crank - Now you need to remove the bearing from the axle shaft.
Often it turns out to be tightly welded to it, so you have to literally cut it off with a grinder. This must be done by first clamping the axle shaft in a vice. The old bearing is cut off with a grinder - Once the old bearing is removed, the axle must be thoroughly wiped with a rag.
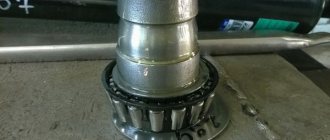
And then a new part and a retaining ring are put on the axle shaft. Installing a new axle bearing - Now, using a medium-sized flat-head screwdriver, you need to remove the worn oil seal from the seat.
The old oil seal is removed with a screwdriver - As soon as it is removed, a new oil seal is installed in its place (it is most convenient to drive it into the seat with a 32 socket head).
- The axle shaft with a new bearing is installed back into the seat and the entire assembly is reassembled.
Important points
You need to be very careful when cutting off the old bearing with a grinder so as not to touch the axle shaft itself. It is best to cut off only the outer ring of the bearing and the cage with a grinder. Only a few small cuts should be made on the inner ring (not through)
Then you can insert a chisel into these cuts and, with a few careful and precise blows, split the inner ring of the bearing without touching the axle shaft. The inner ring of the bearing is cut off with a chisel
Only a few small cuts (not through) should be made on the inner ring. Then you can insert a chisel into these cuts and, with a few careful and precise blows, split the inner ring of the bearing without touching the axle shaft. The inner ring of the bearing is cut off with a chisel
The new bearing cannot be placed on the axle shaft without effort. In fact, it will have to be stuffed onto the axle. But in no case should you use only a hammer for this, since there is a high risk of distortion and damage. The best way is to take a piece of pipe whose diameter is slightly larger than the diameter of the axle shaft, and use it to seat the part in place. Some car enthusiasts heat the bearings and place them hot on the axle shaft. This really makes it easier to fit the new part because all the metals expand when heated. But it is strictly forbidden to install bearings in this way, since when this part is heated and subsequently cooled in air, it may anneal (that is, heat treatment, which consists of heating the steel to temperatures below critical, followed by slow cooling). Annealing will reduce the hardness of the bearing several times and increase its ductility, as a result, its service life will be reduced significantly.
This is interesting: Roads in the Moscow region will be equipped with special vibration strips
Replacing a bearing is a difficult task, but it can be done. The main thing here is to avoid damage to the axle shaft when cutting off the bearing and distortions when installing a new part
In addition, you should take into account the fragility of the bearing rings and use the hammer with extreme caution. Otherwise, the procedure is quite within the capabilities of even a novice car enthusiast, who, by doing it with his own hands, can save a significant amount. Copywriter with five years of experience
(1 vote, average: 1 out of 5)
Copywriter with five years of experience. (1 vote, average: 1 out of 5)
Symptoms of a problem
As soon as the driver notices any changes in the operation of the rear axle (for example, extraneous sounds appear that were not there before), he must respond to these changes as quickly as possible so as not to aggravate the possible malfunction. The most typical sign of such problems may be increased noise levels:
- coming from the rear wheels;
- during operation of the rear axle;
- when accelerating the car;
- when braking with the engine;
- during engine acceleration and braking;
- while the vehicle is turning.
In addition, a knocking sound when the car starts moving and an oil leak may indicate a malfunction of the rear axle.
Oil leakage indicates a malfunction of the rear axle of the VAZ 2107
Grinding noise when moving
The causes of a grinding noise from the rear axle when the vehicle is moving can be:
- wear or destruction of axle or differential bearings;
- deformation of the beam or axle shafts;
- incorrect adjustment, damage or wear of gears or bearings of the gearbox and differential;
- wear of the spline connection with the semi-axial gears;
- incorrect adjustment of the gear teeth of the main gear;
- insufficient amount of oil.
The cardan spins, but the car does not move
If the driveshaft rotates while the vehicle is stationary, the cause may be a failed axle spline or wear on the teeth of the differential or final drive gears. In any case, if the cardan spins, but the car does not move, this indicates a fairly serious breakdown and, most likely, replacement of the axle shafts, bearings or gears will be required.
Oil leakage from the housing and from the shank side
The most likely causes of oil leakage from the rear axle housing:
- wear or damage to the drive gear seal;
- wear of the axle shaft seal, determined by oiling of the brake shields, drums and pads;
- loosening the bolts securing the rear axle gearbox housing;
- damage to sealing gaskets;
- axial play of the shank;
- breather jamming.
Wheels are stuck and won't rotate
If the rear wheels are jammed, but the drum and pads are in order, the cause of this malfunction may be failure of the bearings or the axle shaft itself. Most likely, in this case, the bearings have crumbled or the axle shaft has become deformed (for example, due to an impact) and the parts need to be replaced.
Why might oil leak?
First, let's try to understand how to determine the time to replace the oil seal. If you believe the manufacturers, a high-quality cuff should last more than 60-70 thousand kilometers. But is this really so? Of course not. Under conditions of constant load, bad roads, dirt falling on parts, and poor quality oil, the oil seal cannot withstand and needs to be replaced quickly. A visual inspection of the rear axle will help identify the need for replacement. It is clear that for a better inspection it is recommended to put the car in a pit. It is often possible to eliminate a leak from the gearbox by tightening loose fastening bolts or replacing the washers with softer options. In this case, copper washers are considered ideal. Often, instead of a washer, a sealant in the form of a thread or ordinary gel is used on threaded connections.
Sealant for threaded connections
In addition, the cause of an oil leak may be an insufficiently tightened drain or filler plug.
Careful attention should also be paid to this. If everything is in order with the plugs, then it would be a good idea to pay attention to the connection of the gearbox to the crankcase
Connection of the gearbox to the crankcase
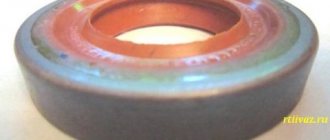
If the tightness of this connection is broken, then oil leakage cannot be avoided. In this case, replacing the oil seal on the VAZ 2106 bridge or replacing the axle shaft seal will help. As a rule, any leaking oil seal needs urgent replacement. No other type of repair will help here. Oil seals are inexpensive and it is better to replace them periodically so that no problems arise in the future. It also happens that the cause of the leak is the breather. It is located on the upper side of the car crankcase, on the right side.
Breather cover VAZ 2106
First of all, we check the breather cap to see how freely it moves. If everything is fine with it, then it’s all about the oil seal, which requires replacement. Needless to say, if you delay replacement, the oil level will drop and ultimately lead to tragic consequences. As you know, oil for all parts and components of a car is comparable to the oxygen that a person breathes.
Replacing axle seals on a VAZ 2106
A common reason why the oil seal fails is an increased oil level. Therefore, you must always monitor this and not allow it to increase or decrease.
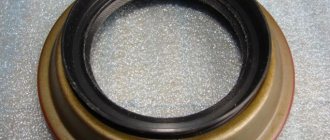
How to remove the shank oil seal on a VAZ 2106:
To make it convenient to change the tail seal, place the car in an inspection hole or on an overpass. Pre-prepare new tail seals. The old oil seal has a worn appearance and excess oil. It must be removed immediately. To do this, proceed with the following steps:
1) Unscrew the drain plug on the gearbox housing using a hexagon. Here you need to place a container for oil;
2) Wait until the lubricant has completely drained from the gearbox. Screw the plug back in;
3) Disconnect the reverse drive gear flange and the driveshaft;
4) Put the car on the handbrake;
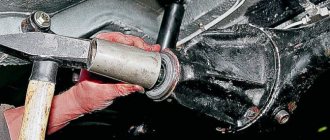
5) Using a 24mm socket wrench, begin to unscrew the nut that holds the tail flange.
It is not necessary to use a hand brake to prevent the flange from rotating.
6) Insert several bolts into the hole in the final drive gear flange;
7) Using special tools, try to hold the flange by these bolts. At the same time, unscrew the nut;
8) Take a two-jaw puller and use it to remove the tail flange from the splines;
9) If you do not have a puller, remove the flange by hand. This will require some effort, but it is not difficult to remove;
10) Remove the washer and flange from the tail of the main gear at the same time as the dirt deflector;
11) Take a flathead screwdriver and pry off the oil seal with it. Remove it from the hole in the gearbox housing using a bracket. The oil seal has been removed and you can begin replacing.
Important: Before you begin installing a new tail seal, you should check the surface of the flange that is in direct contact with the seal. It must be undamaged and free of rust.
If any defects are found, eliminate them by polishing the surface.
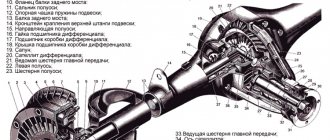
Rear axle
Replacing the rear axle oil seal on a VAZ 2107, as mentioned, is a very important procedure. The rear axle is a car unit that on a VAZ 2107 receives torque from the gearbox through the cardan (see VAZ 2107 repair of the cardan on your own). On rear-wheel drive vehicles, such as the VAZ 2107, the rear axle is its main chassis, without which it is impossible to imagine the vehicle moving. On the VAZ 2107, the rear axle is constantly subjected to high loads and a difficult task falls on the oil seal. Therefore, the driver needs to regularly replace them and try to install high-quality and reliable oil seals.
Types of rear axles
Now let's look at the types of rear axle assemblies, since you also need to know this when replacing the oil seal. The rear axle of the VAZ 2107 has three main types of assembly:
- with semi-balanced axle shafts;
- with completely unloaded axle shafts;
- with independent suspension.
The VAZ 2107 uses a semi-balanced axle shaft, which transmits torque and receives its bending moments in horizontal and vertical positions. The rear axle of the VAZ 2107 is made of a solid beam with a ring-shaped part developed in the center. A beam is welded from two stamped steel halves. The oil filler hole is located in the middle part of the beam.
Kinematic diagram of the axle shaft
Replacing the rear axle seal of a VAZ 2107
1200 rub. for the photo report
We pay for photo reports on car repairs. Earnings from 10,000 rubles/month.
Write:
When the axle shaft oil seal leaks, to replace it you need to remove (dismantle the axle shaft) in order to remove the oil seal. How to remove the axle shaft and replace the axle shaft seal on a VAZ 2107, watch the detailed video instructions.
And first, loosen the wheel bolts, jack it up, and remove it. Use a wrench to “7” to unscrew the two fixing pins. Remove the brake drum. Using a “17” wrench with an extension, unscrew the 4 nuts securing the axle shaft and remove it (dismantle it). Then we take out the axle shaft seal, replace it with a new one and reassemble everything in the reverse order.
One of the main advantages of domestic cars is adaptation to operation on bad roads and ease of maintenance.
But, in order to extend the life of the main components and ensure the reliability of the machine, it is important to promptly identify faults and eliminate them as they arise
Thus, one of the most sensitive and demanding components in the VAZ-2107 car is the rear axle shaft, with an oil seal built into it. The problem is that the seal can become damaged and lose its properties. If you do not replace the axle shaft seal in a timely manner, more serious problems are possible (see video about replacing the axle shaft oil seal on a VAZ 2107, below). That is why this topic is worthy of separate consideration.
What functions does the rear axle shaft perform?
The main purpose of the rear axle shaft is to transmit torque from the VAZ-2107 rear axle gearbox to the wheels of the car. In simple terms, the rear axle shaft is a kind of “intermediary” that ensures the movement of the vehicle. At the same time, the efficiency of the car and its ability to move depend on its performance and serviceability.
The appearance of excessive noise during movement, oil leakage in the oil seal area or heating of the flange indicate failure of the rear axle axle shaft. Another symptom of a breakdown is a complete stop of the car, when the rotation of the gearbox is not transmitted to the wheels of the vehicle’s drive axle. In all of the above cases, replacement of the faulty element is required.
Rear axle malfunctions and their causes
It was mentioned above that one of the symptoms of a malfunction is excessive noise in the area of the rear axle of the VAZ-2107. What are the causes of the problem? There are two of them - violation of the integrity of the bearing (its destruction) and excessive wear of the splined edge of the axle shaft. To eliminate the malfunction, it is necessary to dismantle the axle shaft, followed by replacement of failed parts.
The cause of bearing failure is often deformation (damage) of the axle shaft or rear axle beam. This happens, for example, when driving on a bad road, when there is mechanical contact with some obstacle. If the bearing does not perform its functions, the axle shaft will not move out of the rear axle. The result of a breakdown can be a serious accident. That is why, at the first symptoms of a malfunction, the bearing needs to be changed.
The first signs of a rear axle malfunction are the appearance of unusual sounds (noises) while the car is moving, or increased heating of the wheels. In addition, a failed bearing can produce a strong and noticeable grinding noise.
Another malfunction that deserves close attention is an oil leak in the axle shaft seal. As a rule, it is not possible to diagnose a malfunction immediately. This is due to the fact that to identify the problem, a visual inspection of the rear axle of the car is required. In such a situation, the axle shaft seal needs to be replaced. If the problem is not eliminated, then over time the leak will worsen, and oil stains will appear not only on the part, but also under the car. It is at this stage, as a rule, that the problem is diagnosed by the owner.
RESTORING THE OPERATION OF THE UNIT
To fix the problem, you need to remove the old retaining ring. If a special device is not available, then the operation can be performed using a grinder. The ring is carefully cut off without damaging the axle shaft. This part is for single use and must be replaced every time the unit is repaired. The new bearing is put on the axle and secured with a new ring, which is preheated.
Repairing a component such as an axle shaft on a VAZ 2107 does not take much time from an experienced specialist. At the same time, going to a service station does not always guarantee a good result; often, in the absence of special devices, they simply knock down the ring with a sledgehammer, which leads to runout and rapid destruction of the bearing.
Axle shaft of VAZ 2107, 2106, 2101 - removal and replacement.
The described car bearing performs the important function of ensuring the movement and rotation of the parts of the rear axle shaft associated with it. Below are some of the main signs that may indicate that it is faulty.
- When driving on an uneven road at low speed, tapping sounds of varying frequencies appear in the area of the axle shaft. The sound may disappear or become muffled when driving onto smooth, level roads and upshifting into 4th and 5th gears.
- The appearance of an unusual constant increased hum when the car is moving from the rear wheels.
- The appearance of backlashes.
- Wobbly wheels.
- The appearance of unusual noises when accelerating, braking and turning the vehicle.
How the owner cares for the car plays an important role. The bearing requires periodic lubrication, which can significantly extend its service life.
It is not recommended to delay diagnostics and repairs. After all, if the bearing jams, the rear axle shaft with wheels may completely lose control.
We hang the rear of the car on supports, first remove the rear wheel, then the brake drum. Using a jack, raise the edge of the rear axle beam so that after removing the axle shaft, oil does not spill out.
Using the head 17, through the holes in the flange of the rear axle shaft of the VAZ 2107, unscrew the four nuts.
We attach an impact puller to the axle shaft flange and knock out the rear axle shaft of the VAZ 2107 from the beam.
You can use a removed wheel instead. We unfold it and put it on the reverse side. We fasten it with two bolts and sharply pull out the rear axle shaft.
The axle shaft is removed along with the oil deflector, mounting plate, bearing and locking ring.
A rubber O-ring is installed between the beam flange and the brake shield.
Using a hammer not very strong blows on the socket head, or a piece of pipe of suitable diameter, we press in a new cuff.
In case of deformation of the axle shaft, large radial and axial clearances in the bearing, displacement of the locking ring, wear of the splines, the axle shaft must be replaced with a new assembly. Replacing just the bearing and lock ring yourself is not recommended. Install the axle shaft in the reverse order of removal. Replacing an axle shaft on a VAZ 2106 is not a Nissan repair, so you don’t need to use expensive lubricant. Before installation, lubricate the working surfaces of the cuff with Litol-24 lubricant.
After this, you can replace either the axle shaft itself or its bearing if necessary (I’ll write about this in future articles). Installation takes place in reverse order and does not take much time. The only thing worth noting is that when installing it is necessary to ensure that it matches the slots and hit it with a small blow. But I think that everything is clear from the video clip. As for the price of a new axle shaft for a VAZ 2106, it can range from 100 to 1300 rubles.
The main failures of axle shafts include:
- shaft deformation;
- fracture;
- wear or cutting of splines;
- Damage to the wheel rim mounting threads.
Deformation
The axle shaft, although made of high-strength steel, can become deformed under high loads. Such a malfunction is often a consequence of gearbox jamming, bearing problems, or the corresponding wheel falling into a deep pothole. A sign of deformation of the axle shaft is strong vibration of the wheel rim, sometimes accompanied by a hum, knocking, or crackling noise.
What are axle shafts, why are they needed and how are they designed?
In rear-wheel drive cars, which the “seven” actually belongs to, the rear wheels are driving. It is they, rotating, that make the car move. The torque is transmitted to them from the gearbox through the drive (cardan) shaft, gearbox and axle shafts. There are only two axle shafts: one for each rear wheel. Their role is to transmit torque from the corresponding gear of the gearbox to the wheel rim.
Axle shaft design
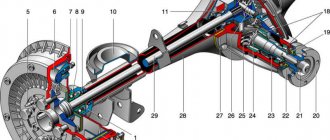
The axle shaft is an all-metal shaft made of steel. At one end there is a flange for attaching the wheel disk, and at the other there are splines for engagement with the gearbox gear. If we consider the axle shaft assembly, then in addition to the shaft, its design also includes:
- oil deflector;
- sealing gasket;
- oil seal (cuff);
- bearing.
In addition to the shaft, the design of the axle shaft also includes an oil deflector, a gasket, an oil seal and a bearing.
Each of the axle shafts is installed in the corresponding (left or right) rear axle housing. An oil deflector with a gasket and an oil seal are used to prevent lubricant from leaking out of the casing. The bearing is designed to ensure uniform rotation of the axle shaft and distribute shock loads coming from the wheel to the rear axle of the vehicle.
1 — oil deflector; 2 - gasket; 3 - seal; 4 - oil seal; 5 - axle shaft; 6 - casing; 7 — bearing mounting plate; 8 — brake shield; 9 — bearing; 10 — fixing sleeve