Removing (replacing) the front bumper Niva VAZ 21213, 21214, 2131 lada 4×4, Urban
The bumpers and methods of attaching them are different for the regular Niva 4×4 and the Urban.
(See also Removing the rear bumper)
Removing the front bumper on a regular Niva
Front bumper: 1 — bumper; 2 — fastening bolt; 3 - tubular connector; 4 — rubber seal; 5 — towing eye; 6 — plastic side trim; 7 — lining holder; 8 — front pad
Remove the crankcase underbody and mudguard protection plate.
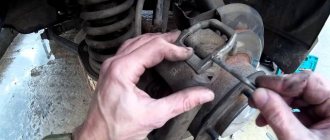
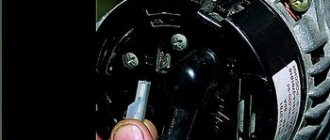
| Using a 22mm socket, unscrew the bolt securing the towing eye and the bumper connector to the left front side member. |
| Remove the eye and bolt. |
Similarly, we disconnect the fastening of the towing eye and the bumper connector to the right side member.
| While rocking, we pull the bumper connectors out of the seals of the lower front cross member. |
| Prying it with a screwdriver... |
| ...remove the rubber seal from the hole in the lower cross member. |
Bumper disassembly
The front and rear bumpers are disassembled in the same way - we show the front as an example.
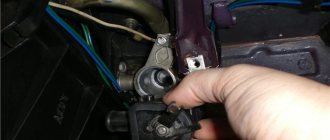
To remove the connector...
| ...with a 13mm head we unscrew the two nuts... |
| ...and remove the connector. |
To remove the side plastic trim...
| ... use a Phillips screwdriver to unscrew the four screws... |
| ...and remove the cover. |
To remove the rubber pad...
| ... using the “8” head we unscrew the four nuts... |
| ...and remove the cover. |
To remove the metal bracket...
| ...with a 13mm head we unscrew the two nuts, holding the bolts with a wrench of the same size... |
| ...and remove the bracket. |
We assemble and install the bumper in the reverse order.
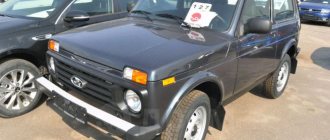
Removing the front bumper on the Niva Urban modification
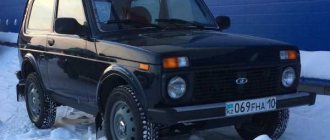
The bumper on cars of the Niva Urban modification is made of ABS plastic, it is a decorative overlay that is mounted on a painted power beam with tubular connectors and rubber seals, similar to that of a regular Lada 4x4, only the tubular connections are slightly longer, in addition, On the left side there is a hole for a towing hook-bolt, which is covered with a decorative plug.
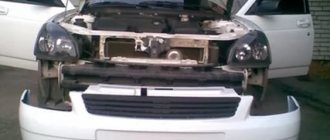
Power beam (bumper removed)
The bumper is secured with four 10mm bolts. Two to the power beam, two to the front wings.
Two of them are located in front, behind the license plate.
..and two on the sides, behind the front fenders
For reference. When assembling a car, holes in the wings are drilled after painting the parts and treated with an anti-corrosion compound. This is due to the peculiarities of body production, which was developed quite a long time ago.
Tuning manufacturing process
A rather difficult stage is creating a drawing and constructing a rear power bumper for the Niva 21214 with your own hands. In tuning companies, the drawing is produced using computer modeling. However, when making a part with your own hands, a professional drawing can be neglected. The main condition remains accurate measurements. For this step you will additionally need cardboard and tape.
The technology for creating a drawing (sketch) of a component is simple: you are required to try on pieces of cardboard, cut them and assemble them using tape. As a result, you will receive a sketch. It will be necessary to very carefully check the arrangement of elements that are symmetrical.
The process of manufacturing a frame for Niva 21214 includes:
- installation work. They involve cutting out the necessary elements from metal sheets according to the created drawing, and drilling holes in the sheets using a drill. After this, you need to weld, bolt the components of the power bumper together and secure the frame;
- working with pipe shapes. To make the rear reinforcing component unusual, you can use a heating pad to bend the pipe in the desired direction;
- welding This refers to work performed after installation of the base.
Rear bumper with a gate for the spare tire on Niva
When strengthening the Niva frame, you need to be careful: if you install a very heavy component, it can break the frame. To prevent this from happening, be sure to compare the mass of the component you created yourself with the tensile strength of the car body frame. To prevent it from falling off, you will need to additionally secure it to the Niva using spars and gussets. After creating the structure, you will need, in addition to paint, to coat it with a primer - this will protect the material from rust.
Source: okuzove.ru
Removal and disassembly of the front and rear bumpers of the VAZ-2121
Page 1 of 2
The bumpers are made of aluminum profile, the front wall of which is finished with a black rubber lining along the entire length of the bumper.
The ends of the bumpers are covered with black plastic covers.
The bumpers are attached to the body with two bolts that must be removed to remove the bumpers.
To remove the front bumper, remove the oil pan and mudguard protection plate.
1. Using a 22mm socket, unscrew the bolt securing the towing eye and the bumper connector to the left front side member.
2. Remove the eye and bolt.
Similarly, we disconnect the fastening of the towing eye and the bumper connector to the right side member.
3. While rocking, pull out the bumper connectors from the seals of the lower front cross member.
4. Use a screwdriver to pry off the seal
5. Remove the rubber seal from the hole in the lower cross member
6. To remove the rear bumper, use a 22mm socket to unscrew the bolt securing the bumper connector to the right rear side member
7. ...and remove the bolt. Similarly, unscrew the bolt securing the bumper connector to the left rear side member. We remove the rear bumper and rubber seals in the same way as the front ones.
8. To remove the rear towing eyes, use a 17mm socket to unscrew two bolts
9. Remove the eye
The front and rear bumpers are disassembled in the same way - we show the front as an example.
10. To dismantle the connector, use the “13” head to unscrew the two nuts
See also related news
| Ventilated brake discs for Samara (2108, 2109, 2113, 2114, 2115) |
| Typical operational defects of shock absorbers and methods for their elimination |
| Electrical diagram of Lada Kalina 2 (models 2192, 2194) |
| Replacing Bosch 7.9.7 ECU with January 7.2 |
| Wiring diagram VAZ 21214 Niva |
Sources used:
- https://ladaprofi.ru/shevrole-niva/kak-samostoyatelno-snyat-zadnij-bamper-na-shevrole-niva.html
- https://automotocity.com/avtovaz/snjatie-zadnego-bampera-shevrole-niva-bertone.html
- https://chevroletov.ru/remont/niva7/1357-demontazh-zadnego-bampera-na-restaylingovoy-shevrole-niva.html
- https://kipdoc.ru/remont-avtomobiley-vaz/59-.html
How to remove and install bumpers VAZ-21213
Page 1 of 2
The bumpers are made of aluminum profile, the front wall of which is finished with a black rubber lining along the entire length of the bumper.
The ends of the bumpers are covered with black plastic covers
The bumpers are attached to the body with two bolts that must be removed to remove the bumpers.
To remove the front bumper, remove the oil pan and mudguard protection plate.
Using a 22mm socket, unscrew the bolt securing the towing eye and the bumper connector to the left front side member.
Remove the eye and bolt.
Similarly, we disconnect the fastening of the towing eye and the bumper connector to the right side member.
While rocking, we pull the bumper connectors out of the seals of the lower front cross member.
Pry up the seal with a screwdriver
Remove the rubber seal from the hole in the lower cross member
To remove the rear bumper, use a 22mm socket to unscrew the bolt securing the bumper connector to the right rear side member
...and remove the bolt.
Similarly, unscrew the bolt securing the bumper connector to the left rear side member.
We remove the rear bumper and rubber seals in the same way as the front ones.
To remove the rear towing eyes, use a 17mm socket to unscrew two bolts
Expressive image of the car
1. One of the most expressive protective elements is the front bumper grille for Chevrolet Niva. Such a body kit for a Chevy Niva is a kind of calling card of the car, its chic external presentation of its own reliability and effectiveness.
The range of body kits of this type is made, as a rule, from steel with anti-corrosion treatment, and the diameter is 76 mm (you can also find 60 mm) ideally combined with the external dimensions of the car itself. At the same time, the designers assure the amazing ease of mounting such body kits and the absolute insusceptibility of the material of these parts to temperature changes. This guarantees exceptional long-term service life.
In addition, all the aerodynamic properties of the car when installing such a grille remain unchanged: streamlining, dynamics, and maneuverability are the same.
2. A body kit in the form of lower front protection for the Chevrolet Niva can protect the front bumper of the car from the “delights” of Russian roads, from small stones getting into the air collector or radiator, from scratches in the paintwork, small holes and similar problems. It is usually made of stainless steel, like the front bumper grille, and has the same characteristics in terms of material quality, installation, resistance to corrosion factors and duration of use.
As an element of external tuning, this part can turn a car into a more serious and respectable vehicle. What is especially valuable for Chevrolet Niva owners is the ability to combine the lower front protection with any color of the car.
3. An excellent way to protect against constantly rising dust when driving, impacts of small (and even large) stones on the surface of the hood, dirt particles getting on the windshield and an endless list of other road consequences can be an accessory such as a hood deflector.
Even streams of water when driving in rainy weather or the weight of snow during heavy snowfall will not have such a destructive effect on the wipers - the hood deflector takes on part of the load, reducing their force. It's convenient and safe!
The hood deflector is an acrylic plastic body kit that is capable of restoring its original shape even after significant damage; only it has good capabilities to perceive temperature changes and changes in atmospheric pressure.
The fastening of this car accessory can withstand significant force, which guarantees impeccable reliability even with the strongest impacts. There is information that the hood deflector is a way to protect the paintwork of a car from the corrosive effects of road dust.
Any owner of a Chevrolet Niva will be able to take a creative approach in choosing this accessory: deflectors are available in various colors (transparent, silver, dark smoky, etc.).
How to remove the front and rear bumper of Lada (VAZ) 2121, 2131 Niva, Lada 4×4 Urban
How to remove the front and rear bumper of Lada (VAZ) 2121, 2131 Niva, Lada 4×4 Urban
Screws and nuts become very sour, so before removing you need to treat the fasteners with a “liquid wrench”.
Front bumper
The bumper is held on by two bolts.
-Unscrew one bolt on each side (twisted from bottom to top) that secure the bumper brackets to the body.
-pull the bumper out of the rubber seals towards you (the main thing is to pull it out evenly so that there is no distortion).
Lada 4×4 Urban
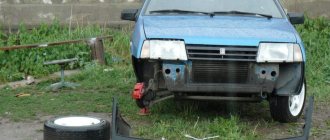
The front bumper of the Lada 4×4 Urban is attached to the regular Niva bumper and to the fenders.
-Unscrew the two screws under the license plate.
-depending on which side we will disassemble, turn the wheels out.
-Unscrew the screws in the wheel arches that secure the fender liners (if any).
-behind the fender liners, Unscrew the nuts that secure the corners to the wings.
-pull the bumper forward (make sure not to break the wires).
-remove the connectors of the fog lights (if any).
Rear bumper
-Unscrew one screw on each side (twisted from bottom to top) that secure the brackets to the body.
-pull out the bumper back (make sure there is no distortion).
Lada 4×4 Urban
Just like the front, rear bumper of the Lada 4×4 Urban is attached to the factory Niva.
-in the wheel arches, Unscrew the screws that secure the fender liners.
-behind the fender liners, Unscrew one nut on each side that secures the corners to the wings.
-from the bottom, between the bumper and the body, Unscrew two screws.
-with an assistant, carefully pull the bumper back (make sure not to break the wires).
-remove the connectors from the electrical equipment (if any).
<div><img src=»//mc.yandex.ru/watch/24565976″ alt="»»" /></div>
Peculiarities
Before making a rear power bumper according to the drawing, you will need to consider the following features:
- color of the component. According to Russian traffic regulations, the amount of color that differs from the main color of the car must be less than 30%;
- the need for space to install license plates, optics on the field 21214. If you do not have them, you will face a fine;
- the need for a powerful winch.
You can make the rear power bumper for model 21214 yourself, following these recommendations:
- in order not to spend a lot of money on materials, take ordinary sheet metal and pipes;
- dismantle all mechanisms and connections on the car that may interfere with installation (linings, fog lights).
How to remove the front bumper of a VAZ 2121 Niva 2131
07 June 2015
The front bumper on a VAZ 2121 and Niva 2131 is removed to replace it or repair it in case of mechanical damage. The bumper is also removed when carrying out various repairs, in which its presence will interfere. To carry out repair work, prepare a standard set of tools and perform the following sequence of actions:
- To make dismantling work easier, it is recommended to remove the protection plate for the oil pan and engine mudguard.
- Using a twenty-two socket, unscrew the bolt securing the towing eye and the bumper connector to the left side member of the body.
- Remove the eye and bolt.
- Similarly, we disconnect the eye to the right side member.
- Gently rocking the bumper, we pull out its connectors from the rubber seals of the lower cross member of the front end.
- Using a flat screwdriver, pry the rubber seals out of the holes in the lower cross member. Replace them with new ones if the rubber has lost elasticity or is damaged.
- Carry out the necessary repairs or replacement of bumpers, then install them in the reverse order.
At this point, the repair work to remove the front bumper on the VAZ 2121 and Niva 2131 has been completed.
Advantages
The power bumper for Niva 2121 has many features. Depending on the configuration and purpose of the product, it can perform several functions. First of all, it is much easier to install an electric winch on power bumpers. It will be firmly attached to the front of the car and will help in case of wheel slip.
Products are manufactured in standard sizes and are suitable for all modifications of the machine. For example, the Niva 2131 power bumper can be mounted on the 21214 and standard model. The product is made from durable steel, coated with layers that protect the material from corrosion and environmental influences. The surface is painted with powder material, which retains its performance properties even after receiving a blow.
With a power bumper you can easily get out of ruts. The design contains grooves for installing a jack. With their help, you can lift the front of the car and move the body to the side, thereby getting out of the trap.
There are designs with kangurin. This power bumper for Niva 21213 looks quite stylish and provides additional protection for the front part of the hood and headlights. This feature is very important for fishing enthusiasts. Frequent driving through forested areas and narrow passages creates the potential for vehicle damage.
Chevrolet Niva bumpers. Differences. How to remove the bumper.
Author: Makeev Vasily
Reading the article will take: 1 minute
In the interior developments of the Italian design studio Bertone, special attention was paid to Chevrolet Niva bumpers. We are talking about the modernization of the car, which took place in 2009. If we consider separately the initial version of the Chevrolet Niva and the version after restyling, it is not so easy to notice the differences. However, they are quite significant and primarily affected the front and rear bumpers.
Restyled Niva-2009
The launch of the first Chevrolet Niva model occurred in 2002. Until 2009, about 300,000 cars rolled off the assembly line. Market analysis showed that the product of the united company “GM-AvtoVAZ” won the hearts of Russian consumers, but it was impossible to stop there. Although the “experience” of the new Niva was practically insignificant compared to the number of years that representatives of the classic family lasted in production. The company's management decides to modernize the model by changing the interior. They decided to leave the technical part without any major changes.
At the end of 2008, the GM-AvtoVAZ company submitted an order to the Bertone design studio. The performers had specific tasks:
- Create a modern design that matches the Chevrolet style, while minimizing financial costs.
- While maintaining the geometry of the body, emphasize the kinetic characteristics of the car. Modernize the interior.
- The headlights, taillights, and radiator grille have undergone changes. But the Chevrolet Niva bumpers played a key role in finding the style.
Front bumper
The lines of the front buffer on cars produced before 2009 corresponded to classical ideas about the purpose of this body part. The plastic cladding was distinguished by the correct shape, which was inherited by European cars of the late 90s. It was conventionally divided into two parts. The upper part is represented by a simple plastic box with a casting for attaching a license plate. At the bottom there are air intakes and rectangular fog lights.
A gap formed between the bumper and the radiator grille, which revealed errors in the body assembly. In fact, this gap was not a mistake by the assemblers at all and was part of the design idea. Already in the reviews of the first owners there were such shortcomings as the lack of radiator protection and the relatively trivial design of the front bumper as a whole.
After restyling, the front buffer began to consist of more sections, which gave the car a modern style. The upper part is now made together with the radiator grille. As a result of this decision, the ill-fated gap completely disappeared. The air intake in the new version is covered with a decorative grille. It not only serves as part of the external design, but also has practical significance. The lower part of the radiator is protected from flowers, grass and other debris. Pursuing a commitment to the Chevrolet Captiva style, the designers decided to change the PTF frame. Round fog lights are installed on modern cars of the European and Asian automobile industry. The lower part of the front bumper is made of black plastic. There is one more detail that appeared after restyling. This is a bottom mounted amplifier.
Such amplifiers are designed to protect the radiator and engine crankcase. Usually installed on powerful SUVs.
Here they serve only a decorative function, but with them the car has its own special style. The amplifier emphasizes the status of an SUV.
Rear bumper
The rear bumper of the restyled Chevrolet Niva model does not have many distinctive elements, but there are practical innovations. The first thing that catches your eye is the horizontal insert in its upper part. Theoretically, it should serve for convenient loading or unloading of the trunk. But even if the owner doesn’t find any use out of it, it looks quite stylish. When the trim is painted in body color, the insert remains black. The rear bumper, like the front, has a lower part made of black plastic. The imitation buffer protection is also a license plate bracket. The air intake slots, even if they are not functional, give the car a semblance of GT styling.
By the way, in the updated version, body kits appeared on the wings and sills. The bumpers have smooth transitions under the linings, which creates a unified picture around the perimeter of the body.
Loading …
How to remove Chevrolet Niva bumpers
In order to dismantle the buffer from the car, you do not need any special devices, however, it is recommended to carry out the work using a lift or inspection pit.
Removing the new front bumper
- Remove the three screws at the top of the radiator grille (in the area of the hood latch).
- Unscrew the two bolts under the license plate.
- The bottom of the bumper is attached to the cross member with two bolts. They need to be unscrewed. But before this, it is necessary to dismantle the cover simulating the amplifier.
- After removing the front wheel, you should unscrew the 6 screws of the front part of the arch protection and 2 nuts with which this protection is additionally tightened.
- There is a decorative trim under the headlight. It needs to be moved to the side. This will give you access to two more screws.
- On the opposite side the work is duplicated. After this you can remove the bumper.
Removing the old front bumper
The algorithm for removing the front bumper from a car produced in 2002-2009 is somewhat different.
- First, the radiator grille is dismantled, since it is installed separately.
- The headlight covers are secured with screws that must be removed.
- It will not be difficult to find 4 bolts from above. They need to be unscrewed.
- Unscrew the 4 nuts from the bottom of the bumper.
- Unscrew the screws of the side fastenings.
- Remove the license plate and unscrew the mounting screws.
- Remove the bumper.
Removing the rear bumper
Removal of the rear bumper for all samples follows the same procedure.
- The mudguards are removed.
- Unscrew the screws on each side that secure the fender liners to the bumper.
- To remove the reflectors, you need to squeeze the latches from the inside. Under the reflectors, unscrew one bolt at a time.
- Remove the number and unscrew the 2 bolts underneath it.
- Unscrew the two nuts from the bottom.
When removing the bumper, care must be taken, since wires are attached to it from the inside, which are subsequently removed. Removing the bumper is not difficult. You just need to know where the fasteners are located.
Preparatory stage
The power bumper "Chevrolet Niva" and "Niva" can be bought almost everywhere, but you can also make it yourself. Personal production has its advantage - independent choice of material for the buffer, as well as the absence of overpayment for the manufacturer's brand when purchasing.
Before actually making a car buffer, be sure to answer the question of why exactly you need this design. This will allow you to think through all the necessary details of future work.
You can make a power bumper for Niva yourself
A do-it-yourself power bumper should contain:
- mounting location for the winch;
- "wind cutters";
- place for mounting license plates and headlights.
It is very important to pay attention to the fact that a homemade bumper for a Niva will add 15-25 additional kilograms to the vehicle.
Recommendations
Comments 20
Anything that exceeds the dimensions of a standard bumper is a reason for a financial discussion with the policeman. Kangurins are prohibited.
Poke the pipe from below, it doesn’t even go beyond the dimensions.
Well, if this argument convinces...)))
This is the cops' feeder
Pipes on both bumpers, no questions from the police yet. And on many cars I see there are tubes at the bottom of the bumper. This is not a full-fledged kangaroo.
“it will fall off at the first normal passage of any hole,” “I only need it for beauty))”
I don’t do offroading, but I often go into the forest (during hunting season). This kind of pipe protects the plastic of the bumper when crossing bushes and overgrowth on forest paths. And if, when driving through a super pit, a pipe rips out, then you need a tractor to travel there. But Shniva with its low plastic bumper aprons is not suitable for super pits. If only you do special training, it will be a completely different horse.
And my bushes fit under plastic without question... From experience: if you make it too strong, you’ll break the body, if you make it too weak, it’s pointless.
Be that as it may, the plastic and license plate suffer less from overgrowth when the pipe is installed. Yes, a person also wants harmony (beauty). And the successful shape of the pipe makes an appearance.
What I mean is that you need to carefully select the strength of such protection. I'm afraid, however, only through experience.