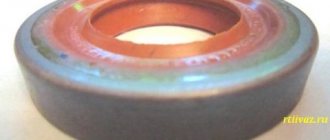
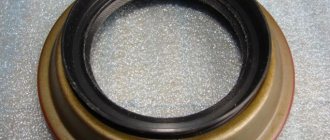
Note: the oil seal must not be skewed when pressed. The end of the oil seal should be recessed relative to the end of the crankcase by 1.7-2 mm.
The mandrel can be made from an old bearing ring or a pipe of suitable diameter.
Rear axle
Replacing the rear axle oil seal on a VAZ 2107, as mentioned, is a very important procedure. The rear axle is a car unit that on a VAZ 2107 receives torque from the gearbox through the cardan (see VAZ 2107 repair of the cardan on your own). On rear-wheel drive vehicles, such as the VAZ 2107, the rear axle is its main chassis, without which it is impossible to imagine the vehicle moving. On the VAZ 2107, the rear axle is constantly subjected to high loads and a difficult task falls on the oil seal. Therefore, the driver needs to regularly replace them and try to install high-quality and reliable oil seals.
Types of rear axles
Now let's look at the types of rear axle assemblies, since you also need to know this when replacing the oil seal. The rear axle of the VAZ 2107 has three main types of assembly:
- with semi-balanced axle shafts;
- with independent suspension.
with completely unloaded axle shafts;
The VAZ 2107 uses a semi-balanced axle shaft, which transmits torque and receives its bending moments in horizontal and vertical positions. The rear axle of the VAZ 2107 is made of a solid beam with a ring-shaped part developed in the center. A beam is welded from two stamped steel halves. The oil filler hole is located in the middle part of the beam.
Kinematic diagram of the axle shaft
- The car is installed above the inspection hole. The plug on the rear axle is unscrewed, and the oil from the gearbox is drained into a previously prepared container. The cylindrical flange of the gearbox is wrapped with nylon thread, which is then attached to the dynamometer. The dynamometer is pulled down until the flange begins to rotate. The value observed on the dynamometer at the moment the rotation begins is stored or recorded.
This force is measured using a dynamometer
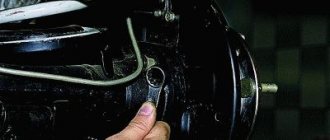
For this operation it is convenient to use a 27mm spanner.
The flange has been removed from the shank
This operation requires a tube and a hammer.
The flange is tightened with a torque wrench
Video: How to carry out work on a VAZ 2107
Assembly
- Install the drive gear flange and washer.
- Tighten the nut to a torque of 117-254 Nm. It can be determined more accurately by measuring the force of rotation of the gear. It should correspond to the value measured before removing the flange. When tightening the nut, it is necessary to hold the flange using a wrench, which can be made from a pipe with a pair of bolts and nuts attached to it.
- Install axle shafts and wheels.
- Fill the rear axle gearbox with new oil.
Any component of a car can become unusable for a variety of reasons. This can also happen with oil seals in the rear axle gearbox of a VAZ 2107. The vast majority of car enthusiasts consider replacing these oil seals to be extremely difficult and immediately send the car to a service center. In this article we will try to prove to the reader that you can change such an oil seal with your own hands.
Purpose of the gearbox oil seal
All classic Lada car models, up to VAZ-2108, have rear-wheel drive. Starting from VAZ 2108 and higher, cars are driven by front-wheel drive. Everyone knows that a gearbox is a device through which torque is increased with its further transmission from the cardan to the rear wheels. All parts of the rear axle operate predominantly in an oil environment, which has a positive effect on the following factors:
- The service life of rubbing parts increases due to reduced wear.
- The heat generated by gear friction is removed.
- The friction force is reduced.
- The gears are cleaned from metal dust and shavings that are formed when metal parts come into contact with each other.
Repair or replacement, which is better?
Car owners of VAZ classics often cannot decide what is best to do - buy a complete ready-made REM assembled or purchase individual parts and repair the gearbox. It’s really difficult to decide here - the price of a new gearbox, of course, is higher, but the owner of the car is freed from the headache of adjustment. The thing is that it’s not so easy to find a good specialist in VAZ gearboxes, and there is no guarantee that the new main pair will not hum.
If a car owner buys a new gearbox, but it hums, the part can be exchanged under warranty, but the car owner loses money on removing and installing the gearbox. If you purchase a defective main pair, the repair itself will be more expensive - you will have to pay a technician for a secondary overhaul of the gearbox.
Diagnostics of VAZ 2107 gearbox seals
The transmission system needs to be checked if there are leaks of transmission oil under the car, noise, or grinding noise from the gearbox. The leak may be between the gearbox and the transfer case. Also, if the sealing elements are worn out, difficulties may occur when changing speeds. In most cases, the need to replace the gearbox seal occurs after 60,000 km.
The gearbox shaft seal must also be checked. If this component of the box has become unusable, liquid leaks are noted. Wear of the shank oil seal may be due to natural wear or mechanical damage. High-quality products will not lose their properties even after 70,000 km.
Cardan shaft outboard bearing
During vehicle operation, the driveshaft and crosspiece are subject to increased load, so it is not surprising that this unit often fails, requiring appropriate repairs and replacement. In this article we will tell you how to change the crosspiece on a VAZ 2107. At first glance, such repairs may seem like a complex and time-consuming job, but in reality, using a high-quality tool, every car owner can do such work, which will allow you to significantly save on the maintenance and repair of your car. car.
Symptoms of failure
The main sign of damage to the driveshaft crosspiece is the appearance of knocking sounds in the area of the bridge when starting to move and changing gears. You can determine the breakdown by carrying out the simplest diagnostics of the car, for which you drive it into a pit or overpass, after which you loosen the driveshaft up and down and left and right with your hands. If there is noticeable play in the crosspiece, then it is necessary to replace this unit. Repairs should not be delayed, since a failed crosspiece quickly leads to damage to the outboard bearings, and such work is expensive, and it is not possible to do it yourself. Therefore, at the first sign of damage to the crosspiece, it should be replaced.
Necessary tool
To complete this job you will need the following tool:
- Sets of socket and open-end wrenches.
- Hammer.
- Tweezers and screwdriver.
- Bronze knockout.
- Metal brush.
Step-by-step description of the process of replacing the cross
As mentioned above, these works are not particularly difficult, so every car owner can cope with them. We will tell you step by step how to change the crosspiece on the cardan shaft of a VAZ 2107. All parts removed from the driveshaft must be marked with a chalk or chisel, which will simplify their installation later when reassembling such units.
You will need to remove the driveshaft, for which, using a 13mm wrench, unscrew the two nuts that secure it to the car body.
We unscrew the rear part of the cardan, which is attached to the rear axle shank with four bolts.
The next stage of work involves directly removing the cardan. You need to thoroughly clean the metal elements with a metal brush, which will remove rust and possible contamination. It is necessary to remove the cardan using pliers, which makes it possible to remove the retaining rings and easily remove the cross. In the absence of such special pliers, you can use a screwdriver and pliers. When doing this work, do not be afraid to bend the retaining rings, since new clamps will be used in the future.
To knock out the cups of the cross, you will need to use a drift and a hammer. A wooden block should be placed under the cardan eye. You can knock out the crosspiece as follows. First, carefully hit the lower cup of the cross with a hammer, and at the same time make sure that the needle bearing does not rest against the floor. After this, we take a drift and hit it on the upper cup, which will knock out the lower bearing, and you can easily remove the cross.
Having knocked out the crosspiece, you should carefully clean its seat with a metal brush, after which you usually begin assembling a new crosspiece and installing it in the cardan.
It is necessary to lubricate the bearings of the new cross with the appropriate composition, and then install this unit into the propeller shaft in the reverse order. The crosspiece is inserted into the eyes of the cardan, and only after that the bearing cups are carefully fixed. Watch the bearing needles, which must remain stationary.
Having installed the bearings, we fix the crosspiece on both sides with retaining rings. All you have to do is install the assembled crosspiece in place, then carefully tighten the bolts and check the correct assembly. The crosspiece and all elements must be assembled in full accordance with the pre-made marks. Remember that if this element is assembled incorrectly, increased vibrations may occur, to eliminate which you will have to contact a repair shop.
When and why to change the front oil seal
The manufacturer recommends replacing the front crankshaft oil seal of VAZ 2101-2107 engines every 150,000 km. However, in practice such replacement has to be performed more often. Accelerated wear of the sealing element and the appearance of engine oil leaks are caused by:
- skewed oil seal during installation;
- loss of elasticity due to engine overheating;
- increased radial runout of the drive pulley of mounted units;
- use of low-quality motor oil;
- wear on the crankshaft pulley hub.
In addition, we cannot rule out hardening of the cuff due to natural aging and the possibility of a manufacturing defect - unfortunately, the quality of parts for rear-wheel drive VAZ models leaves much to be desired.
It is impossible not to notice damage to the sealing element - the rotating pulley scatters oil in the front of the engine and throughout the engine compartment. However, do not think that such a malfunction only leads to oiling of the units and a decrease in the lubricant level. If engine oil gets on the generator belt and other rubber parts, it can quickly render them unusable.
Keep in mind that the appearance of a leak through the engine seals is provoked by another factor - increased crankcase gas pressure. For this reason, be sure to check the cleanliness of the engine ventilation system.
Something else useful for you:
- Replacing the rear crankshaft oil seal of a VAZ 2101-2107 with your own hands
- Replacing valve stem seals: main signs of wear, replacement procedure
- DIY crankshaft bearing replacement for VAZ 2105-2107
Can't you spoil the porridge with oil?
Oil is poured into the axle housing up to the lower edge of the filler hole, in the position when the axle is installed and secured to the vehicle. You should not fill oil above this level, since a larger volume significantly increases power loss when the gears rotate and provokes leaks.
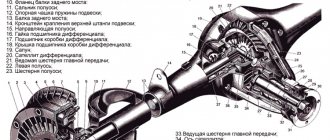
Lubrication of gearbox parts occurs as follows. The lower part of the driven wheel and differential are constantly immersed in an oil bath. When the car moves, they rotate, alternately wetting with oil all the teeth of the main gear and differential gears. The differential bearings and the rear pinion bearing are lubricated in the same way. In addition, the teeth of the driven wheel spray oil abundantly, creating “oil mist” in the crankcase. The least amount of oil when splashed goes to the front, most distant, bearing of the drive gear. To lubricate it, a channel is made in the upper part of the crankcase, where, under the influence of centrifugal force, oil is thrown from the outer circumference of the driven wheel. The higher the rotation speed, the more oil enters the channel. This channel leads into the cavity between the bearings of the drive gear, passes through the bearings and returns to the bridge beam. To drain oil from the flange side of the drive gear, there is an oil drain channel in the crankcase. The bearings, due to the conical shape of the rollers, have a pronounced pumping effect, so the flow of oil that flows from the front bearing directly to the oil seal can be quite significant - more than one liter per minute. It is not easy to withstand such pressure, so an oil-removing washer is installed immediately behind the bearing, in front of the oil seal. It slows down the flow rate, but there is still a gap between it and the crankcase through which the oil flows to the oil seal. Therefore, the tightness of the drive gear oil seal is a constant concern for axle designers and manufacturers.
The amount of oil supplied to the oil seal depends on the speed of rotation of the driven wheel of the final drive
But the lack of oil supplied to the oil seal is no less, and perhaps even more harmful to its “health”, because with dry friction against the surface of the flange, no matter how smooth it may be in appearance, the working edge of the oil seal will wear out very quickly, and a gap will form between it and the shaft, through which not only oil can flow out, but also water can flow in if you need to cross a ford or just a deep puddle in a heavy downpour. And water in oil is a very quick “death” for gears and bearings.
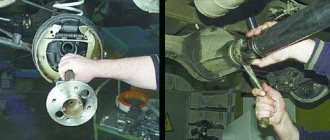
Removing the axle shaft and replacing the oil seal. VAZ 21213, 21214 (Niva)
Using a 17mm spanner, unscrew the four nuts on the bolts securing the axle shaft to the beam flange.
Use a slotted screwdriver to bend the locking plates of the axle shaft mounting bolts...
...and remove the bolts.
We fix the wheel with the reverse side on the axle shaft by tightening three nuts several turns.
Holding the wheel, we move it with a jerk...
...and remove the axle shaft assembly with the bearing mounting plate, bearing and locking ring.
We take out the rubber sealing ring of the beam flange.
We insert two bolts into the holes of the brake shield and the rear axle beam so that the shield does not hang on the brake pipe.
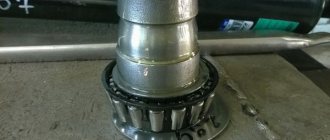
We pry off the oil seal using sliding pliers...
Using a tool head of a suitable size with an extension (or a piece of pipe), we press in a new oil seal.
If the axle shaft is deformed, its splines are worn out, or the bearing is worn out, we replace the axle shaft with a new one complete with bearing and locking ring (it is not recommended to replace the bearing or locking ring yourself). Install the axle shaft in reverse order. Check the oil level in the rear axle and add if necessary.
A little anatomy
In the last years of its life on the AvtoVAZ assembly line, the classic Zhiguli remained perhaps the only passenger car in the world with a rigid drive axle. This design is simple and technologically advanced in production, but has serious disadvantages in operation:
- large unsprung mass of the bridge, which negatively affects the smoothness of the vehicle;
- tendency to steer when one of the wheels hits an obstacle - at this time, due to the misalignment of the bridge, both wheels tilt from the vertical and tend to roll in the direction of the tilt;
- reduction in the useful volume of the trunk, because there must be free space between the axle and the car body for the axle to move during the compression of the suspension.
The advantage of a rigid axle, in addition to manufacturability, is its better adaptability to bad roads: the ground clearance under the axle practically does not change depending on the load, and the wheel drive is reliably protected from external influences by the axle housing.
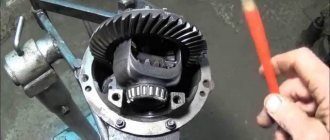
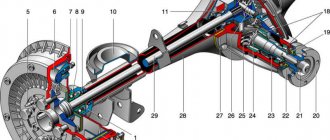
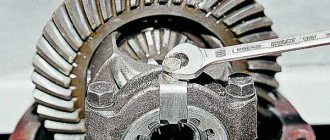
The Zhiguli bridge consists of a stamped-welded bridge beam (such beams are called “Banjo” for their characteristic shape), a main gearbox with a differential, and axle shafts. The gearbox is made in a separate open housing, the flange of which is bolted to the crankcase. A drive gear with a driveshaft mounting flange and a differential with a driven wheel are mounted in the housing on bevel bearings. The main gears are hypoid, that is, their axes are located at an angle of 90 degrees to each other, but do not intersect (they are crossed). The amount by which the axis of the drive gear is offset relative to the axis of the driven gear is called hypoid offset. Such a transmission, if it is precisely manufactured and well adjusted, operates smoothly and with the least noise, but due to the intense sliding of the curved teeth, it is very sensitive to the quality and quantity of oil in the bridge.
The design of the bridge is relatively simple and technologically advanced, although it is not without its drawbacks
Problems when paying with bank cards
Sometimes difficulties may arise when paying with Visa/MasterCard bank cards. The most common of them:
- There is a restriction on the card for paying for online purchases
- A plastic card is not intended for making payments online.
- The plastic card is not activated for making payments online.
- There are not enough funds on the plastic card.
In order to solve these problems, you need to call or write to the technical support of the bank where you are served. Bank specialists will help you resolve them and make payments.
That's basically it. The entire process of paying for a book in PDF format on car repair on our website takes 1-2 minutes.
If you still have any questions, you can ask them using the feedback form, or write us an email at