Rice. 7.76. Checking the integrity of the conductors of the rear window heating element: 1 – voltmeter probe; 2 – direction of finger pressing; 3 – foil; 4 – heating element track
WARNING
To avoid damaging the heating element tracks when checking, wrap foil around the tips of the voltmeter probes. To check for a break, press the foil with your finger and run it along all the tracks of the heating element ( Fig. 7.76 ).
Checking technical condition
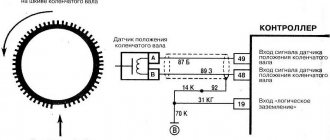
Rice. 7.77. Diagram for checking the resistance of the rear window heating element tracks
Turn on the rear window heating with the switch and check the voltage on each track at a point located in the middle of the glass (Fig. 7.77). If the voltage measured by the voltmeter is approximately 6 V, the heating element trace can be considered serviceable.
Rice. 7.78. Determining the location of the break point of the track of the rear window heating element with a voltmeter reading of 12 V (the break point is marked with a cross)
If the track is broken in the middle between the center point and the “+” terminal (Fig. 7.78), the voltmeter will show a voltage of 12 V.
Rice. 7.79. Determining the location of the break point of the track of the rear window heating element when the voltmeter reading is zero (the break point is marked with a cross)
If the track break occurs in the middle between the center point and the “–” terminal (Fig. 7.79), the voltmeter will show a voltage equal to zero.
To find the exact location of the break, slowly move the voltmeter probe along the path to the expected location of the break. Find the point where the voltage appears or drops to zero. The point at which the voltage changes is the break point of the circuit.
Using an ohmmeter, check the resistance of each trace of the heating element between one of the terminals and the midpoint of the trace and between the same terminal and the midpoint of the adjacent trace. The resistance of the section in which the break occurred will be twice the resistance of the other section. Move the tester probe across the section with the gap until the point where the resistance changes abruptly.
Repairing broken heating element conductors
For this you will need: conductive paint, paint thinner, adhesive tape, silicone remover.
Using a thin brush, wipe the surface of the glass around the broken traces, clean this surface with silicone remover and stick two pieces of adhesive tape along the damaged conductor on either side of the broken point so that the pieces of tape do not overlap the conductor thread.
Shake the container with conductive paint vigorously and apply it to the broken area with a brush in three layers at intervals of about
15 minutes (the pasted pieces of adhesive tape serve as a template, which ensures that a layer of paint is applied with a width comparable to the width of the heating element track).
Remove the adhesive tape.
Allow the paint to dry sufficiently before turning on the glass heating (drying time is indicated on the paint packaging).
To improve the appearance of the current-carrying path, after the paint has completely dried (after 24 hours), carefully remove excess paint with a knife.
If the heated rear window of a car does not work in winter, visibility is significantly reduced, compromising the safety of the driver and passengers. That is why, if a malfunction is identified, repairs should be made immediately.
Design of the rear window heating system
The system that helps clear the rear window of ice, snow or fog is not very complicated in design. The electrical circuit in general terms can be depicted as follows:
- C - generator.
- E230 - OZS system switch.
- J519 - on-board electrical network control unit.
- Z1 - heating element of the OZS system.
Although there may be some differences in different car models, nevertheless, if we consider it in detail, then in principle it includes the following main elements.
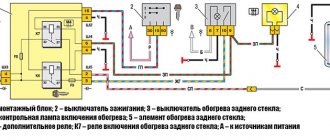
- Mounting block.
- Ignition switch.
- Heating switch ZS.
- Indicator lamp signaling the activation of the OZS.
- Heating element of the OZS system.
K6 - additional relay. K7 - OZS switching relay. A - connection to power systems.
In addition, the system has fuses, terminals and wires that connect all elements into a single whole.
When the ignition key is turned, the OZS is turned on by pressing a button, to which power is supplied through an additional relay K6. At the same time, the rear window heating relay K7 is activated, the heating element is connected and at the same time the control light comes on.
The design of the heating element on the rear window may also vary. In the standard version, it is a mesh of thin metal nickel threads, which are connected by two conductive busbars located on opposite sides. On one side, a 12V current is supplied to the bus, and on the other, the bus is shorted to ground. Such devices are attached to the glass using special glue.
On some car models, the heating element is applied to the glass using spraying, for example, aluminum. A thin film with good light transmission is attached on top of this coating using glue that conducts current.
Recommendations
Comments 31
Tell me the number, it’s not with b7, I need heating, etc.
3AA845011APNVB Apparently this is the same number, I don’t know, is it the default for the assistant? Is there a bracket for it included?
Does the same thing come with only a rain + light sensor? If only they would drop the number)))
... According to ETKA, it turns out that your glass 3AA845011AP is not athermal, but transparent. PR-4GW According to PR codes... 4GY - athermal without heating 4GX - green with heating 4GF - green without heating 4GW - transparent with heating
As far as I understand, there are NO athermal ones with heating! There is already metal there (for athermality). and also adding a film for heating is overkill IMHO.
PS On my B6 I have a stock athermal (3C0845011BS PR-4GY) without heating, with an OBVIOUS purple tint. Although in your photo you also have a low tide. Most likely this is “olive” from the heating film..., not from “athermality.”
Tell me, please, do all athermal glasses heat up this way? I can not understand. FUYAO Chinese athermal 17tr and not a word about heating.
I can't say anything about China
where where did I find such a film. thanks in advance
This is the original glass with this heating
where where did I find such a film. thanks in advance
Number below in comments link
infection. I'm looking for a heated windshield, but there isn't one for mine. I think I can find a film like this
The helmet is running out, I'll go today and talk on the windshield) don't know if this will work for the Passat B7? :)
Hello. Tell me, is it glass with a purple tint? In the photo there is some kind of red color.
Yes, I filmed it in winter and on my phone
are there any newer photos? where can you see the purple tint?
Maybe I’ll just tell you how much it costs and the questions will disappear?
maybe just a number
Thank you. We'll be waiting for the flying photos)
Did you encounter any problems during installation? Are the heating connectors of the new glass similar to the old ones?
Troubleshooting in the OZS system
If you find signs that the rear window heating is not working, you must carefully check the entire electrical circuit of the vehicle's EOS system.
The first thing to check is the serviceability of the fuses. So, for example, on a VAZ-2110 these are rear window heating fuses F4 and F7, which are located in the mounting block. Their malfunction may occur due to a factory defect, short circuit or voltage surge in the on-board network. The faulty fuse needs to be replaced, for which it must be removed from the mounting block.
Next, you need to check the terminal connections in the OZS system. When operating a vehicle, all equipment is subject to strong vibrations. As a result, the contacts may be damaged or a terminal may become disconnected or loose.
The heated rear window relay must also be checked. Breakdown of the relay is possible when the wire in the working coil of this part breaks or due to burnt contacts, due to a manufacturing defect or short circuit. To check it, the relay must be removed and checked using a tester. If this part malfunctions, it needs to be replaced with a working spare part.
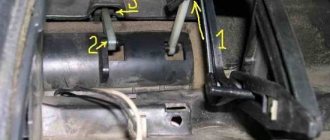
You should also check the rear window heating contact. A conductive element is attached to the rear window using glue, which is a contact to which an electric current is supplied through a wire, which is transmitted through this contact to the heating filaments.
In this place, the wiring may break or, due to the fact that the glue was of poor quality, the contact element may peel off from the glass.
Quite often, the failure of the rear window heating is caused by a break or damage to the threads in the heating element on the rear window. This is detected by visual inspection or instrumental analysis. Visually, only obvious damage to the thread can be detected by identifying a gap between the damaged ends.
It is possible that during some repair work on the car, mechanical damage was caused to the surface of the glass on which the heating element is attached using glue.
However, the main tool for diagnosing this malfunction is a voltmeter or ohmmeter.
They allow you to accurately identify an area with faulty threads, even if this break cannot be visually detected.
No heating
Imagine that the heater grill on your car doesn't work at all. Check the obvious first: is the fuse good? The heater grill draws a lot of current (10 to 20 amps), and if the fuse is not strong enough, it won't last long. If it doesn't look like the fuse is blown, check it with a voltmeter - the ignition is on and so is the heater. You should see 12 volts on both terminals.
Check for 12 volts at the grille terminals to see if the electrical circuits to the rear of the vehicle are intact.
If the voltage is excellent, the problem is somewhere in the wiring or in the grille. Check the connection from the wire bundle to the grille. The terminals near the grille are easily damaged. Usually the contact that is attached to the glass breaks off. This will leave you with a loose wire that can't be reattached. Here you have two options: solder or glue.
If you know how to solder and have a high power soldering iron or soldering gun, solder the pin back. You will need a helper to hold the contact against the grid while you solder. There is usually a metal strip running across the glass underneath the silkscreen. Clean surfaces with alcohol and use rosin solder. Act quickly because excessive heat may crack the glass.
Experienced solders may want to solder the contact back onto the window.
If you're not sure if you know how to solder, or you're not ready to face the problem of cracked expensive glass, there is another way. The dealership and most department stores that sell auto parts can sell you a special conductive epoxy compound to reattach the contact.
Broken rear window defroster grille terminals can be repaired using conductive epoxy adhesive.
If it's winter, you'll have to work in a heated garage, and the car needs to sit there long enough to warm up to at least 16°C. Again, wipe the glass with rubbing alcohol. Apply adhesive tape so that the epoxy glue does not get on the glass. Mix a moderate amount of epoxy compound with hardener. Apply a little glue to the contact and press with a sharp object for 10 minutes or so to allow the epoxy to harden. You can use a wooden stick or wet your finger and spread the adhesive with the tip for a minute to make the repair area look nicer. Although the epoxy glue sets quickly, do not attempt to reattach the wires until 24 hours have passed at a temperature of about 16°C or more to allow the glue to fully cure. The repaired wire will never be as strong as the original one, so you need to be extra careful to avoid damaging it in the future.
The procedure for repairing a faulty OZS system
Having determined the reason why the rear window heating does not work, you can begin to repair this system.
- If the fuses or relays of the OSZ system are faulty, then the faulty parts must be removed. Replacing them with new, functional ones is not difficult. The main thing is that they are installed as indicated by the on-board electrical system diagram.
- In the case where the culprit of the damage in the OZS system is the terminal connection, restoring the heated rear window is also not difficult. It is enough to clean the contacts in the terminals. The terminal box may need to be replaced, but this will not take much time either.
- If the glue that was used to attach the contact on the rear window turned out to be of poor quality and peeling occurred, then in this case you need to buy a new high-quality conductive glue. Remove the layer of old glue from the peeled contact using a napkin with an alcohol solution. Then apply a layer of new connector and glue the contact in place.
How to make it yourself
To repair heat pipes it is not at all necessary to use special substances. It is quite possible to make conductive glue yourself. There are several popular alternatives.
Superglue with aluminum shavings
To make an effective conductive mixture, mix sawdust with superglue. These substances are taken in equal proportions.
Nail polish with silver graphite powder
It is recommended to add 2 types of powder to a bottle of nail polish. You can use a toothpick to mix the contents.
Heating system design
To understand how to restore the heated rear window, it is worth first studying the principle of operation of this system. Its purpose is to eliminate fogging and prevent drying out the air in the cabin. In winter, this function is indispensable, since the icing is evenly removed from the glass and at the moment when you already need to drive, the view is 100% free.
When it comes to the rear window, compact heating elements come into play, the source of which is the electrical network. Metal tracks are fixed on the glass surface from the interior side. These are numerous thin ribbons through which electricity passes, activating the process of heat generation. As a result, due to the heating of the glass, water evaporates and the surface becomes transparent within a couple of minutes.
Defrost MAX mode
On luxury Vestas with air conditioning, the “Defrost MAX” mode appears. It allows you to most effectively clean all windows and exterior rear-view mirrors from fogging, freezing or icing. To enable this mode, you need to press the corresponding button (No. 24) on the climate control unit.
When the mode is activated, the air conditioning (if conditions permit), electric heating of the windshield and rear windows, as well as side mirrors will be forcibly turned on. The entire air flow is directed to the blower nozzles of the windshield and front side windows, and the maximum air speed and temperature are also set.
Scheme of work
To know how to restore the heated rear window of a car and approach the repair with a high level of professionalism, study the principle of operation and the electrical wiring diagram. From the + terminal of the battery, power is sent to the ignition switch, then to the fuses and, lastly, to the controller. After this path it follows to the power contact of the relay. The vehicle body is connected to the negative terminal of the battery. Activation of the heater supplies voltage to the relay winding, then the power contacts are closed, and the relay terminals are also connected. The current flows through parallel-connected heater strips and then reaches the negative terminal through the body of the machine.
In some cases, a running motor acts as a factor predisposing to activation. This feature is due to the fact that the battery should not be discharged prematurely, and taking into account the characteristics of each car brand, the consumption volume of this system can be 10-25 A.
REGISTER
Group: Users Messages: 3 Registration: 12/22/2008 From: Yaroslavl User No.: 7 863
Car make:
FREELANDER 2/LR2
Did you like the topic? Useful? Share with your friends on social networks:
Group: Club Member (500) Messages: 912 Registration: 11.2.2009 From: Moscow User No.: 8 614
Car make:
Car of a different brand
Heated glass is a powerful consumer of electricity. You can check operation in warm weather only by indirect signs:
Turn on the heating while the engine is idling and you will immediately feel a slight dip and even the tachometer needle will “twitch” down for a second. it means it works.
Group: Club Member (100) Messages: 397 Registration: 7/28/2008 From: Moscow User No.: 4,516
Car make:
Car of a different brand
Or maybe just touch the glass from the outside?
Group: Club Member (1000) Messages: 1,759 Registration: 11/28/2007 From: St. Petersburg User No.: 893
Car make:
FREELANDER 2/LR2
Group: Users Messages: 3 Registration: 12/22/2008 From: Yaroslavl User No.: 7 863
Car make:
FREELANDER 2/LR2
Heated glass is a powerful consumer of electricity. You can check operation in warm weather only by indirect signs:
Turn on the heating while the engine is idling and you will immediately feel a slight dip and even the tachometer needle will “twitch” down for a second. it means it works.
Thank you. I tried your advice when the engine is running and there is indeed a slight dip when the heating is turned on.
Sources of the problem
Since many drivers prefer to restore the heated rear window with their own hands, you need to know about repair options taking into account the source of the problem. There will be no obstacles to independently checking the functional components of the car if you have minimal skills in repairing automotive equipment.
System fuse
The safety element is the first thing that should attract your attention when a breakdown is detected, since the system will not work if it is burned out. The location of this element varies depending on the car model, so at this stage you will have to turn to the vehicle service book for help. Next, remove the fuse and make sure it is working. Repair of the rear window heating will be limited to replacing the burnt out element.
About heated seats
The heating works quite efficiently. The only drawback is the lack of heating sensitivity. That is, there is no option to select power (low, medium, high), as on some foreign cars. But it does not “fry” all the time, but automatically turns off/on while the indicator is on.
Checking the heated seats of Lada Vesta from ZaRulem:
Phased renovation
The first thing you need to do is diagnose it and purchase a repair kit. There may be several options for a repair kit, and the repair technology in each case is discussed below.
Finding a Cliff
In addition to visual diagnostics of the condition of the threads, there are several more methods that are more reliable and effective:
- Visual diagnostics require activating the heater when the rear window is foggy. Where the threads are broken, the surface will warm up almost instantly, while in other areas visibility will be problematic.
- Using a voltmeter requires activating the ignition and then turning on the heating system. One probe should lie on the vehicle ground, and the second near the center of the heating tape. First wrap the second probe with foil. The break will be localized in the area where the voltage rises to 12 V or drops to zero. Ideally, this parameter should not exceed 5 V.
- The second method of using a voltmeter involves fixing one probe to the positive terminal of the heater, and the second one must be moved along the negative terminal strip. The problem area will be where the voltage is zero.
- Using the ohmmeter requires activation of the kilo mode. The device must be analog, with an arrow. The probes should be located near the system terminals, which are located in opposite directions from each other. Use distilled water to wet the cotton wool, which must be smoothly passed over the tape. As soon as the needle of the device moves, you will be able to detect the cliff area.
Repair with conductive glue
Repair of the rear window heating threads can be carried out using conductive adhesive. It is designed for temperatures from -60 to +100 degrees. You should not choose kits with glue, which cost 150-200 rubles. Often they do not last long or may not be effective at all. A cost of 300-400 rubles would be optimal for such a set.
Work order:
- Please read the instructions included with the kit. You should have a clear understanding of the options for applying the composition and the speed of its complete drying.
- Prepare the problem surface. Soak a rag in the alcohol solution and wipe the area.
- Lightly sand the edges in the break area with grade-grade sandpaper. It is enough to simply remove plaque and carbon deposits in two movements.
- Use tape to cover the strips along the thickness of the sides. It should not overlap the thread, but also avoid going too far away from the tape. Focus specifically on the width of the thread.
- Proceed to apply conductive glue to the prepared area using a brush or syringe. The instructions will tell you how many layers to apply. The overlap on the working areas of the tape should be 1 cm to the left and right.
- Remove the tape and wait until the composition dries completely. This will not happen before 24 hours.
- Check the functionality of the system after drying.
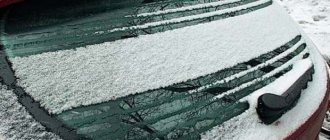
In winter, on cars in which the air conditioning does not work well, the rear window defroster is a real salvation. Driving a car without being able to assess the situation behind you is extremely irresponsible, and it is not recommended to go to parking areas with ice on the rear window. Some drivers use a scraper to remove ice, but most car models have a rear window defogger that can eliminate the ice problem.
The rear window defroster is a very simple device that consists of a series of horizontal lines of electrically conductive material applied directly to the glass. Near the side edges of the glass, vertical conductor lines approach the threads, through which the current flows to the electrically conductive material. The simple design of the rear window heater suggests that there are not many reasons that can lead to its failure. Below we present the main reasons why the device may not work, as well as methods for repairing the rear window defroster.
Broken rear window defroster threads
One of the most common malfunctions of this car component is a broken thread. Thin electrically conductive threads only need to be slightly touched for a rupture to occur, and this will lead to the rear window defroster no longer performing its intended functions. Most often, problem areas are diagnosed visually.
If you cannot detect visible breaks in the rear window defroster filaments, you can use diagnostic tools to troubleshoot the problem. Get a multimeter and use it to measure the voltage in all sections of each thread. For example, 5 conditional control points are taken on each thread. The negative probe of the multimeter is connected to ground, and the positive probe is connected to the test points of each thread. Moving the measuring probe from one end of the thread to the other, a voltage drop from 12 to 0 Volts should be observed on the device. If at one of the control points the voltage is higher or lower than normal, then you should take a closer look at this area, since there is an open circuit there.
Attention: Apply a sharp probe to the heater filaments carefully so as not to cause further damage.
Repair. A car enthusiast can easily fix such a malfunction on his own. Automotive stores sell a special kit designed to restore the rear window defogger pattern. The kit includes a stencil, conductive glue and a brush. The stencil is glued to both sides of the damaged area, after which conductive glue is applied to the problem area. Next, you need to wait until the composition dries (about 30 minutes) and remove the stencil.
Signs of breakdown
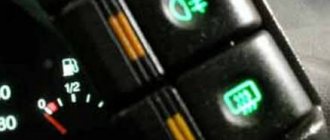
You can understand that there are problems with heating by the following signs:
- The glass begins to sweat when the warning light does not work. The first thing you need to do is check what voltage and serviceability of the fuses
- The glass does not heat up when the control lamp is on. The reason may be due to lack of voltage
- Condensation appears in some places; this may be due to a broken thread. Can be restored through repairs, special varnishes
- Defrosting does not occur even though the system is working properly. This can happen if the glass is heavily iced and there is not enough voltage; you need to clean the ice yourself.
There can be many reasons for the breakdown, ranging from the switch to the wiring itself, which can only be repaired by disassembling the entire dashboard.
If the reason is a broken thread, you can try to restore it. There are many different ways to solve this problem, which look like this:
- To eliminate a break, up to one millimeter, you need to prepare a special adhesive composition, for example (Kontaktol, Elekont), a syringe, or a glass cleaner. Special glue is applied to the area where there is a break, and insulating tape is tightly applied on both sides.
- You can use soft soldering or resort to the option of galvanic application of the material. But this procedure is labor-intensive and difficult to carry out in garage conditions.
- If the width of the gap exceeds two millimeters, you need to use a tinned copper core with a cross-section of 0.2 millimeters. It is better to perform soldering with POS-61 solder, but do not tinning the thread.
This is interesting: What to do if the battery light on the instrument panel is on
Rear window defroster fuse blown
If any electrical device on your car stops working, the first thing you need to do is check the fuses. Fuse failure can be caused by a temporary surge in current in the vehicle's on-board circuit or a more serious malfunction.
Repair. First, try simply changing the fuse and using the device normally. If the problem persists and the element fails again, determine the cause of the blown fuse and repair it.
More serious problems
Is the fuse ok? The grille is intact and attached to the glass, but there is simply no defrosting effect? Look for a faulty switch, relay or breaker. To do this, you will need a schematic diagram or extensive experience in identifying wiring problems. Start at the fuse and follow the wire. If the switch is bad, you will be able to plug it in externally and get 12 volts from outside for diagnostic purposes. But you may have to replace the breaker - which may be built into a large electrical control box hidden under the dash. Check your vehicle's manufacturer's manual for more detailed steps. If you don't have one, you'll have to determine the problem the old way. Trace the path of current from the fuse to the switch, then to the breaker and back to the glass.
Oxidation of contacts on heater connectors
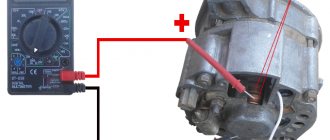
The rear window defroster may stop working properly due to oxidation of the contact directly bonded to the glass. To detect this malfunction, you need to measure the voltage of the supply wire and make sure that it exceeds 11 Volts.
Repair. If the measurement results in a value less than 11 Volts, it is necessary to clean the contact from any oxidation that has formed. To clean the contact, you can use fine-grain sandpaper or a special rust remover.