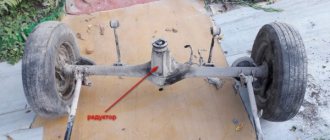
Signs of a malfunction of the rear axle gearbox of the VAZ 2107
The gearbox is a fairly expensive part, and its repair is a labor-intensive and complex process. Therefore, you should first make sure that the cause of the noise is a gearbox malfunction. You can do this as follows:
- Choose a flat section of the road and gradually accelerate on it from 20 to 90 km/h. While driving, you should listen carefully and note the appearance and disappearance of extraneous noise from the rear axle gearbox.
- Release the gas and start braking with the engine. While the speed is decreasing, you should also note the moments when noises appear and disappear.
- Accelerate the car to approximately 100 km/h and, switching to neutral, turn off the engine. While the car is coasting, note the presence and disappearance of noise.
If the rear axle hums both when the gear is engaged and when the gear is disengaged, there are no problems with the gearbox. If the noise is observed only when the gear is engaged, repair or replacement of the VAZ 2107 rear axle gearbox is necessary.
To verify the presence or absence of a mono problem like this:
- Park the car, securing it with wheel chocks.
- Raise it with a jack, hanging the rear axle.
- Start the engine, turn on the speed and add gas so that the wheels rotate without load, and the speedometer shows the same speed as during tests on the move.
If the noise remains the same when operating without load as under load, the problem is not in the gearbox. Other rear-wheel drive components should be checked.
If the gearbox does not make noise without load, you will have to start restoring it. Worn gears begin to make noise only under load.
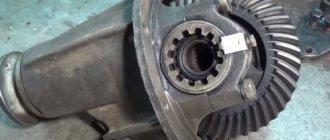
Replacement procedure
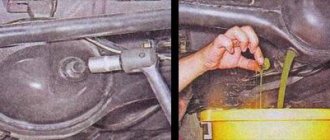
Before proceeding with dismantling the gearbox, drain all oil from it. Remember - never reuse old grease.
In order to free the rear axle, put the car in neutral.
Further:
- raise the rear with a jack;
- The cardan joint, carefully held with a pry bar (so that it does not turn during the process), is disconnected from the drive gear;
- unscrew the 4 nuts securing it;
- taking a flat screwdriver, disconnect the flange;
- the cardan is suspended on a rope, secured to the bottom of the car;
- twist the nut that secures the drive gear;
- remove the washer;
- the flange itself is dismantled;
- turn off the brakes and unscrew the wheels.
Since it is impossible to replace the gearbox without removing the axle shafts, dismantle them too.
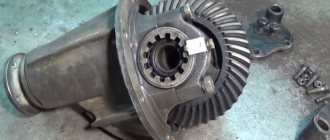
After this, all that remains is to remove the gearbox itself. It is disconnected from the beam by unscrewing 8 bolts.
Whatever the reason forces you to disassemble the rear axle, always check the condition of other moving elements along the way. As previously noted, oil seals most often become unusable.
The main bearings also often wear out due to high loads. If visible defects are found on these elements, they must be replaced. By the way, this element is designed to ensure the correct gear ratio of the power unit. For those who intend to start tuning their “seven”, it is useful to know that installing a superior gear directly into the gearbox allows you to lower the above-mentioned indicator and, therefore, increase the speed. For 2107, the highest allowed number is 4.4.
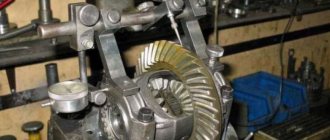
Repair and adjustment of the VAZ 2107 gearbox
Adjusting and repairing the gearbox requires some skills and careful adherence to technology. It is also necessary to have pullers, stands and special tools. If the above is not the case, you should entrust the work to professionals.
If your qualifications are insufficient, it is better not to start working with the gearbox. Assembly and adjustment work requires fairly high metalworking skills. It is not difficult to disassemble the VAZ 2107 axle, but this is one of the few components of the “Seven” that requires highly qualified maintenance. It is not worth saving on these works.
Disassembling the gearbox is performed in the following sequence:
- unscrew the shank nut;
- remove the flange and remove the drive gear and adjusting rings;
- remove the oil seal, oil deflector, inner ring of the bearing;
- press out the outer rings of the bearings with a puller;
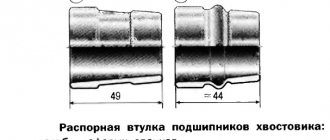
- disassemble the drive gear with the differential (the spacer sleeve in this case must be replaced).
When disassembling the gearbox, it is necessary to put marks on the bearing caps in order to then install them in their original position. To do this, you can use a core (which is more reliable) or a pencil. Marks must be placed on the covers and on the body, so that later during assembly they can be aligned. You should also mark the left and right covers so as not to confuse them.
This can be done this way: on the covers, in addition to the marks opposite the marks on the body, apply numbers or letters with a pencil. The disadvantage of this method is that the marks will be erased when you clean the lid. Therefore, it is safer to simply make marks with a core. For example, one on the left cover and two on the right.
The inner rings with the separator are removed using a hammer and drift. You need to knock out the rings by lightly tapping them in different places. If you hit only one place, you won’t be able to pull out the ring.
Typically repairs consist of replacing bearings or the main pair. These parts most often fail.
The main pair is available in several variations and determines the gear ratio. The higher the gear ratio, the greater the traction; the lower, the higher the maximum speed of the machine. There are three standard versions of the main pair, used on different VAZ models.
| lovely couple | number of teeth on gears | number of revolutions of the propeller shaft per 10 wheel revolutions | gear ratio | |
| on the slave | on the leading | |||
| 2102 | 40 | 9 | 22,2 | 4,44 |
| 2101 | 43 | 10 | 21,5 | 4,3 |
| 2103 | 41 | 10 | 20,5 | 4,1 |
| 2106 | 43 | 11 | 19,5 | 3,9 |
VAZ 2107 owners sometimes install the main gearbox pairs with a non-standard gear ratio. To increase traction, pairs are set with a larger value, to increase maximum speed - with a smaller one. If the task is to tune a car, you can take this opportunity to change these characteristics of the VAZ 2107.
Reference: the VAZ 2102 axle had the maximum gear ratio (4.44). After this model was discontinued, finding pairs with this ratio became problematic, but as practice shows, the best option is installation on a VAZ 2107 with a 1.5-1 engine ,6 gearboxes with 2103 (4.1 gear ratio). When choosing this gearbox in conjunction with a five-speed gearbox, traction and speed are maintained.
Repairing the rear axle gearbox of a VAZ 2107 is not always advisable. It is often easier to replace the gearbox with a new one. It is worth considering that the new unit will be more durable than the restored one.
Correct assembly
When using old parts, only the oil seal and spacer sleeve are changed. When replacing elements of the main pair, it is necessary to use a new spacer washer for the shaft gear and bearing. The washer is selected according to the size, which can be found on the shaft itself. The adjustment ring is mounted and pressed with an attachment onto the inner bearing race.
Requires installation of a spacer sleeve. It is placed in the crankcase. A new oil seal is installed. Next, put on the flange and tighten everything with a new nut. When installing new bearings, the nut must be tightened with a force of 16-200 kgf meter. After running-in, the force will drop to 6. When using old bearings, tightening occurs in the same way as the oil seal.
The differential is assembled and installed in place. If the semi-axial gears had axial play, then thickened washers are installed. After this you can screw on the lids.
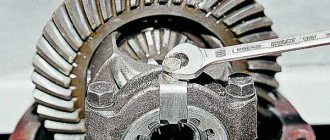
A specialized wrench is made to adjust the bearings.
The main pair is adjustable. The nut must be tightened from the main gear until the gap disappears. The shtangel will help measure the gap.
Then the second nut is tightened and tightened a couple of teeth. The first nut has a gap of 0.08-0.13 mm. It will be noticeable if you pick up the gear: a faint knock of teeth will appear.
While controlling the gap, slowly tighten both nuts until they increase by 0.2 mm. This ensures that the bearings are tensioned correctly.
Next, the gear is turned by hand and backlash is tested. If it is the same in different positions, then locking plates are installed, tightened with bolts. If this is not the case, then they say that the differential box is deformed, and therefore it needs to be replaced.
Adjustment and installation of the VAZ 2107 gearbox
Before assembling the gearbox, all parts must be thoroughly washed in kerosene. They should be inspected before installation. Gear teeth should not be chipped or scored and have the color of metal, and not be covered with a black coating of oil. Minor scuffs on the satellite axle, journal and axle gear seats can be treated with fine sandpaper. If there are large scuffs or large wear, the parts must be replaced.
The gearbox parts are assembled in the reverse order of disassembly. You can press in the bearing rings using a hammer and a special tool (a socket wrench head will do).
The gaps between the gears of the gearbox are adjusted using an adjusting ring, the thickness of which is selected individually. For selection, you need a caliper and probes of various thicknesses. The flange nut must be tightened with a torque of 18 kgf-m.
Types of blocking
There are three of them: manual (forced), automatic (self-locking differential) and partial.
- The driver turns on the manual locking himself when he finds himself on rough terrain. It's simple: a switch is pressed in the cabin, after which a special limiting unit begins to operate, preventing torque from being distributed to the drive wheels depending on the path they travel. The advantages of such a lock are obvious: the driver himself decides when to engage the limiting mechanism, and the rest of the time this device does not work and, accordingly, does not wear out. There are also disadvantages: to lock the differential manually, the driver will have to take his mind off the controls. And he gets distracted in extremely difficult road conditions. The driver should also not forget to disable the lock when he is on a flat road. If you don't do this, you can break the differential itself. And finally, you will have to install not only the limiter itself, but also the system that will operate it, which is associated with certain technical difficulties.
An example of forced differential locking on VAZ and Niva cars
An example of a finished lock on a VAZ from Val-racing
How does a simple differential work?
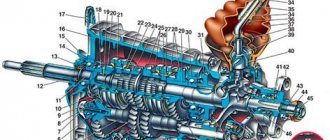
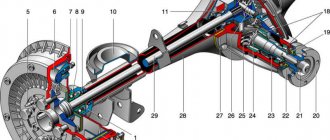
The structure of the simplest differential is shown in the animation: rotation from the engine is transmitted through the drive gear of the main pair to the driven gear, which is rigidly fixed to the differential housing. Then, through satellite gears installed in the housing, rotation is transmitted to the semi-axial gears, which in turn transmit rotation to the wheels of the car through drive shafts.
The differential is designed in such a way that the satellite gears installed in its housing can rotate around their axis. When driving in a straight line, rotation from the internal combustion engine through the GP is transmitted to the differential housing; while rotating, it transmits torque to the wheels through satellite gears and side gears, while the satellites in the differential housing do not rotate around their axis, since the car is driving in a straight line and its wheels make the same journey. If the car deviates from straight-line motion and begins to turn, we see the picture shown in the figure above. As we can understand, the wheels move at different speeds, the inner wheel moves along a shorter path, the outer wheel, accordingly, takes a longer path. To make it possible to travel different distances in the same amount of time, the wheels must rotate at different speeds, which is what the differential provides. When turning, the rotational resistance of the inner wheel increases; the inner side gear rotates slower than the outer one, causing the satellites in the differential housing to rotate around their axis, allowing the wheels to rotate at different speeds. All motorists know that the differential does its job perfectly as long as we drive on the roads and do not move to the side. If the car moves on the road with the same grip, there are no problems, but as soon as we move off the asphalt with at least one wheel, for example, onto ice or just high-quality dirt, we simply cannot move. In this case, the wheel with poor grip will begin to spin vigorously and cheerfully in the air, throwing dirt, while the second wheel, which is standing on the asphalt, will not even think of moving, I think many have found themselves in a similar situation.
Locking coefficient (KB) is the ratio of the torque on the lagging wheel to the torque on the leading wheel. Its value for a symmetrical differential is always equal to 1, for limited-slip differentials it is from 1 to 5. The larger the KB, the better the vehicle’s cross-country ability. That is, with KB = 3, the moment on the lagging wheel will be three times greater than on the slipping one, and with KB = 5, it will be five times greater. But the moment on the wheel at this second will be possible from 20 to 70%, depending on the capabilities of the locking mechanism.