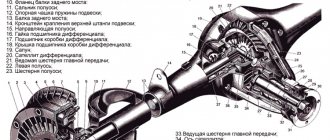
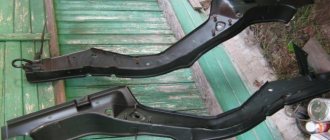
↑ Disassembling the rear axle gearbox
Having installed the gearbox on the workbench, use a 10mm wrench to unscrew the two bolts securing the locking plates of the differential bearing nuts and remove the plates.
We use a core to make marks on the bed and the corresponding bearing cover so that during assembly we can install the covers in their places.
Using a 14mm wrench, unscrew the bolts securing the bearing caps.
Remove the outer bearing rings and adjusting nuts from the differential housing.
If we do not change the bearings, then we mark the outer rings so as not to mix them up during installation, because The bearings are individually worn in and it is not advisable to disassemble them.
We check the absence of radial play in the axle gears.
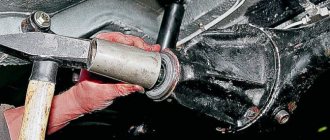
Use a puller to compress the inner rings of the tapered bearings.
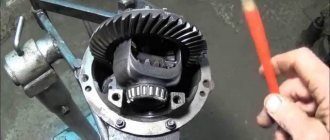
Using a 17mm wrench, unscrew the eight bolts securing the driven gear to the differential housing and remove it.
We use a beard to knock out the satellite axis.
We turn the axle gears and remove the satellite gears.
We take out the axle gears with adjusting washers, marking their position.
We remove the drive gear and the deformed spacer from the crankcase. When assembling the gearbox, we replace it with a new one.
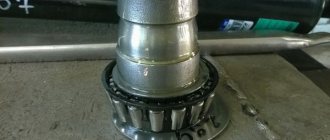
Using a soft metal drift, knock the inner ring of the tapered bearing off the drive gear shaft.
An adjusting ring is installed under the bearing to ensure the correct relative position of the main gear gears.
Use a suitable tool to knock out the outer rings of the tapered bearings from the crankcase.
Let's get started
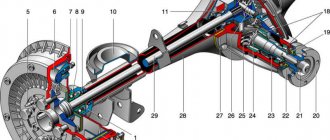
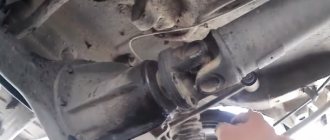
To begin dismantling the bridge, you must first drive the car onto an inspection pit or overpass. Then you need to drain the oil and disconnect the driveshaft from the gear shank flange.
After this, the axle shafts are removed from the machine and, using an end prick, the 8 mounting bolts that connect the gearbox to the beam are unscrewed. Then you can safely remove the rear axle (gearbox) from the VAZ 2106. At this stage, you can go in two ways - install a new element or try to dig deeper into the old one. In the first moment, the elements are assembled in the reverse order, but we will tell you how to proceed in the second case in the following sections.
↑ Diagnostics of gearbox parts
We thoroughly wash the gearbox parts in kerosene and carefully inspect them. If at least one tooth is damaged (chipping, waves, scratches, scuffs on the working surfaces), we replace the gears with new ones.
The edges between the tops and working surfaces of the driven gear teeth must be sharp. If the slightest nicks or roundings are visible, replace the main pair with a new one.
Minor damage to the satellite axle, axle pinion journals and their mounting holes can be eliminated with fine sandpaper followed by polishing.
How to fill the oil?
Before revealing the specifics of the replacement, we note that this instruction can be used not only for cars of model 2106. A similar algorithm for changing the oil can be observed in VAZ cars of models 2101, 2102, 2104, 2105, as well as model 2107.
So what do we need to do to change the oil? First you need to unscrew the drain plug with a hex key. Next, put some container and unscrew the filler element. After the oil has drained well, we screw the plug back in and use a special oil pump (or a large syringe) to pump transmission oil into it. Pour to the level of the bottom edge of the hole. Next, tighten the plug, and now you can safely start operating the car.
Sometimes the substance in the gearbox can be heavily contaminated. In this case, before adding new fluid, thoroughly rinse the gearbox or gearbox housing with a mixture of diesel fuel and oil (not necessarily transmission oil). The proportion is about 300 milliliters of diesel fuel per liter of oil.
↑ Rear axle gearbox assembly
When assembling, replace the cuff, flange nut and spacer with new ones.
If the gearbox is assembled in the same crankcase, then the change in the thickness of the drive gear adjusting ring can be calculated as the difference in deviations in the manufacturing dimensions of the old and new gears. The deviation in size with a “ ” or “–” sign in hundredths of a millimeter is engraved on the drive gear shaft.
For example, the old gear is engraved with –12, and the new gear is 4. The difference between the two corrections will be 4–(–12)=16. This means that the new adjusting ring should be 0.16 mm thinner than the old one. With the opposite ratio of corrections (4 on the old one, and 12 on the new one), the ring should be 0.16 mm thicker than the old one.
To more accurately determine the thickness of the adjusting ring, we make a device from the old drive gear.
We weld a plate 80 mm long and trim it to a size of 50–0.02 mm relative to the plane for the bearing. The serial number and size deviation are engraved on the conical part of the shaft.
We grind the seats under the bearings (can be treated with fine sandpaper) until they fit smoothly.
We press the outer rings of the front and rear bearings into the crankcase.
We install the inner ring of the rear bearing on the manufactured device and insert the device into the crankcase. We install the inner ring of the front bearing, the flange of the drive gear and tighten the nut with a torque of 0.8–1.0 kgf.m.
We set the crankcase to a horizontal position and level.
We place a round, even rod (an extension from a set of socket heads) in the bearing bed and use a flat feeler gauge to determine the size of the gap between it and the device plate.
The thickness of the adjusting ring is determined as the difference between the gap size and the deviation in the size of the new gear (taking into account the sign).
For example, the gap value is 2.8 mm, and the gear size deviation is 15. This means that it is necessary to install an adjusting ring with a thickness of 2.8–(–0.15)=2.95 mm.
We install an adjusting ring of the required thickness on the shaft and, using a piece of pipe of a suitable size, press on the inner ring of the bearing.
We insert the shaft into the crankcase. We install a new spacer, front bearing inner race, collar and drive gear flange.
Gradually tighten the nut with a torque wrench to a torque of 12 kgf.m.
We determine the moment of rotation of the drive gear shaft.
To do this, tightly wrap a strong thread around the neck of the flange in several turns and attach a dynamometer to it. The force at which the flange begins to rotate evenly should be 7.6–9.5 kgf (which corresponds to a torque of 16–20 kgf.cm) (for new bearings). If the force is not enough, tighten the flange nut. In this case, the tightening torque should not exceed 26 kgf.m.
If, when tightening the nut, the turning torque exceeds 20 kgf.cm (9.5 kgf), disassemble the gearbox and replace the spacer sleeve.
We install the differential housing together with the bearings into the crankcase and tighten the bolts of the bearing caps.
If axial play is detected in the axle gears, then during assembly we install new, thicker support adjusting rings. The side gears should fit tightly into the differential housing, but can be turned by hand.
We make a wrench from a steel sheet 2.5–3 mm thick for tightening the adjusting nuts.
Replacing the axle shaft
Let's look at the process of replacing the axle shaft, its bearing and oil seal in detail. Tools you will need:
- wheel wrench;
- a jack and a safety stand (in extreme cases, a stump or a few bricks);
- wheel stops;
- reverse hammer;
- wrenches 8 mm, 17 mm;
- slotted screwdriver;
- Bulgarian;
- round nose pliers;
- hammer;
- chisel;
- workbench with a vice;
- blowtorch or gas torch;
- spacer made of wood or soft metal;
- a piece of steel pipe with a wall diameter of 33–35 mm;
- Litol type lubricant;
- dry clean rag.
Removing the axle shaft
To dismantle the axle shaft, you should:
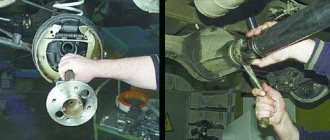
Place the car on a flat surface and place chocks under the front wheels. Use a wheel wrench to unscrew the wheel bolts. Raise the car body with a jack. Unscrew the wheel bolts and remove the wheel. Using a size 8 wrench, unscrew the drum guide pins. Remove the drum
If it does not come off the blocks, carefully knock it down using a spacer and a hammer. Using a 17mm wrench (preferably a socket), unscrew the nuts (4 pcs) securing the axle shaft. They are located behind the flange, but you can access them through specially provided holes by turning the axle shaft. Using round-nose pliers, remove the spring washers that are located under the axle nuts. Disconnect the axle shaft from the rear axle by pulling it towards you
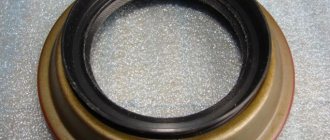
If it does not give in, use a reverse hammer. To do this, the tool flange must be screwed to the axle flange with wheel bolts. By sharply moving the hammer weight forward, knock out the axle shaft. If you don't have a reverse hammer in your tool arsenal, you can use a removed wheel instead. It needs to be screwed with the back side to the axle shaft flange and struck with a hammer on the tire from the inside until the axle shaft comes out of the casing. Remove the axle shaft assembly with the bearing and its retaining ring. Remove the sealing gasket located between the brake shield and the axle shaft flange. Using round nose pliers or pliers, remove the oil seal from its seat.
↑ Adjusting the gaps
We adjust the gap in the main pair and preload the differential bearings simultaneously, in several stages:
- tighten the nut from the side of the driven gear until the gap in the mesh is completely eliminated;
- Using a caliper we measure the distance between the covers;
- screw the second nut until it stops and tighten it by 1-2 teeth of the nut. The distance between the covers should increase by approximately 0.1 mm;
- By rotating the first nut, we set the required gap in engagement of 0.08–0.13 mm. This is minimally noticeable play in the engagement, accompanied by a slight knock of tooth against tooth;
- We control the constancy of the gap in the engagement with our hands and gradually tighten both nuts until the distance between the covers increases by 0.2 mm. This will ensure the necessary bearing tension.
Slowly turn the driven gear three turns and at the same time feel the play in the meshing of each pair of teeth.
If it is uniform in all gear positions, then install locking plates.
A decrease (increase) in play in any sector indicates deformation of the differential housing and the need to replace it or trim it on a lathe.
There are two types of locking plates: single-claw or double-claw.
Depending on the position of the nut slot, we install one of them.
Is it necessary to change it?
Of course, there are other ways to solve the problem. Instead of buying a new part, you can repair the VAZ 2106 gearbox. However, doing this in a garage is highly not recommended, since you simply will not be able to set the gap in the gear meshing correctly. That is why the most reliable solution would be to purchase a new element. Fortunately, its cost is not that high (about 4 thousand rubles), so from a financial point of view, your costs will be minimal.
Functions and principle of operation
The rear axle reducer (RAG) is part of the vehicle transmission. This unit changes the direction and increases the value of torque, which is transmitted from the driveshaft to the axle shafts of the drive wheels. The engine rotates at high speed (from 500 to 5 thousand revolutions per minute), and the task of all transmission elements is to transform the direction and angular speed of the rotational movement of the motor and ensure the efficient operation of the drive wheels.
Technical characteristics of the gearbox
The VAZ 2103 gearbox is suitable for any “classic” VAZ model, but engine performance may change after installing a “non-original” gearbox. This is due to the design features of such a gearbox.
Gear ratio
Each type of REM installed on the VAZ 2101–2107 is characterized by its own gear ratio. The lower the value of this indicator, the more “speedy” the gearbox is. For example, the gear ratio of a “penny” RZM is 4.3; a gearbox with a gear ratio of 4.44 is installed on a “two”, i.e. the VAZ 2102 is a slower car compared to the VAZ 2101. The VAZ 2103 gearbox has a gear ratio of 4, 1, i.e. the speed indicators of this model are higher than those of the “kopek” and “two”. The fastest of the “classic” REMs is the unit for the VAZ 2106: its gear ratio is 3.9.
Number of teeth
The gear ratio of the RZM is related to the number of teeth on the gears of the main pair. On a “three-piece” RZM, the drive shaft has 10 teeth, the driven one - 41. The gear ratio is calculated by dividing the second indicator by the first, i.e. 41/10 = 4.1.
The number of teeth can be determined by the gearbox markings. For example, in the inscription “VAZ 2103 1041 4537”:
- VAZ 2103 - gearbox type;
- 10 and 41 - the number of teeth of the drive and driven shafts, respectively;
- 4537 — number of the final drive gear set.
Consequences of installing a non-standard gearbox
You should know that installing a “faster” REM does not mean an automatic increase in vehicle speed. For example, if on a VAZ 2103, instead of the “native” gearbox with a gear ratio of 4.1, you use a VAZ 2106 unit with a gear ratio of 3.9, then the car will become 5% “faster” and the same 5% “weaker”. It means that:
- effective torque will decrease by 5%;
- to accelerate to a certain speed, fewer engine revolutions will be required, i.e., to accelerate, for example, to 120 km/h, 3900 rpm will be enough, instead of 4400. The problem is that now the engine may not have enough power to spin up to 3900 rpm.
Thus, if you installed a non-standard RZM with a different gear ratio on a VAZ 2103, then in order to maintain the dynamic performance of the car, a proportional change in engine power will be required.
genchik64
https://vaz-2106.ru/forum/lofiversion/index.php/t5261–600.html
Why did it happen so?
Perhaps the automatic requests do not belong to you, but to another user accessing the network from the same IP address as you. You need to enter the characters into the form once, after which we will remember you and be able to distinguish you from other users exiting from this IP. In this case, the page with the captcha will not bother you for quite a long time.
You may have add-ons installed in your browser that can make automatic search requests. In this case, we recommend that you disable them.
It is also possible that your computer is infected with a virus program that is using it to collect information. Maybe you should check your system for viruses.
If you have any problems or would like our support team, please use the feedback form.
The front suspension and rear axle assembly are called the main elements on which the so-called “wheel drive” of the vehicle rests. If these units are in working order, the machine will function well.