When to change shock absorbers
The service life of shock absorbers depends on the make and model, as well as on climatic, road and operating conditions. Typically, the manufacturer does not provide a standard mileage before replacing the shock absorber struts. It is recommended to check the struts once a year or every 20 thousand km. mileage and replace or repair if the shock absorbers have lost their performance properties. In general, the life of the shock absorbers should be enough for 50-60 thousand km. mileage, but, depending on operating conditions, these figures can be either more or less.
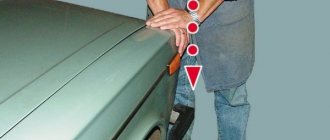
You can perform the check using specialized equipment at a service station or yourself. To check it yourself, you need to press firmly but gently (so as not to bend it) on the car’s fender so that the body goes down. Then, suddenly release your hands so that the body rises up. If the body returned to its starting point smoothly without swinging, then the shock absorbers can still serve, but if the body begins to swing up and down, then this indicates faulty shock absorbers.
Also, the following symptoms may indicate the need to replace or diagnose the shock absorber strut:
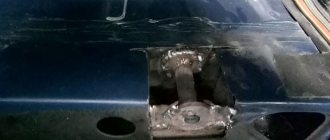
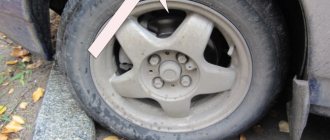
- Traces of smudges on the counter
- Extraneous sounds in the suspension when driving and when turning (clicks, knocks, grinding sounds, squeaks)
- Increased braking distance and deterioration of controllability
- Rocking of the car when driving
- Corrosion of the support cup or stem
- Suspension breakdown
- Uneven tire wear
- Damage to the shock absorber body and mountings or rod.
This is interesting: Installing a central lock with your own hands
Checking the serviceability of shock absorbers
But before we describe the work process, we will consider ways to identify a shock absorber malfunction.
The first sign, as already indicated, is a knocking sound on one or both sides of the car when passing strong bumps.
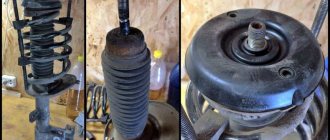
A visual inspection will also help to identify the malfunction. Oil leaks can often be seen on the outside of the damaged element.
This indicates that the shock absorber has lost its seal and some of the oil is leaking out.
You can also assess the condition by rocking the body. To do this, you need to go to one of the front wheels and with both hands press firmly on the body to overcome the resistance of the springs.
You need to press several times to set the amplitude of oscillations as large as possible, and then suddenly stop swinging.
If the shock absorber is working properly, the body will immediately return to its original position, without any vibrations.
If there are vibrations, even minor ones, the shock absorber is faulty.
It is necessary to check by rocking on both sides of the car, since replacement must be done at least in pairs - two shock absorbers of the front suspension or rear suspension are changed at once. It's even better to change all the elements at once.
We will not consider replacing the rear shock absorbers for now; everything stated below will concern only the front suspension.
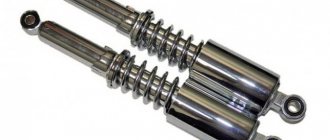
How does a shock absorber work?
Next to each wheel assembly you can find a spring, its function is to dampen the vibrations of the car when driving on an uneven road surface, and also to soften the shock if the wheel hits a pothole on the road.
But springs alone cannot cope with keeping the car body in a stable condition and limiting the constant rocking of the body as on sea waves; to eliminate this effect, car struts are additionally installed, which will create the effect of a smoother ride for the driver and passengers.
In general terms, it consists of an oil-filled cylinder with a rod connected to an internal piston. A set of valves allows oil to flow slowly through the piston in either direction as needed.
At the lower end it connects to the control arm or axle. The support connects to the steering knuckle, which holds the wheel. At the upper end, the shock absorber is connected to the car body.
The stand assembly consists of a mounting base - a housing, a spring and fasteners. The mechanism itself has various configurations, even computerized ones, for increased efficiency and more precise control.
In short, since the spring helps insulate the car body from direct “impact” on the road, the shock absorber helps dampen the movement of the spring, make it less harsh and prevent the spring from continuing to rock the body due to inertia after the shock has been absorbed.
Often it is located in the internal space of the spring, to save space and more effectively resist road irregularities.
You can often hear expressions such as strut or shock absorber, and speakers often mean the same element by these concepts. But actually:
A shock absorber is in fact an oil pump, a tube with a rod, piston and valves in an iron casing.
A strut is the same shock absorber, but already assembled with a spring and attachment mechanisms to the car body.
Sometimes the strut can be dismountable, that is, you can remove the spring and replace only the shock absorber itself, but it happens that the shock absorber already comes with all the fasteners welded to its body and it is no longer possible to pull it out directly from there; it would be more correct to call such an assembly a strut.
Procedure
To change the front struts, for example, on a Hyundai Getz, you need to perform a number of the following manipulations:
Remove the engine compartment seal, as well as other elements that prevent access to the upper strut support.- After removing the plug, unscrew the nut securing the strut rod to the upper support. This is done with a head with an extension and a wrench while the car is on wheels and the rack is not removed. It is much more difficult to do this with it removed, because you will have to look for a tool to fix the rod from twisting.
- Loosen the wheel mount and lift the car with a jack so that the wheel does not touch the floor. For insurance, be sure to place a stand under the car.
- Remove the wheel. Using a wire brush, clean the threaded connection of the stabilizer bar joint, the screw securing the brake hose, and the bolts securing the steering knuckle strut. Moisten them with Vedashka or kerosene.
- Unscrew the nut securing the stabilizer joint and the screw securing the brake hose. If the car is equipped with an ABS system, remove the tube with the sensor wires from the rack.
- Unscrew the nuts from the bolts securing the knuckle to the strut. Knock out the bolts with a hammer. On some cars you will also have to remove the bushing. After removing the bolts, nothing holds the rack down.
- Remove the nuts securing the upper support to the body. Remove the strut assembly with support and spring.
- Compress the spring with ties until a small gap appears between its outer coil and the support cup.
- Unscrew the previously loosened nut from the rod. Remove the upper support and the spring with the cup.
- Inspect the boot and bumper, and if necessary, replace them with new ones.
- If the manufacturer of a new shock absorber recommends bleeding its products, carry out bleeding in accordance with the recommendations.
- Place the bumper with the boot on the rod of the new strut, do not forget to move the gasket under the spring from the old strut to the new one. Place the spring on the strut body, aligning its lower coil with the seat under it. Place the support on top of the cup and screw on the stem nut.
- Remove the tie rods from the spring and insert the upper support studs into the holes provided for them and tighten with nuts.
- During assembly, pay attention to the anti-roll bar; if you notice that it moves too freely, then it’s time to change the rubber bushing in its bracket, or better yet, both.
- Pull the stand mount from below, screw on the wheel, remove the stand, and lower the car.
- Tighten the wheel mount, the rod nut, and the nuts on the upper support studs.
As you can see, the process is simple, do the same on the other side and the front ones are ready. Camber adjustment is not provided on this model, which means that when installing serviceable components on an undamaged body, the desired camber value is obtained. And since we did not change the length of the steering rods, the wheel alignment angles should be normal (if the toe-in was adjusted correctly before the replacement). This means you don’t have to do “geometry”.
Please note that it is recommended to replace shock absorbers in pairs. This way you will insure yourself against unexpected behavior of the car on the road.
Rear axle
Often on passenger cars, the rear axle is equipped with only a shock-absorbing element (unlike the front axle, where the shock absorber is installed in a cartridge, and the entire assembly is called a strut). In this case, to replace, you will need to unscrew the upper and lower fasteners. In cases where the shock absorber is located separately from the spring, you will not need ties, and the process itself will take much less time.
Most often, on rear axle shock absorbers you have to change the bushing, which breaks over time and causes play.
Replacing struts and shock absorbers
Now that you know the difference between the shock and strut assembly and their functionality, it's time to replace them.
- Park the car on a level surface and open the hood. Place the transmission in the park position (in an automatic transmission) or in gear (in a manual transmission) and additionally put it on the handbrake.
- If your vehicle is equipped with Automatic Ride Control (ARC), turn off the air suspension before raising the vehicle.
- Loosen the wheel nuts on the side.
- Jack up the tire and secure it securely.
- Remove the wheels.
A) Replacing the rack
- Working from the engine compartment, remove the three top mounting nuts holding the strut to the body assembly.
- On some vehicle models, it is necessary to disconnect the tie rod end from the bottom of the steering knuckle.
- To do this, you may need a puller to disconnect the tie rod from the steering knuckle.
- On some other models, you may need to remove the brake caliper, brake rotor, and even the hub assembly before removing the strut assembly.
- Also, if your car has an ARC system, you will need to disconnect the electrical connectors, air pipes and sensors.
- When rust does not allow you to turn the mounting bolts, apply penetrating oil to the threads or use WD40 - a lubricant with very high fluidity and permeability, even in micro crevices.
NOTE. On some models, you must first compress the coil spring before you begin to loosen the strut mounting bolts. To do this, you will need a spring remover; you can buy it in a store or order a homemade one from a car mechanic who deals with similar things.
- Begin loosening the nuts on the two lower mounting bolts that secure the strut to the steering knuckle.
- Using a hammer, carefully push out the mounting bolts, remove the nuts from the mounting bolts, and finish removing the bolts.
- Carefully remove the strut flange assembly from the steering knuckle.
- If you have difficulty separating the strut mounting flange from the steering knuckle, use a rubber mallet or wood block to tap the strut mounting flange to help separate the strut from it.
- On other models, you may have to spread the knuckle and strut mount apart, using a pry bar to separate the components.
- Once you have removed the knuckle spacer, use a piece of wire to secure the knuckle to the suspension to prevent the knuckle from turning and sagging.
- Remove the strut assembly from the vehicle.
B) Replacing the shock absorber
- Working from the engine compartment, loosen the top mounting nut holding the shock absorber to the body. On some models, you can access the top mount bolt from underneath the vehicle after the vehicle is jacked up and securely secured.
- If the rod turns when you try to remove the top mounting nut, try holding the rod in place with pliers from under the car.
- Support the bottom of the shock absorber with a jack.
- Apply penetrating oil to the bolts to make it easier to remove if necessary.
- Loosen and remove the lower mounting bolt that holds the shock absorber in place.
- Remove the top mounting bolt and slowly lower the jack a few centimeters. Leave the jack in place to support the axle or control arm.
CAUTION: Removing the shock absorber
In some cases, it is necessary to support the axle (usually with a jack) to which the shock absorber is connected before actually removing the mounting bolt. This will prevent downward shock (shock absorber expansion) after removing the mounting bolt, which could cause serious damage to the vehicle.
After removal, leave the jack supporting the control arm or axle in place.
Self-replacement
This procedure is simple, the work can be done in your own garage. The presence of a hole is desirable, but you can replace the racks without it.
Tools needed for work
- Ratchet handle with a set of interchangeable heads.
- Power (long) handle for “undermining” soured fasteners.
- Penetrating fluid for threaded connections (WD-40 or its equivalent).
- A prybar or a small crowbar to align the rack fastenings.
- Torque wrench.
- Wheel removal tool kit.
- Anti-recoil shoes.
- Jack and support for car body.
Important! It is dangerous to carry out work if the car is supported only by a jack!
Borrow these from your neighbor or make some improvised ones yourself.
There is no fundamental difference between replacing the front and rear shock absorbers. It all depends on the characteristics of the suspension of your car. There are two main designs for mounting racks:
- The shock absorber and the elastic element are made in the form of one unit. This is a common scheme.
Assembled struts are somewhat more difficult to change
In this case, you will also need a spring retainer to replace it. The shock absorber and the elastic element are separated. With this design, it is easier to change the shock absorber.
Details may vary individually
Step-by-step instructions for removing shock absorbers
- The general rule is that before starting work (it’s better to do this a day before), you should treat the threaded connections with a penetrating liquid like WD-40.
- The car should be lifted onto supports, having previously placed wheel chocks under the wheels. The parking brake must be activated. If you have a manual transmission, put it in first gear.
- Remove the wheel.
Dismantle the wheel, not forgetting about the body supports
Loosen the nuts securing the upper bowl
Important! Shock absorbers are always under buoyant load, so try to lower the suspension arm as low as possible.
Use only correct tools
The general principles of replacing a shock absorber can be seen in the video.
Video about removing the front shock absorbers on a car
Important! Shock absorbers are usually replaced in pairs on the same axle. If one of the racks fails, it is better to change both together, otherwise imbalance will appear.
Tools needed to complete the work
To replace the front shock absorbers in the MacPherson strut suspension you will need:
- standard wrenches (open-end wrenches, socket wrenches, heads of standard sizes);
- remover of ball joints and steering tips;
- spring ties;
- means for processing bolted joints (WD-40);
- marker or center punch;
- percussion instrument (hammer);
- rags;
Shock absorbers must be replaced in pairs; replacing only one element is not allowed. Therefore, it is necessary to purchase two struts or shock absorbers and additional elements at once - anthers, bump stops.
Although the MacPherson suspension on different cars has the same design, there are always certain differences in design, which affects the work algorithm.
For example, let's look at the technology for replacing front shock absorbers on a VAZ-2110. Note that there are two ways to perform the work - by disconnecting the strut from the hub and removing the strut assembly with the steering knuckle.
This is interesting: Do-it-yourself wheel balancing
How to replace front strut shock absorbers
During operation, the car suspension is subjected to serious loads, which lead to wear and breakage of a number of components. More often, damping components fail - shock absorbers, whose task is to dampen spring vibrations.
The consequences of faulty shock absorbers are serious - the car’s handling deteriorates greatly, and it begins to “float” on the road, especially after going over bumps, the braking distance increases, and all this is accompanied by strong knocking from the suspension. An additional sign of shock absorber failure is the appearance of oil smudges on the body.
Shock absorbers are non-repairable suspension elements, and in case of malfunction they are replaced. It is noteworthy that due to the greater load, the front shock absorbers wear out more often and require replacement.
The car uses several types of front independent suspension, differing in design, which affects the algorithm for replacing worn damper elements. But the most widespread is the MacPherson suspension; it is used on most passenger cars.
This type of suspension is structurally simple, but the technology for replacing shock absorbers in it is the most labor-intensive compared to other suspensions. This is due to the fact that the damping element in it is part of the shock-absorbing strut, which, in addition to the shock absorber, includes a spring, a housing, supports, and all this is assembled into a single structure. Therefore, a special tool is required for replacement.
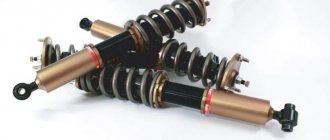
The principle of operation of shock absorber struts in a car
The operating principle is based on the conversion of mechanical energy into thermal energy. Oscillations are damped in a liquid (oil) or gas (gas) environment; options for integrated use are possible (such models are called gas-oil models).
Any vibrations and irregularities are absorbed precisely by the shock-absorbing struts
What you need to know when reinstalling
Follow the same procedure in reverse order from the removal method you used, keeping in mind the following guidelines.
- Reinstall the strut assembly or shock absorber and tighten the mounting bolts by hand.
- Tighten all mounting bolts.
- When installing the tie rod to the steering knuckle, tighten the fasteners.
- Reinstall the wheels
- Lower the vehicle and gradually tighten the wheel lock nuts in a crisscross pattern. Check your repair manual or vehicle owner's manual for torque specifications.
- Tighten the upper strut mounting nuts.
- Finally, if you replaced the front elements, do a wheel alignment.
2nd method for replacing VAZ front shock absorbers
The second method (removing the strut together with the hub) is more labor-intensive, but it is good because during disassembly the adjusting bolt is not affected, but in this case only the shock absorber changes, and the body remains the same.
A brief algorithm for replacing the front shock absorber of a VAZ-2110 using the second method is as follows:
- Before starting work, loosen the nut holding the drive shaft in the hub;
- Jack up the car and remove the wheel;
- Loosen the nuts under the hood (shock absorber rod, upper support);
- We unscrew the brake caliper, take it to the side and hang it (so that the rubber pipeline is not stretched);
- Press out the tie rod end;
- Unscrew the fastening bolts of the lower arm to the ball joint;
- Unscrew the drive fixing nut;
- Pull the hub off the drive shaft using a “pull towards” movement;
- Unscrew the nuts of the upper support and remove the stand;
And then we disassemble the hub, change the cartridge, and put everything back together. After completing the replacement, it will not be superfluous to adjust the camber/toe angles.
This replacement technology was considered using the example of the VAZ-2110. But this algorithm is also suitable for other versions of the VAZ, ranging from 2108 to Lada Priora.
Top Five Tips When Replacing Struts or Shock Absorbers in Your Car
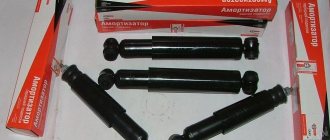
- When purchasing a new shock absorber, purchase a quality replacement.
- Always replace these mechanisms only in pairs (front or rear axle) to keep the suspension in balance, unless you need to replace a fairly new faulty unit.
- Even if you're replacing front or rear, always replace one unit at a time, as shock absorbers can help keep suspension components in place. You will avoid potential damage to other parts.
- When replacing the rear one, you will need access to the trunk or under the trim in the rear of the car.
When replacing, this guide can only give you a general idea of the actual process. However, the specific steps vary between brands and models. Although for some car models this manual will be what you need.
If you have no idea how this is done at all and have never seen it, then it is better to go to a service station and see with your own eyes how the process happens and only then try it yourself, since, for example, removing springs can be a very dangerous task and even lead to death if these parts are handled incorrectly. Be very careful and attentive.
Stabilizer strut structure
The main task of the stabilizer struts is to dampen the translational waves that arise in the car’s suspension when driving over uneven surfaces. The racks are fixed thanks to special lugs located in the rear and front parts of the suspension. Despite the strength of the part, they have a service life of 100-120 thousand km. Of course, the service life may vary depending on certain factors (driving style, part manufacturer, etc.).
Stabilizer strut device
Damage or wear of the anti-roll bar can lead to the car tipping over, because when turning, the load will not be distributed between the elastic elements of the suspension. Therefore, it is important to change the part in a timely manner - this will avoid machine breakdown or accident.
Features of the front stabilizer bar of Toyota Yaris
How to replace stabilizer bushings?
You can find detailed instructions for replacing bushings here.
Signs of shock absorber malfunction, replacement time
Since shock absorbers are constantly under load, they are subject to accelerated wear. Therefore, the racks need periodic replacement. How do you know how long the racks have left and whether it’s time to change them? The service life is specified in the vehicle maintenance regulations. In addition, there are signs of breakdown and accelerated wear:
- The car jumps sharply when driving over bumps.
- After “working out” the obstacle, the suspension oscillations continue.
- Liquid is leaking from the shock absorber strut or streaks are visible.
- Corrosion damage is visible on the body.
- When the shock absorber is compressed, a creaking or knocking noise is heard. Sometimes they say that the racks “squeak.”
- Handling deteriorates when driving on uneven roads.
- There is a noticeable decrease in comfort, the car shakes on uneven surfaces.
If any of these symptoms appear, it is necessary to undergo suspension diagnostics in order to more accurately determine the cause. It is also necessary to change the struts after mechanical damage, for example, after an accident.
How to properly replace front and rear shock absorbers
Shock absorbers are designed to dampen shocks and jolts that occur when moving parts of the suspension. These parts are called unsprung, because between the ground and the car there is only a layer of air in the tires. Elastic elements (springs, torsion bars, springs or air bags) are not able to provide comfort, since parasitic vibrations occur during operation. When driving over bumps, the car will bounce like a tightly inflated ball. Shock absorbers help make the suspension articulation smoother and prevent unnecessary movement after driving over bumps. Timely replacement of worn struts is the key to a safe and comfortable ride.
Device Features
Many people equate the concepts of shock absorber and shock absorber strut. Some people think that it is a simple spring, while others correctly call all its components together as a shock absorber strut.
Where is the truth and where is the lie? We'll figure out.
Let's start with the fact that shock absorber struts are a suspension element necessary to connect two important components - the wheels of the car and the body itself. The support is connected to the damper and spring. By the way, the damper is considered the most important component of the shock absorber.
The shock absorber strut or simply AC performs several key functions:
- holds the weight of the machine;
- transfers the force of adhesion to the road surface to the body;
- maintains optimal position of the body in relation to the wheels;
- eliminates excess roll;
- takes on lateral loads.
The price of struts is higher compared to shock absorbers, since their design is complex and higher quality materials are used in production. If you look at the design, speakers are produced with and without springs. Think carefully before you buy.
You need to choose new struts for Ford Focus, Renault Logan, Skoda Octavia, Kia Spectra, as well as cars like VAZ 2110, 2114 or Lada Granta and Priora based on the design features of the suspension and the available budget.
Theoretically, the front and rear struts can simply be called shock absorbers. But I don’t agree with this position. These elements are different from each other. If you can’t see it in the photos and videos, then I’ll tell you. Although the two elements are similar, the strut additionally has a support spring and a tie rod.
The rack includes the following elements:
- Cylinders. They contain a piston and a special hydraulic fluid;
- Hydraulic fluid. It can be represented by a mixture of gas and liquid, or simply a mixture of gases. It is needed to transmit forces between shock absorbers;
- Stock. Holds the piston and is necessary for assembling pushing forces;
- A piston equipped with a bypass valve. It moves inside the cylinder. Needed for smooth transmission of vibrations;
- Oil seals. Sealant and sealant;
- External body. Serves to house all the components of the shock absorber;
- Fasteners. You understand, they are necessary to connect the shock absorbers to the car body.
Alas, even on cars like Kia Sportage, Chevrolet Cruze, Lacetti and Aveo, Renault Logan, various Mitsubishi, Volkswagen and Toyota models, like the domestic Kalina, it is not always possible to operate the car for a long time on the same racks without consequences. Over time, they wear out, break and become unusable.
It is important to notice in time when the speakers are showing signs of fatigue and need to be replaced.
Symptoms of Excessive Wear or Breakage
I will not describe what can happen if the left or right strut breaks. Nothing good will happen, I guarantee you that. Therefore, carefully monitor your car. Timely repair or replacement of racks will avoid problems.
The following characteristic signs indicate a malfunction of the front struts:
- when moving, there is a creaking, clicking and knocking sound;
- the car sways and continues to oscillate from side to side for a long time;
- the car skids heavily when cornering;
- braking requires a longer braking distance than usual;
- the car “squats” when you accelerate or brake (the sensations are observed behind and in front, respectively);
- the car clings to the road worse;
- rubber wears unevenly;
- Brake fluid is leaking from the shock absorbers;
- the spring, supports or rod become corroded;
- the noise level increases during acceleration (most likely, the bushing fasteners are damaged);
- the body is deformed, the piston cannot move normally inside the cylinder;
- The springs are positioned incorrectly, so the body of the car begins to oscillate when moving.
Wear and breakage of racks can occur due to poor quality of the elements themselves, improper installation, or the natural process of wear and aging of the elements.
I cannot say unequivocally which racks are best to buy if replacement is required. Much depends on the budget and the car itself. But the price now is the Kayaba brand, or, as it is correctly called, KYB. Positive reviews and reasonable prices make these racks a worthy choice. But it's up to you.
Do-it-yourself installation of new ones, after disassembly or repair
Proceed in reverse order.
- Thoroughly clean the mounting lugs. If necessary, remove corrosion and paint damaged areas.
- Check the condition of the mounting bolts. If there are grooves, cracks and corrosion holes, we replace them with new ones.
- When installing combined struts (spring + shock absorber), install the spring tie.
Clamps can be used
- We secure the upper bowl (eye) without tightening the nut all the way.
- Using a jack, align the lower eye with the stand.
- We tighten the fastener without tightening it.
- We install the wheel, lower the car into the transport position or set the suspension arm to a typical level for driving.
- Tighten all nuts using a torque wrench.
Checking shock absorbers after replacement
A test drive is required. Ask your partner to listen for any extraneous sounds when moving. Drive on rough roads at low speed. Close the windows and, if there is no extraneous noise, listen to the operation of the suspension. If you notice irregularities in the operating mode (effort when turning the steering wheel, an increase in the stiffness of the shock absorbers), check the tightening torque of the fasteners. Inspect the racks to see if they are clinging to other parts. Check the straightness of the body. If the shock absorbers are installed correctly, the car should stand level.
A tilt to one side indicates that either the installation was carried out incorrectly, or you replaced not both racks on the axle, but only one
If the trim has changed, you have installed struts that do not match the parameters of the vehicle. The second reason is that the shock absorbers on the other axle also failed. Check the suspension position to ensure it matches factory specifications.
A car enthusiast with little experience in car maintenance can easily change the shock absorbers on his own. No special stands, devices or equipment are required for this. As for the mandatory camber/alignment installation procedure, this statement is both true and false. Shock absorbers are not directly related to wheel alignment, and replacing struts cannot change the correct settings.
On the other hand, remember the last time you went through this procedure. It makes sense to check the general condition of the suspension after installing “fresh” shock absorbers. In addition, long-term use of a car with worn shock absorbers could affect the wheel alignment angles, and therefore wheel alignment may be a completely reasonable solution.
Step-by-step instructions for replacing front shock absorbers
Convenience and comfort while driving a car are ensured by the proper functioning of shock absorbers.
It is also a guarantee of safety. Suspension failure significantly accelerates steering wear. In this case, the suspension needs immediate repair and replacement of spare parts that have failed. Any motorist who has some experience in independently repairing his car can replace shock absorbers on his own. In this case, you will be able to save on a visit to the service station. All you need is desire, time and the ability to use simple tools. What you need to know for this and how to replace shock absorbers yourself - we will consider further.
What tools are needed
- Set of wrenches.
- Jack.
- Balloon key.
- A device for removing suspension springs.
- Screwdriver set.
- Wheel stoppers (prevent removing the car from the jack).
List of malfunctions for which shock absorbers require replacement:
Oil leakage from shock absorber.
Traces of rust on the shock absorber mounts. There is a risk of the spring plate coming off when the car is moving. Rust on the piston rod. There is a risk of oil seal failure and oil leakage. Curvature of the shock absorber body. The piston is likely to be blocked or slow down. Knocking while turning indicates a decrease in the stability of the car.
It is necessary to carefully inspect the car to decide what to do - repair the shock absorber struts yourself or replace the shock absorbers. But you should always take into account that after repair or replacement it is necessary to bleed the shock absorbers.
When replacing both pairs of shock absorbers, you should take from the set wrenches that match the parameters of your car. You also need a jack and sawhorses. Wheels are often used instead, but for your own safety you should use goats. After all, the risk of injury during repairs is quite high. You should take care of yourself.
Removal and installation of shock absorbers are performed in pairs. It is unacceptable to apply notches to the strut to save wheel alignment settings. It won't do anything. After completing the repair, you should come to the service station to get the wheel alignment done.
How to replace the front shock absorber
To replace the front shock absorber, follow these steps:
- Hang the wheel that is intended for repair and install stops. Remove the 2 bolts that connect the shock absorber strut to the steering knuckle. The steering tip is detached using a puller; a pry bar can be used.
- If the car is front-wheel drive, disconnect the brake system hose and unscrew the nuts that secure the upper shock-absorbing cushion.
- Remove the shock absorber strut from the arch.
- Tighten the spring until the support cup is free.
- Unscrew the central nut of the shock absorber, remove the dust protector and the shock absorber strut with the spring, as well as the bump stop.
- Inspect the shock absorber struts and make a decision: either perform routine repairs or replace the shock absorbers. By replacing the seals or adding fluid, you can only delay the moment when replacing the shock absorbers will be absolutely necessary. Shock absorbers are installed after repair or replacement; the installation procedure is reverse.
Source
How to prevent damage to a shock absorber strut?
In order for the shock absorber to work out its declared life, it is worth adhering to some operating rules:
- Regular inspection of not only the struts, but also the entire chassis will help prevent unexpected breakdowns.
- Replacement of shock absorbers must be carried out as planned, according to the manufacturer's regulations, even if there are no noticeable signs of wear.
- If the car owner does not have experience in replacing struts on his own, it is better to contact specialists. You can also consult with them on the issue of choosing new spare parts.
- If there are signs of a breakdown, you should immediately go to a service center for diagnostics and subsequent repairs. A car with faulty suspension is a threat to the safety of not only its owner, but also other road users.
For installation, it is worth purchasing those shock absorbers that meet the operating conditions, even if their cost is higher than those offered by the automaker. The difference in price will be compensated by an increase in service life.
Features of replacement work on a Ford Focus 3
As already noted, the general design of the MacPherson suspension is similar on different models, but differs in design. So, if you take a Ford Focus 3, then replacing the front shock absorbers on this car is done differently than on a VAZ. Below are the nuances of the operation on Ford Focus 3:
- It is impossible to change only the shock absorber itself, and it is replaced together with the body. Therefore, the method of removing the strut together with the hub is not suitable for this car;
- There is no adjustment bolt on the Ford, and the strut is attached to the hub with only one bolt connection.
- The anti-roll bar strut is attached to the shock absorber strut, which is disconnected during disassembly.
- In the process of removing the shock absorber strut, the ABS sensors should be removed from the hub (after first disconnecting the battery from the on-board network).
- To pull the hub off the rack, after unscrewing the fasteners, loosen the eyes through which the bolt passes. This is done using a thin chisel, which is “driven” into the slot between the eyes with a hammer.
But otherwise, the technology for replacing the shock absorber is the same as described above - disconnect the hub from the strut, unscrew the bolts securing the upper support to the body. After dismantling the strut, we disassemble it, replace the shock absorber and body assembly, put everything back together and install the strut on the car.
Replacing front strut shock absorbers on a VAZ. 1st method
The first method is simpler, but it is not always used. Replacing shock absorbers using this technology is performed as follows:
- We jack up the front of the car and remove the wheel.
- Under the hood we find the plugs covering the fasteners of the strut to the body and remove them.
- Loosen the nut holding the shock absorber rod in the upper support (under no circumstances should we twist it completely, otherwise the spring will “shoot”).
- Loosen the three fastening nuts of the upper support.
- Unscrew the nut and press out the tie rod end with a puller.
- We remove the brake system line from the bracket.
- Using a center punch or marker, we mark the position of the upper bolt securing the strut to the hub (this bolt is an adjustment bolt - it adjusts the mounting angles of the wheels, so it is important to mark it in order to position it correctly when assembling the suspension).
- Tighten the nuts on the rack mounting bolts.
- We knock out the bolts.
- Using a downward movement, we pull the hub off the rack.
- We unscrew the three fastening nuts of the strut to the body (under the hood).
- We remove the stand.
- We tighten the spring with ties.
- Unscrew the shock absorber rod nut.
- Remove the support and spring cup.
- We remove the spring, remove the boot and bump stop.
The shock absorber is placed in the strut housing. Most car enthusiasts prefer to replace it together with the body assembly. A bump stop with a boot and a spring are installed on the new element and secured with an upper support. After this, the rack is installed in place.
But on a VAZ-2110 you can replace the shock absorber itself (it is often called a cartridge, cartridge, insert). In this case, it is necessary to further disassemble the rack and for this:
- Using a hammer and chisel, knock the support washer off the body.
- Using a special wrench, we unscrew the fixing nut, which is installed in the housing under the washer (if you don’t have a wrench, you can carefully unscrew it with the same hammer and chisel).
- We remove the worn cartridge.
- Installing a new element.
- We fix the cartridge with a nut and fill the support washer.
- We put the removed elements (spring, support, etc.) on the rack.
- We install the rack on the car.
Before assembling the strut, be sure to bleed the new shock absorber. During the installation process, it is important to correctly install the adjusting bolt (according to the marks) and check the tightness of the bolt connections. After assembly, we carry out a similar operation on the other side.
Video: Replacing the front shock absorbers of a VAZ 2110
Replacement procedure
Since the bearing, upper support or entire strut assembly has already served its purpose, there is only one way out - replacing the suspension component.
You can do this work on the front of the car yourself. If only the left or right strut is worn out, then both will have to be replaced at the same time.
I'll tell you what the replacement process looks like. But it is better to rely on the repair manual for your specific car. Still, there are certain differences in the design and dismantling features.
- Give yourself access to the top rack support. At a minimum, you will have to remove the engine compartment seal.
- Remove the plug and unscrew the AC rod fastening nut. You will need a head and an extension with a knob. It is better to do this when the rack itself has not yet been dismantled.
- Loosen the wheel fasteners and jack up the car so that the tires do not touch the floor. Don't forget to protect yourself against the jack falling off.
- Remove the wheel. Using a metal brush, everything in there is cleaned. It is better to treat with additional WD40 and wait for the product to take effect.
- Unscrew the fastening nut from the stabilizer joint, as well as the brake hose screw. If the car has ABS, you will have to remove the tube with the wiring from the sensor from the rack.
- Now the knuckle fasteners are unscrewed. The bolts can be carefully knocked out with a hammer. Some cars have additional bushings. After this, nothing should be holding the rack underneath.
- Now is the time to remove the nut that holds the top mount to the body. The speaker is removed along with the spring and support.
- Next, you need zip ties to compress the spring. It is required to obtain a gap between the outermost turn and the cup. You have already loosened the nut on the rod before. Now you can unscrew it completely. This will allow you to remove the support and spring along with the cup.
- If the bumper and boot are worn out, they also need to be replaced.
- New speakers are usually advised to pre-pump. Do this according to the manufacturer's instructions.
- Replace seals and gaskets. The old ones are no longer good.
- Reassemble.
By the way, an interesting article has already been posted about spacers in springs to increase ground clearance. I advise you to read it.
I hope you didn’t find the instructions too complicated and you roughly understood what awaits you. I wish you good luck in your endeavors and I hope you will return to the site for a portion of new interesting materials!