Ford Focus 2 suspension shock absorbers naturally dampen vibrations when driving. They reduce the force of shocks and impacts on roads with poor surfaces and make the ride more comfortable. The operating principle of shock-absorbing devices is based on the conversion of mechanical energy into thermal energy.
Today, as you might have guessed, we will find out how to replace the front shock absorbers of a Ford Focus 2. We are going to look at the purpose and properties of an element of the suspension system of a Ford Focus 2 in a station wagon. Identify strengths and weaknesses. Determine which kits are best suited. What tool is needed to replace them, and the algorithm of actions. Traditionally, at the end of the article we will summarize and draw conclusions.
Shock absorber functions
These are key elements in the suspension, which are largely responsible for driving safety. As you know, during braking, acceleration and turns, the forces acting on the car tend to overturn it. In such a situation, the main load falls on only 2 wheels, and the rest actually lose contact with the road. This is prevented by shock absorbers, which exert a counter force, further pressing the wheel against the road surface. The second function is to absorb road irregularities. You may not even feel small bumps and holes if the shock absorbers effectively cope with their task.
In what cases will replacement be required?
You can install new suspension elements in several cases:
- The installed shock absorbers are damaged or too worn. These parts do not last forever and, like consumables, have a limited service life. You can ride on old shock absorbers, but it is recommended to install new ones.
- Not happy with the stiffness of the suspension. If you want the smoothest and most comfortable ride possible, or for the suspension to cope more effectively with hitting potholes, then purchasing new shock absorbers is the solution.
- Additional increase in the cost of the car. This is a minor but important factor. With such modernization, you can safely increase the cost of the car, especially if you have installed branded shock absorber models that are much superior to standard ones.
Only professional diagnosticians can say reliably about the need to replace shock absorbers. Drivers can only use garage diagnostic methods and monitor the car’s behavior on the road. We will talk about this in more detail below.
Important points when replacing suspension springs
When repairing the front suspension, you need to take into account the specifics of replacing the front springs: if you do not follow some rules, complications may arise in the future, for example, you will have to re-do the work or make another purchase. Characteristic specifics of this repair:
- The front springs should be replaced in pairs and try to match them according to stiffness and height. Almost all parts are marked with a paint mark; it is necessary that the paint color of both springs matches;
- The service life of the spring largely depends on the performance of the bump stop and shock absorber, so the condition of these parts also needs to be monitored. If the bump stop is missing or is in poor condition, it will not be able to soften the impact, for example, if a wheel falls into a hole, the spring may break;
- When purchasing spare parts, you should not buy the cheapest parts; defects often come across here. It's better to spend a little more money, but you won't have to redo the work in the future. The most ideal option is to purchase original spare parts, or if you buy non-original ones, then from a well-known manufacturer with a good reputation;
- When removing and installing a spring, it is necessary to use ties; all traditional methods of tightening spring coils often lead to injury.
Ties must also be purchased of high quality, and it is better to try not to use Chinese tools at all. With Chinese ties, the threads quickly pull out, and the metal is of such poor quality that the special device may simply not be able to withstand compression of the coils, and the spring will fly off to the side. What the consequences may be is clear without further ado; you should take care of your health and take care of your safety.
Signs of a damaged shock absorber
Almost all drivers know the standard behavior of their iron horse, so any deviations are immediately noticed. We recommend paying attention to the following symptoms that indicate problems with shock absorbers or other components in the suspension:
- excessive body sway when cornering and a noticeable deterioration in handling;
- the appearance of skidding and strong roll when cornering;
- obvious “sagging” during acceleration and braking;
- increased sensitivity when hitting holes and potholes;
- the appearance of shaking and vibration;
- the appearance of leaks in the shock absorber area;
- visible deformations;
- the appearance of extraneous noise in the suspension, for example, squeaks when turning or braking;
- accelerated or uneven tire wear.
The causes of these problems can be very diverse. The first and most important thing is bad roads. The higher the speed of the car when it hits a pothole, the more damage the shock absorbers will receive. As a result, the service life is reduced many times over, forcing you to buy new parts.
Dirt, dust and moisture pose a hazard. If the protective elements become unusable, then small particles fall on the metal, causing corrosion and further destruction of the structure of the entire shock absorber. This can be prevented by regularly replacing boots and similar elements.
Garage diagnostic methods
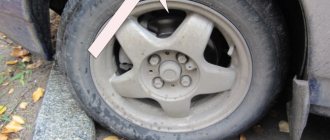
Without special equipment, it's difficult to pinpoint the problem, but drivers can check their shock absorbers in several ways that don't require special tools or money. The first and most accessible method is visual inspection. Make sure that there are no oil leaks on the shock absorbers and that all boots are completely intact. You can wipe the structure and look at its condition after 1-2 days of driving. If the oil appears again, the seal is broken and repair or replacement is required. Additionally, examine the wear of the tires. The appearance of an uneven “pattern” of wear most often indicates problems with the suspension.
The second method known in driving circles is rocking the car. Its essence is quite simple: you need to swing the car from one corner and monitor the reaction. If the car swings by inertia for too long or, conversely, stops almost immediately, then this is definitely a problem with the shock absorber. This way the driver will be able to determine in which specific direction the part failed. Pay attention to unusual knocking, clicking, grinding or clattering noises.
Another test is to check controllability. Here you need to get onto a flat road, preferably a freeway, and accelerate to 90-100 kilometers per hour. If the car starts to “yaw” from side to side, and you have to steer regularly, then it’s time to diagnose the suspension. Service centers use special vibration stands. They obtain a deviation diagram and compare the obtained values with the reference ones.
Signs of a faulty front strut
Road safety is one of the important criteria that should concern every road user. Therefore, after the planned mileage of the products declared by the manufacturer, you need to go to a service center to inspect the vehicle and make a decision on replacing parts of the suspension system.
But there are cases when unscheduled intervention by specialists is required:
- A characteristic knocking sound while driving. It is more clearly audible when passing a speed bump.
- The car "floats". When driving in one direction, it moves to the side. The driver, literally, has to catch the road, constantly steering.
- When the car turns and/or brakes, the body sways.
- There is a high level of roll and instability when driving on a winding road.
- When driving on a poorly paved road, you can clearly hear a knocking sound in the car's suspension system.
There is another way to check: while driving along a straight section of a road with good coverage, you need to let go of the steering wheel
If the car moves to the side, you need to pay attention to the front elements and perform diagnostics. If a set of diagnostic measures reveals a “disease” of a node element, it will need to be replaced
Or: drive the car into a viewing hole and shake the car with a partner. You can immediately hear where the extraneous sound is coming from.
Types of shock absorbers
When purchasing new parts, we recommend that you familiarize yourself with the existing classification of these parts. There are three main types of shock absorbers on the market:
- Oily. Cheap, simple and relatively reliable models. Installed on most cars. The disadvantage is that the oil foams when exposed to increased loads.
- Gas. They provide not only oil, but also gas, separated by a piston. The latter prevents oil foaming, ensuring shock absorber reliability and high-quality absorption of impact vibrations.
- Gas-oil. They consist of two cylinders, the upper part of which is filled with nitrogen. Due to this, optimal pressure is created and the performance of the unit is increased. They have maximum service life, but make the suspension much stiffer.
On the market you can find products of each type for the Ford Focus 2 car.
Ford Focus 2 Manual
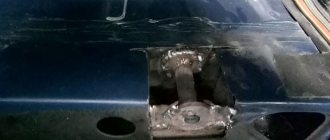
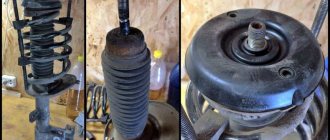
We remove and disassemble the shock absorber strut when it is necessary to replace its upper support, bearing, spring, compression stroke buffer, or the efficiency of the telescopic strut has decreased.
Shock absorber strut Ford Focus 2
If the telescopic strut or spring is faulty, both struts or springs must be replaced so that the characteristics of the shock absorber struts on both sides of the vehicle are the same.
To remove the shock absorber struts, remove the windshield wiper arms along with the blades and the windshield trim (see “Removing the Ford Focus 2 windshield wiper”). We hang and remove the wheel. We securely fix the car on a factory-made stand. We disconnect the ball joint of the stabilizer bar from the bracket on the shock absorber strut body (see “Removing the stabilizer bar”).
We remove the rubber bushing of the brake hose from the hole in the bracket on the shock absorber strut body.
Using a 15mm socket, unscrew the bolt securing the strut housing to the steering knuckle.
Use a suitable tool, such as a spade or chisel, to loosen the steering knuckle eyes.
We disconnect the steering knuckle and the strut.
The upper mount of the left pillar to the body is combined with the mount of the transverse reinforcement.
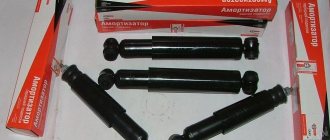
Which shock absorbers to choose
The best option would be to install the factory model of shock absorbers that was on the car before. They are guaranteed to be compatible with the car's structure and will feel the same as the old ones. To do this, you need to find the article number for Ford Focus 2 shock absorbers. The right original strut is designated in the catalog under number 1619269, and the left one - 1619274. The price varies from 6 to 8 thousand rubles. After restyling, improved models were added to the standard racks. They have article numbers 1619281 and 1619283 for the right and left, respectively. The price of these shock absorbers is 6-9 thousand rubles.
However, original parts do not always satisfy drivers, especially at a price. In this regard, you can always find an impressive assortment of equally high-quality analogues from other manufacturers on the market. We recommend that you familiarize yourself with the shock absorbers for the Ford Focus 2, presented in the following tables (for the right side):
| Brand | Catalog number |
| Kayaba | 334838 |
| Hola | SH22033G |
| Profit | 20041037 |
| Japan Parts | MM00231 |
| Patron | PSA334838 |
And for the left side:
| Brand | Catalog number |
| Kayaba | 334839 |
| Patron | PSA334839 |
| Quinton Hazell | 178963 |
| Japan Parts | MM00230 |
| Lynxauto | G32513 |
The cost of analogues, as a rule, does not exceed 3-4 thousand rubles per piece. Before purchasing, be sure to check the compatibility of the selected shock absorbers with your car. Carefully inspect the packaging and labeling of the products. All inscriptions and drawings must be clear, without streaks. Which front shock absorbers to choose (original or compatible) is up to you to decide.
Article number and cost of good analogs of original rear shock absorber struts for Ford Focus 2
Not wanting to overpay for the original Focus 2 pillars, car owners are resorting to searching for alternative options. The table below presents the best analogues from third-party manufacturers, which show themselves to be no worse than their own units in both quality and performance characteristics.
Table - Well-proven analogues
| Manufacturer | vendor code | Approximate price, ruble |
| Sachs | 315897 | 2700-2200 |
| Kayaba | 343413 | 1900-2300 |
| Quinton Hazell | 879045 | 1150-1500 |
| Meyle | 7267250009 | 1450-1900 |
| Profit | 20020649 | 1300-1800 |
Preliminary preparation
Replacing shock absorbers for the front or rear axle can be done in a garage. Additionally, we recommend preparing not only the shock absorbers themselves, but also additional components that may be needed. This list includes:
- front and rear bump stops;
- anther;
- upper and lower spring seals;
- shock absorber supports;
- support bearings.
These are protective structural elements that many auto mechanics recommend replacing along with shock absorbers. In most cases, they wear out and break down faster than metal parts.
The second step of the preparatory work is to assemble the necessary tools. During the work you will need:
- a set of keys and hexagons;
- flathead screwdriver;
- tool for working with TORX fasteners;
- hammer, chisel, special spring remover;
- WD-40 lubricant;
- jack and safety elements.
- metal brush.
Typically, you will already have most of these tools in your garage, with the exception of the spring puller. You can ask your friends from other garages or, in extreme cases, rent it from a workshop.
Carrying out dismantling work
To repair or restore the shock absorber struts, you need to remove them from the car. Traditionally, this does not cause difficulties, but in rare cases it is necessary to resort to extreme measures, using gas cutters or grinders.
In less extreme situations, everything can be done with mechanical cleaning of all kinds of contaminants. In most cases, using WD-40 helps. After soaking for half an hour, you can start working.
There are some recommendations that will help you carry out work faster and safer:
- the side of the car where dismantling operations are expected is jacked up and also secured under the bottom and sills (for example, stumps) to protect against accidental shifting;
- comfortable access to the operation area will be provided after removing the wheel from this side;
- It is worth considering that the upper mounting point is located in the trunk or under the hood.
Motorists repairing front-wheel drive cars will have more work. This is due to the specifics of the design. The type of rack used by the automaker also influences the duration and complexity of the operations.
Considerable effort has to be expended when working with collapsible structures. To dismantle it, you have to unscrew the hub fastenings and remove the strut directly with the hub.
Non-separable units are easier to deal with. Before rebuilding the shock absorber, it must be removed. At the bottom it is placed in a cup in which fastening is carried out with one or a pair of bolts. Unscrewing one or two nuts is almost always enough to remove it from the top mount.
Replacing front shock absorbers
To understand how to change shock absorbers in FF2, watch a short video. If this is not possible, then there is a text description below the video.
Let's take a closer look at how to replace the front shock absorbers of a Ford Focus 2. Follow the steps in the following instructions:
- Open the hood of the car and remove the air duct cover. To do this you will need a TORX wrench.
- Clear the shock absorber mounting area in the engine compartment and loosen the rod nut.
- Place the car on a jack on the part where you plan to replace the shock absorber, and then remove the wheel.
- Disconnect the stabilizer link from the shock absorber.
- Disable the wheel speed sensor.
- Release the brake hose from the strut.
- Using a chisel, wedge the place where the strut is attached to the fist.
- Unscrew the lower bolt and then the rack mounting. Remove it completely.
- Using a puller, remove the spring and unscrew the rod nut.
- Next, install the new shock absorber and reassemble in reverse order.
To reduce the risk of incorrect operation of the ABS system, before installing the strut, be sure to blow out the plug socket with compressed air. If at first you can’t unscrew the bolts even with WD40, then all that remains is to cut them off. Also pay attention to the special marks that are located on the rack. During assembly, make sure that they are located on the same side.
How to change the rod, valves, how to adjust the stiffness of shock absorbers.
Another problem is a violation of the integrity of the rod, seals, and valves inside the strut.
But of course, stores already have a set of spare parts for this unit. And an experienced driver is not in a hurry to take old parts to a landfill; he repairs them. At least some useful details can be extracted. First, we disassemble the shock absorber. It is better to carry out the work wearing gloves and work clothes. We take it out and identify damage to the rod with the piston, valves and o-rings. Damaged parts are removed. We recommend choosing suitable replacement rubber bands on the market. If it was not possible to select the metal parts to the required size, then they are ordered from a turner. The labor of a turner will cost less than buying a new shock absorber. The shock absorber is assembled, but you need to check yourself often: whether the sequence is broken and whether the parts are mixed up
We highly recommend filming the disassembly with a camera, this way it will be much easier to cope with the task and nothing will be lost. It is important to maintain cleanliness when assembling the unit, because debris and small particles can easily render a newly repaired shock absorber unusable. Remove dirt and stains while disassembling the unit. It is necessary to carefully inspect the valve mechanisms, because the parameters of the shock absorber depend precisely on their normal functioning
You can adjust the shock absorber stiffness by changing the number of washers. Just before doing this, you need to read the factory instructions. Now we put the rod in place in the unit. It is better to replace the oil seal, but if it is in perfect order, then you can simply clean it and add fresh lubricant. Next, fresh lubricant is added to the shock absorber, right to the very edge of the pipe. When you put the rod back in place, the excess will flow out on its own. Don’t be afraid that you will waste a lot of oil; here you need to not let air inside the pipe. When the oil is pumped in, the strut needs to be pumped as always. When the rod is in place, it is slowly moved so that the bubbles come out using the valves. After this, the shock absorber is completely assembled and installed on the car.
Important! General work tips
- Drivers, do not forget that the racks are changed in pairs. If you are planning to change the left shock absorber, then the right one is also subject to this procedure. The same can be said about renovations. Moreover, the unit may outwardly work without problems, but after 1500 km it breaks down.
- We advise you to carry out repairs of both the rear and front shock absorbers not on jacks, but on goats that are more appropriate in this case. The main reason is safety.
- Note that VAZ shock absorbers at the front are easier to change than on foreign cars with front-wheel drive. In the second case, you will have to use ties to be able to compress the springs evenly on both sides.
- Once you've finished replacing the strut, don't forget about the wheel alignment. After repair, the required optimal angle is usually violated. This leads to rapid damage to the tires, poor vehicle handling, and damage to the suspension unit.
- If you have basic information about the design and operation of your car's shock absorbers, you can save money on replacing them.
- Often, shock absorber strut repairs are done on your own, and other parts are made independently or purchased inexpensively.
- To work independently with shock absorbers, it’s a good idea to see and look for defects in the part. There is nothing impossible about this. Just imagine what your “new” shock absorber was like and what it is like now. In case of even minimal discrepancies, there is already a reason to think about repairs. When it comes to establishing the working capacity of the spring - if you don’t notice any damage or cracks - you don’t have to change it
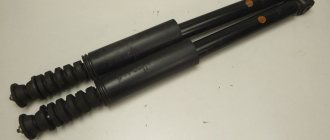
Changing rear shock absorbers
Replacing the rear shock absorbers of a Ford Focus 2 is generally similar to the instructions described above and includes the following steps:
- Place the car on a jack and remove the required wheel.
- Press down the lower suspension arm with a jack. Unscrew the rack fasteners (top and bottom).
- Next, take out the stand and unscrew the fastening nut on it.
- Disassemble the rack, carry out troubleshooting and install a new part.
- Put the strut with the new shock absorber in place and put everything back together.
Also, the Ford Focus 2 has one important feature - the bolts are screwed into the body of the nut. The nut itself is welded and does not rotate. In this regard, dismantling the shock absorber is carried out only by unscrewing the bolt from the body of the welded nut.
There are practically no difficulties in replacing shock absorbers. The main thing is to gain convenient access to the space and securely secure the car. At the end of the work, you can perform a body sway test and make sure that the shock absorbers are doing their job perfectly. Only then take it for a test drive.
Recovery
First, the dismantled device must be washed and then carefully inspected. If there are cracks or jams, repairing the shock absorber makes no sense: it is better to scrap it and buy a new one. The whole body requires further checking: pull the rod up and push it down - if there is play or jamming, replace the spare part. There are two types of shock absorbers, disassembling each of them has its own characteristics:
- double-pipe: pull out the rod completely to gain access to the fastening nut, which can be unscrewed with a special wrench;
- single-pipe: there is a protective cap at the top, which must be knocked down, and then unscrew the fixing nut to remove the rod together with the cylinder or cartridge.
Peculiarities
If the shock absorber is oil, you need to drain the oil from the cylinder by pressing on the valve spring. Then knock down the bushing, remove the rod with the piston, remove the valve from the other side of the cylinder. If the device is gas or has a replaceable cartridge, simply unscrew the fixing nut and install a new one.
Recovery methods
There are two ways: the first involves completely replacing the rod along with the cylinder with a new cartridge, the second involves replacing the parts of the device. It’s worth going into more detail here, because in the first case, the financial costs will be 5-10 times higher (it all depends on the car model). To independently restore the shock absorber with complete disassembly, you must purchase a repair kit.
To disassemble the product, unscrew the fastening nut and pull out the piston. Further:
- replace the compression valve, which is installed by pressing in by hand;
- install the piston and guide bushing;
- fill in the oil (you can use the old one if it is clean and transparent) - hydraulic fluid for automatic transmission, power steering or the Russian product AZh-12T.
Press the rod into the cylinder and fill in 200-250 ml of liquid. Next, slowly insert the cylinder while simultaneously pulling out the rod so that the oil penetrates into the cavity and does not leak out. When the cylinder is fully inserted, pull the rod out and put it back in several times to allow the oil to completely fill the body. Then tighten the nut and pump the shock absorber again 4-5 times.
We recommend: Paint over a scratch on your car with your own hands - from minor defects to deep chips
On a two-pipe device, all of the above restoration procedures must be carried out by putting the upper pipe on the lower one. As you do this, push it down while holding the rod in place. Next you need to bleed the device and tighten the nut.
Features of installing shock absorbers on the VAZ2108-15
All operations to restore performance are no different from those described above. But before installation, the shock absorbers must be well pumped (this also applies to new products), otherwise they will not work fully. How to do it?
Bleeding the oil shock absorber
- place the device with the rod down and press the rod until it stops;
- hold the shock absorber in this position for a couple of seconds;
- Without releasing the rod, turn the part over and hold it in a compressed position for 5-6 seconds so that the air comes out;
- extend the rod completely, pause for 2-3 seconds and repeat the operation 5-6 times.
Bleeding the gas shock absorber
- turn the product upside down;
- slowly press the rod in and leave the part in this position for 5-6 seconds;
- turn the product over and hold for 5-6 seconds;
- extend the rod all the way;
- turn the shock absorber over and repeat the procedure 3-4 times.