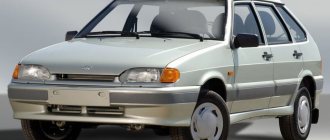
1. The main purpose of the hood deflector.
2. Does your car need a hood deflector or not?
3. Deflectors from EGR and SIM manufacturers. Two types of deflectors.
4. First type. Attaching the deflector to the inner surface of the hood. Installation procedure.
5. Second type. Attaching the deflector to the outer surface of the hood. Installation procedure.
The main purpose of the hood deflector.
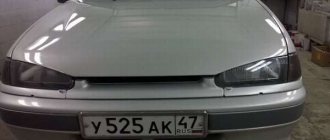
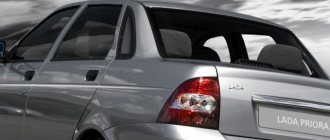
The hood deflector is a specially shaped plastic plate that is installed on the front of the hood and is designed to protect the hood and windshield from scratches and chips.
Drivers sometimes call the hood deflector a “fly swatter.” But the deflector itself does not serve as a shield against the ingress of pebbles, insects and various small debris, since the surface area of this plate is small, although it happens that pebbles fall on the deflector and ricochet over the roof of the car.
The main purpose of the deflector is to change the movement of the oncoming air flow, which can carry debris and small stones flying out from under the wheels of cars in front.
The shape of the deflector is designed in such a way that the air flow does not flow around the hood and glass, but thanks to the upward curved rear edge of the deflector, it rises up and flows around the car along the roof. This way, the hood and windshield remain intact and clean.
Comment:
The deflector performs its protective function best when the vehicle speed is over 70 km/h.
To prevent dirt from accumulating under the deflector, it is attached to the hood so that there is a gap of up to 10 millimeters between the hood and the deflector, and even if dirt gets under the deflector, it is easily removed with water during a regular car wash.
So after all – does your car need a hood deflector or not?
If you value the appearance and health of your car, but you often have to operate it on long-distance highways, where there is a lot of small debris (sand, pebbles, etc.), then a hood deflector is a necessary accessory that will protect the paintwork of the hood and front glass from dirt, scratches, chips and cracks.
Some drivers do not want to install a hood deflector because they are afraid that the appearance of the car, and at the mounting points, the paintwork of the hood itself will be damaged. All fears are vain and unfounded. The fastenings of modern deflectors from trustworthy manufacturers are such that the paintwork of the car will not be damaged during the installation and operation of the hood deflectors.
About appearance: today the shape of deflectors is developed taking into account not only aerodynamic, but also decorative functions. Deflectors are made of durable acrylic glass in various colors, including colorless transparent. Therefore, you can choose a hood deflector that matches the color of the car, and if you don’t find a suitable one, then install a transparent one.
So, you have decided to protect your car and install a hood deflector.
The question arises: which manufacturer’s deflector should you choose to protect your car?
Hood deflectors from EGR and SIM manufacturers. Two types of deflectors.
In our store we offer hood deflectors from two manufacturers: EGR (Australia) and SIM (Russia). The deflectors from these manufacturers are made of high quality acrylic glass; they are quite easy to install in car repair shops or independently. When developing deflectors, the shape of the car hood and aerodynamic characteristics are taken into account. To install the deflector, no additional holes are drilled, and the fastenings do not damage the paintwork of the hood.
The EGR company (Australia) is one of the first manufacturers of plexiglass accessories for cars and today it supplies its accessories to the assembly lines of the most famous American, Korean and European automobile factories.
The SIM company is a manufacturing enterprise in the city of Barnaul, where they develop and manufacture automobile accessories made of acrylic glass for cars of domestic and foreign production.
How to install a hood deflector from these manufacturers yourself?
Installation of the EGR and SIM hood deflectors is very simple. Depending on the shape of the hood and the make of the car, there are two types of hood deflectors. They differ in shape and method of attachment to the hood.
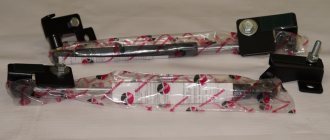
First type. Attaching the deflector to the inner surface of the hood.
The shape of this deflector is such that the deflector is not placed on top and fastened in various ways, but is put on the lower edge of the hood and secured with clips and screws on the back side of the hood in the places where the sealing rubber band is attached. This deflector is easy to recognize - it has curved ears with rectangular holes in the lower part, and there are no holes on the upper part of the deflector. When installing this type of deflector, no additional holes are drilled, nothing is glued, and the standard holes for attaching the sealing rubber to the hood are used to secure the deflector. Since hood deflectors are designed and manufactured strictly for a specific car model, the mounting holes for the deflector will exactly match the standard mounting holes for the rubber sealing strip.
What is a deflector?
When a car moves at high speed, it experiences the impact of a counterflow of air, along with which dust particles rise. This dust scratches the car's paintwork, and larger stones can damage the windshield. To eliminate the possibility of such troubles, a special hood deflector was developed for cars.
The hood deflector is a special lining that is made of acrylic glass and is attached to the front of the car hood. The main feature of the deflector is that it has a structure bent upward, which diverts the flow of oncoming air and conducts it over the car.
Removing the front bumper upper grille
You will need: pliers, long and short straight screwdrivers.
- Remove the 6 screws of the upper bumper mounting;
- Bend the upper part of the bumper along with the grill towards you;
- Remove the fixing washers (on Priora SE, remove the screws) of the upper bumper grille by inserting your hand with a short screwdriver through the resulting hole;
- Remove the upper bumper grille by pulling it towards you.
It is worth noting that those with large hands may not be able to get their hand through or may break the upper part of the bumper. Mounting diagram for the upper and lower bumper grille:
Purpose of the deflector
1. Due to the features of its design, the deflector improves the aerodynamic properties of the car. The frontal resistance of the oncoming air flow is reduced, which means the speed characteristics of the machine are improved.
2. The deflector performs a protective function, protecting the car from the effects of oncoming dust raised from the ground by the oncoming air flow. In addition, this part allows you to avoid collisions with various insects when driving at high speed.
3. In many circles of drivers, the deflector is part of the external tuning of the car. This is due to the fact that there are elements that have a special structure that gives the car a sporty or solid appearance.
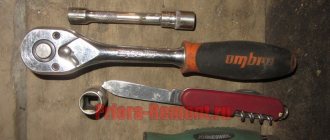
Tools and materials for work
Anyone can handle the task of removing the rear bumper on a Priora, and you don’t need to have the relevant experience to carry out the work correctly. The only thing you need to carry out such manipulations is tools and materials. These include:
- wrenches “10” and “13”, which depends on the type of car body;
- crosshead screwdriver;
- pliers;
- a screwdriver with an oblong shaft, which may be needed to disengage the bumper from the body part bracket.
When carrying out work, it may be necessary to remove the rear wheels in order to be able to unscrew the fasteners. If you have a flexible shaft screwdriver or an angle wrench at your disposal, they will eliminate the need to remove the rear wheels. Having prepared the necessary tools for the work, you can begin to implement the process.
This is interesting! Depending on the reason for removing the bumper on a Priora, additional tools and materials may be needed.
Installing the deflector on the hood
To make the process easier, many parts come with installation instructions. Using the instructions, you can install the deflector yourself. Moreover, this operation will not require a lot of time.
Installation of deflectors, which do not come with instructions, is carried out according to the diagrams described below.
Instructions for removing the rear bumper on Priora hatchback, sedan and station wagon
Having dealt with the necessary tools for the work, you can begin the procedure for dismantling the rear bumper on a Priora. It is important to note that products on cars with different body types have minor differences. They lie not only in the design of the products themselves, but also in the methods of their fixation. That is why we will next consider the features of dismantling work to remove the bumper on a Priora sedan, station wagon and hatchback.
- Initially, use a Phillips screwdriver to unscrew the screws from the side of the wheel arches. On each side you need to unscrew three self-tapping screws (two screws secure the bumper to the car body, and the bottom one secures the mudguard). The photo below shows the location of all the elements on one side.
- It is not necessary to remove the rear wheels to unscrew the screws. However, getting to the bottom screw without an angled screwdriver will be extremely difficult.
- And therefore, in this case, it will be easier to remove the wheel in order to unscrew the lower self-tapping screw (we rely on the availability of available tools).
- The fasteners on the opposite side of the car are unscrewed in the same way.
- Next, open the trunk lid (door) and unscrew the fasteners on which the bumper is attached. Depending on the type of car body, the procedure will differ, so we will consider it separately for each.
- For a Priora in a sedan body, you need to unscrew 2 turnkey bolts to “10”.
- They are located near the rear lights.
- On a Priora with a pre-restyling bumper there are 4 fasteners. They are indicated in the photo below.
- There is no need to unscrew these fasteners, as they are designed to secure the bumper reinforcement (technically called an energy absorption beam, which may be useful when searching for it in online stores). If you plan to move the amplifier to a new device, then it is possible and advisable to unscrew them immediately. It is important to note one point that if you plan to install a new restyled bumper, then it needs a new amplifier. The photo below shows what amplifiers look like for pre-restyling and restyled devices.
- On a Priora in a hatchback body, you need to unscrew 4 bolts using keys “10” and “13” (under the rubber plugs).
- The rubber plugs can be removed using pliers.
- If you plan to replace a pre-restyling device with a restyling Priora in a hatchback body, then along with the new product you need to buy an amplifier, since they are different. The photo below shows the amplifier in the pre-restyling bumper of the Priora hatchback.
- And a photo of the appearance of the amplifier device of the restyled Priora hatchback.
- To remove the bumper on a Priora station wagon, you need to unscrew the five fastening screws with a Phillips screwdriver.
- After the dismantled product on Priora in different types of bodies is disconnected at the top, all that remains is to unscrew the fasteners that are located below. For Prior in all types of bodies, this mount is identical.
- Loosen the two fastening nuts from below using a “10” wrench. To do this, it is enough to make 5-6 revolutions. The only note is that if a restyled device on a Priora hatchback is dismantled, then the nuts must be completely unscrewed. The situation is similar if you need to install a restyled part on a hatchback.
- After this, you can remove the rear bumper on the Priora. There is no need to unscrew the five screws at the bottom, as they are intended for fastening the amplifier. We remove it along with the product.
- You can unscrew them immediately if you plan to remove the amplifier or replace reflectors.
This is interesting! To replace reflectors on a Priora, it is not at all necessary to remove the rear bumper. It is quite possible to do this by unscrewing the fastening nuts at the bottom and five self-tapping screws securing the amplifier.
After all the Priora rear bumper fastenings have been removed, all that remains is to dismantle the part. To do this, we take hold of the sidewall flanging with one hand, and with the other we press the device to the body near the taillight. Thus, we disengage it from the grooves of the bracket on the body.
Similarly, we disconnect the rear bumper on the Priora on the other side, and then remove it. If it is not possible to disengage it from the grooves of the body bracket, which usually happens when the product is dismantled for the first time, then you can use a long screwdriver or pry bar, prying the product at the joint and disengaging it.
At this point, the process of removing the rear bumper on a Priora sedan, hatchback and station wagon is completed, and all that remains is to carry out the necessary work with the product, and then install it back. Installation is carried out in the reverse order of removal. The procedure usually takes no more than half an hour, and specialists complete the task in 10-15 minutes.
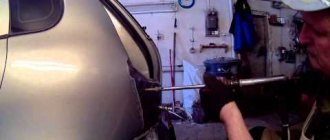
Replacing the front saber on Lada Priora
Now you need to repeat the same thing only in relation to the front saber.
- Raise the hood cover. We move the insulation aside, and then use an “8” key to unscrew the 2 nuts that secure the saber.
- Carefully pry it out of the fastenings. It may be dirty under the lining, although this is not the worst thing; it is worse if there is rust waiting for you there.
- As in the first case, we transfer the fastening bolts to the new saber, and then install it in place. We press lightly, but “wisely” so as not to damage the latches.
Now all that remains is to tighten the nuts.