The principle of the device and its operation
Structurally, the starter 2114 is an electric motor powered by 12 volt direct current (on-board power supply). When the key is turned, its rotor begins to move, after which, with the help of a retractor relay, which brings the Bendix starter into engagement with the crankshaft flywheel, the latter begins to unwind.
After the combustion of the working mixture is initiated during rotation of the crankshaft and the engine starts, the retractor relay will move the bendix to the rear position and the starter will disengage with the flywheel.
Due to the fact that the starter has a fairly high load, its rated power is 1.55 kW.
In this case, the current strength in its circuit can reach:
- 80 A at idle;
- 375 A at maximum load;
- 700 A when in a braked state.
As for the internal structure, the starter includes such components as:
- stator (fixed winding);
- rotor;
- bendix;
- brushes and their holders;
- solenoid relay;
- frame.
Also, sliding bushings, of which there are 3, are used as supporting elements for the rotor shaft in the starter. Two of them - front and rear - are pressed inside the body of the device, and the third is located at the point of contact between the bendix and the rotor.
Main malfunctions and their symptoms
The most common breakdowns that occur in the starter are as follows:
- The electric motor of the device does not rotate. A short circuit has occurred on the stator windings, the rotor has become soured in the support bushings, or the contacts have oxidized;
- The electric motor spins, but at insufficient speed and low power. Either the graphite brushes are worn out or a short circuit has occurred on one of the windings;
- The starter works as it should, but rotation is not transmitted to the crankshaft. Bendix wear or breakdown;
- The starter starts the engine, but does not turn itself off. The retractor relay mechanism has oxidized or the return spring has burst.
If you notice one of the above signs on the starter, it should be dismantled and a detailed diagnosis should be carried out already in the removed state.
Removing the starter
A complete replacement of the VAZ 2114 starter is performed in the following order:
- Remove the terminals from the battery.
- Unscrew the 3 mounting bolts securing the device body to the box (if they are heavily oxidized and do not give in, you should first fill them with kerosene or “Vedeshka”).
- Disconnect the negative terminal from the solenoid relay (the red wire that goes to the device ends with it).
- Remove the positive terminal from the solenoid relay, having first unscrewed its fastening nut using a 13mm wrench.
- Slide the starter to the right and remove it from the mounting studs.
- Install the new device and fix it in the same order, but in reverse order.
Before installing a new starter, it is recommended to treat all 3 mounting studs with graphite grease - it will protect them from corrosion and will help dismantle the device during the next repair without any problems.
It should be remembered that a new starter installed to replace a worn one must be exactly the same type, namely 5712.3708. Most often, owners of the 14th model recommend purchasing devices from manufacturers such as PRAMO, Eldix and KATEK.
Starter replacement process
In order to remove the faulty unit and replace it with a working one, you will need to follow the step-by-step instructions below.
- Use the handbrake to brake the rear wheels, securing the vehicle.
- Open the hood.
- Remove the negative terminal from the battery.
- Disconnect the terminal block of the mass air flow sensor.
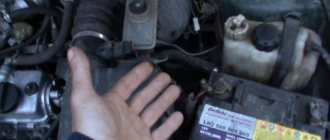
- Using a screwdriver, unscrew the clamp that secures the air duct pipe, as shown in the photo below.
- Disconnect the air duct from the air filter housing.
- Remove the air filter. This action will allow you to gain access to the place where the starter is located.
- Disconnect the red wire that goes to the starter relay. Using a wrench, you need to unscrew the terminal nut, the wire from which goes to the battery.
- Unscrew the two nuts that hold the starter on top.
- Unscrew the lower fastening.
- Release the starter completely.
- Install the new starter into place.
- Reassemble everything in the reverse order of disassembly.
- Check the functionality of the mounted starter by test starting the VAZ 2114 engine.
Source
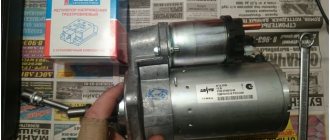
VAZ 2114 starter – connection diagram, device, technical characteristics
The starter installed on the VAZ model we are interested in is type 5712.3708.
It is a DC motor with a traction two-winding electromagnetic relay and a planetary gearbox.
The device is excited by permanent magnets. Its rated power is 1.55 kW and the current is:
- up to 700 A in the inhibited state;
- up to 375 A at maximum power;
- up to 80 A at idle.
The starter devices and its operation diagram are as follows:
- four permanent magnets are placed in the stator (in its housing);
- liners made of metal-ceramic material are mounted in the support and cover, in which the rotation of the armature shaft is carried out;
- the planetary gearbox imparts movement to the drive shaft from the armature shaft;
- the front end of the drive shaft rotates in a cermet bushing, which is built into the clutch housing;
- The movement of planetary gears occurs on needle-type bearings;
- when the device we are considering is turned on, the voltage from the battery is supplied through the ignition switch to the windings (there are two of them) of the traction relay, and after its contacts close, the retractor winding is switched off.
Basic starter malfunctions and their symptoms
The need for repair of the described mechanism is indicated by the following symptoms:
- The car engine does not start, although the starter turns;
- significant reduction in vehicle power;
- turning the ignition key does not start the starter;
- there are voltage interruptions and delays when the mechanism is turned off;
- the engine does not rotate when the starter is turned on (idle rotation).
These facts tell the driver that he is faced with such possible malfunctions of this device as:
- collector wear;
- loose fit of the brushes to the commutator;
- breakdown of the solenoid relay or lack of ground on it.
To deal with them, you will need to dismantle the starter, replace failed components or the device itself with a new one.
What needs to be changed?
In order to carry out repairs, you need to purchase a set of spare parts. In particular, you will need the following components:
- Brushes.
- Bushings.
- Bendix.
As a rule, these elements most often fail. If there is a breakdown of the windings or part of the housing, then it will be much easier (and more efficient) to install a new starter or a used one, but working.
How to remove and replace the VAZ 2114 starter?
The procedure is as follows:
- the negative terminal is removed from the battery;
- the upper mounting screws (there are two of them) are unscrewed from the starter, which connect it to the clutch housing (the operation is performed with a key set to “13”);
- the starter is slowly moved forward and the wires that run from the connector on the relay (retractor) to the positive terminal of the battery are removed;
- the nut that secures this wiring is unscrewed with the same key;
- The flywheel teeth are visually assessed (perhaps their condition requires replacement of this element);
- in the starter cover, unscrew both screws using a Phillips screwdriver, and then remove the nut connecting the solenoid relay and the starter winding, and remove the washer-bracket;
- two long coupling bolts are removed using a “10” wrench and the condition of the bushings is analyzed;
- the starter housing is separated by light blows with a wooden (or better yet, rubber) hammer on its lower part and the brushes are assessed (whether they are in working order or not);
- remove the bendix ears from the bushing using a screwdriver, then knock down the first retaining ring with a hammer and a wrench, prying up the second with a screwdriver - the bendix can be dismantled and a serviceable part installed in its place.
Starter repair procedure:
1. First, you need to remove the starter from the car. Now let's start disassembling the part.
2. You need to unscrew the nut.
3. Disconnect the busbar from the contact bolt of the traction relay.
4. Carefully remove the two bolts that hold the traction relay.
5. The traction relay must be removed from the starter.
6. Set aside the starter itself and remove the armature from the traction relay. To do this, lift it up and the armature loop is released from the lever.
7. Now we return to the starter itself. Unscrew the tie rod nuts.
8. The next step is to remove the cover from the drive side with the gearbox and the same part assembled.
9. The cover must also be removed from the side of the commutator with brushes and brush holders.
10. Then remove the gear from the anchor shaft.
11. Pull the armature itself out of the starter.
12. There is a washer installed on the anchor shaft on the drive side (pay special attention to this).
13. Using a screwdriver or other thin object, remove the anchor shaft support.
14. Then use a small screwdriver to remove the two tie rods from the starter cover. In general, it is not necessary to remove them; if you are in a hurry, you can leave them, but it is more convenient to remove the drive and gearbox without these pins.
15. After this, remove the three gears of the gearbox. A starter breakdown may be due to the fact that these gears have damaged, broken teeth or needle bearings embedded in the gears. If this deficiency is present, then replace the parts and the starter will work again.
16. But, if the gears are in order, then continue to disassemble and check the starter for damage further. You need to remove the gearbox with the drive from the cover by first pressing the starter drive gear.
17. The support with the seal must be removed from the lever.
19. Using a hammer, knock the restrictor ring off the retaining ring using a suitable mandrel.
20. Carefully remove the retaining ring first and then the restrictor ring.
21. Remove the drive assembly from the drive shaft.
22. Unscrew the lock ring of the lever.
23. Then remove the lever with the washer and driver.
24. Use a screwdriver to unscrew the lever spring.
25. Now you can remove the lever from the connection and separate the halves of the lever.
26. Remove the internal gear retaining ring.
27. Next, disassemble the internal gear and remove the drive shaft support from the shaft.
28. Carefully remove the O-ring from the pore. Examine it carefully. A damaged, deformed, hardened ring has a bad effect on the operation of the entire starter. It definitely needs to be replaced.
29. The next step is to remove the liner from the support.
30. On the commutator side, remove the two screws and remove the brush holder.
31. Using a screwdriver, pry up the brush clamps.
32. Then remove these retainers and their retainer springs. Again, replace deformed or damaged parts, heavily compressed or bent, or torn springs.
33. Remove the brushes themselves from the brush holder guides.
34. Non-insulated brushes must be removed.
35. Then remove the cardboard insulation pad. If it is damaged, compressed, torn, replace it with a new one.
Starter connection diagram
The starter is an engine that converts electricity supplied from the battery into mechanical energy, which serves as the initial impulse for the movement of the pistons in the internal combustion engine.
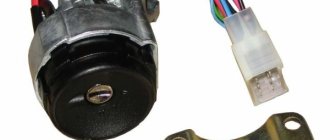
So, the starter connection diagram starts from the ignition switch, in which turning the key closes the electrical circuit in the start relay connected to the fuse box. This relay commands the solenoid relay, which connects the starter to the battery. Electric current is supplied from the power source and the mechanism starts.
Please note that the starter connection diagram for the VAZ 2114 is the same as for similar models: VAZ 2113 and 2115. The starter connection diagram for the VAZ 2114 with an 8-valve engine was used on the models:
- VAZ-21140. This model was equipped with an injection engine with 8 valves, a volume of 1.5 liters and a power of 77 horsepower. The model was produced from 2003 to 2007.
- VAZ-21144. Eight-valve engine with a volume of 1.6 liters and a power of 81.6 horses. The model was produced in 2007-2013.
Which starter should you choose?
When choosing a new spare part, most car owners give preference to the geared version. Its advantages are that it is smaller in size, turns the engine faster even with a dead battery, and works better in winter.
Of the gearbox options, everyone prefers the following companies:
- KZATE — 3600 rubles
- Eldix — 4500 rubles
- PRAMO – 4400 rubles
Try not to save money when buying a new part. As mentioned earlier, the item from the factory is considered the weak link of the car. If you buy a cheap Chinese analogue, you can return to removing the starter on a VAZ 2114 at the most inopportune moment. Read the reviews in stores in your region, this will help you identify quality brands and not fall for a fake, which will also save time and money.
VAZ 2114 starter circuit
A starter in a car is usually called a device that starts the rotation of the shaft that moves the cylinders in the internal combustion engine. Essentially, it is an electric motor that converts electrical work into mechanical work.
The starter housing consists of a mask and a glass. Under the mask there is a retaining ring and a gear. Inside the glass there is an armature and 4 magnetic shoes, or cores, between which a magnetic field is formed. These magnetic cores form the stator of the motor. The armature is a shaft with a core made of electrical steel.
Frames are inserted into the grooves of the core, which will rotate under the influence of the electromagnetic field generated by the shoes. The frames are connected at their ends to the commutator, to which 4 carbon brushes are connected:
- two positive - from the battery;
- two negative ones, connected to ground and closing the circuit;
The brush assembly is built into the rear closing cover of the housing. The springs that press the starter brushes to the armature commutator assembly are soldered to the brush holders.
The rear cover of the starter houses an armature bearing, which acts as a support sleeve.
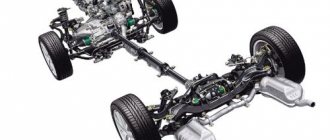
Design
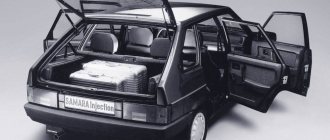
Where the starter is installed on the VAZ-2114, there are several more elements - an air filter, a thermostat, etc. Therefore, in order to gain free access to all components of the launch system, you will have to remove some parts. The starter design consists of the following components:
- Back cover.
- Bronze bushings.
- Copper-graphite brushes.
- Armature with winding (rotor).
- Stator with windings.
- Bendix - overrunning clutch, fork and gear.
- Gear starters have a planetary mechanism.
- Front cover.
- Solenoid relay.
Next, we proceed to describe the operation of the mechanism.
Where is the starter relay located on the VAZ 2114?
Two relays are connected to the starter:
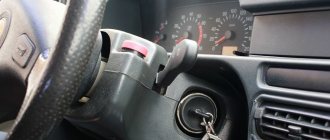
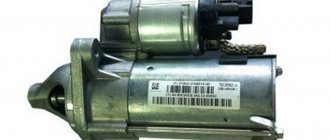
- The retractor relay is located above the starter, acting as its mechanism. Its position is shown in the first figure with a general view of the unit and in the diagram of the mechanism itself.
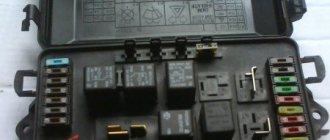
- The next relay is a unit located to the side and is connected by a contact electrical wire to the solenoid relay. This electrical device often breaks down and needs to be replaced, so the car owner needs to know its location in a complex system of components and parts.
What causes the starter to fail?
Understanding the reasons for the failure of a part, we can say that there are not so many of them:
- Manufacturing defects. Due to the design features of the body, the manufacturer had to reduce the size of the mechanism, so it has insufficient power and often fails;
- Operation of the device with unacceptable overloads. If you have to turn the engine for a long time, the element can overheat;
- Violation of operating rules. For example, a car enthusiast has run out of gas, and in order to move the car to the side of the road, he puts the car in gear and turns the starter, which allows him to move the car. The mechanism is not designed for such a load;
- Natural wear and tear of parts.
The mechanism is a defect of the manufacturer and is considered a “sore” of the VAZ 2114 car, as it often fails.
Signs of a faulty starter
Poor contact with brushes
The simplest and at the same time most common problem is a loose fit of the brushes to the commutator, as a result of which the electrical contact is broken. As a result, the starter does not start. The brushes wear out quite quickly and must be replaced. Another reason for a loose connection between the brushes and the commutator may be a weak spring.
Traction relay malfunction
Another common problem with the engine starting mechanism is that the armature does not rotate. The reason lies in the failure of the traction relay. It doesn't work for a variety of reasons. To get to the bottom of the truth, the car owner will have to carry out a step-by-step check of the electrical equipment in the vehicle, starting with the battery, which could have been discharged for various reasons. We check further from the battery:
- If the pole terminals on the battery and the ends of the relay wires are heavily oxidized, then the oxide film, forming electrical insulation, does not allow electric current to pass through. The contacts must be cleaned with fine sandpaper.
- Loosely tightened tips interrupt the flow of current. To restore contact it is necessary to tighten the screws.
- A break in the wires connecting the traction relay to the starter or ignition switch. The wires should be connected or replaced.
- short circuit between the turns in the electrical winding of the solenoid relay, breakage or grounding;
- sticking of the traction relay armature;
- faulty contact part of the switch.
If the traction relay is triggered, but the armature does not rotate, the reasons mentioned above may influence it, plus the following affects the armature:
- commutator burning. The cause of burnout is an electric arc that occurs between loosely fitting brushes and the commutator. The brushes do not fit tightly due to abrasion or misalignment. If the distortion does not cause serious deformation, it is enough to correct it. Worn brushes must be replaced.
- Having thus eliminated the cause of the burnout, clean the collector itself with light sandpaper.
- Destruction of the winding in the armature or stator is not uncommon. There are many reasons why the turns in the windings break: they overheat during overloads, the solder melts, and a short circuit occurs. As a result of winding breakage, sparking and burnout of the collector occurs. Long-term operation of a starter with damaged windings causes the insulation to burn through, which leads to short circuits to the housing.
- breakdown of the insulated brush holder of the positive brush and its short circuit.
- short circuit between the collector plates;
- interturn connection in the windings, or their short circuit to ground.
The operability of the traction relay, the presence or absence of electrical short circuits is checked with a voltmeter or ammeter. Before this, a gasket 12-15 mm thick is inserted between the restrictive ring and the drive gear. In a working device, the current values should not exceed 23 A and voltage 9 V. Exceeding these values indicates the presence of a short circuit or other problems in the coil of the solenoid relay or in the drive. If the engine starting device works, but the crankshaft does not rotate, the reasons are as follows:
- The freewheel, called Bendix after its inventor, is slipping;
- The bendix release lever is broken or its axle has jumped off;
- The drive ring on the overrunning clutch has worn out, or the buffer spring has burst;
- the drive on the starter armature is jammed or difficult to move.
Problems that arise in the starter, whether electrical or mechanical, cannot be left to chance.
Otherwise, a small breakdown will lead to a larger one. Whether there is a short circuit in the car's electrical network, whether cracks and chips form in the body, whether the elasticity of the brush holders is impaired, all these problems must be corrected in a timely manner. Old and worn bearings must be replaced. Cracks and chips are welded, and the welding site is thoroughly cleaned. Source
Tips that may be useful when replacing a starter
- Before removing the starter, you need to make sure it is faulty. First of all, you need to check the reliability of the terminals on the battery. Oxidized terminals should be cleaned of deposits and re-secured. The reason for the failure may also be poor weight of the engine and the body. You should also check whether the solenoid relay wire has come loose from the connector and whether the positive terminal nut on the starter is tightly tightened;
- When removing a part, you can disconnect the positive wire of the terminal last. In this version, it is more convenient to unscrew the nut of the positive wire. By pulling the starter closer to you, it will be easier to get to the desired nut;
- You need to install the solenoid relay wire in place until it stops. The connector must be fixed, and in this case the wire will not fly off during movement due to shaking;
- Do not forget to first remove the terminals from the battery and turn off the ignition - this will save you from additional problems.
That’s basically all that can be said about how to change the starter on a VAZ 2114.
Source